Mantenimiento a un ventilador | By @wbrandt [ENG-ESP]

Hello friends of this great community of @hive-motors I welcome you to my blog in #hive I hope you feel very comfortable in this space of engines, as on many occasions I wish you find yourself very well where it wants you to be, that every effort is worthwhile so keep fighting for your goals and dreams to have a life fully full of happiness, encouragement.
 |  |
|---|
Today my dear and dear readers, I bring you a post talking about my experience, cleaning a fan, and doing some maintenance, it should be noted that I am not an electrician or anything like that, but, whenever I can do these things as a habit I do it both for health and to have things clean, at home or where we have a device of these that is for us to cool us.
 |  |
|---|
And that's the reason why I'm cleaning the fan in our room, first because my wife got sick, so I thought of doing the maintenance, so that it would not be affected by the dust that could be expelling from there, and on the other hand, is that in recent months and these days the heat and high temperatures are very strong and it is unbearable, and this is the other reason to get down to work.
 |  |
|---|
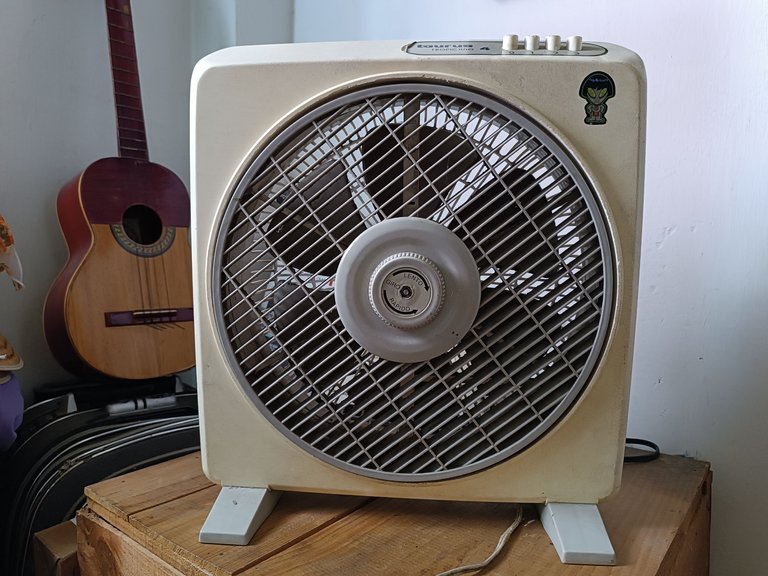
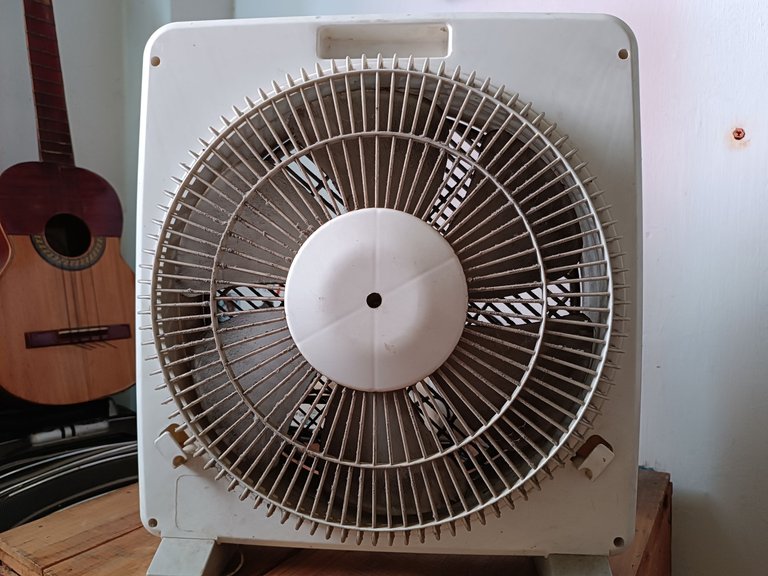
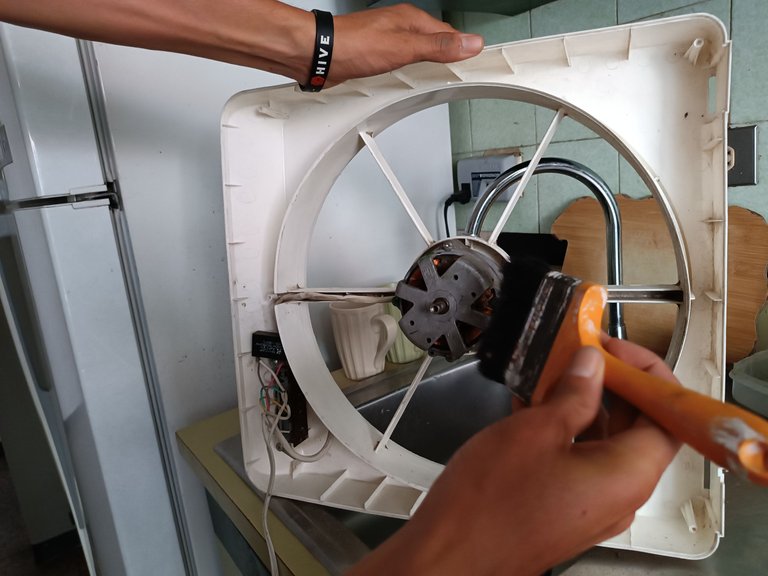
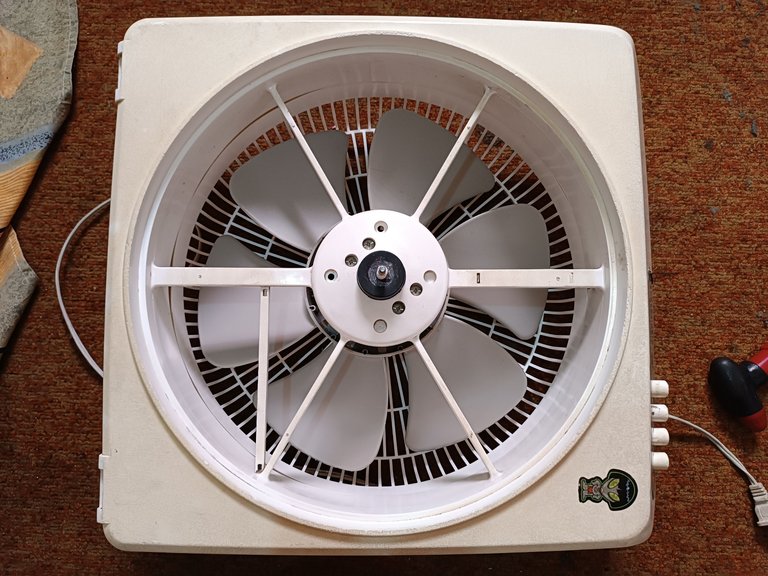
As you can see in the pictures, the fan is very dirty, I would say very dirty, the thing is that here too, for my part since we moved we did not do any maintenance or clean it, and we do not know how much longer it was like that, that's why I feel responsible for this because long ago I would have done that and it would not be so dirty.
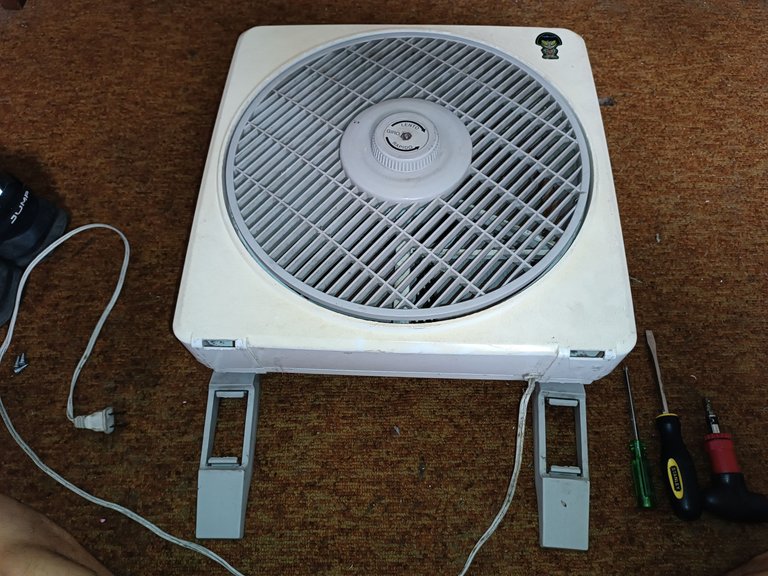
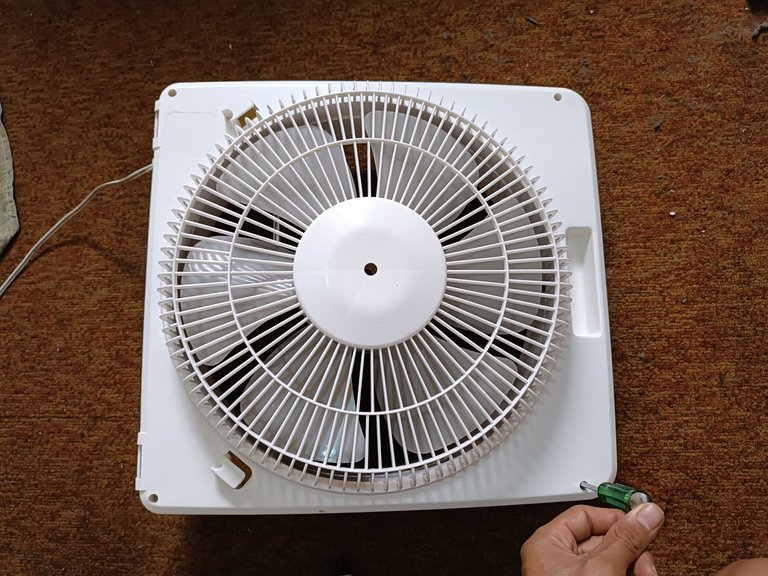
Well, to begin with I took a Phillips screwdriver, and from the back, the cover has 5 screws that hold the two covers, I proceeded to remove them although it was a little difficult to open it, but then I noticed that a part that are the legs of the fan also has a function of joining the two covers, and well I took them out and I could separate these two plastic covers.
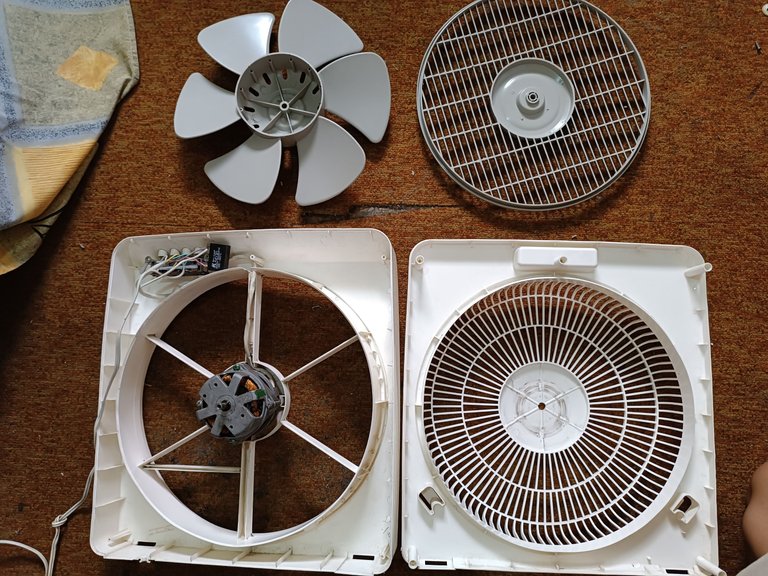
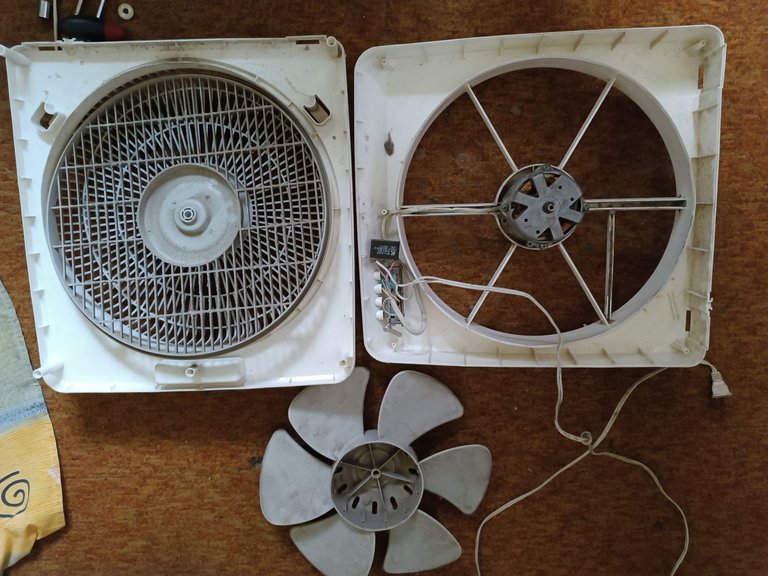
When separating the covers one part has the engine and the blade and the other only the plastic cover with its grids, which was very dirty, as you can see the blade was also very dark because of the dirt, and the inside of the engine was very full of dust, the next thing I did was to remove a screw that adjusts the blade, here I was a little complicated because I did not want to leave the blade and I had to do a lot of pressure until it came out, and after having everything separated I dedicated myself to clean everything.
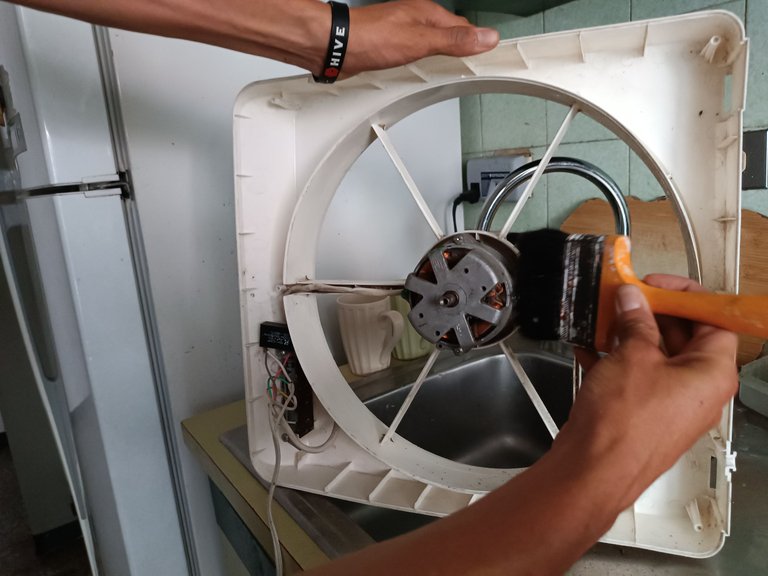
For the engine part, what I did was to take a paint brush, and began to remove all the dust and hair and dirt I had, it was so much that the sink was black, but I did a lot of emphasis there to be very well clean, after this with a rag, water and bleach began to remove the dirtiest, but it was not very good, grab a sponge with soap and so I can wash the covers very well, but mostly on flat surfaces.
 |  |
|---|
Because for the part of the grids it was complicated, in that case grab the brush, the wet it I added soap and it became very easy to clean it there and it was faster, after having everything washed and clean, dry everything, while waiting for everything to dry very well, grab the oil 3 in one, and I threw a little by the cylinder where the blade goes, as I noticed that it was missing as a lubricant and this was the reason for a noise that had, I made sure that I had covered everything and slid much better.
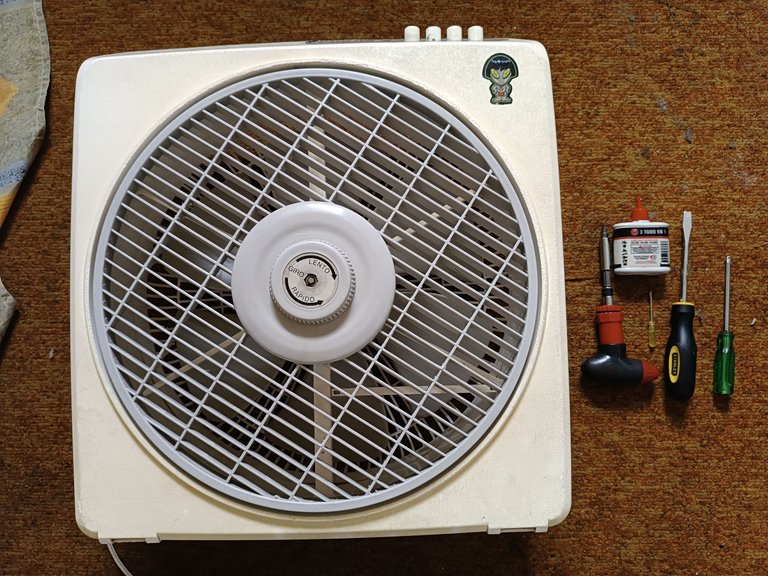
After this I proceeded to assemble everything putting the blade in place along with the engine, then placing both covers and legs, another thing that has this fan is that it has a turntable that distributes the air to where you want and this goes on the front and you adjust it if you want to blow air up or down or turn and blow air everywhere.
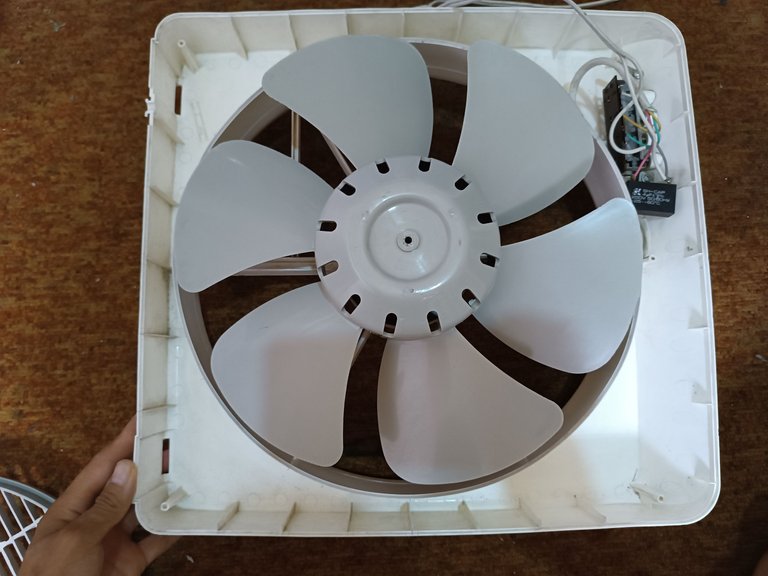
After placing this I realized that I had loosened a cable that is connected in the 3 levels that brings the fan and well put it back in place, but here I could not take pictures, I reassembled everything as it was and gave it to turn on the first level and as you can see if it lit, finally I wanted to give a personal touch, because before I had a decal of a Martian and we did not like, and as we have hive stickers I put one on top, and it was very cool.
The good thing about seeing it cleaned and that it was so great is that in the visual part you can see the difference of how dirty it was, and it looks great, the other thing is that the noise is gone, and it is blowing more air, the only thing is that with the heat it blows more hot air (hahaha).
But in general everything went very well, I was very nervous because some time ago I damaged a fan cleaning it and had no repair, but this was much easier, but the experience this time very good and is cleaning it more often.
I hope you enjoyed this post and also serve as a reference if you want to clean a fan, to have more confidence when buying a device.
Thank you, my dear friends for getting this far in this post, thanks for the support and love I receive from the whole community, if you like this post let me know in the comments, I'm saying goodbye, take care of me, see you another time, a big hug.

Hola amigos de esta grandiosa comunidad de @hive-motors te doy la bienvenida a mi blog en #hive espero que te sientas muy cómodo en este espacio de motores, como en muchas ocasiones deseo que te encuentres muy bien donde quiere que estés, que cada esfuerzo valga la pena por eso sigue luchando por tus metas y sueños para tener una vida plenamente llena de felicidad, ánimo.
| |
|---|
Hoy mis queridos y estimados lectores, les traigo un post hablando sobre mi experiencia, limpiando un ventilador, y haciendo un poco de mantenimiento, cabe destacar que no soy electricista ni nada por el estilo, pero, cada vez que puedo hacer estas cosas como un hábito lo hago tanto por salud y por tener las cosas limpias, en el hogar o donde tengamos un aparato de estos que es para que nos refresquemos.
| |
|---|
Y a eso voy el motivo del por cuál le estoy haciendo esta limpieza al ventilador de nuestro cuarto, primero porque mi esposa se enfermó, a raíz de esto pensé en hacerle el mantenimiento, para que no le afectara el polvo que pudiera estar expulsando por allí, y, por otra parte, es que en estos últimos meses y estos días el calor y las altas temperaturas están uy fuertes y está insoportable, y este es el otro motivo para ponerme manos a la obra.
| |
|---|
Como pueden ver en las fotografías, el ventilador está muy sucio, yo diría que mucho, la cosa es que aquí también, por mi parte desde que nos mudamos no le hicimos nada de mantenimiento ni limpiarlo, y no sabemos cuanto tiempo más estuvo así, por allí me siento responsable por esto porque desde hace tiempo hubiera hecho eso y no estuviera tan sucio.
Bueno, para empezar tomé un destornillador de estrella, y por la parte de atrás, la tapa tiene 5 tornillos con que sostiene las dos tapas, procedía a quitarlos aunque se me dificulto un poco al abrirlo, pero después me percate que una parte que son las patas del ventilador tiene una función también de unir las dos tapas, y bueno las saque y pude separar estas dos tapas de plástico.
Al separar las tapas una parte tiene el motor y el aspa y la otra solo la tapa plástica con sus rejillas, la cual se encontraba muy sucia, como pueden ver el aspa también estaba muy oscura por la suciedad, y la parte interior del motor estaba muy lleno de polvo, lo siguiente que hice fue quitar un tornillo que ajusta el aspa, aquí se me complico un poco porque no quería salir el aspa y tuve que hacer mucha presión hasta que saliera, ya después de tener todo separado me dedique a limpiar todo.
Para la parte del motor, lo que hice fue tomar una brocha de pintar, y comencé a quitarle todo el polvo y pelo y mugre que tenía, era tanto que el lavamanos quedo negro, pero hice mucho hincapié allí para que quedara muy bien limpio, luego de esto con un trapo, agua y cloro empecé a quitar lo más sucio, pero no quedaba muy bien, agarre una esponja con jabón y así fue que puede lavar muy bien las tapas, pero más que todo en las superficies planas.
| |
|---|
Porque para la parte de las rejillas se complicaba, en ese caso agarra la brocha, el moje le agregue jabón y se me hizo muy fácil limpiarlo por allí y fue más rápido, después de tener todo lavado y limpio, seque todo, mientras que esperaba que se secara todo muy bien, agarre el aceite 3 en uno, y le eche un poco por el cilindro donde va el aspa, ya que me percate que le hacía falta como un lubricante y este era el motivo de un ruido que tenía, me asegure que hubiera cubierto todo y deslizaba mucho mejor.
Después de esto procedí a armar todo colocando el aspa en su lugar junto con el motor, colocando luego ambas tapas y sus patas, otra cosa que tiene este ventilador es que tiene un plato girador que distribuye el aire para donde tú quieras y este va en la parte delantera y tú lo ajusta si quieres que sople aire para arriba o para abajo o que gire y sople aire para todos lados.
Después de colocarle esto me percaté que se había aflojado un cable que va conectado en los 3 niveles que trae el ventilador y bueno lo coloque otra vez en su lugar, pero aquí no logre tomar fotografías, volví a armar todo como estaba y le di a encender en el primer nivel y como pueden ver si encendió, por último le quise dar un toque personal, porque antes tenía una calcomanía de un marciano y no nos gustaba, y como tenemos stickers de hive le coloque uno en la parte superior, y quedo muy genial.
Lo bueno de verlo limpiado y que quedara tan genial es que en la parte visual se nota la diferencia de lo sucio que estaba, y se ve muy bien, lo otro es que ya el ruido se le quitó, y está soplando más aire, lo único es que con el calor sopla más aire caliente (jajaja).
Pero en general todo salido muy bien, estaba muy nervioso porque hace un tiempo dañe un ventilador limpiándolo y no tuvo reparación, pero este estaba mucho más fácil, pero la experiencia de esta vez muy buena y ya con más frecuencia lo está limpiando.
Espero que hayan disfrutado de este post y que les sirva también de referencia por si quieren limpiar un ventilador, para tener mayor confianza a la hora de comprar un dispositivo.
Gracias, mis estimados amigos por llegar hasta aquí en este post, gracias por el apoyo y el cariño que recibo de parte de toda la comunidad, si te gusto este post dejame lo saber en los comentarios, me voy despidiendo, se me cuidan, nos vemos en otra oportunidad un fuerte abrazo.
The photos were taken with my Xiaomi Redmi note 12s phone and are of my authorship.
The photo was edited with Canva
Use Lumii App
Las fotos fueron con mi teléfono Xiaomi Redmi note 12s son de mi autoría
La foto fue editada con Canva
Utilice App Lumii
Congratulations @wbrandt! You have completed the following achievement on the Hive blockchain And have been rewarded with New badge(s)
Your next target is to reach 4000 comments.
You can view your badges on your board and compare yourself to others in the Ranking
If you no longer want to receive notifications, reply to this comment with the word
STOPTo support your work, I also upvoted your post!
Check out our last posts:
Ese mantenimiento hay que hacerlo frecuentemente porque los ventiladores lo que hacen es redireccionar el aire y si las aspas están sucias contaminan el aire que respiras.
Si exactamente es lo que hacen los ventiladores, eso afecta mucho, pero ya con más regularidad lo estaré haciendo gracias por pasar y comentar @gpache
Hrno que gusto tenerte por acá, gracias por compartir el mantenimiento del ventilador, es importante con esta ola de calor tener estos equipos al día.
Si vale mi hermano por eso lo hice y también porque estaba muy sucio pero ya lo voy hacer con más regularidad para que esto no suceda gracias por pasarte por aquí te envío un fuerte abrazo 🤗
Épale bro que bueno que animaste a publicar en Hive Motors. Excelente y muy completa publicación. Gracias por compartirla. Aquí en Ecuador es puro ventilador, ya que el costo de la electricidad es muy caro para tener un aire
Saludos mi herma o @josuemonterola jajaja si me animé ya me verán más seguido por aquí por allí tengo otro ventilador pero ese si no está rodando está como pegado pero vamos a ver cua dl lo desarmo porque está ola de calor está fuerte, y si me imagino porque allá es costoso la electricidad pero bueno que más se hace mi hermano gracias por pasar y comentar por aquí te envío un fuerte abrazo 🤗