Tutorial Caja para tazas personalizada ☕💗 | Te enseño a hacer un empaque diferente y hermoso - Te comparto la plantilla💛💕 [ESP-ENG]
Hello to all my creative family of Hive Diy! Very good afternoon to all, I hope your day has started with the right foot and you are wonderful, I wish each of you as always lots of health, love, happiness and of course you can not miss the creativity, commitment and productivity daily in your lives, I also hope you do not miss the beautiful crafts to share in the community.♡
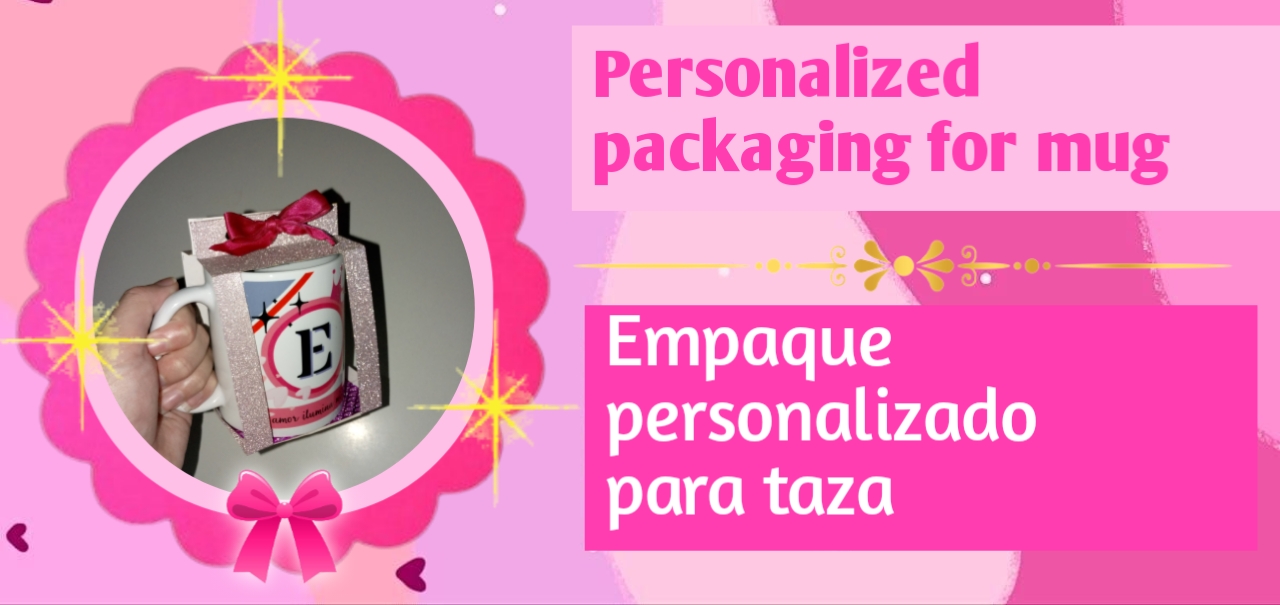
Bienvenidos a una nueva manualidad de la semana, me encuentro muy contenta de poder traerles la mañana de hoy un hermoso empaque para tazas, ya sea para venderlas o regalar, como es mi caso. Este es un Diy fácil y práctico, que realza los detalles de nuestro regalo y le da el toque especial, un empaque hecho a mano con mucho amor, fácil y rápido de hacer, además de que es totalmente personalizable, es perfecto para obsequiar hermosas tazas a los amantes del café e incluso a cualquier persona que queramos.
Welcome to a new craft of the week, I am very happy to bring you this morning a beautiful packaging for cups, either to sell them or give them as a gift, as is my case. This is an easy and practical Diy, which enhances the details of our gift and gives the special touch, a handmade packaging with love, easy and quick to make, plus it is fully customizable, it is perfect for giving beautiful cups to coffee lovers and even anyone we want.
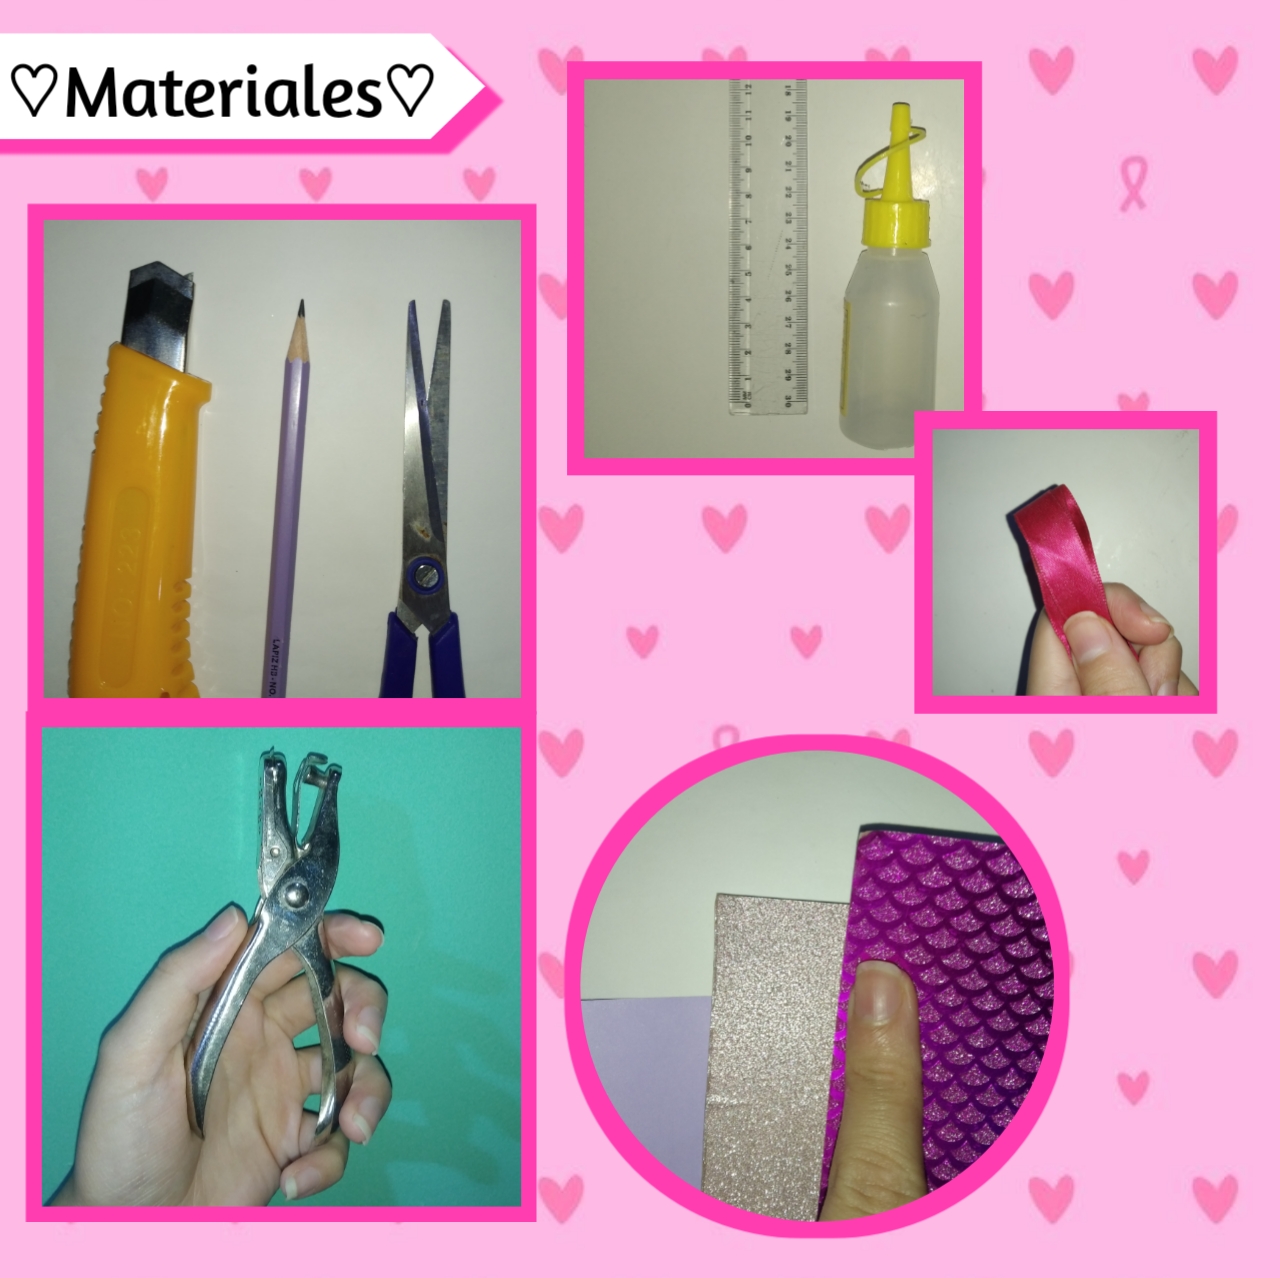
♡💕📝 Materials📝💕♡
- Cartulina
- Lápiz
- Regla
- Tijeras
- Perforador de círculos
- Cinta fina
- Cutter/exacto
- Cardboard
- Pencil
- Ruler
- Scissors
- Circle punch
- Thin tape
- Cutter/acto knife
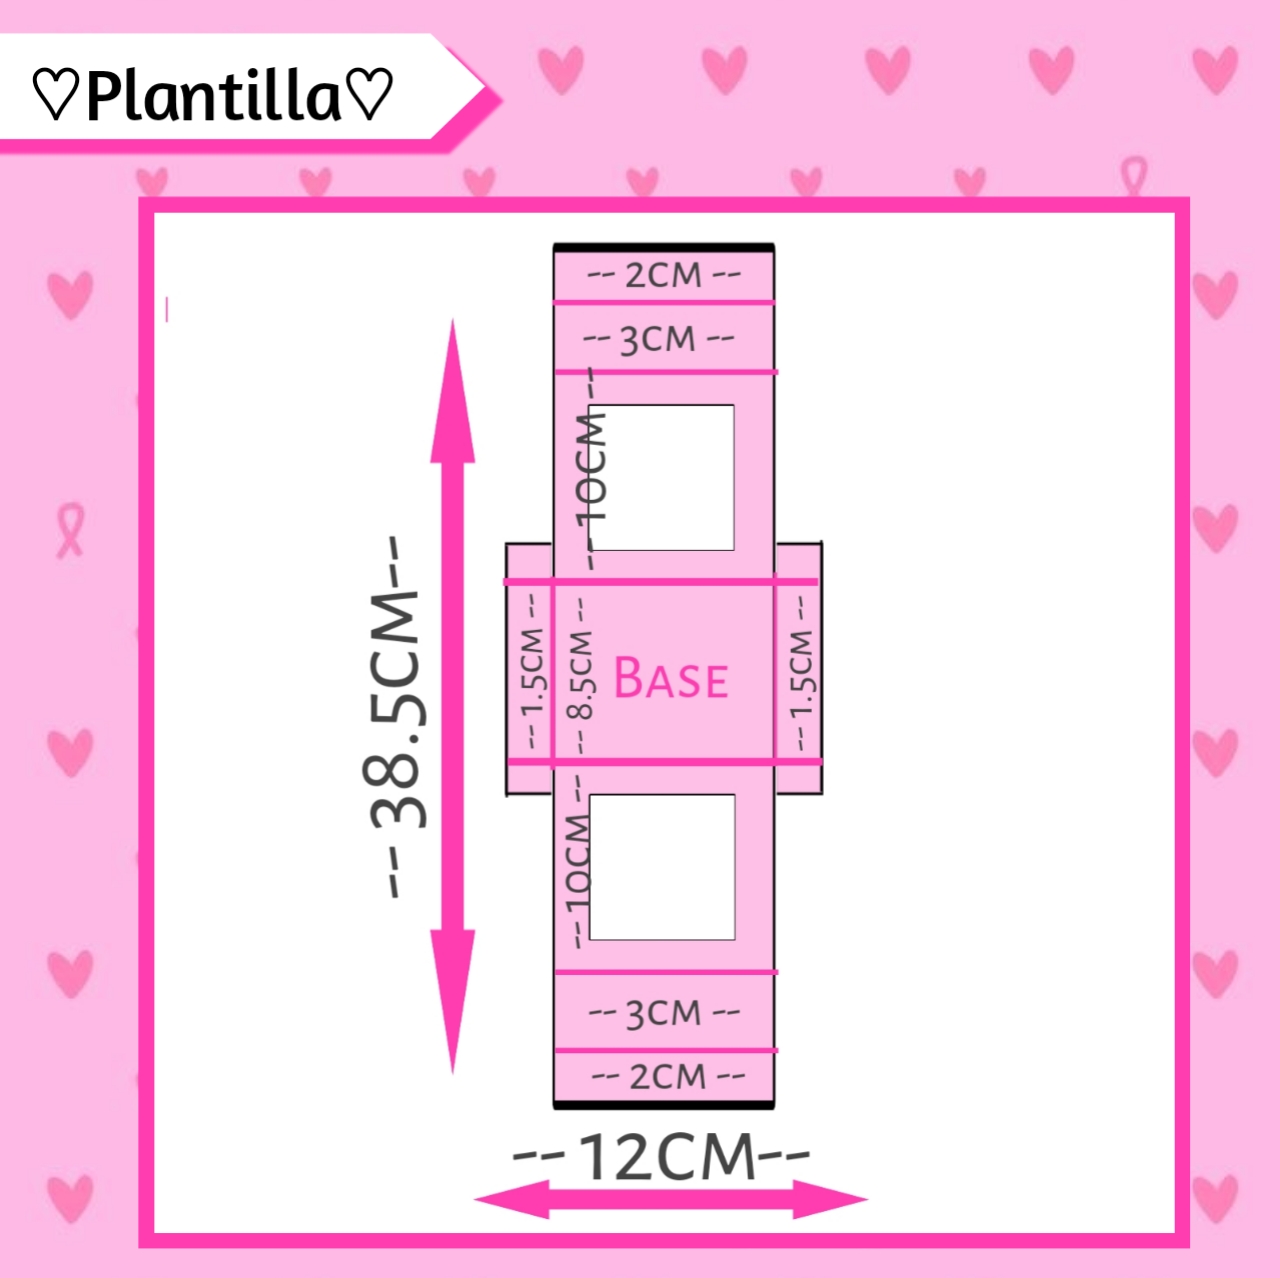
♡🌷Template🌷♡
♡💛Step by Step💛♡
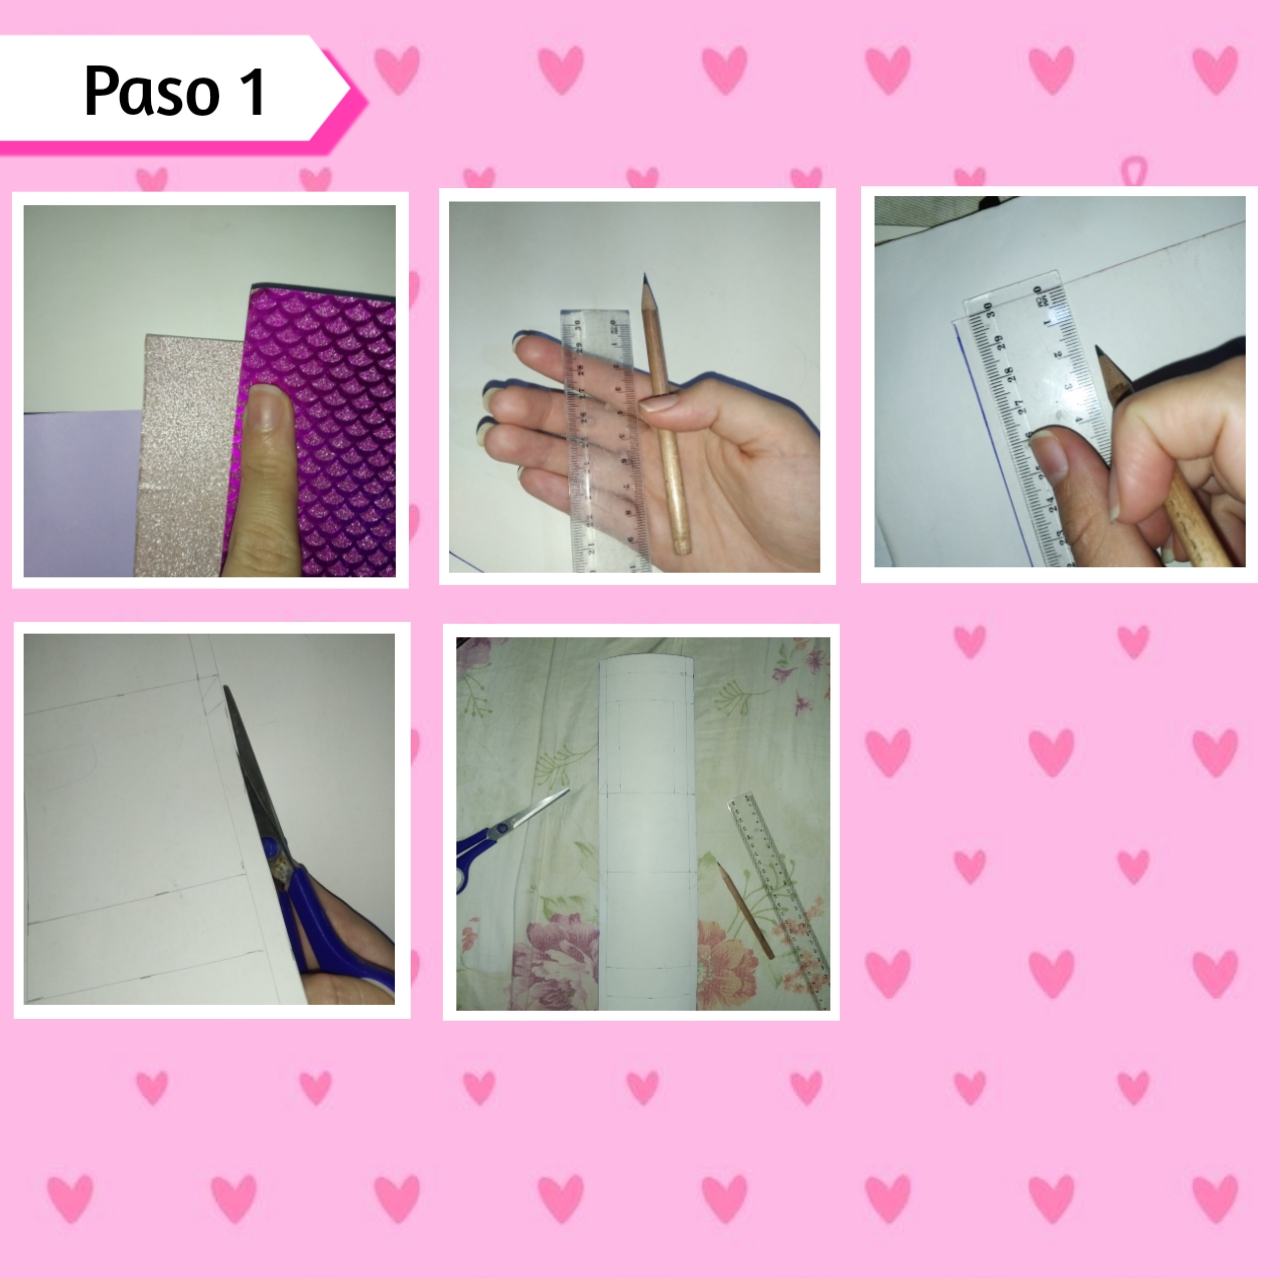
Paso 1:
Step 1:
Primeramente necesitamos escoger una cartulina de nuestra preferencia, yo escogí una rosa escarchada, así le daremos vuelta y con el apoyo de una regla tomamos nuestro lápiz y comenzamos a trazar nuestra plantilla sobre está, hasta tener todo bien marcado. Luego recortaremos todo el contorno de nuestra figura muy bien y pasamos al siguiente paso.
First we need to choose a cardboard of our preference, I chose a frosted rose, so we will turn it over and with the support of a ruler we take our pencil and begin to trace our template on it, until we have everything well marked. Then we will cut out all the outline of our figure very well and move on to the next step.
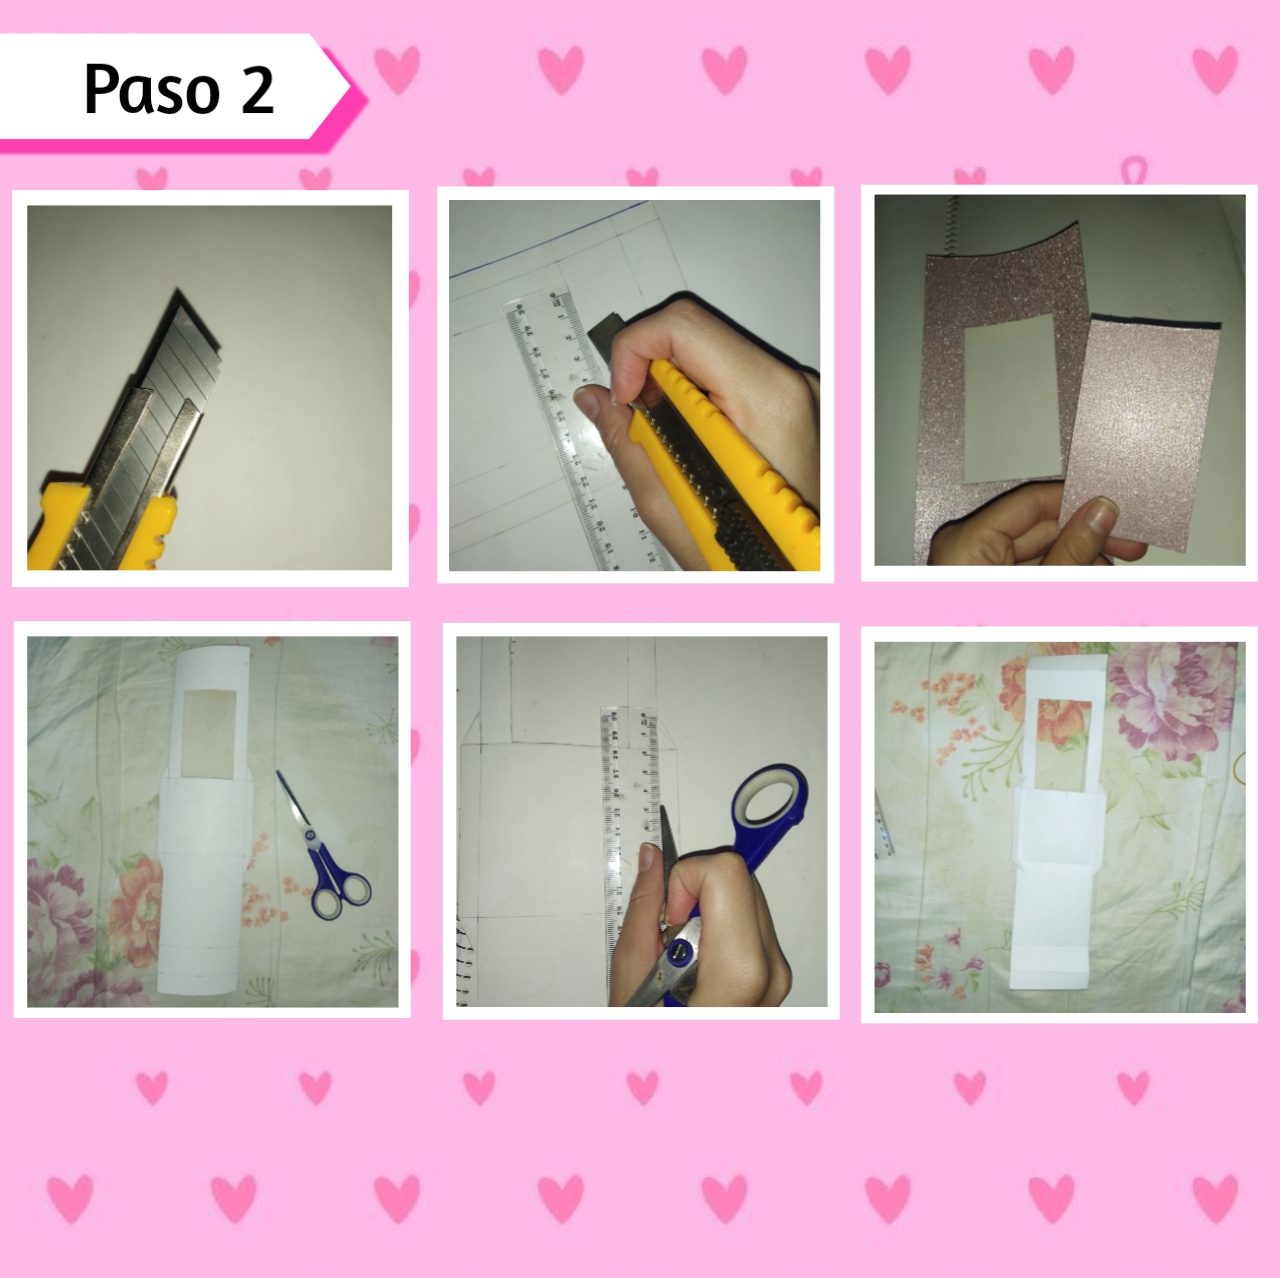
Paso 2:
Step 2:
Continuamos tomando nuestro cutter, de está manera, con el apoyo de nuestra regla, vamos a recortar el rectángulo que se indica en la plantilla, haciendo cortes rectos y precisos, para poder extraer este rectángulo. Después tomaremos nuestra tijera e igualmente la regla, para esta vez marcar cada dobles de la pieza muy bien, por cierto las piezas que se encuentran a cada extremo (solo los primeros dobleces de 2cm) las doblaremos al contrario, permitiendo que queden hacía "afuera".
We continue by taking our cutter, in this way, with the support of our ruler, we will cut out the rectangle indicated in the template, making straight and precise cuts, to be able to extract this rectangle. Then we will take our scissors and also the ruler, this time we will mark each fold of the piece very well, by the way the pieces that are at each end (only the first 2cm folds) we will fold them in the opposite direction, allowing them to be "outwards".
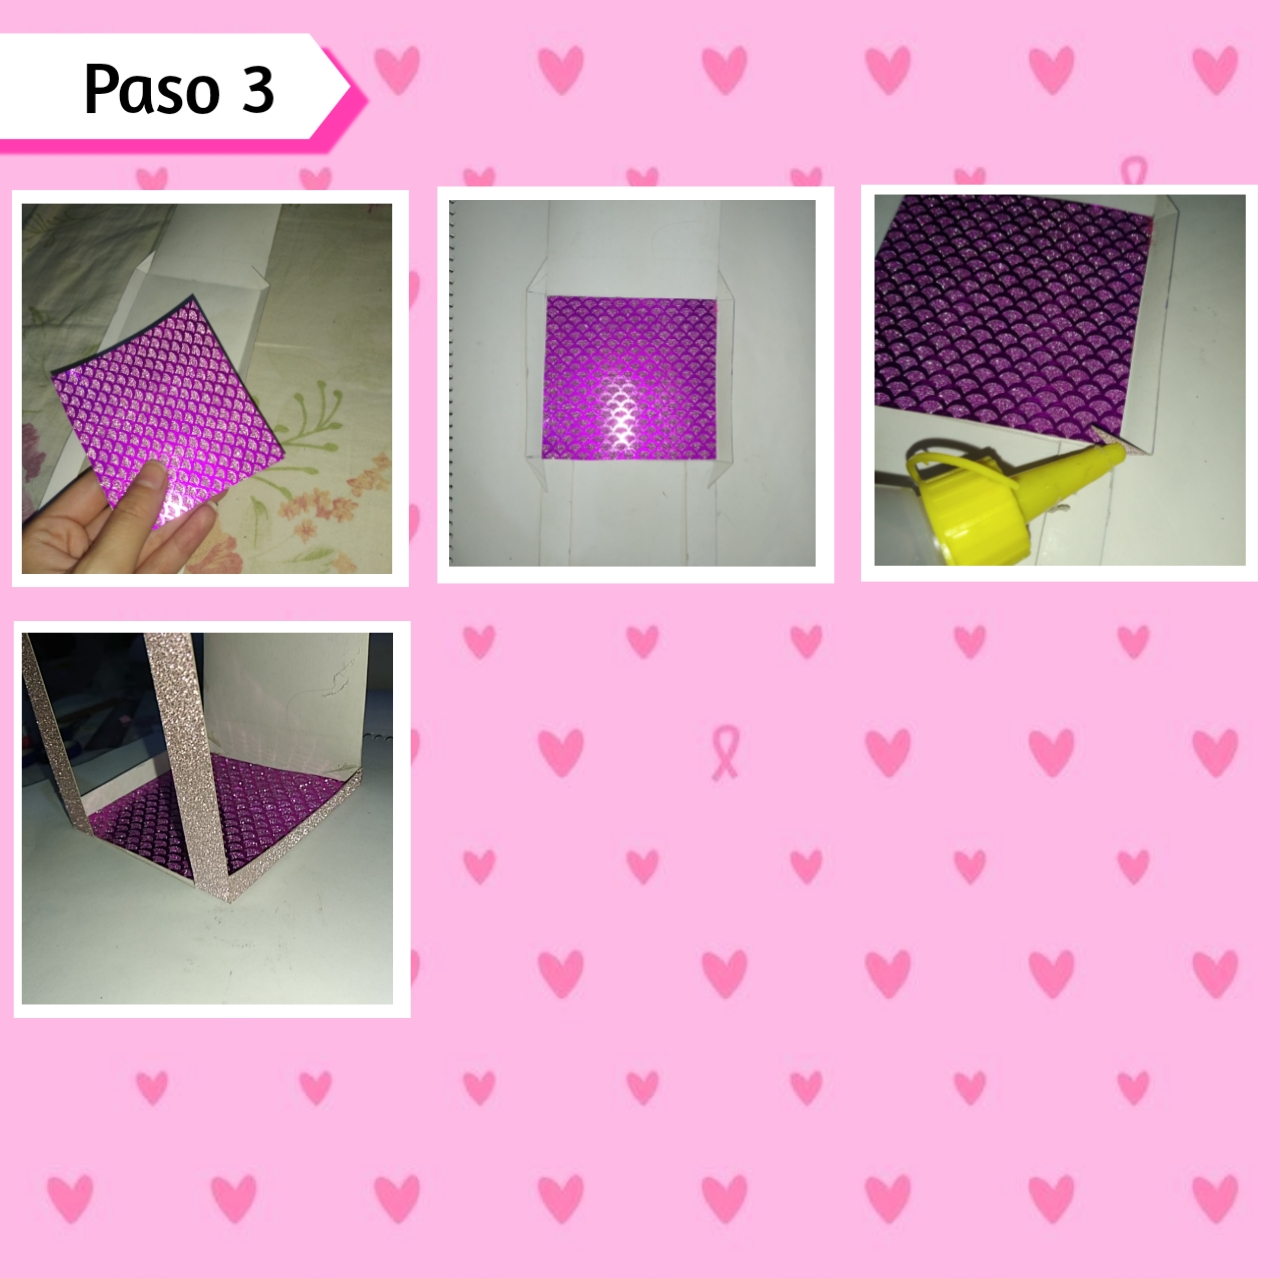
Paso 3:
Step 3:
Ahora bien, marque y recorte un cuadrado en cartulina, de la misma medida que la parte del centro (10cm x 9cm), le agregué silicón frío y lo pegue sosteniendo esto unos cuantos segundos, para que quede fijo y pegue bien, esto permitirá que está parte sea más resistente, es para reforzar la base dónde irá la taza. También vamos a tomar el silicón y agregaremos una pequeña cantidad de silicón, apenas una gota pequeña, en las pequeñas solapas que están en la base, luego lo esparcimos un poco y unimos a los laterales, hacía adentro.
Now, mark and cut out a square in cardboard, the same size as the center part (10cm x 9cm), add cold silicone and glue it holding it for a few seconds, so that it is fixed and sticks well, this will allow this part to be more resistant, it is to reinforce the base where the cup will go. We are also going to take the silicone and add a small amount of silicone, just a small drop, on the small flaps that are on the base, then we spread it a little and attach it to the sides, inwards.
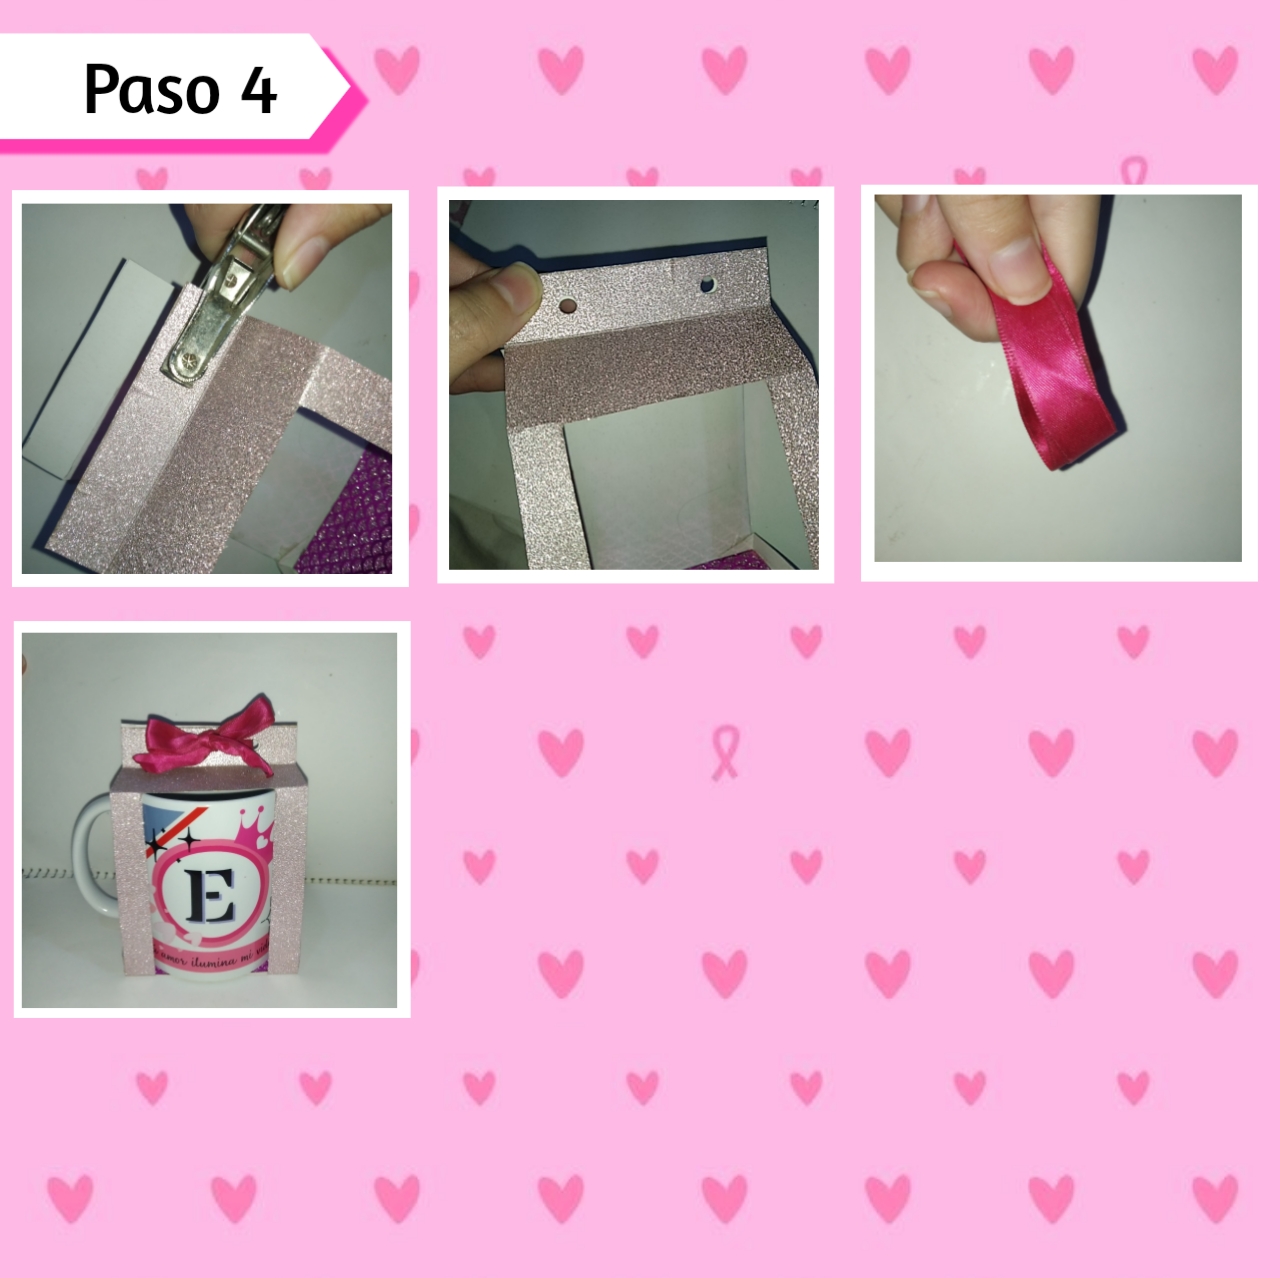
Paso 4:
Step 4:
Para terminar con nuestra pequeña y hermosa caja rosa, haremos los últimos detalles, así tomaremos nuestro perforador (el de nuestra preferencia o disponibilidad), uniremos las dos solapas de arriba y abriremos dos hoyos calculando una misma distancia desde los extremos, haciendo que queden centrados y de alguna manera paralelos entre sí. Para finalizar tomaremos una cinta, preferiblemente un poco fina, del color que queramos y la meteremos primero por la parte de atrás en cada hoyo, luego para terminar las introducimos por lo hoyos de adelante y haremos un lazo, antes introduciendo la taza claro, como pueden apreciar en las imágenes.
To finish with our beautiful little pink box, we will make the last details, so we will take our hole punch (the one of our preference or availability), we will join the two top flaps and we will open two holes calculating the same distance from the ends, making them centered and somehow parallel to each other. To finish we will take a ribbon, preferably a little thin, of the color we want and we will put it first by the back part in each hole, then to finish we introduce them by the holes in front and we will make a loop, before introducing the cup of course, as you can see in the images.
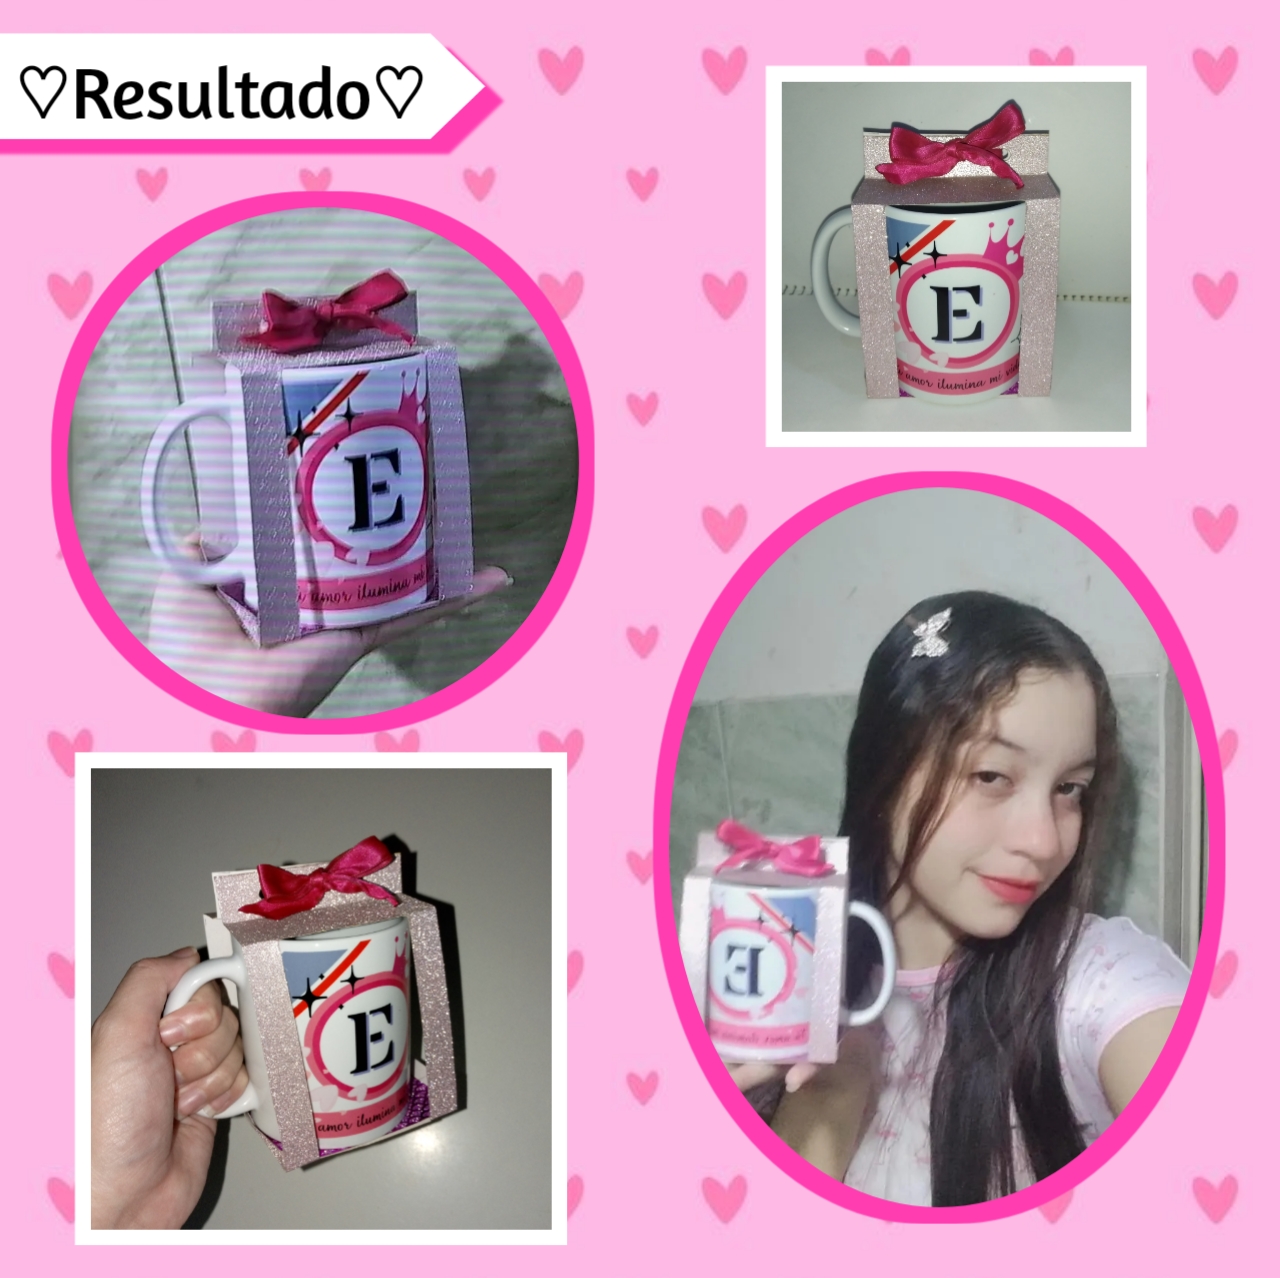
De está forma podemos obtener una hermosa caja, que sirva para regalar una taza de una forma mucho más única, original y delicada para nuestras personas especiales. A decir verdad, es un empaque diferente y práctico, porsupuesto es personalizable para cada gusto y temática, además se pueden agregar detalles extras, como corazones, mariposas, dibujos, entre otras cosas, que pueden realzar aún más está idea, en está ocasión la hice un poco más sencilla por el tiempo y otros factores, pero hay gran variedad de ideas, es cosa de dejarnos llevar por nuestra creatividad y crear con amor.
In this way we can get a beautiful box, which serves to give a cup in a much more unique, original and delicate way for our special people. To tell the truth, it is a different and practical packaging, of course it is customizable for every taste and theme, you can also add extra details such as hearts, butterflies, drawings, among other things, which can further enhance this idea, this time I made it a little simpler because of time and other factors, but there are a variety of ideas, it is a matter of letting our creativity and create with love.
Así llegamos al fin de está manualidad que disfrute bastante, es un regalo especial, para una persona especial, hecho a mano con mucho amor y cariño. A mí me encantó el resultado demasiado y espero que a ustedes igual, deseo que lo hagan si les gustó y compartan, con mucho cariño y un abrazo enorme me despido por este día familia, los leo en los comentarios.💛💗
So we come to the end of this craft that I enjoyed a lot, it is a special gift for a special person, handmade with love and affection. I loved the result too much and I hope you like it too, I hope you do it if you like it and share it, with love and a big hug I say goodbye for this day family, I read you in the comments.
💛🌷Una vez más, gracias por leer ¡Hasta pronto mi familia creativa!🌷💛
💛🌷Once again, thanks for reading ¡Hasta pronto mi familia creativa!🌷💛
Photos of my authorship taken from my Xiaomi Redmi 7 phone, edited in the free version of PixeLab💛💙
Very cool idea!
Thanks❤️✨
Que belleza, esa cajita es perfecta para complementar un detalle y asi la taza no quede sola, me encantó 🥰
Así es, algo hecho con mucho amor fácil y rápido, me alegra mucho, gracias amiga, saludos.💜✨
https://twitter.com/hivediy47901/status/1761933657617400139
Gracias por compartir y apoyar, un abrazo.💜
¡¡¡Buen trabajo!!! Gracias por publicar tu excelente contenido en Hive Diy, qué hermosa caja, con estas ideas podemos hacer las nuestras y no solamente para tasas, sino también otros tipos de regalos
Tu comunidad artesana ahora es testigo

Muchas gracias, un abrazo fuerte.😍💜