Te muestro como hacer un lindo arreglo de dulces desde casa - Paso a Paso 🍬🍭 | Ideal para obsequiar a alguna persona especial [ESP-ENG] ❤️🎁✨
Hello my dear, beautiful and wonderful people of Hive Diy! I wish you a happy and blessed week, full of good things, lots of productivity, creativity and above all lots of beautiful crafts, of course among my best wishes is also that you have a lot of health and are accompanied by your loved ones every day.♡
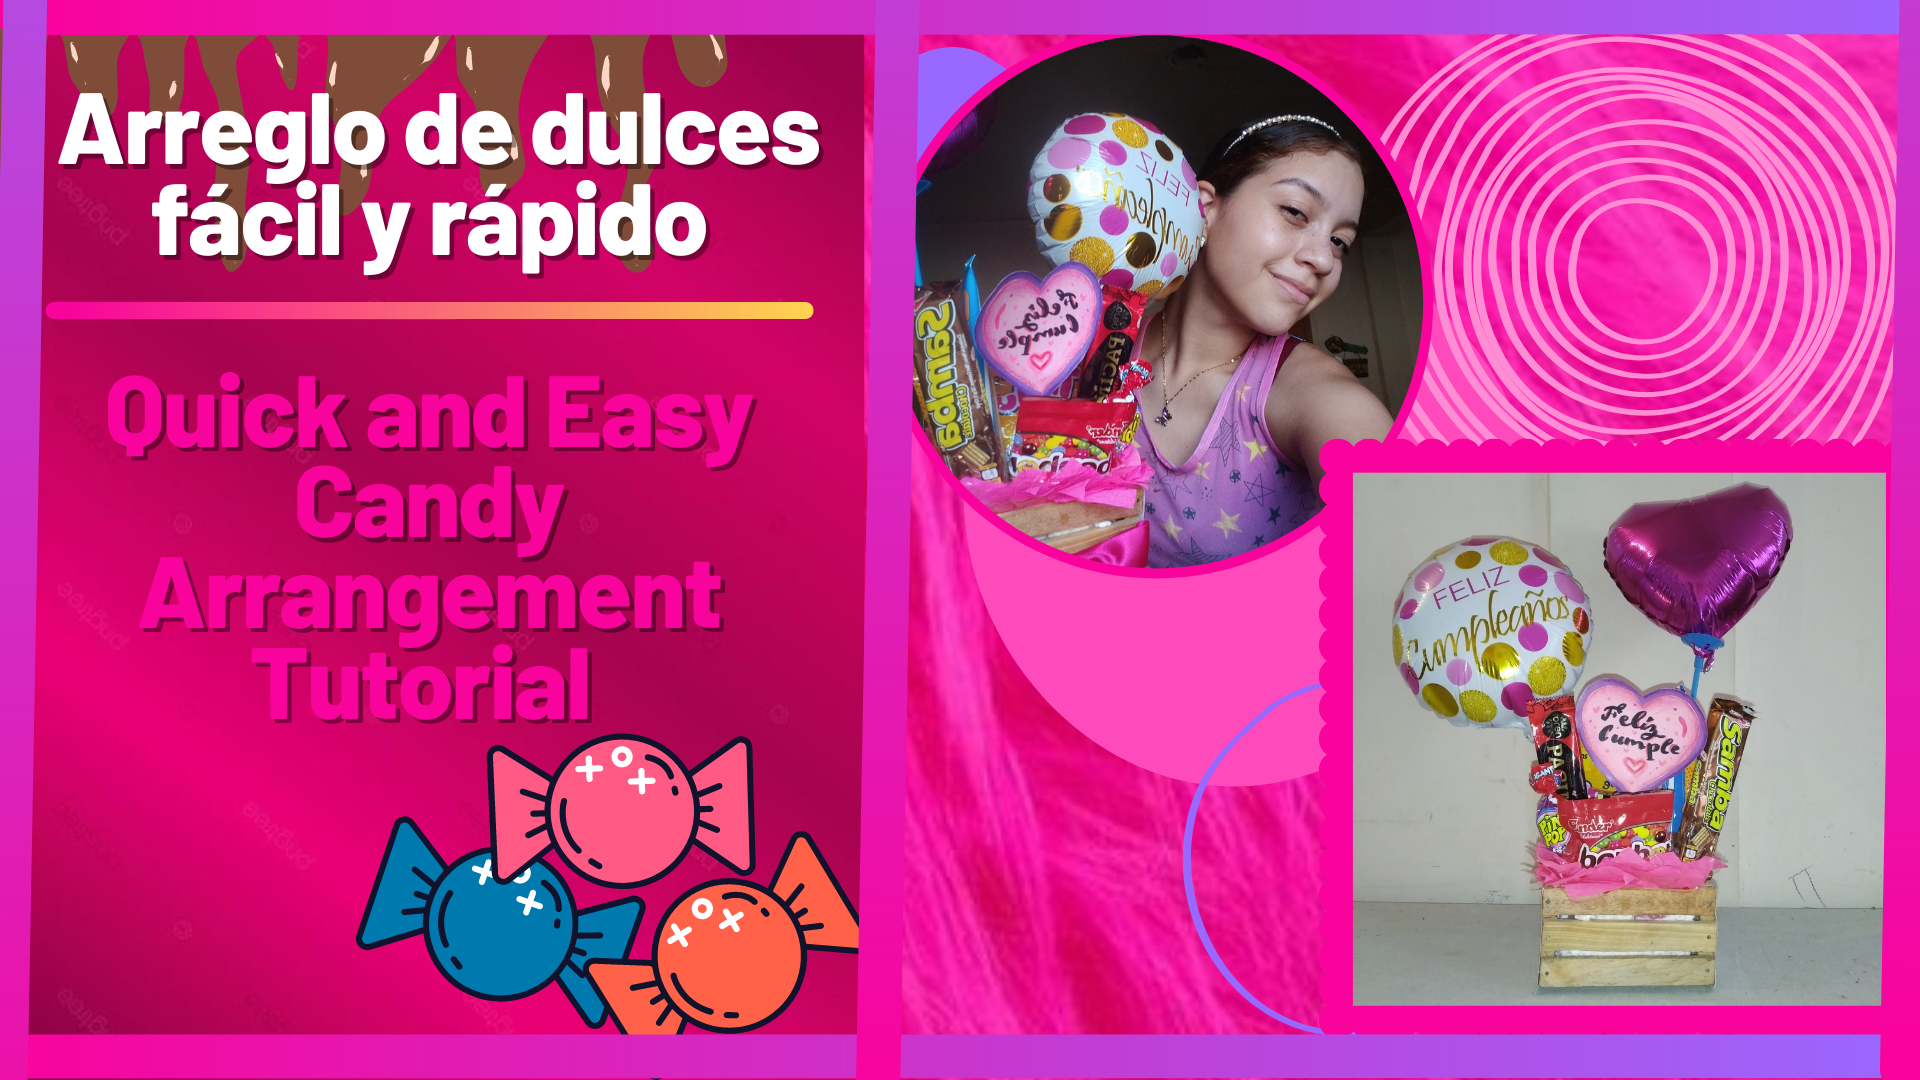
En está oportunidad me complace traerles una manualidad hermosa y sencilla, especial para regalar en cumpleaños y en fechas únicas, al igual que especiales, así les traigo el tutorial paso a paso para enseñarles cómo hacer un arreglo pequeño con dulces, muy hermoso y lleno de amor para sus personas especiales. La idea de esto surge debido a que el día sábado que pasó, fue el cumpleaños de mi preciosa madre, así que tenía que regalarle algo tan único y especial como ella, entonces pensé en un arreglo y aquí estoy, porsupuesto a ella le encantó, apesar de que es la primera vez que hago uno de estos, quedó muy precioso, así que gustosa les comparto el tutorial, pero antes sus materiales.
In this opportunity I am pleased to bring you a beautiful and simple craft, special to give on birthdays and unique dates, as well as special, so I bring you the step by step tutorial to show you how to make a small arrangement with sweets, very beautiful and full of love for your special people. The idea of this arises because the day Saturday that happened, was the birthday of my beautiful mother, so I had to give her something as unique and special as her, then I thought of an arrangement and here I am, of course she loved it, even though it is the first time I do one of these, it was very beautiful, so I gladly share the tutorial, but before your materials.
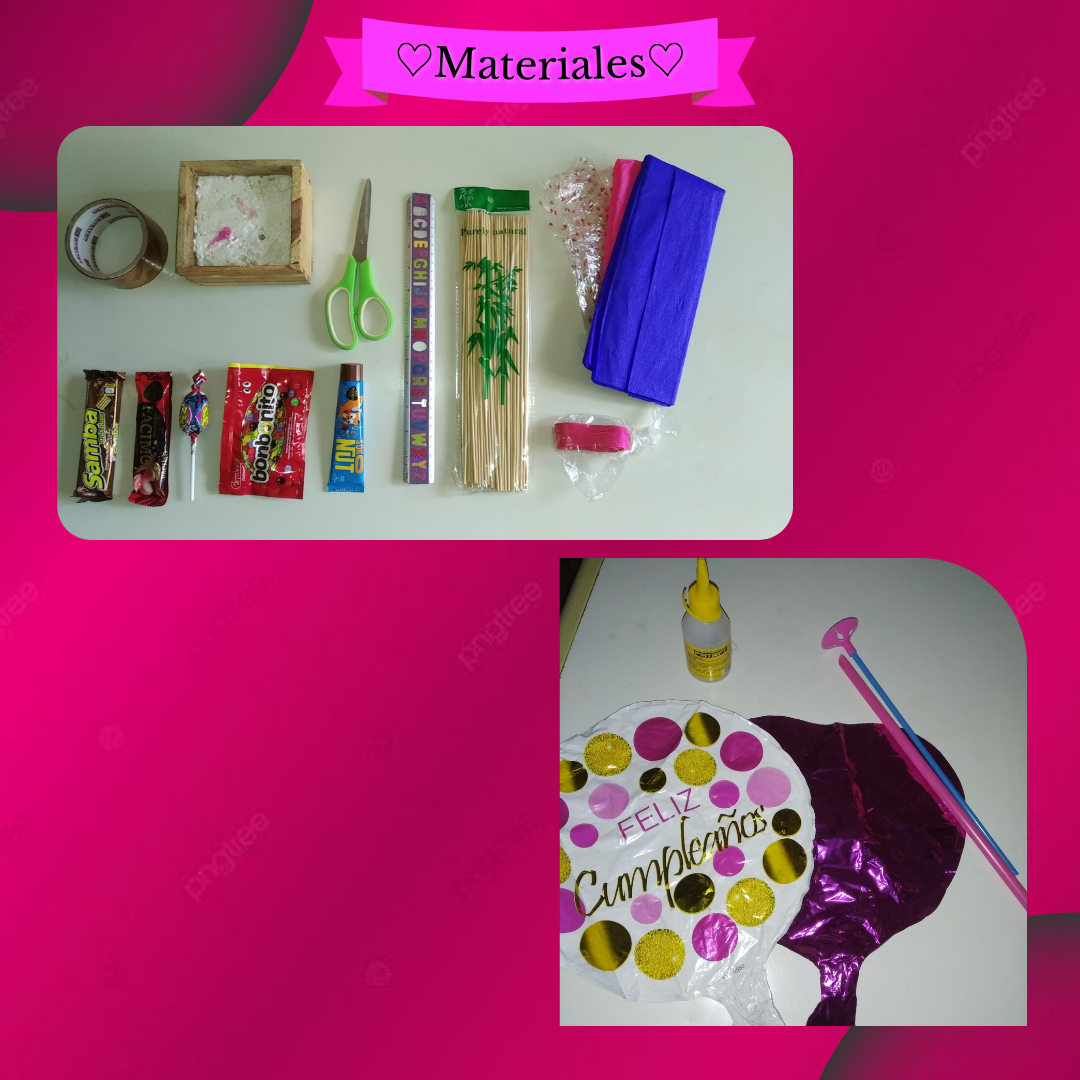
♡Materials:♡
- 1 Huacal de madera del tamaño de nuestra preferencia
- Anime
- Papel crepe
- Palitos de altura (palillos)
- Globos
- Cinta adhesiva
- Dulces
- Tijera
- Silicón
- Regla
- Otros
- 1 Wooden Huacal of the size of our preference
- Anime
- Crepe paper
- Height sticks (chopsticks)
- Balloons
- Adhesive tape
- Candy
- Scissors
- Silicone
- Ruler
- Other
♡Step by Step♡
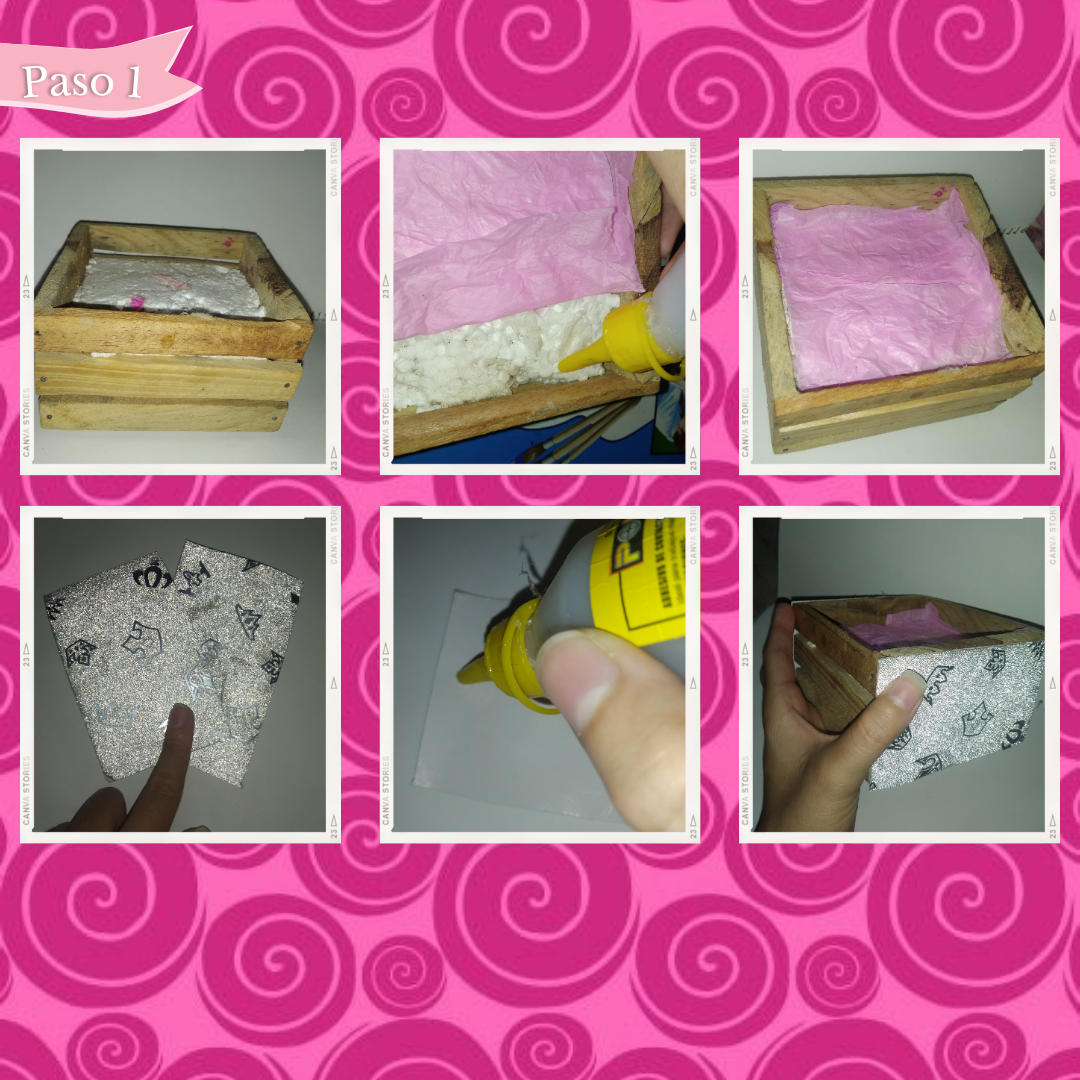
Paso 1:
Step 1:
Para empezar a armar este lindo arreglo, vamos a tomar nuestro huacal del tamaño que gusten dependiendo de lo que tengan, yo tengo uno pequeño, este tiene unas medidas de 12cm por 11cm, con 6.5cm de ancho de altura de esta pequeña cajita, sabiendo esto seguimos a recortar un cuadrado de anime, que encaje justamente en este, después tomaremos papel seda o crepé y recortaremos un cuadro del mismo tamaño del huacal y con ayuda del silicón frío pegaremos cuidadosamente, ahora para terminar este paso vamos a recortar dos rectángulos en cartulina decorada de la misma medida de los lados y nuevamente con el silicón pegamos.
To begin to assemble this cute arrangement, we will take our huacal the size you like depending on what you have, I have a small one, this has a size of 12cm by 11cm, with 6. 5cm of width of height of this small box, knowing this we continue to cut a square of anime, that fits exactly in this one, then we will take tissue paper or crepe and cut a square of the same size of the box and with the help of the cold silicone we will paste carefully, now to finish this step we will cut two rectangles in decorated cardboard of the same size of the sides and again with the silicone we paste.
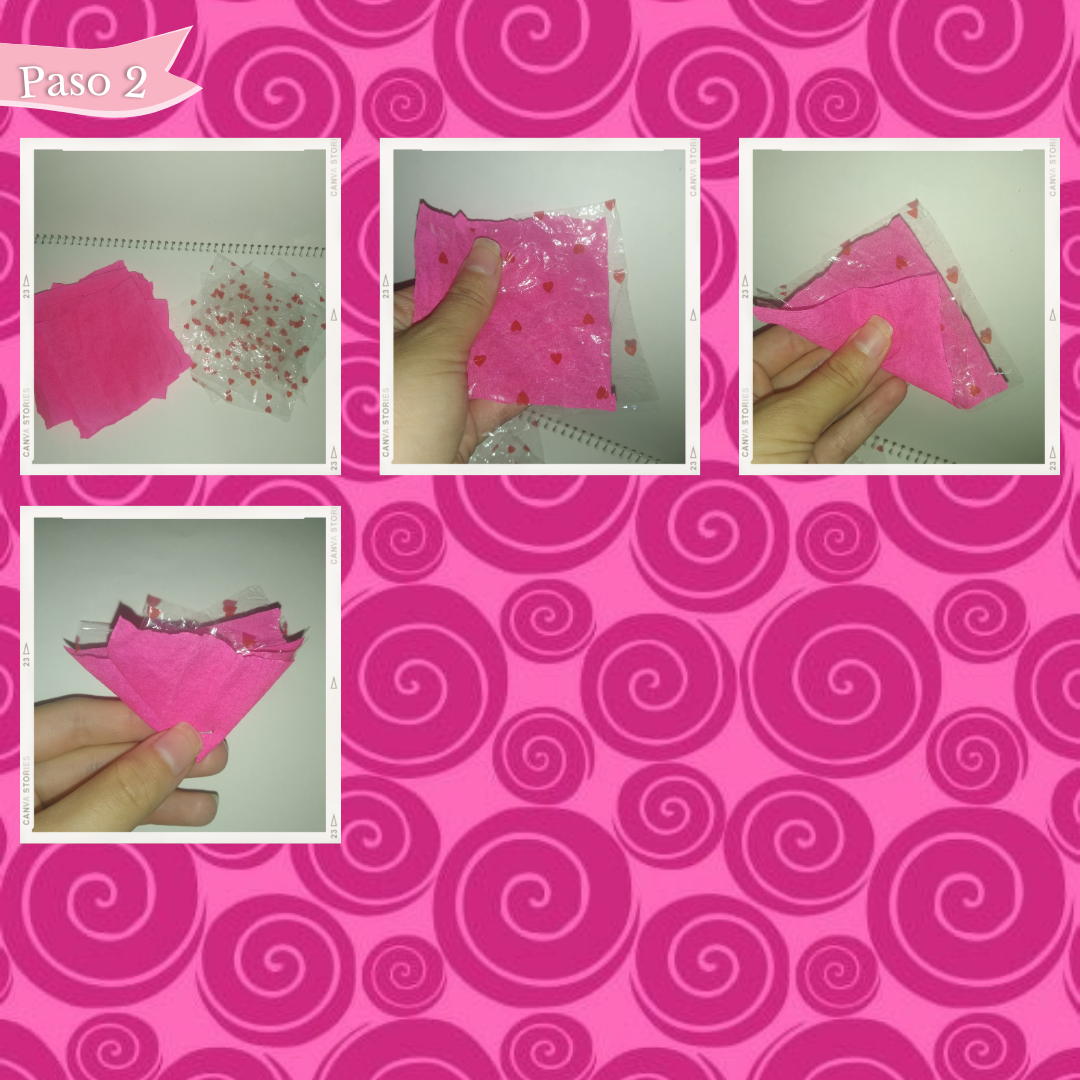
Paso 2:
Step 2:
Ahora vamos a tomar papel crepe o seda, además de algún papel transparente decorativo y con la ayuda de nuestra tijera vamos a recortar cuadrados para cubrir el arreglo, en este caso por el tamaño de mi arreglo los hice pequeños, estos con unas medidas de 8cm de largo, por 8cm de ancho, haciendo 12 cuadrados de cada papel, en total 24. Así colocaremos uno sobre otro, para proseguir a doblar una esquina hacía adentro y luego la otra, formado una figura parecida a un triángulo, y los vamos a grapar en la parte de abajo, como pueden observar en las imágenes.
Now we are going to take crepe or silk paper, as well as some decorative transparent paper and with the help of our scissors we are going to cut squares to cover the arrangement, in this case for the size of my arrangement I made them small, these with measures of 8cm long, by 8cm wide, making 12 squares of each paper, in total 24. So we will place one on top of another, to continue folding one corner inwards and then the other, forming a figure similar to a triangle, and we will staple them at the bottom, as you can see in the images.
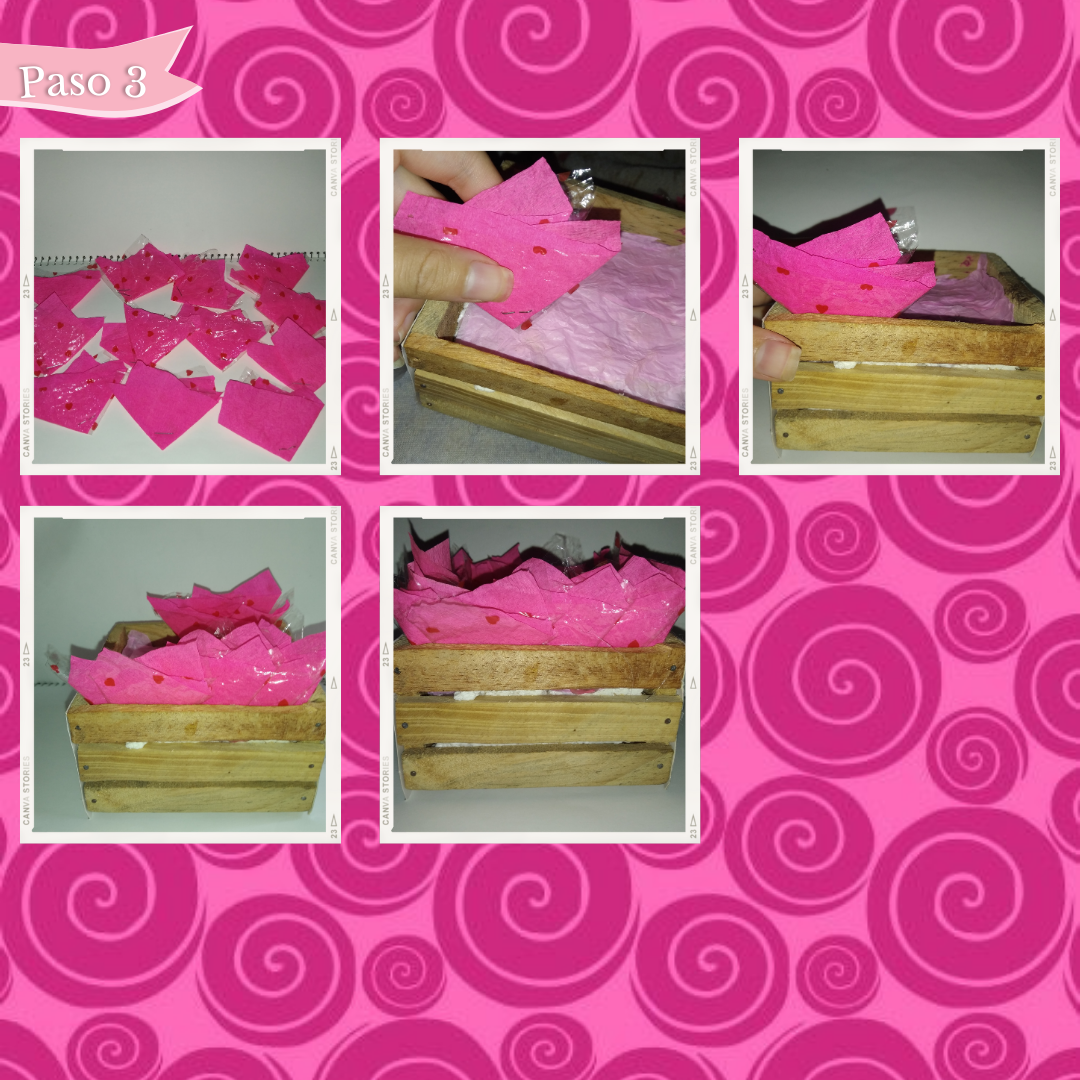
Paso 3:
Step 3:
Con nuestros 12 "triángulos" ya armados, procedemos a agregar una gota de silicón en la parte de abajo y adelante, así cuidadosamente, al igual que un poco rápido lo acomodaremos muy bien en la parte de adentro por todo el borde, así hice con todos los lados hasta armar esta parte de la caja.
With our 12 "triangles" already assembled, we proceed to add a drop of silicone on the bottom and front, so carefully, as well as a little fast we will arrange it very well on the inside along the entire edge, so I did with all the sides to assemble this part of the box.
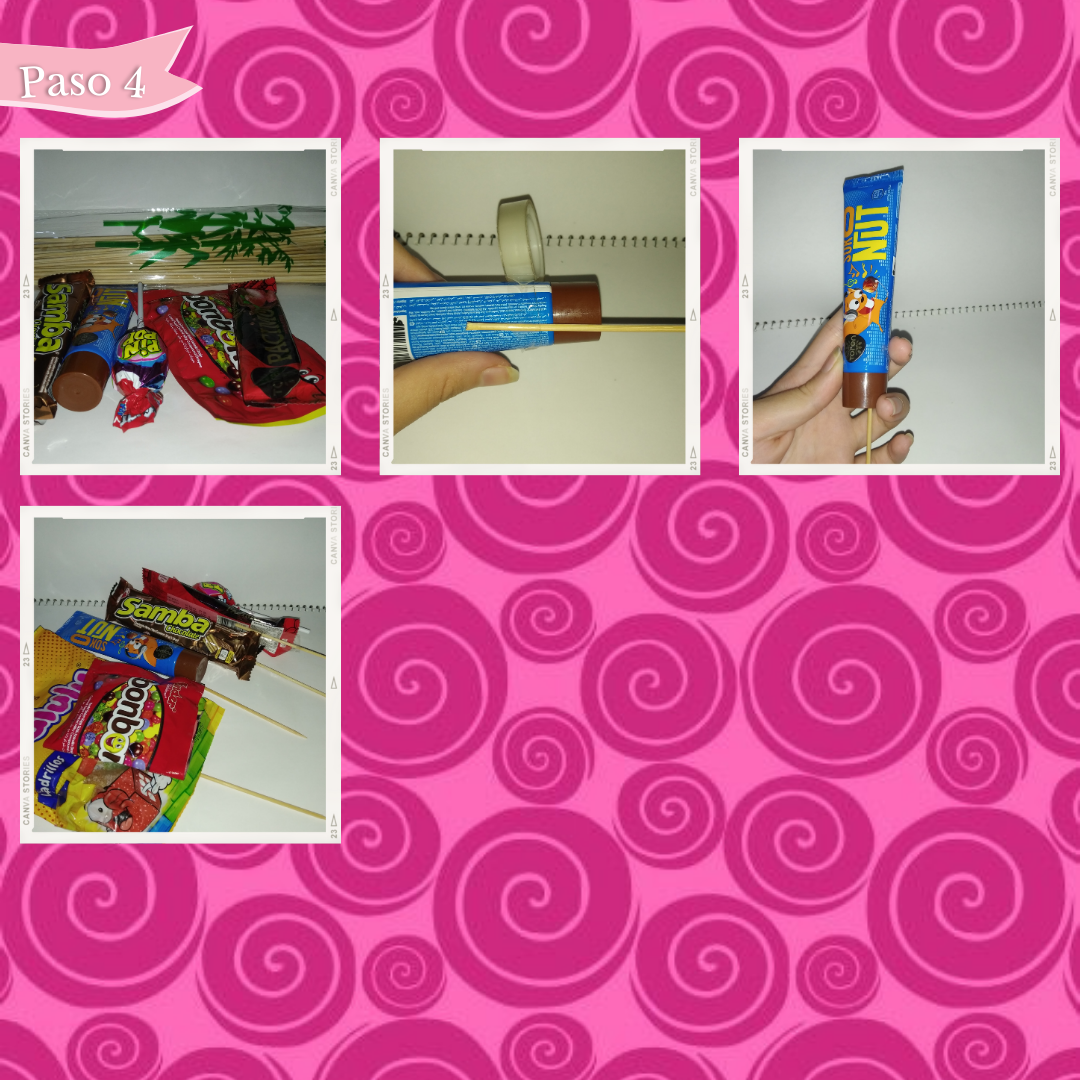
Paso 4:
Step 4:
Continuaremos tomando los dulces y a la vez nuestros palillos, así le colocaremos el palillo del tamaño de nuestra preferencia en la parte de atrás de cada dulce y con la ayuda del celofán o mayormente conocido simplemente como teipe transparente, unimos el palillo al dulce hasta que quede totalmente firme, así sucesivamente haremos con cada uno de estos variando el tamaño del palito, como queramos.
We will continue taking the candies and at the same time our toothpicks, so we will place the toothpick of the size of our preference in the back of each candy and with the help of cellophane or mostly known simply as transparent teipe, we attach the toothpick to the candy until it is completely firm, and so on we will do with each of these varying the size of the stick, as we want.
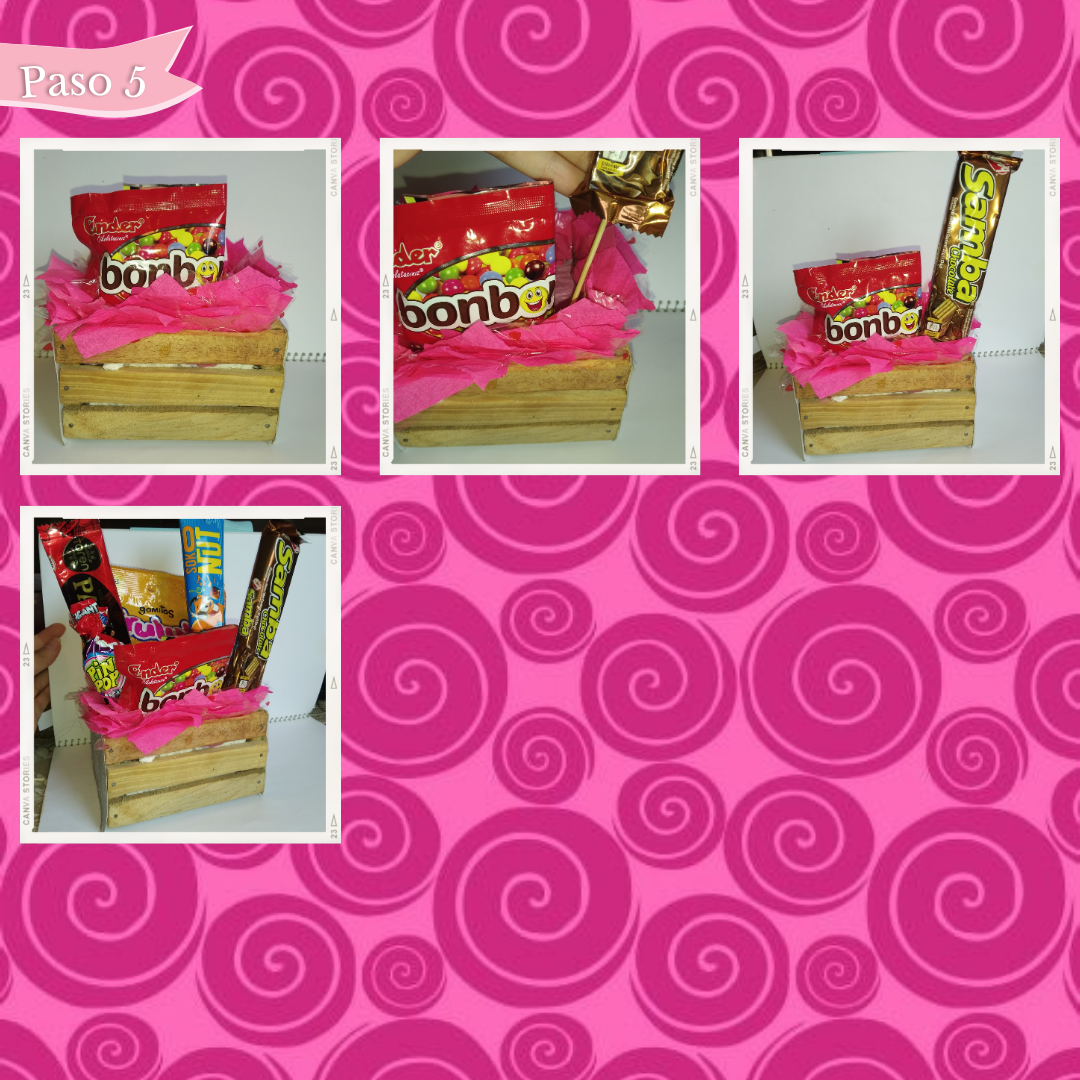
Paso 5:
Step 5:
Después al tener la base y los dulces listos es hora de armar el arreglo, comencé a colocar un dulce que no tenía palillo, debido a que era pequeño, al igual que ancho, así le agregué teipe y pegue este en frente, luego tomé cada palillo, los clave en el anime muy bien, acomodando cada uno a mi conveniencia y gusto.
After having the base and the candies ready it is time to assemble the arrangement, I started to place a candy that had no toothpick, because it was small, as well as wide, so I added teipe and glued this in front, then I took each toothpick, I nailed them in the anime very well, accommodating each one to my convenience and taste.
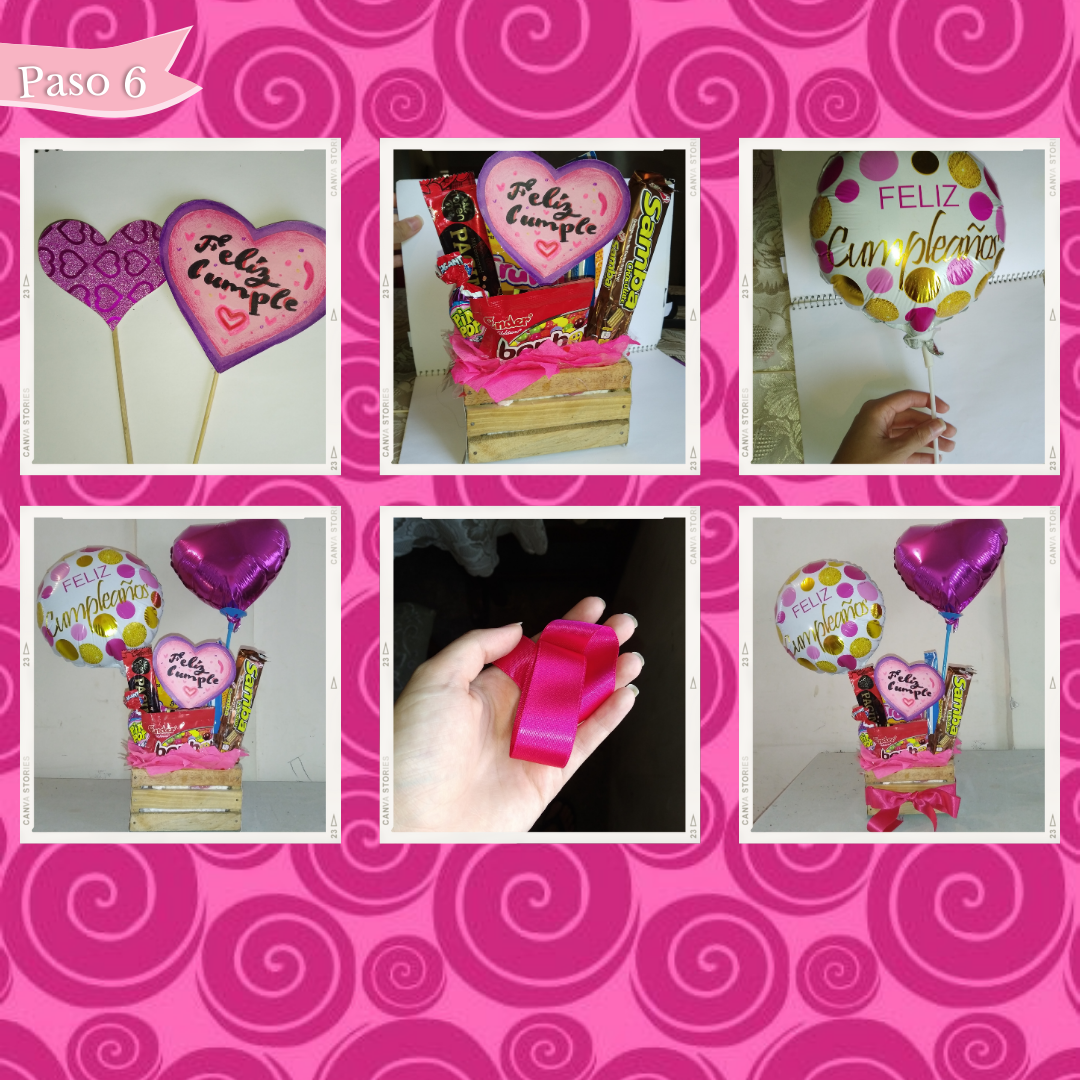
Paso 6:
Step 6:
Cómo último paso empezaremos pegando dos corazones en cartulina, uno con una frase de "Felíz Cumple" y el otro solo de cartulina decorada, después para terminar de decorar, tome dos globos, uno metalizado fugsia y el otro con la misma frase anterior, pero más larga, les puse un palito para globo y los clave en el arreglo acomodados, así para terminar y agregar un toque, tome la cinta de aproximadamente un metro, de color fugsia y hice un lazo en frente, rodeando la cajita.
As a last step we start gluing two hearts on cardboard, one with a phrase "Happy Birthday" and the other just decorated cardboard, then to finish decorating, I took two balloons, one metallic fugsia and the other with the same phrase above, but longer, I put a balloon stick and nailed them in the arrangement arranged, so to finish and add a touch, take the tape about a meter, fugsia color and made a bow in front, surrounding the box.
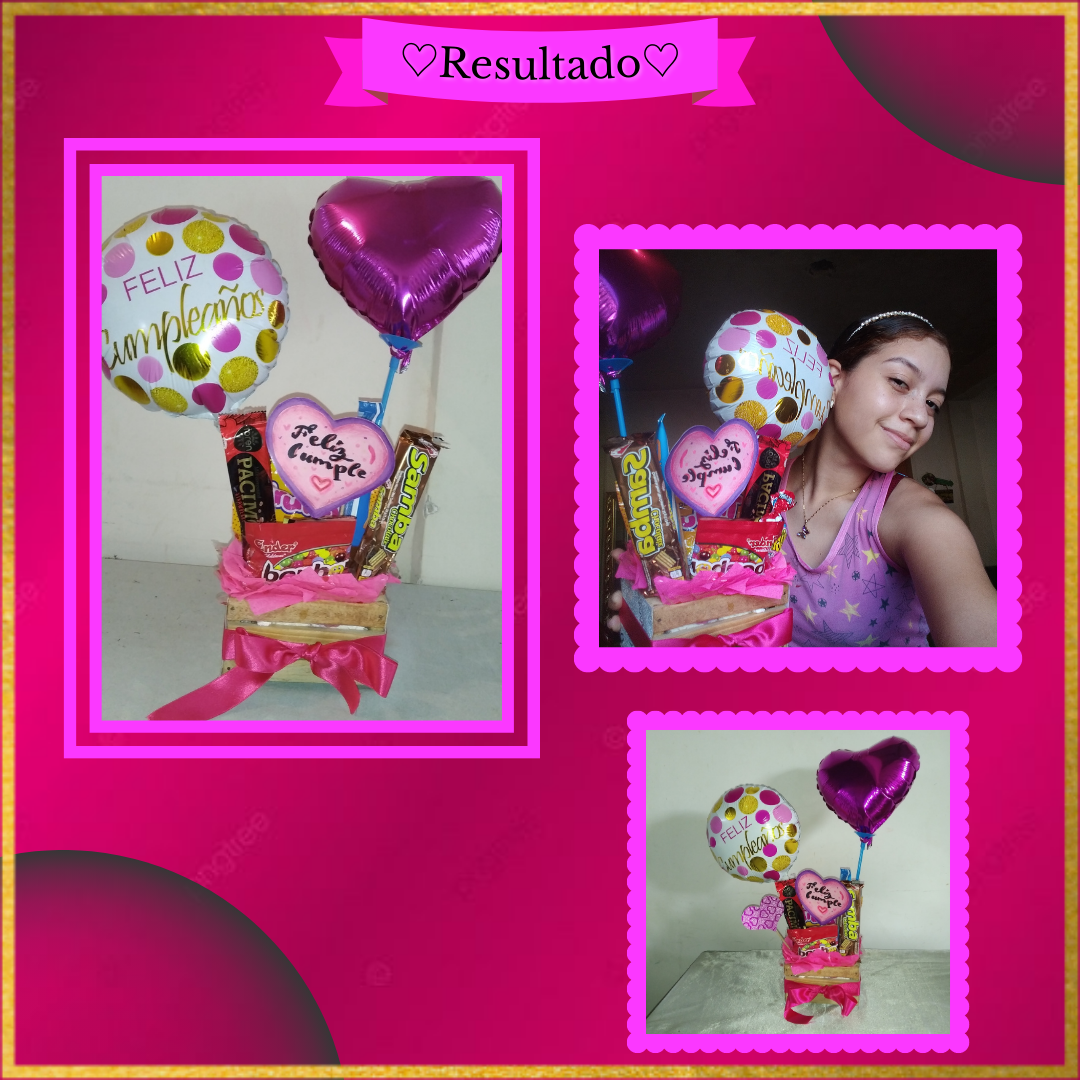
¡Y listo así de fácil y rápido tenemos nuestro espectacular arreglo, perfecto para regalar en cualquier ocasión, sencillo de hacer y especial, precisamente para regalar a nuestras personas especiales, lo mejor de todo es que lo podemos adaptar a nuestro presupuesto, hacerlo de las medidas que queramos y elegir el color a nuestra elección, también cabe señalar que no se lleva un gran presupuesto, variando el tamaño aún vale la pena hacerlos, así que espero y les sea de ayuda este tutorial que hice con mucho cariño.</div
And ready so easy and fast we have our spectacular arrangement, perfect for gifts on any occasion, simple to make and special, just to give to our special people, best of all is that we can adapt to our budget, make it of the measures we want and choose the color of our choice, also note that it does not take a big budget, varying the size is still worth doing, so I hope and be helpful this tutorial that I made with love.
Así culmina la manualidad del día de hoy, espero que les haya gustado tanto como a mí, y que les sea de gran utilidad para cualquier ocasión, les agradezco por leer y porsupuesto por estar una vez más junto a mí, en una nueva oportunidad y claramente en una nueva manualidad, un abrazo.
This is the end of today's craft, I hope you liked it as much as I did, and that it will be very useful for any occasion, I thank you for reading and of course for being with me once again, in a new opportunity and clearly in a new craft, a hug.
♡¡Gracias por leer! Hasta la próxima, queridos amigos de Hive.♡
♡Thanks for reading! Until next time, dear friends of Hive♡
Photos of my authorship taken from my Xiaomi Redmi 7 phone, edited in the free version of Canva.
Te quedo hermoso, es ideal para un detalle en cualquier ocasión, saludos gracias por compartir.
Muchas gracias 🥰💗, así es, para eso estamos, saludos igualmentemente y un abrazo también.💗
Que hermosa manualidad amiga, me ha encantado. Saludos, tu explicación está muy entendible.
Hola amiga 💗, me alegra demasíado gracias por tu comentario, un abrazo.✨💙