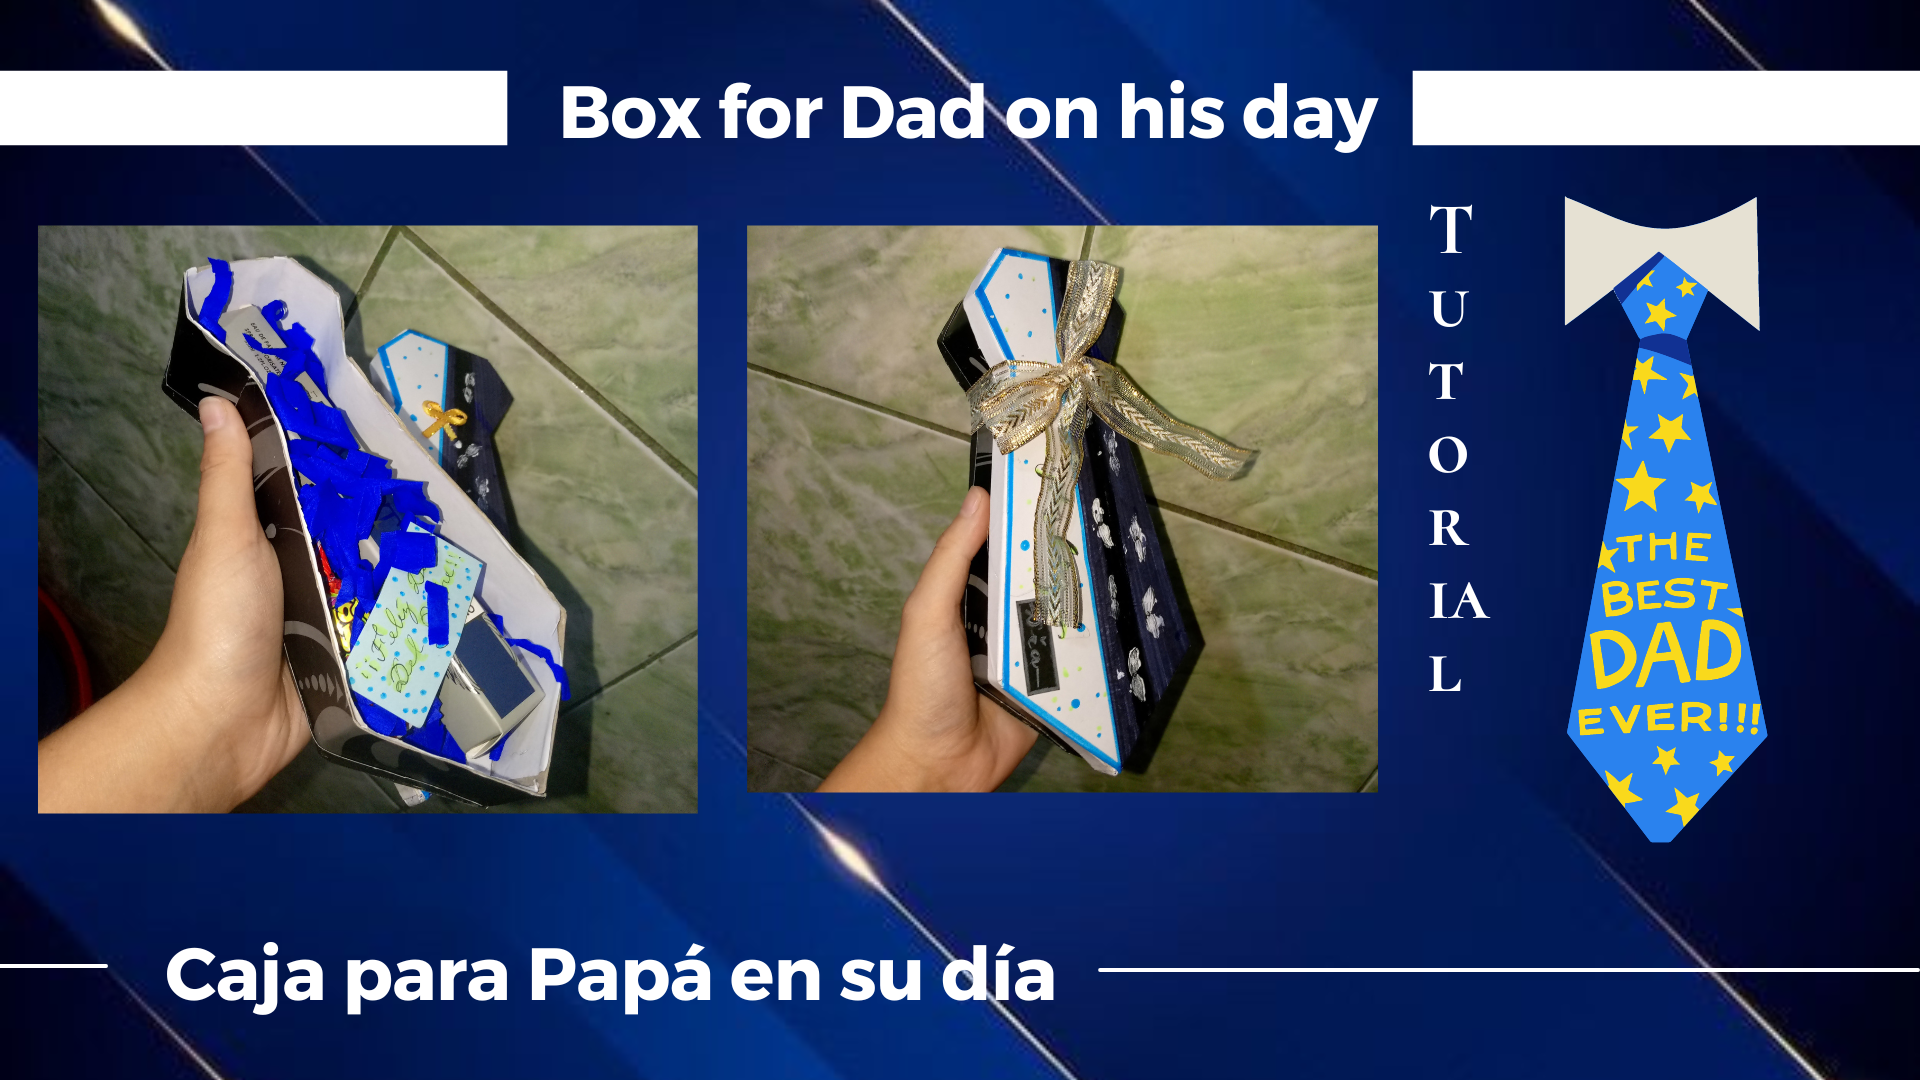
Te enseño como hacer una caja especial para el día del padre que te sacará de apuros - Regalo tarde, pero seguro 💙👔✨| Tutorial Paso a paso - Con materiales de reuso ♻️ [ESP-ENG]👨👧👦💙
Very good afternoon! For me it is a pleasure to share this wonderful day with you, accompanied by a new creative and punctually useful craft, so I wish first of all a happy day to all those fathers of the community and send you a big hug, late, but sure, I hope you have enjoyed your day to the fullest and that you are covered with blessings everywhere Happy Father's Day! Still, in general I also wish each of you an excellent day, full of happiness and lots of crafts, creativity, obviously also determination and desire to do things right.♡
En este día tan especial tengo el honor de traerles una manualidad respectivamente sencilla, pero verdaderamente hermosa, con la temática del día del padre en nombre de este día, está más que ideal para obsequiar a los queridos padres, porsupuesto les traigo el tutorial paso a paso, bien estructurado, al igual que fácil de entender para que puedan recrearlo a su manera incluso, lo que es mejor es que lo pueden hacer a sus gustos en ciertas partes y diversas cosas, es ideal para esas personas que aún deben el regalo del día del padre por ahí, porque más vale tarde, que nada JKKJSJS, lo importante es dar el detalle con amor.💙
On this special day I have the honor to bring you a craft respectively simple, but truly beautiful, with the theme of father's day on behalf of this day, it is more than ideal to give to the dear fathers, of course I bring you the tutorial step by step, well structured, as well as easy to understand so you can recreate it in your own way even, what is better is that you can make it to your tastes in certain parts and various things, it is ideal for those people who still owe the father's day gift out there, because better late, than nothing JKKJJSJS, the important thing is to give the detail with love. 💙
Me hubiese gustado compartir está manualidad con ustedes un poco antes, con más tiempo, pero no tengo internet, por lo tanto se me dificultó, aún así llegó a última hora, tarde, pero seguro, tal vez sea un poco ideal para esas personas que no han preparado nada aún, necesitando algo hermoso, fácil, rápido y con las tres "b", bueno, bonito y barato, en este sentido hablo de un empaque que cumple perfectamente estás características, que de seguro te sacará de apuros, con material reciclado que lo más probable es que tengas en casa.
I would have liked to share this craft with you a little earlier, with more time, but I don't have internet, so it was difficult, even so it arrived at the last minute, late, but sure, maybe it is a little ideal for those people who have not prepared anything yet, needing something beautiful, easy, fast and with the three "b", good, nice and cheap, in this sense I speak of a packaging that perfectly meets these characteristics, which will surely get you out of trouble, with recycled material that most likely you have at home.
Agregando un poco de información adicional, les menciono que mi mayor inspiración para está manualidad fue simplemente El Día del Padre, ya que en está celebración predomina todo decoración con bigotes o corbatas, representando al hombre de la casa, así adapte este diseño a una caja del tamaño que se me hizo más cómodo, ideal para un regalo especial, ahora bien, sin más que agregar, les mencionaré los materiales con los que vamos a trabajar en esta ocasión.
Adding a little additional information, I mention that my biggest inspiration for this craft was simply Father's Day, since this celebration is dominated by all decorations with mustaches or ties, representing the man of the house, so I adapted this design to a box of the size that was more comfortable, ideal for a special gift, now, without further ado, I will mention the materials with which we will work on this occasion.
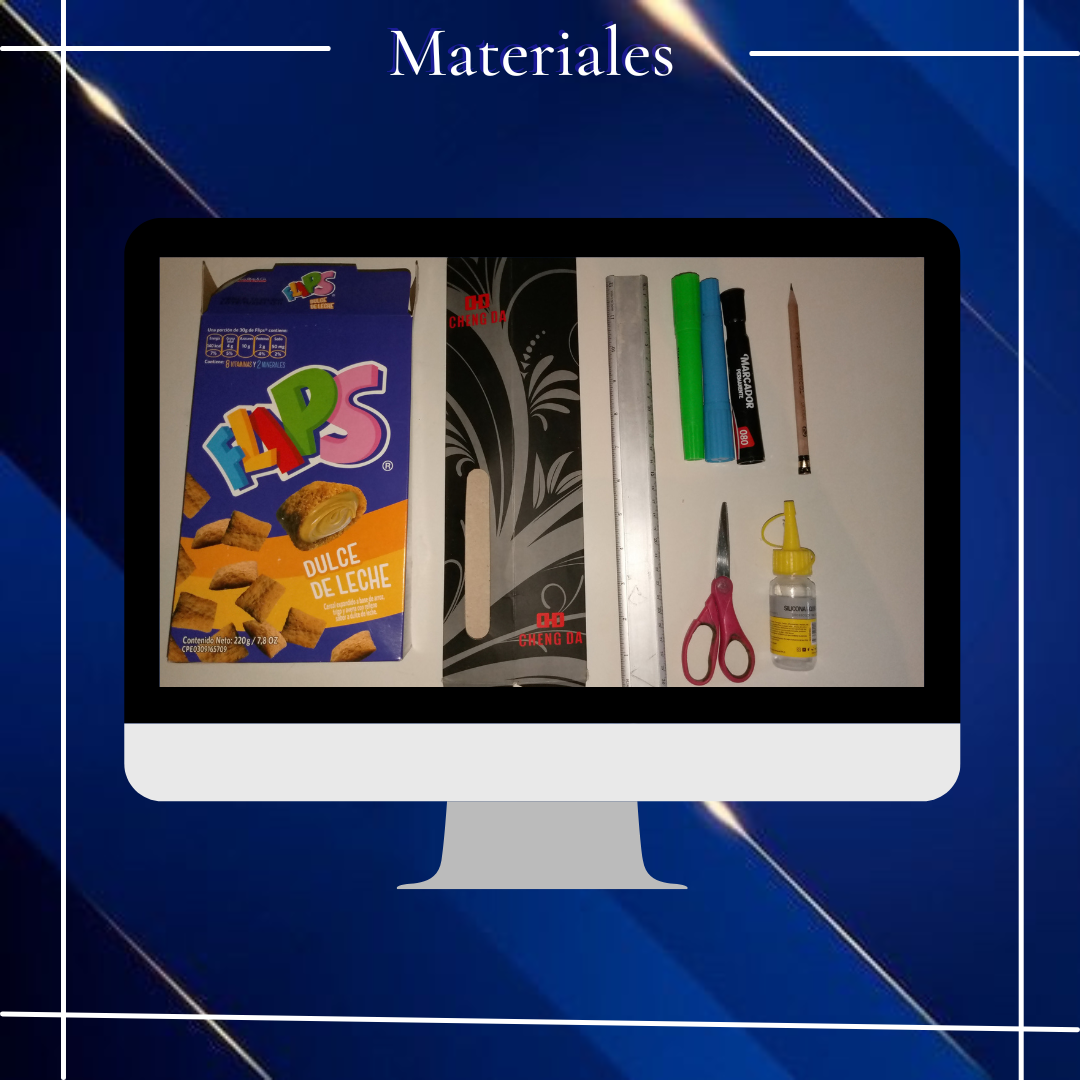
♡Materials♡
- Cartón
- Cartulina
- Silicón
- Cinta
- Lápiz
- Regla
- Tijeras
- Marcadores
- Cardboard
- Cardboard
- Silicone
- Tape
- Pencil
- Ruler
- Scissors
- Markers
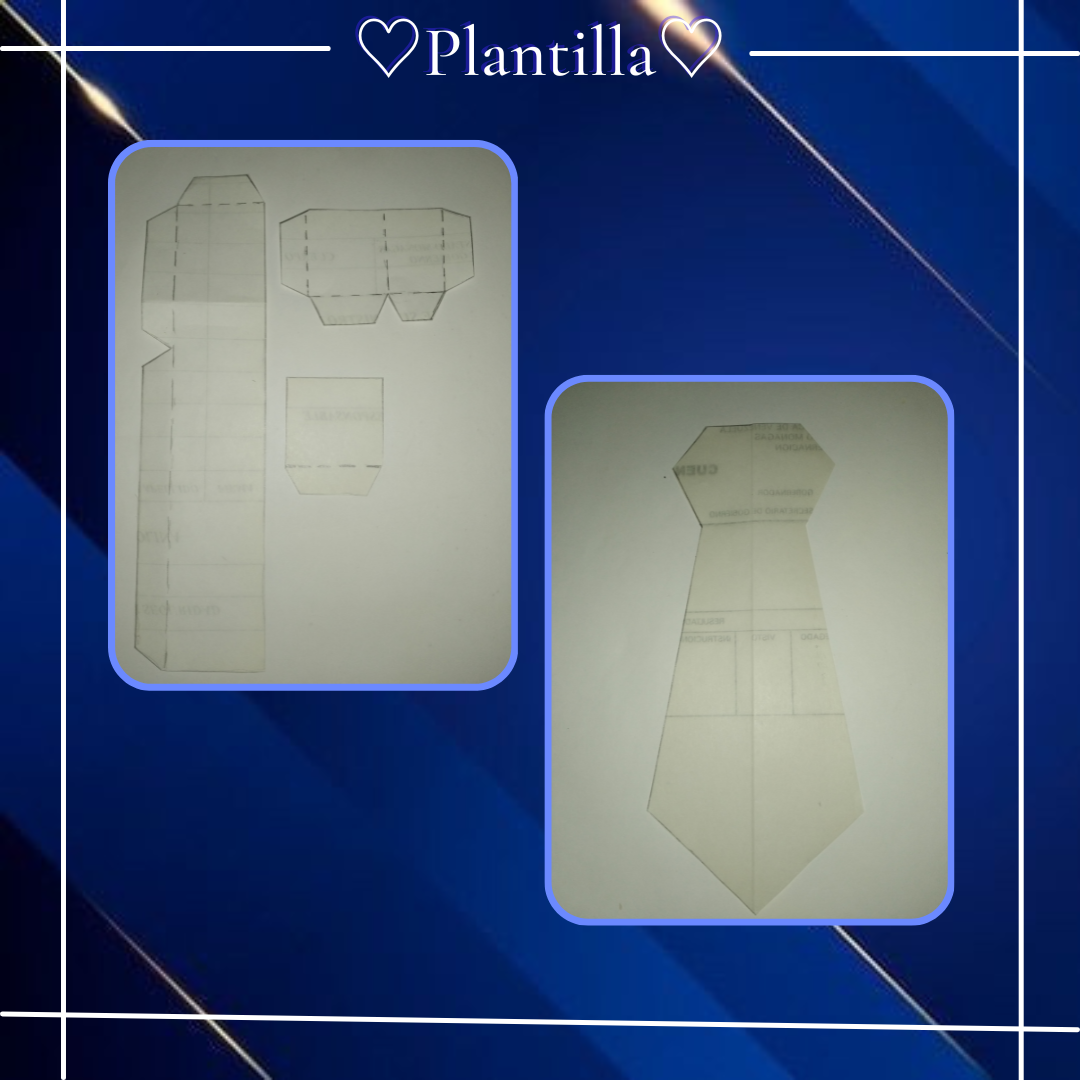
♡♡Template♡♡
Vamos a marcar está plantilla dos veces, uno para la base y otra para la tapa, así en cada uno haremos la mitad al derecho y la otra mitad al revés, para que coincida con el armado de la pieza.
We are going to mark this template twice, once for the base and once for the lid, so in each one we will make half of it right side up and the other half upside down, to match the assembly of the piece.
Seguidamente les muestro el paso a paso a continuación:
I will show you the step by step below:
♡Step by Step♡
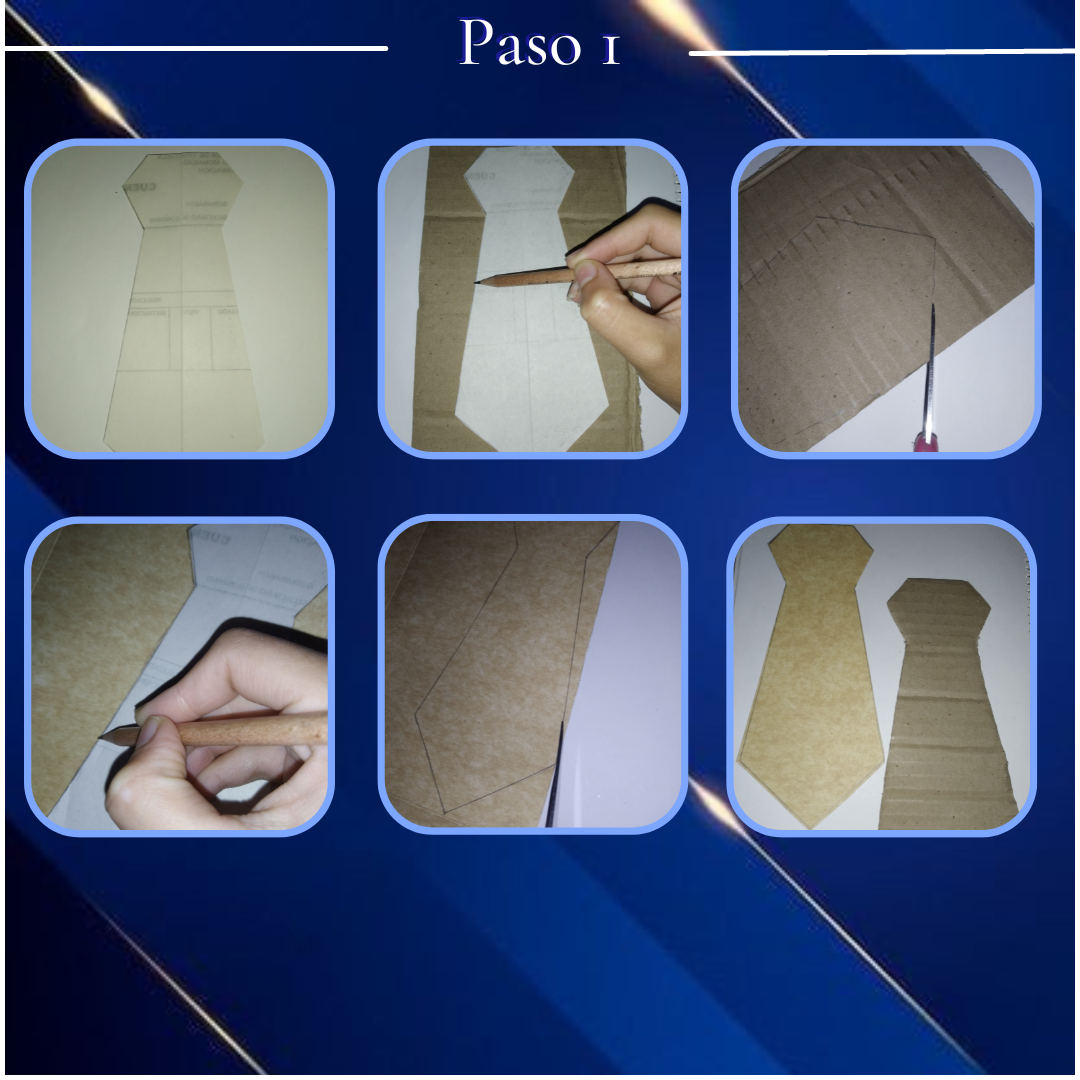
Paso 1:
Step 1:
Empezando tomaremos primeramente un cartón grueso de preferencia para la base y otro más delgado y flexible para la tapa de la caja, así tomaremos nuestra plantilla de una simple corbata (se las dejaré arriba) para posicionar, al igual que acomodar está encima del cartón, marcaremos con un lápiz todo el contorno en uno, en el otro (el más delgado) vamos a marcar un poco por fuera de la línea, solo unos pocos milímetros para que quede bien la tapa, luego recortamos con cuidado y como resultado obtendremos dos piezas, una en cartón grueso y el otro en el fino.
First we will take a thick cardboard preferably for the base and another thinner and more flexible for the lid of the box, so we will take our template of a simple tie (I'll leave them above) to position, as well as accommodate is on top of the cardboard, we will mark with a pencil all the contour in one, in the other (the thinner one) we will mark a little outside the line, just a few millimeters to fit the lid, then we cut carefully and as a result we will get two pieces, one in thick cardboard and the other in the thinner one.
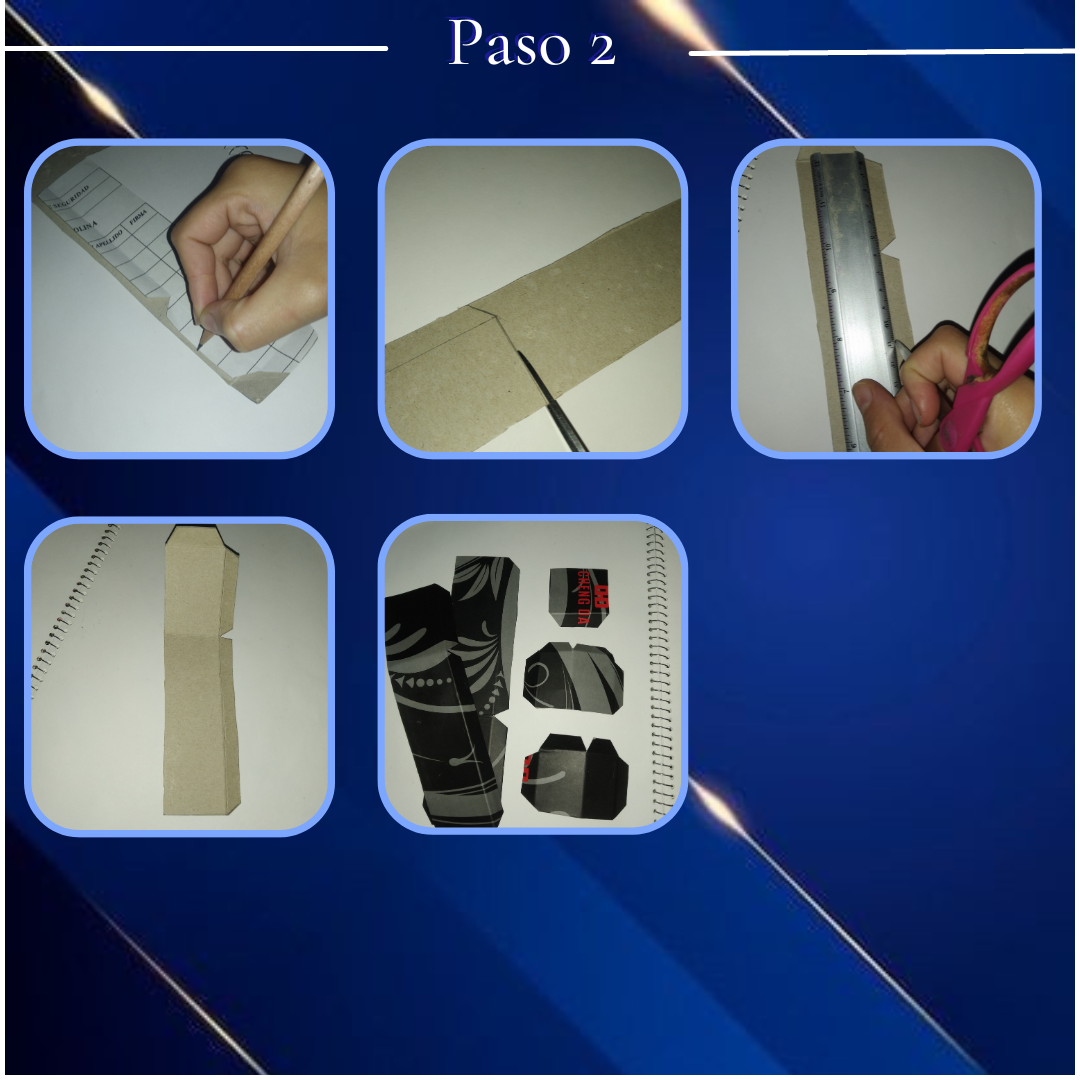
Paso 2:
Step 2:
Ahora vamos a tomar nuestras tres piezas restantes, repitiendo el proceso anterior, pero estos si todos en cartón delgado, después de tener todas las piezas bien marcadas y recortadas nos vamos a apoyar de una regla, así con la ayuda del filo de una tijera proseguiremos a remarcar cada dobles cuidadosamente guiandonos con esta, de igual manera haremos con cada una de las piezas restantes que tenemos.
Now we are going to take our three remaining pieces, repeating the previous process, but these if all in thin cardboard, after having all the pieces well marked and cut we are going to support of a rule, so with the help of the edge of a scissors we will continue to mark each double carefully guiding us with this, in the same way we will do with each of the remaining pieces that we have.
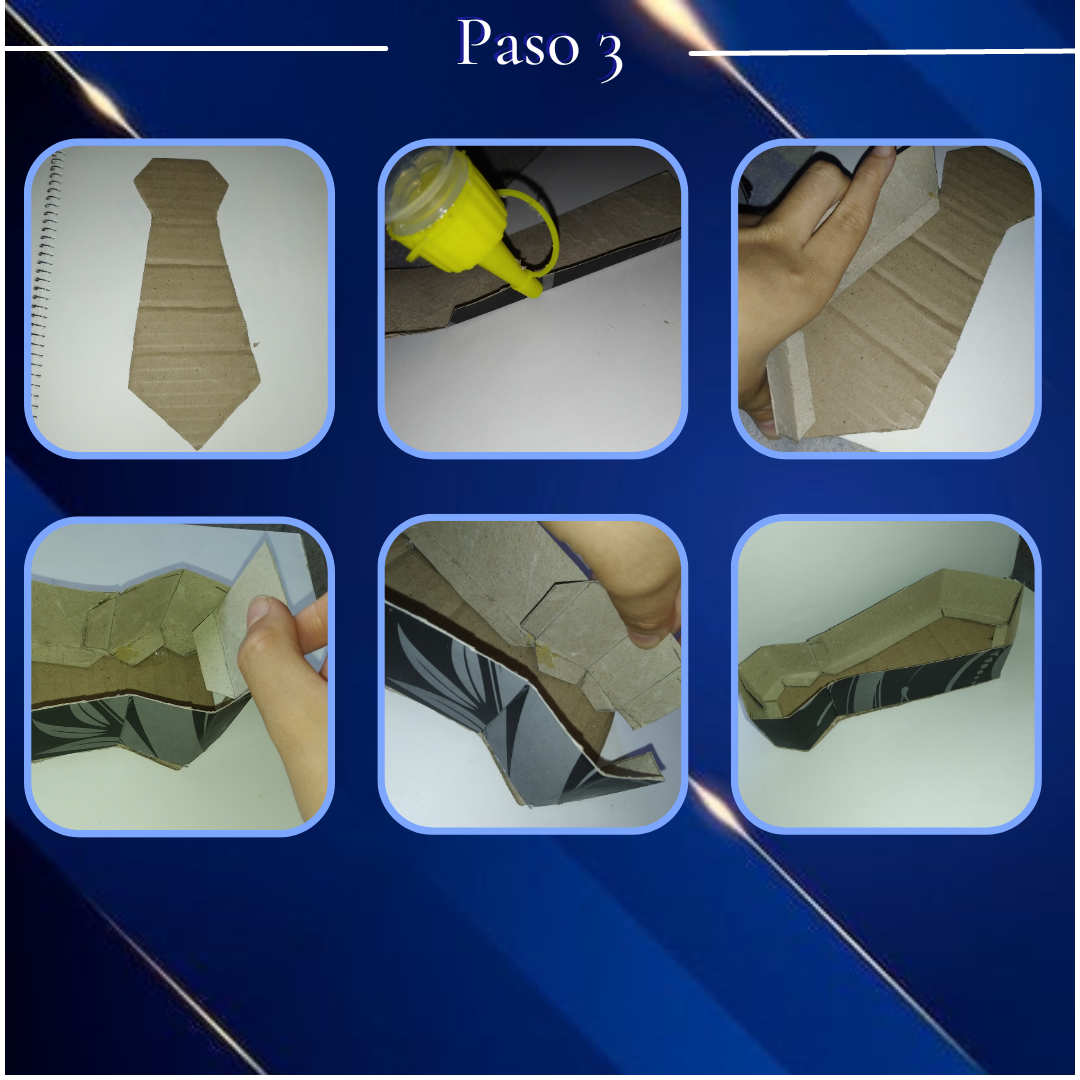
Paso 3:
Step 3:
Al tener las piezas sacadas, se pueden empezar a forrar con cartulina o con el papel de nuestra preferencia, en este caso yo no lo hice porque el cartón reciclado que tenía ya tenía un diseño, por lo que me cayó del cielo. Ahora procedemos a armar la base, tomaremos nuestro cartón más grueso de base, seguidamente tomaremos la pieza más larga, así le agregaremos silicón a las solapas y comenzaremos pegando desde la parte de abajo, guiandonos del dobles, luego tomaremos las piezas pequeñas y repetimos, colocaremos en la parte de arriba que sigue, a cada lado, haciendo que coincida el tamaño de los bordes, por último la solapa alargada la acomodamos en la parte restante y ya tendríamos la base armada.
Once we have the pieces out, we can start lining them with cardboard or with the paper of our preference, in this case I didn't do it because the recycled cardboard I had already had a design, so it fell out of the sky. Now we proceed to assemble the base, we will take our thicker cardboard base, then we will take the longest piece, so we will add silicone to the flaps and start gluing from the bottom, guided by the doubles, then we will take the small pieces and repeat, we will place on the top part that follows, on each side, matching the size of the edges, finally the elongated flap we accommodate it in the remaining part and we would have the base assembled.
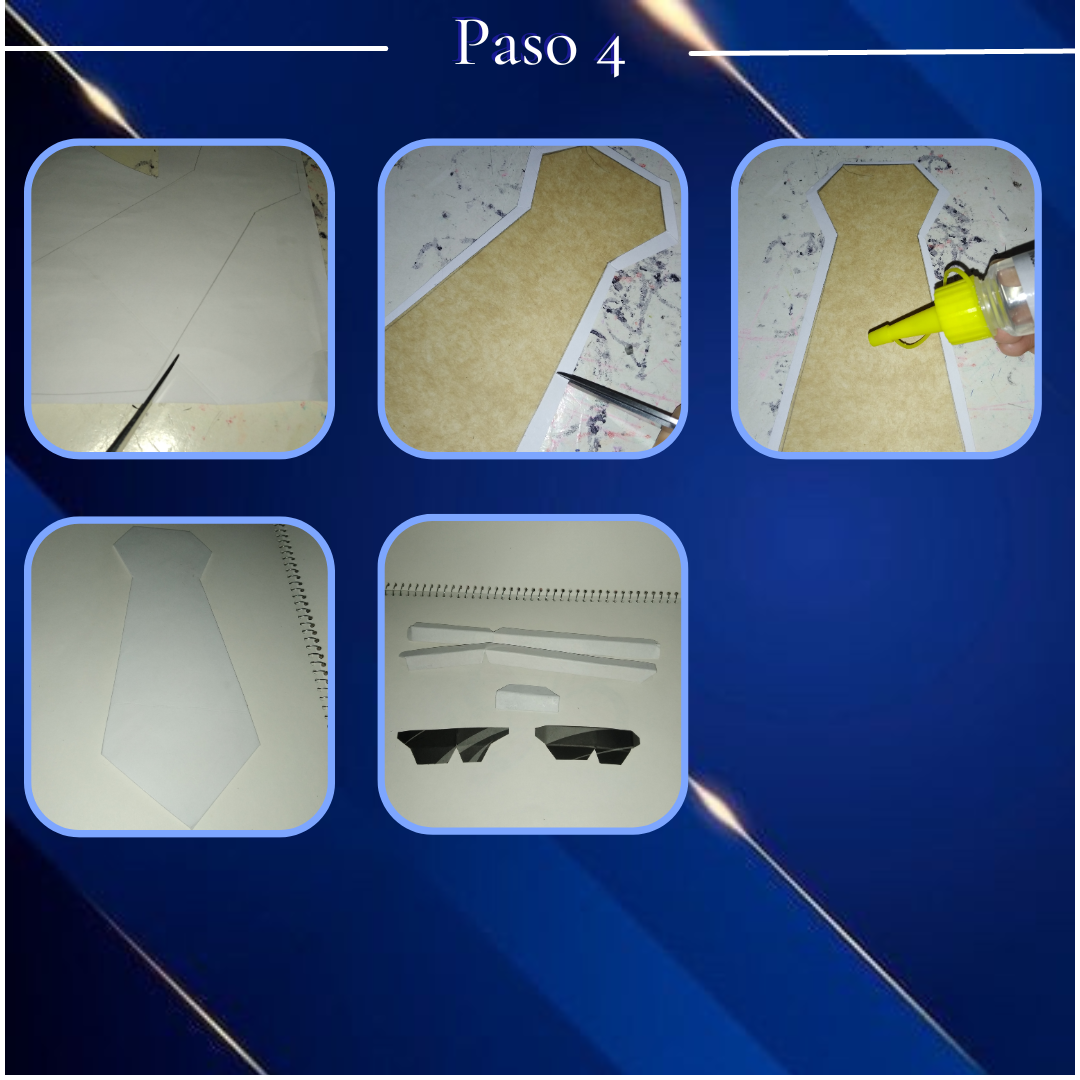
Paso 4:
Step 4:
Seguimos con la tapa, tomamos cada pieza en cartón fino, para proceder a forrar cada una, de manera que debemos recortar la pieza en la cartulina o en el papel con un borde un poco más grande, ya sea de 1cm o más, para luego cortar de forma recta teniendo como límite la figura de cartón, después agregamos silicón a estás y las pegamos de la parte de adentro, así haremos con cada una de las piezas hasta terminar.
We continue with the lid, we take each piece in thin cardboard, to proceed to cover each one, so we must cut the piece in the cardboard or paper with a slightly larger edge, either 1cm or more, then cut straight having as a limit the cardboard figure, then add silicone to these and glue them from the inside, so we will do with each of the pieces to finish.
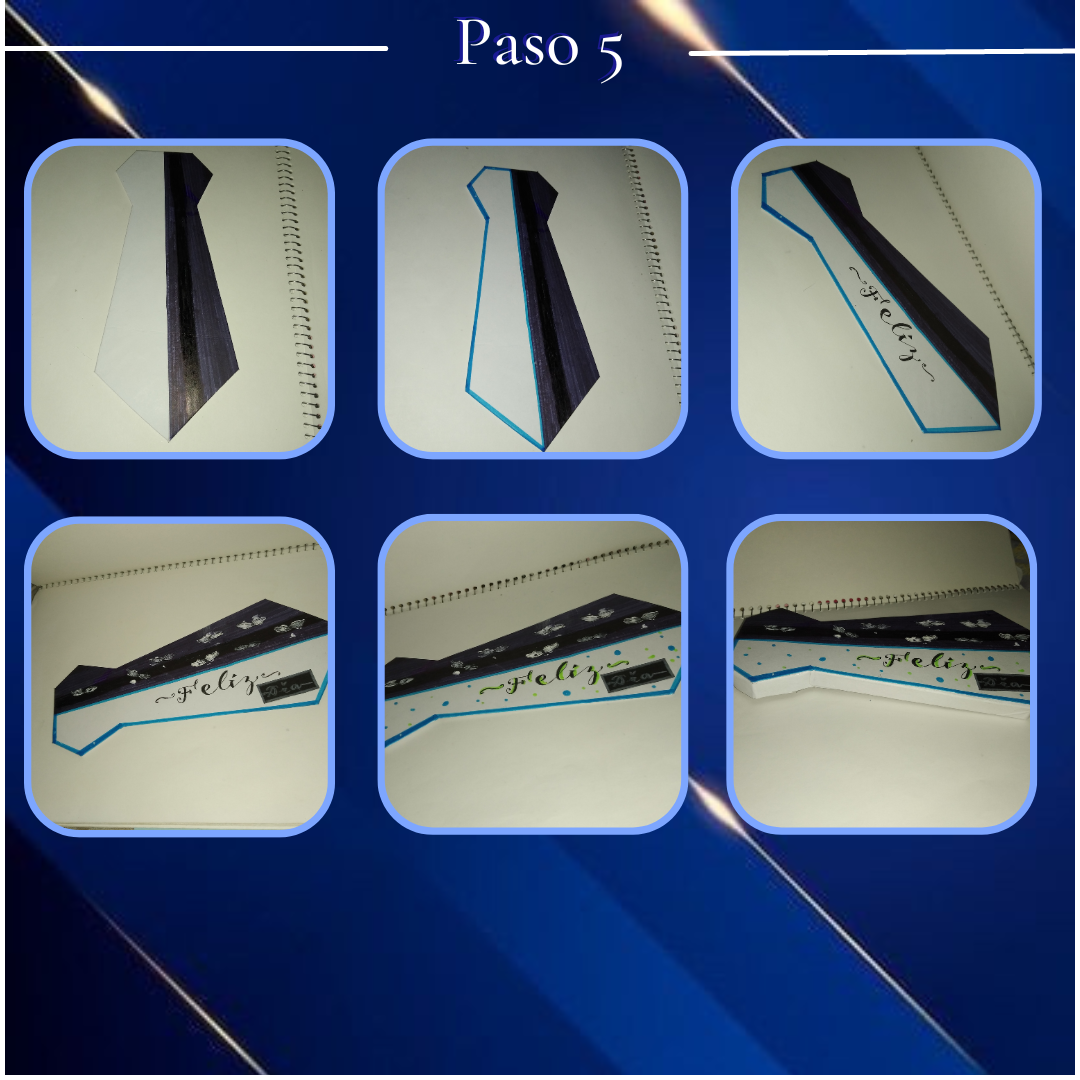
Paso 5:
Step 5:
Antes de armar la tapa vamos a decorar, ya que se nos hace más fácil en este momento que sigue totalmente plana, para está decoración primero hice una línea recta justo a la mitad de la corbata, luego me apoye de una regla, para empezar a marcar con un marcador negro azulado toda la mitad, de inmediato marque el borde del lado restante con resaltador azul claro, por consiguiente escribí la frase "Felíz" con lapicero negro, también le pegue "Día" en un trozo de cartulina negra, para añadir los toques finales marque unos bigotes en el lado negro de una manera un poco abstracta con pintura blanca y con los resaltadores agregué puntos y decoraciones extras, luego de todo eso se le agrega el borde y ya.
Before assembling the cover we are going to decorate it, since it is easier for us at this time that is still completely flat, for this decoration I first made a straight line right in the middle of the tie, then I used a ruler to start marking with a bluish black marker all the half, immediately I marked the edge of the remaining side with light blue highlighter, then I wrote the phrase "Happy" with a black pen, I also glued "Day" on a piece of black cardboard, to add the final touches I marked some whiskers on the black side in a little abstract way with white paint and with the highlighters I added dots and extra decorations, after all that I added the border and that's it.
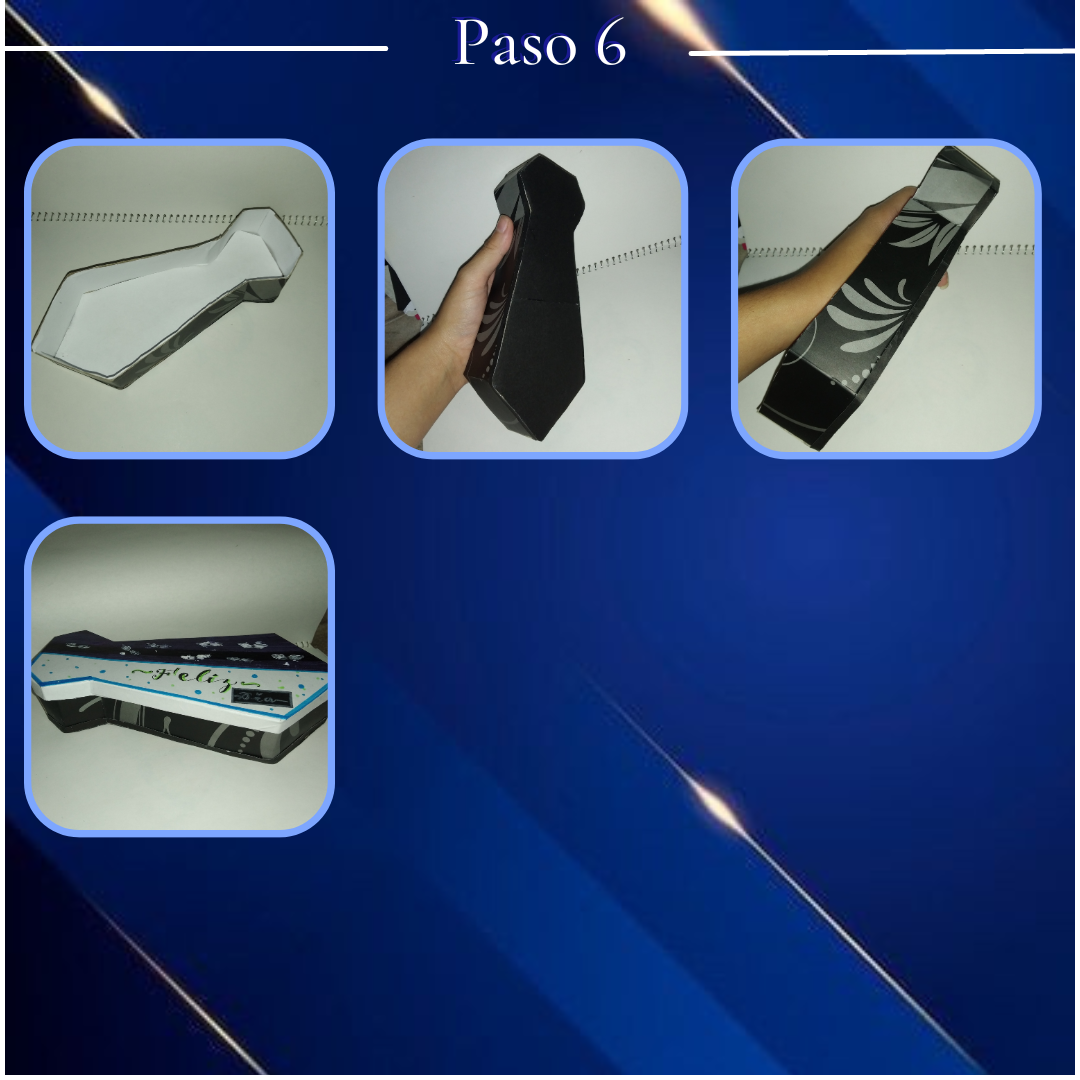
Paso 6:
Step 6:
Para terminar con está manualidad agregaremos pequeños detalles, así se forra completamente la parte de adentro de la base con cartulina o el papel que queramos, e igualmente con la tapa, además forre la parte de abajo de la base con cartulina negra, después con la misma cartulina hice una pequeña tira para tapar el borde de cartón que quedaba y ya estaría.
To finish this craft we will add small details, so the inside of the base is completely lined with cardboard or the paper we want, and likewise with the lid, I also lined the bottom of the base with black cardboard, then with the same cardboard I made a small strip to cover the edge of cardboard that was left and it would be ready.
Así culminamos con la manualidad de hoy, muy sencilla, pero especial para regalar el día de hoy, es una buena opción, ideal para personalizar a nuestro gusto y adaptar al tamaño de nuestra preferencia, al igual que necesidad, así espero que les sea útil y que les haya gustado tanto como a mi, a mí me encantó totalmente el resultado, parece comprada incluso. Sin más que añadir, les deseo un Felíz Día, que disfruten de este día del padre, saludos y un abrazomu gente querída.
So we culminate with today's craft, very simple, but special to give away today, it is a good option, ideal to customize to our taste and adapt to the size of our preference, as well as need, so I hope you find it useful and that you liked it as much as I did, I totally loved the result, it seems even bought. Without further ado, I wish you a Happy Father's Day, enjoy this Father's Day, greetings and a hug my dear people.
♡¡Gracias por leer una vez más!♡
♡Thank you for reading once again!♡
Photos of my authorship taken from my Xiaomi Redmi 7 phone, edited in the free version of Canva.
🥰❤️
Te quedó genial esa cajita un lindo detalle para regalar en este día especial
Me gustó tanto, ojalá se me hubiera ocurrido una idea tan Linda
Muchas gracias amiga, saludos.💜