Tarjeta con temática del espacio - Personalizada✨🌌 | Paso a Paso 👣🚀 [ESP-ENG]
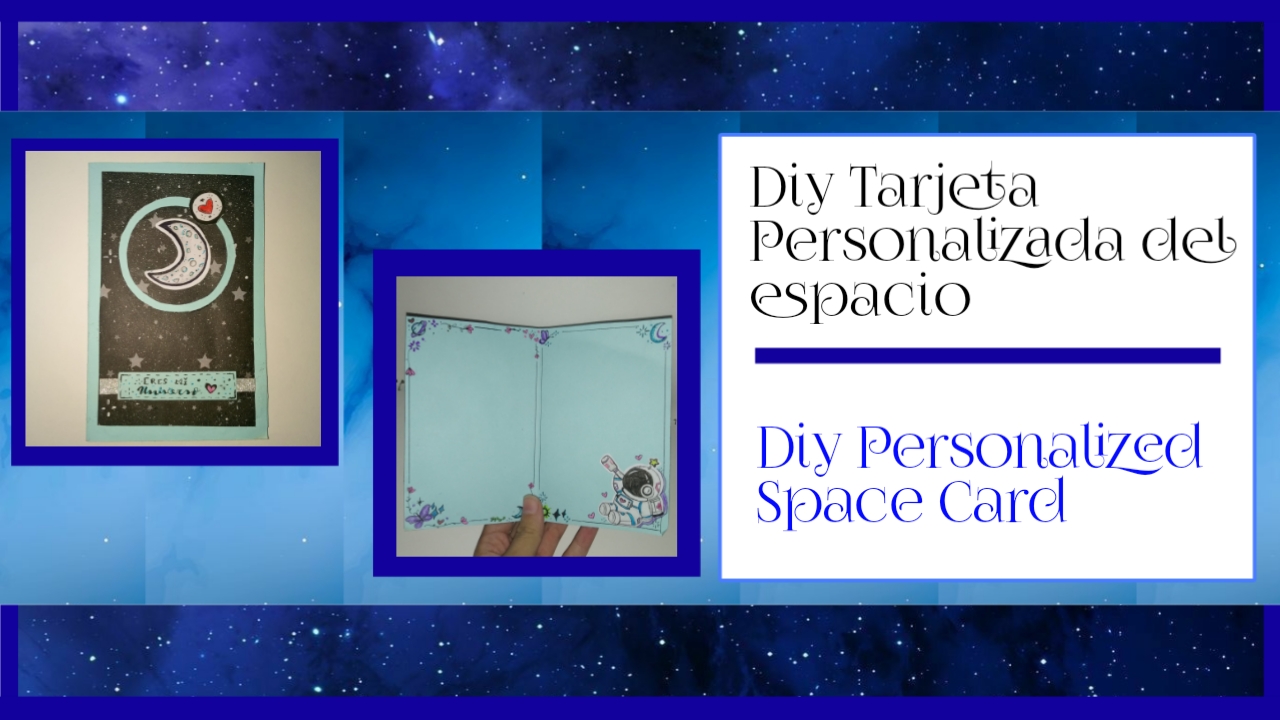
A continuación les mostraré siempre, un paso a paso sencillo de recrear, para hacer una hermosa tarjeta llena de amor, ideal para obsequiar a nuestras personas especiales, más aún si estos les gusta el universo, los planetas, lo astronautas, las estrellas y todo lo que tenga que ver con ello. Es un detalle muy simple, pero bonito, el cuál puede perfectamente ser, acompañante de cualquier regalo, para hacerlo aún más especial y personalizado, está increíble para impresionar a todos esos amantes del universo y sus maravillas, así que acompañenme a realizarla.♡
Next I will show you always, a simple step by step to recreate, to make a beautiful card full of love, ideal to give to our special people, even more if they like the universe, planets, astronauts, stars and everything that has to do with it. It is a very simple, but nice detail, which can perfectly be, accompanying any gift, to make it even more special and personalized, it is amazing to impress all those lovers of the universe and its wonders, so join me to make it.♡
Entonces, con mucho gusto, enseguida les mostraré todo el proceso y sus materiales.
Then, I will be happy to show you the whole process and its materials in a moment.
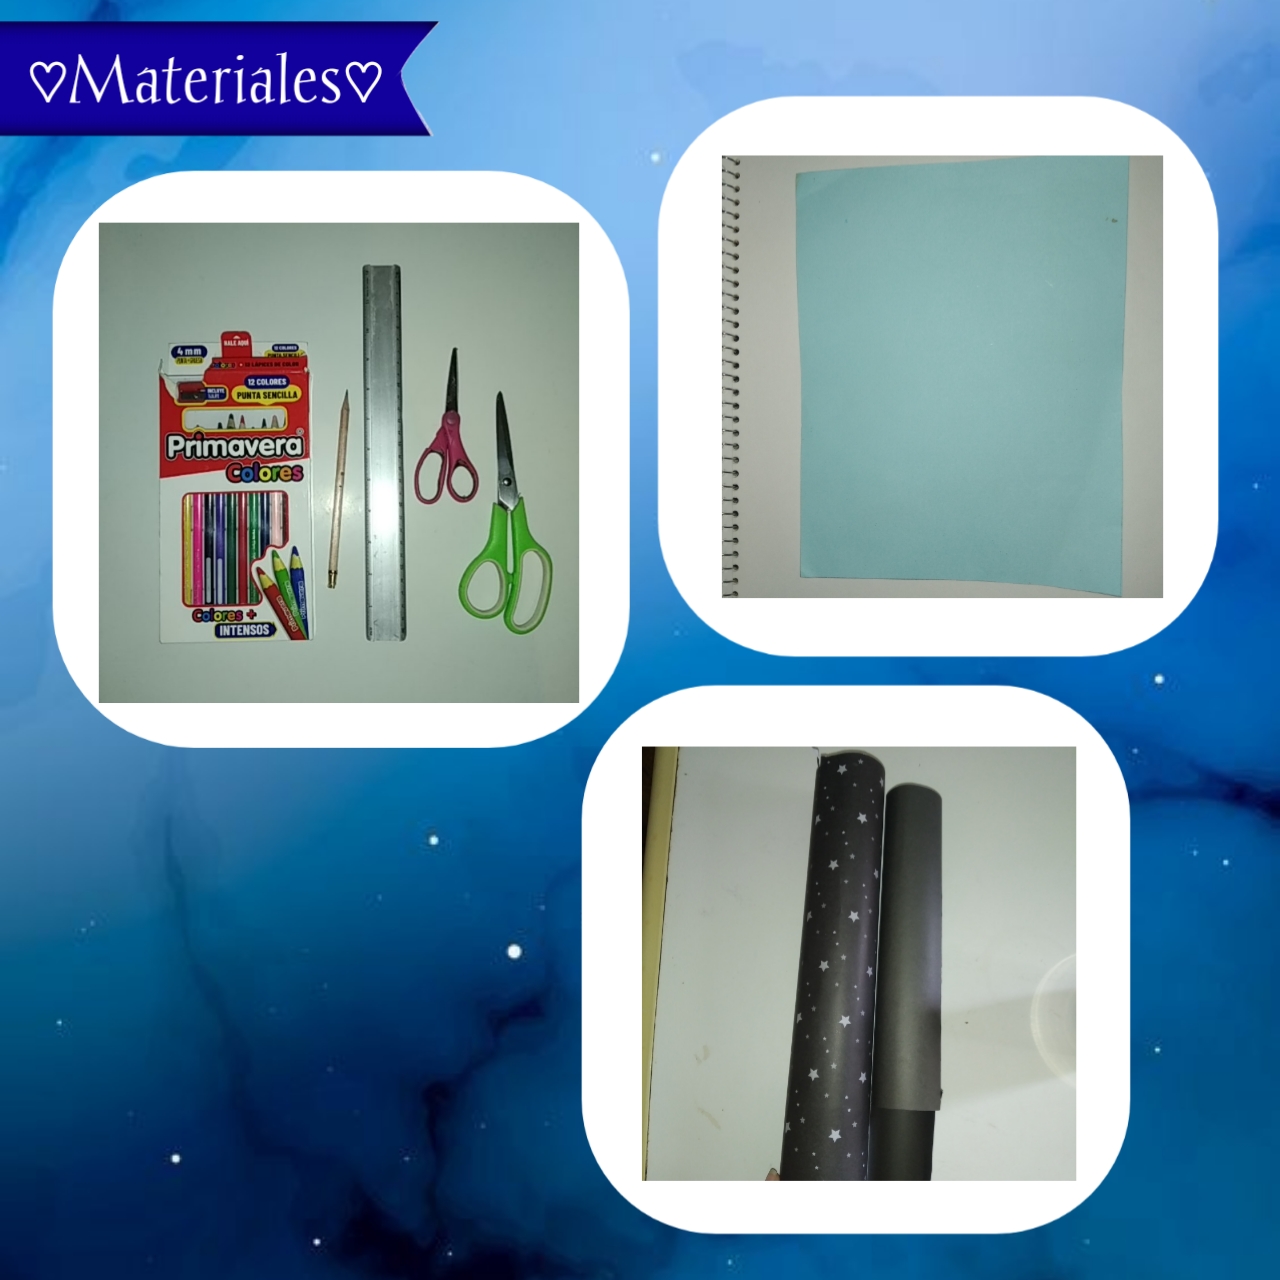
✍️✨Materials✨✍️
- Cartulinas
- Tijera
- Regla
- Lápiz
- Colores
- Cardboard
- Scissors
- Ruler
- Pencil
- Colors
♡Step by Step♡
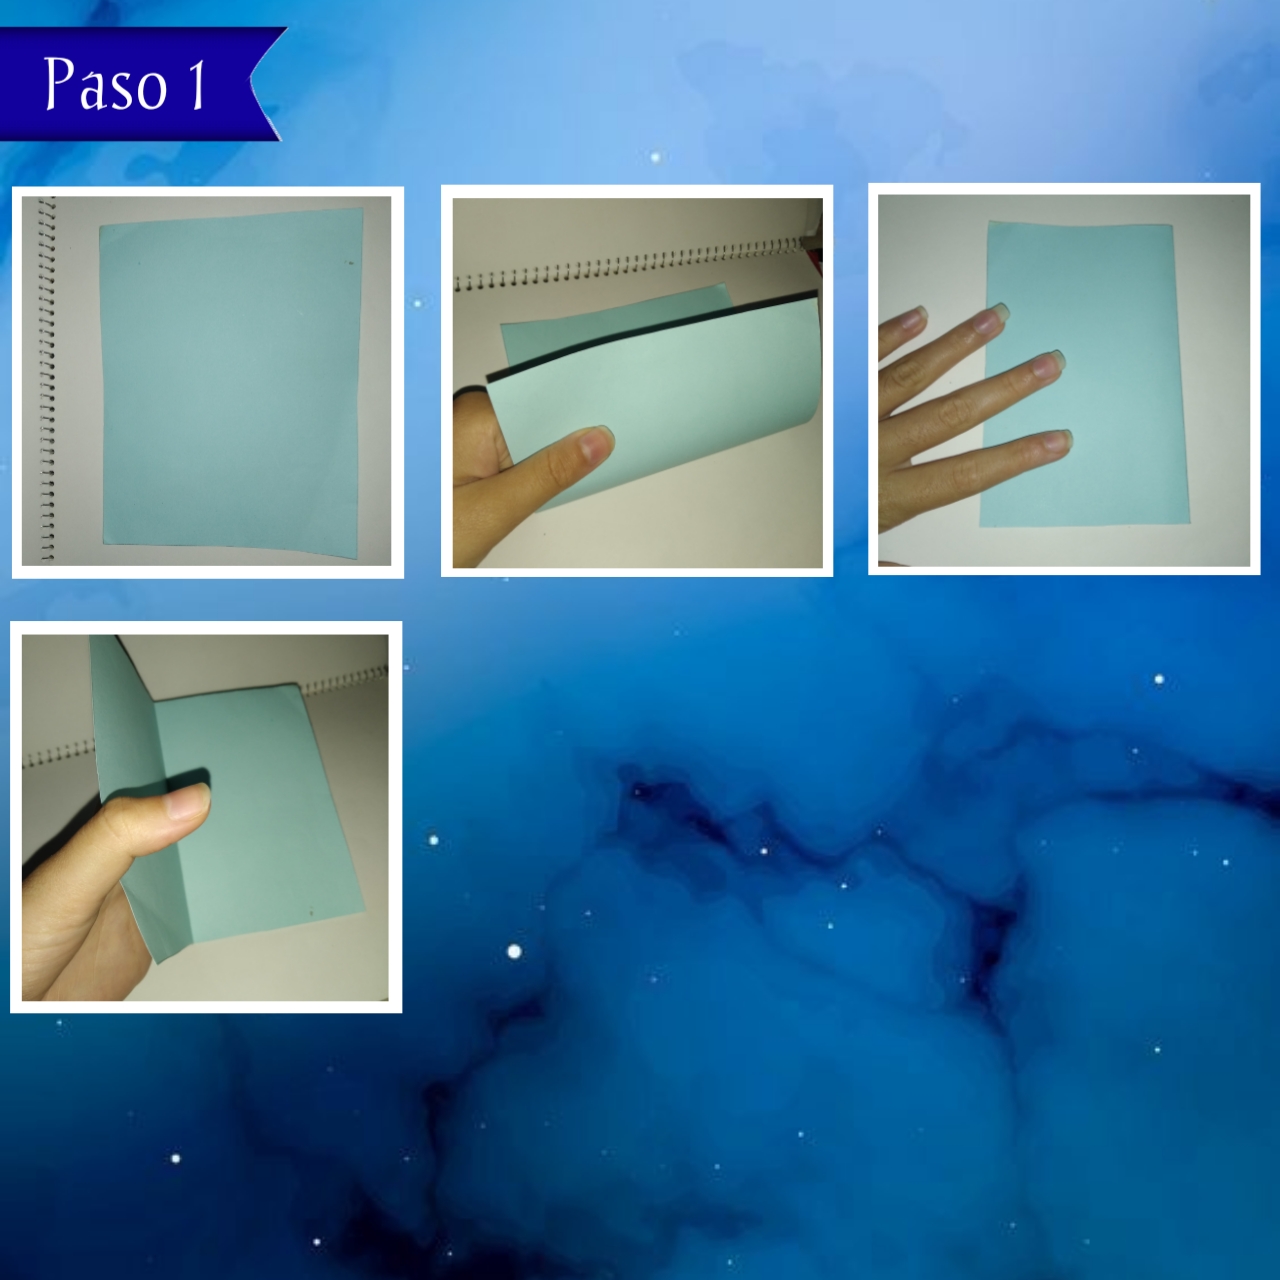
Paso 1:
Step 1:
Para comenzar tomaremos una cartulina preferiblemente unicolor (del color que gusten), recortando de la medida que quieran en este caso yo recorte está con la medida de 19 cm de largo x 14 cm de ancho, luego doblaremos justamente a la mitad, tomando ambas esquinas de un lado y llevando estás hacia a la otra, aplicando presión aplastamos con nuestra mano hasta marcar bien y así terminamos el primer paso.
To begin we will take a cardboard preferably unicolor (the color you like), cutting the size you want in this case I cut is with the measure of 19 cm long x 14 cm wide, then we will fold just in half, taking both corners on one side and taking these to the other, applying pressure crush with our hand to mark well and so we finished the first step.
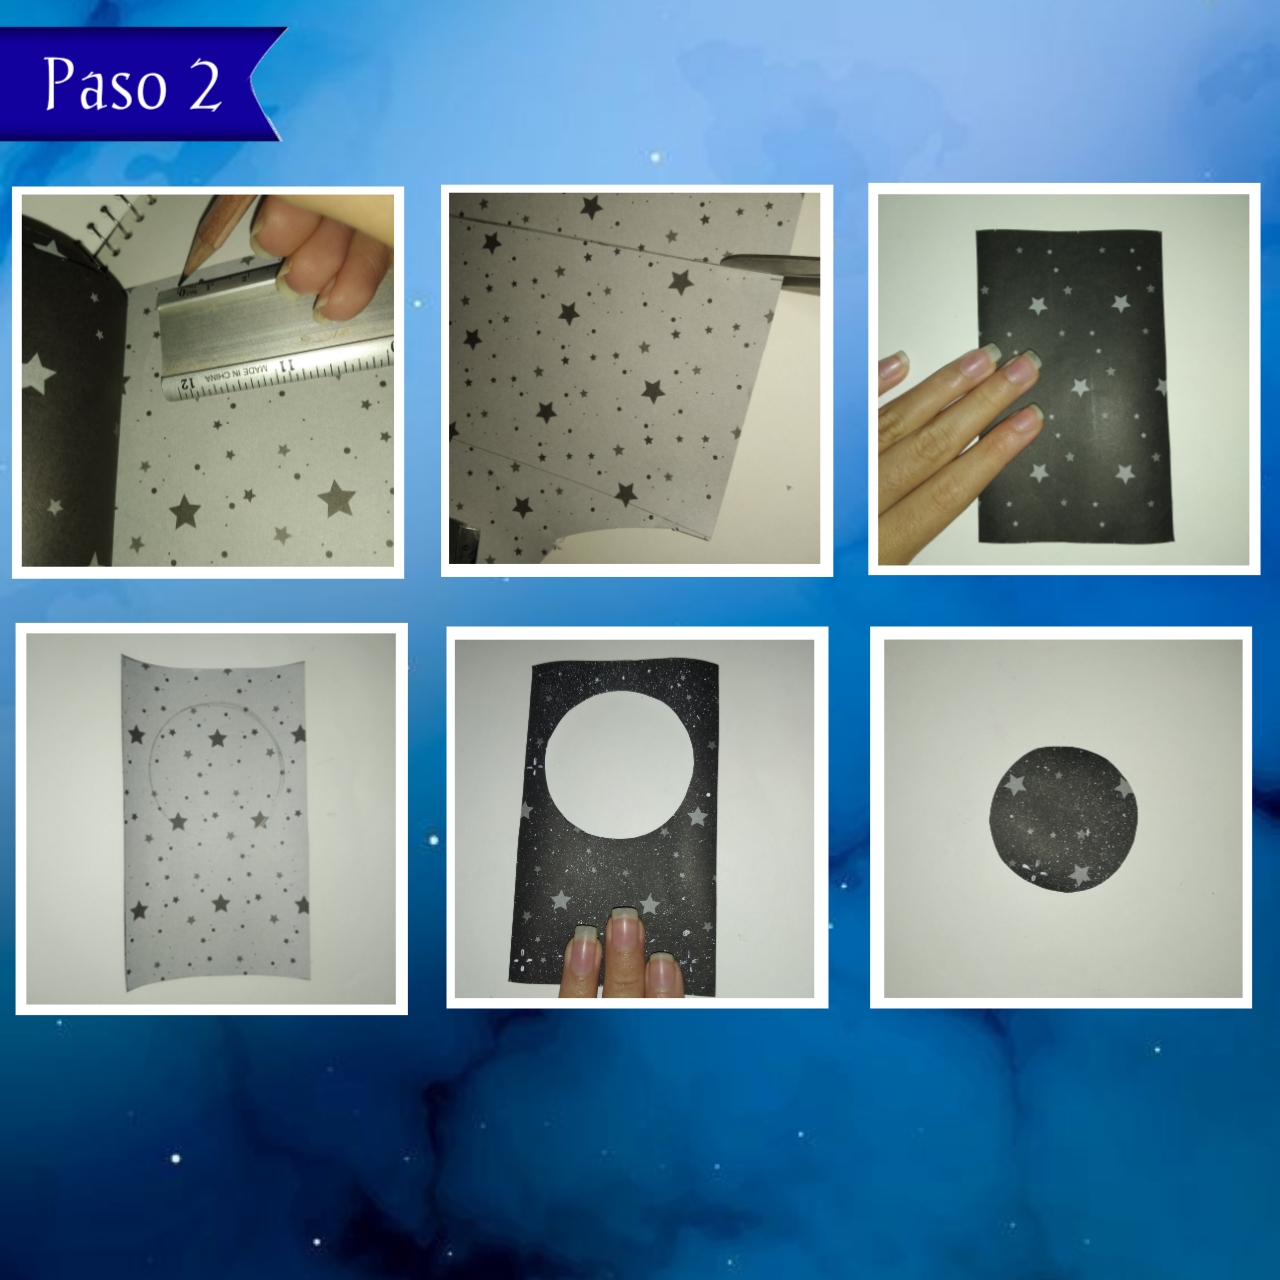
Paso 2
Step 2:
Ahora tome una cartulina decorada con estrellas, de está marque y después recorte un rectángulo con un centímetro (1cm) menos de cada lado de la cartulina, teniendo como referencia unas sola cara, es decir, la mitad del rectángulo anterior, quedando un pequeño rectángulo de exactamente 8.5 cm de largo, por 6 cm de ancho. A continuación, centre un círculo un poco hacía arriba en el medio, lo marque y con una tijera lo recorté con cuidado y aparte el círculo que quedó.
Now take a cardboard decorated with stars, mark it and then cut out a rectangle with one centimeter (1cm) less on each side of the cardboard, taking as reference only one side, that is, half of the previous rectangle, leaving a small rectangle exactly 8.5 cm long by 6 cm wide. Next, center a circle a little upwards in the middle, mark it and with a scissors I carefully cut it out and set aside the remaining circle.
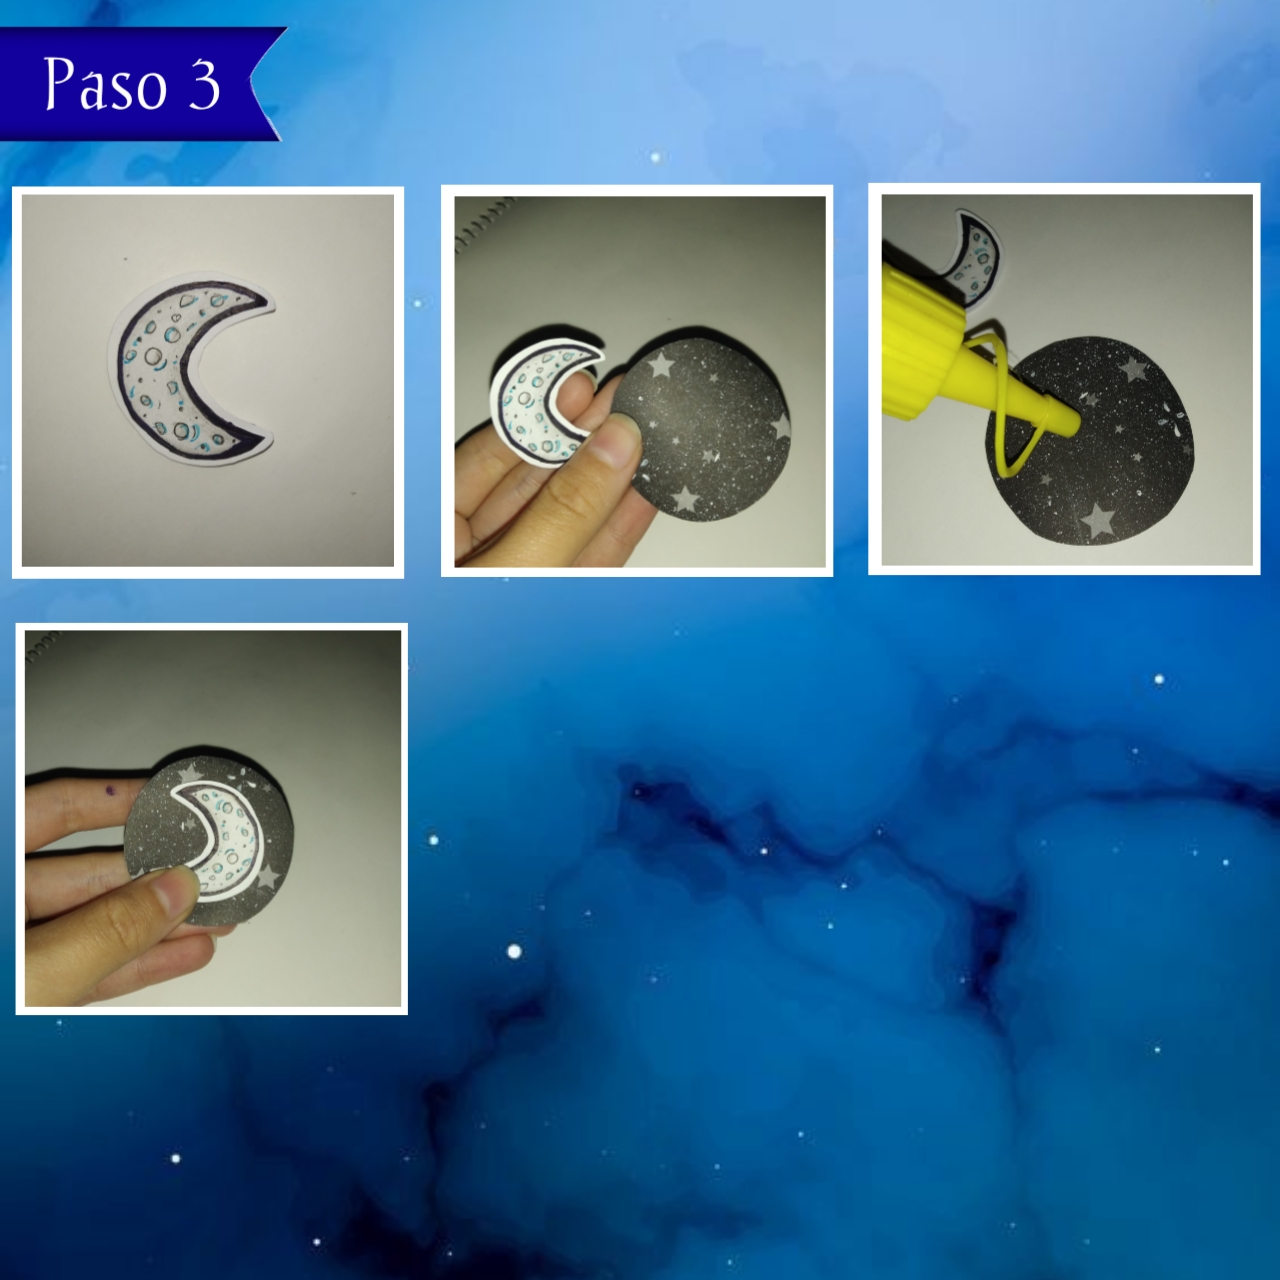
Paso 3:
Step 3:
Enseguida, el círculo anterior que apartamos le recortamos un poco, aproximadamente un centímetro menos, luego haremos un dibujo para pegarlo en medio de este, puede ser el que quieran que tenga que ver con está temática espacial, podría ser un planeta, un astronauta, estrellas, entre otros. Ahora bien, al tener el dibujo hecho y coloreado completamente, se recorta y se pega en el centro del círculo, esparciendo silicón sin excedernos, para que no se haga un pegoste, hacemos presión y ya estaría.
Next, the previous circle that we set aside, we cut it a little, approximately one centimeter less, then we will make a drawing to paste in the middle of it, it can be the one you want that has to do with this space theme, it could be a planet, an astronaut, stars, among others. Now, once the drawing is done and completely colored, cut it out and glue it in the center of the circle, spreading silicone without overdoing it, so that it doesn't get sticky, press it and you're done.
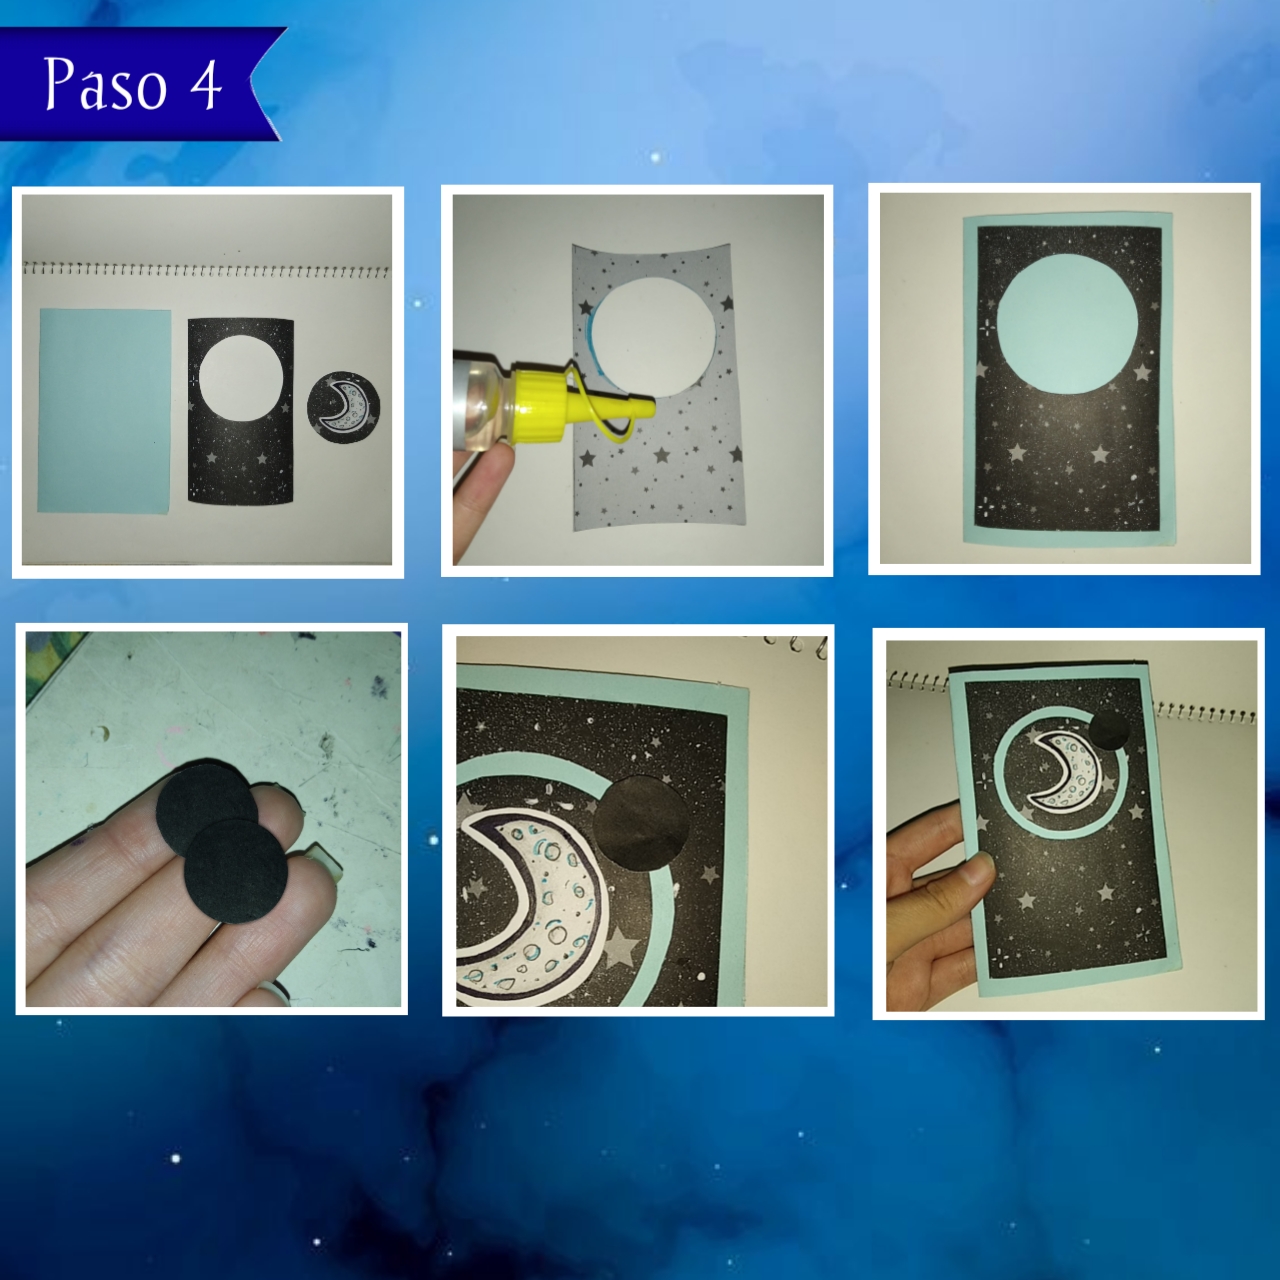
Paso 4:
Step 4:
En este preciso momento vamos a empezar a armar la tarjeta, tomaremos las tres piezas hechas antes, así tomando de primera la tarjeta doblada a la mitad (la base), le pegaremos encima el rectángulo con el orificio grande, o sea, el círculo, estos los vamos a unir con silicón, apretando, al igual que centrando muy bien para que de cada lado quede un centímetro de espacio, cabe mencionar que solo agregué pequeñas líneas de silicón al borde, dejando por dentro espacio despegado.
At this precise moment we are going to start assembling the card, we will take the three pieces made before, so taking first the card folded in half (the base), we will glue over it the rectangle with the big hole, that is, the circle, we are going to join them with silicone, pressing, as well as centering very well so that on each side there is a centimeter of space, it is worth mentioning that I only added small lines of silicone to the edge, leaving space inside unstuck.
Después recorte dos círculos pequeños en color negro del mismo tamaño, uno lo coloque con la mitad debajo del borde del círculo, luego agregué una pequeña cantidad de silicón en el centro del círculo grande con el dibujo y lo pegue centrando y dejando el borde, así agregando una pequeña gota de silicón al círculo de abajo, como consiguiente le pegue el otro encima, sin que toque el resto de bordes, permitiendo que está pieza circular pueda rotar por todo el círculo, solo es un pequeño detalle, para el que quiera agregarlo.
Then I cut out two small black circles of the same size, one of them I placed half under the edge of the circle, then I added a small amount of silicone in the center of the big circle with the drawing and glued it centering and leaving the edge, adding a small drop of silicone to the circle below, as a consequence I glued the other one on top, without touching the rest of the edges, allowing this circular piece to rotate around the circle, it is just a small detail, for those who want to add it.

Paso 5:
Step 5:
Por último para decorar la tarjeta, hice un círculo pequeñito en color blanco, con un corazón, con unos milímetros menos de diámetro que los círculos pequeños y lo pegue con silicón encima de estos centrando bien. Continué pegando una tira de cartulina decorada en la parte de abajo de la "portada" de la tarjeta, encima de este pegue una pequeña tira de la misma cartulina de la base, con la frase "Eres mi Universo", siguiendo la misma temática, así, para finalizar hice un borde por toda la parte de adentro de la tarjeta y por último le pegue un dibujo de un astronauta y agregué color.
Finally to decorate the card, I made a small circle in white, with a heart, with a few millimeters less in diameter than the small circles and glued it with silicone on top of them, centering it well. I continued by gluing a strip of decorated cardboard at the bottom of the "cover" of the card, on top of this I glued a small strip of the same cardboard of the base, with the phrase "You are my Universe", following the same theme, so, to finish I made a border around the inside of the card and finally I glued a drawing of an astronaut and added color.
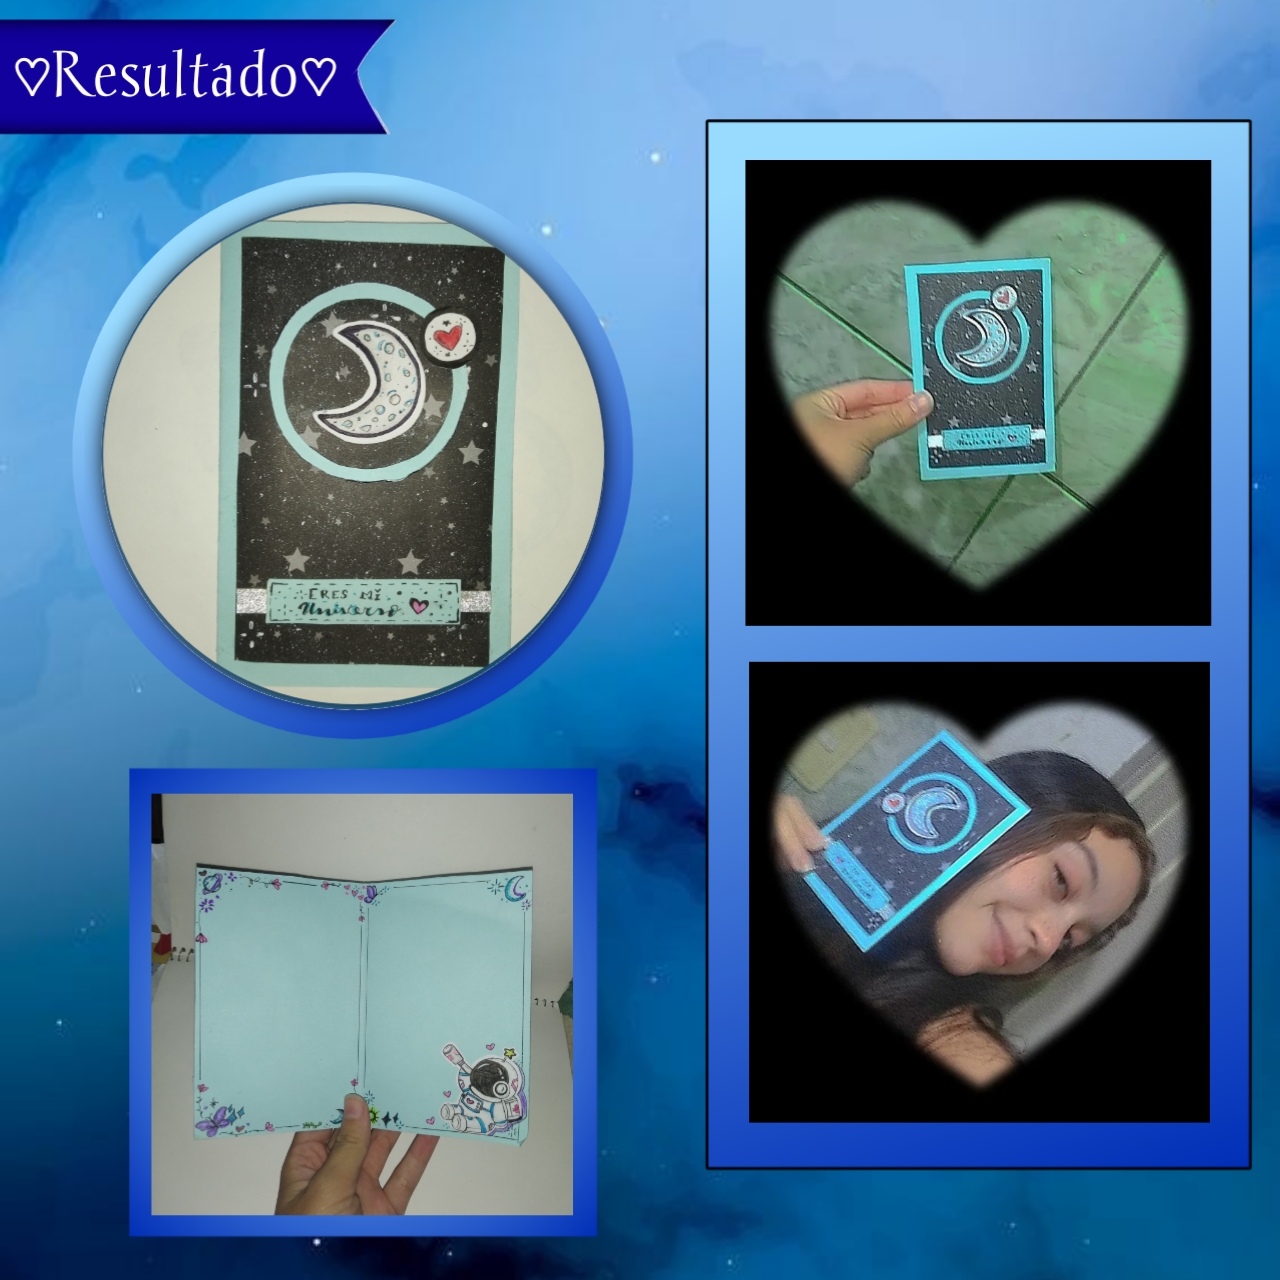
De está manera, obtenemos una hermosa tarjeta decorada, hecha con nuestra propia mano, al igual que con nuestra temática preferida, ya que lo pueden hacer del color que quieran, con diferentes dibujos, con diferentes cartulinas, entre otros, ya que es adaptable a nuestro presupuesto y disponibilidad, totalmente personalizable, ideal para regalar a nuestras personas especiales, impactar y dar ese toque diferente, con nuestra tarjeta creativa, única y sin duda especial.
In this way, we obtain a beautiful decorated card, made with our own hand, as well as with our favorite theme, since it can be made in the color you want, with different drawings, with different cardboards, among others, since it is adaptable to our budget and availability, fully customizable, ideal to give to our special people, impact and give that different touch, with our creative, unique and certainly special card.
Así finaliza el tutorial del día de hoy, espero les resulte útil, que les haya gustado y que puedan recrearla incluso a su manera, usando su creatividad al 100%. Gracias por leer nuevamente, les agradezco su presencia y el tiempo que se toman para leer, un abrazo enorme a todos y hasta la próxima.♡
So ends today's tutorial, I hope you find it useful, that you liked it and that you can recreate it even in your own way, using your creativity 100%. Thank you for reading again, I appreciate your presence and the time you take to read, a huge hug to all and until next time.♡
♡¡Gracias por leer!♡
♡Thank you for reading!♡
Photos of my authorship taken from my Xiaomi Redmi 7 phone, edited in the free version of PixeLab.
Te quedó muy hermosa, ideal para regalar a los seres queridos, gracias por mostrarnos el paso a paso, me parece sencilla de relaizar. Saludos,amiga.
Sii, la verdad no tiene un alto grado de dificultad y queda súper linda. Me alegra que le haya gustado, muchas gracias por comentar, saludos igualmentemente y un abrazo enorme.❤️