Hermoso envase de navidad 🎄💚 | Recicla envases de vidrio y dale vida a la temática que más te guste ♻️ - Paso a paso✨❤️ [ESP-ENG]
Hello my great creative family! Many greetings and hugs to all, I hope you have a happy and blessed Wednesday, full of the best vibes, the greatest happiness, lots of creativity, productivity and always eager to create excellent crafts to share here in the community. I also wish that this rest of the month and the year itself, be greatly blessed, I wish you a Merry Christmas and Happy New Year in advance, with much affection.💚✨
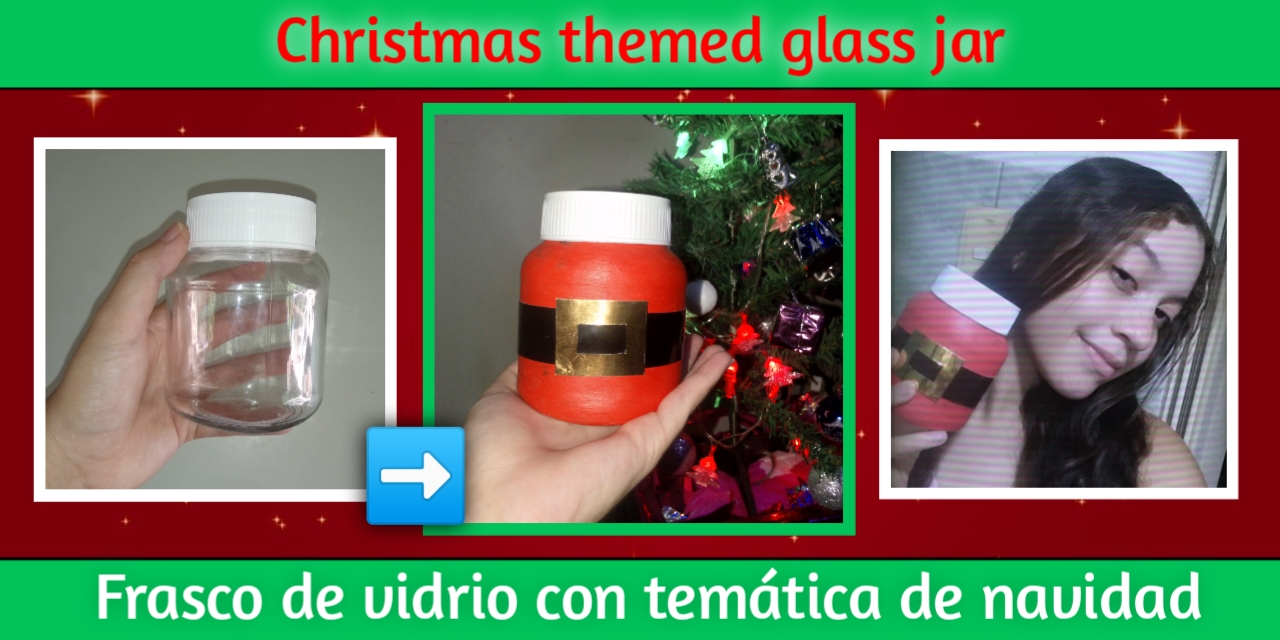
La mañana de hoy les traigo nada más y nada menos que una manualidad navideña, llena de color y de espíritu navideño claro que sí. Así les comparto un tutorial de como decorar de forma sencilla, fácil, rápida y creativa los frascos de vidrio que tienen en su casa, ya sean de mayonesa, nutella, entre otros. La cosa es que reciclando estos envases y colocándoles amor podemos obtener un hermoso resultado, que nos da la oportunidad de usarlo para decorar el espacio de nuestra cocina en parte, siendo de gran utilidad, para guardar el azúcar, granos, sal, especias, entre muchas otras cosas, así que los invito a quedarse y acompañarme en este hermoso proceso.❤️
This morning I bring you nothing more and nothing less than a Christmas craft, full of color and Christmas spirit of course. So I share with you a tutorial on how to decorate in a simple, easy, quick and creative way the glass jars you have at home, whether mayonnaise, nutella, among others. The thing is that recycling these containers and putting love we can get a beautiful result, which gives us the opportunity to use it to decorate the space of our kitchen in part, being very useful to store sugar, grains, salt, spices, among many other things, so I invite you to stay and join me in this beautiful process. ❤️
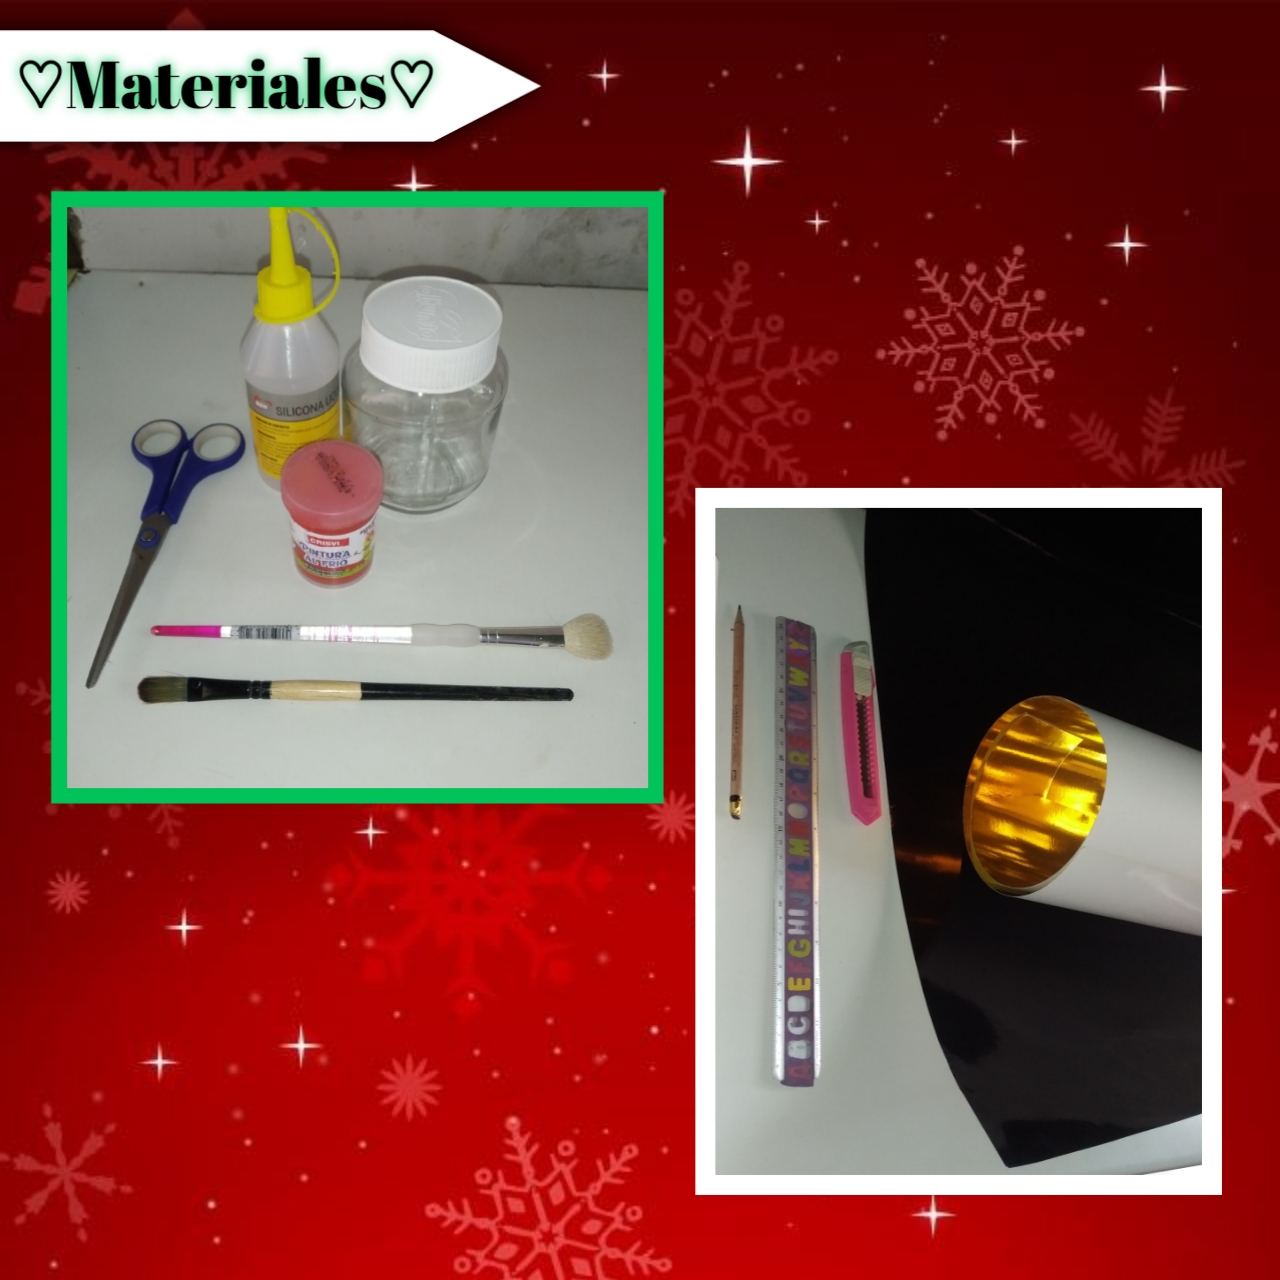
♡💚❤️ Materials💚❤️♡
- Frasco de vidrio
- Pintura al frío roja
- Cartulina negra
- Cartulina dorada
- Silicón
- Tijeras
- Reglas
- Lápiz
- Pincel
- Glass jar
- Red cold paint
- Black cardboard
- Gold cardboard
- Silicone
- Scissors
- Rulers
- Pencil
- Paintbrush
♡💚❤️Step by Step💚❤️♡
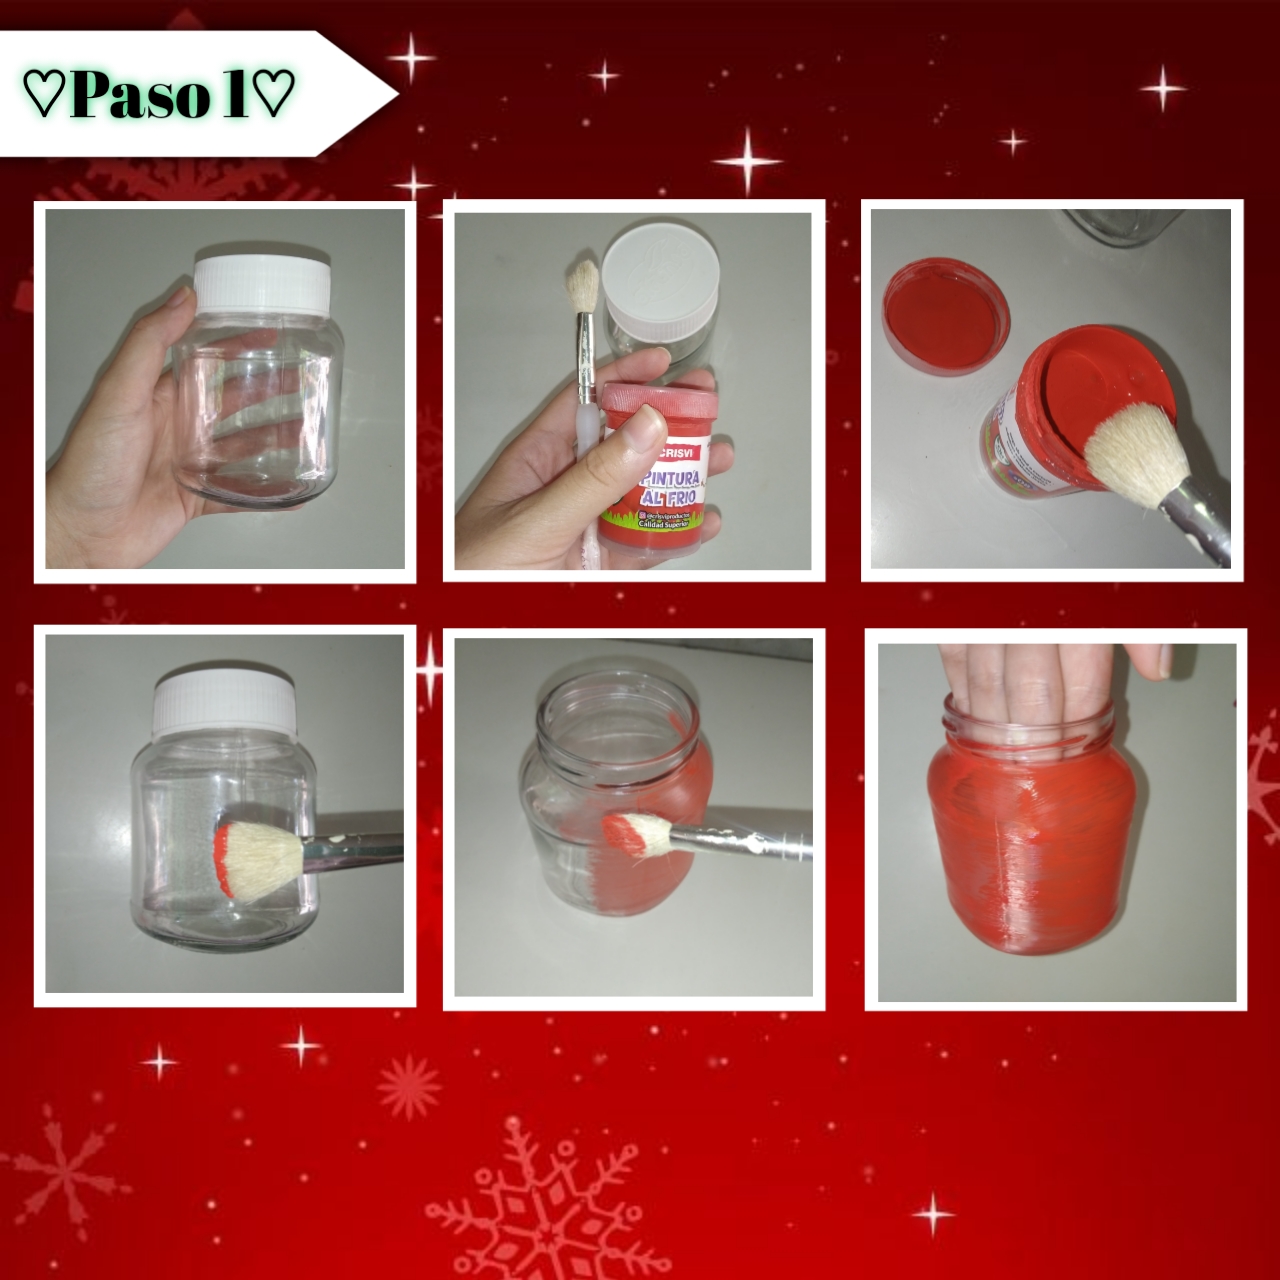
Paso 1:
Step 1:
Para iniciar comenzaremos con nuestro frasco de vidrio en blanco, es decir, sin etiqueta y con la superficie limpia y seca, así también utilizaremos nuestra pintura al frío de color roja y nuestro pincel porsupuesto. Abrimos nuestro envase de pintura y sumergimos un poco nuestro pincel, así iniciamos a pintar la superficie, hasta cubrir el envase por fuera completamente y tras está primera mano dejamos secar.
To start we will begin with our glass jar in white, that is to say, without label and with a clean and dry surface, we will also use our red cold paint and our brush of course. We open our container of paint and dip our brush a little, so we begin to paint the surface, until we cover the outside of the container completely and after this first coat we let it dry.
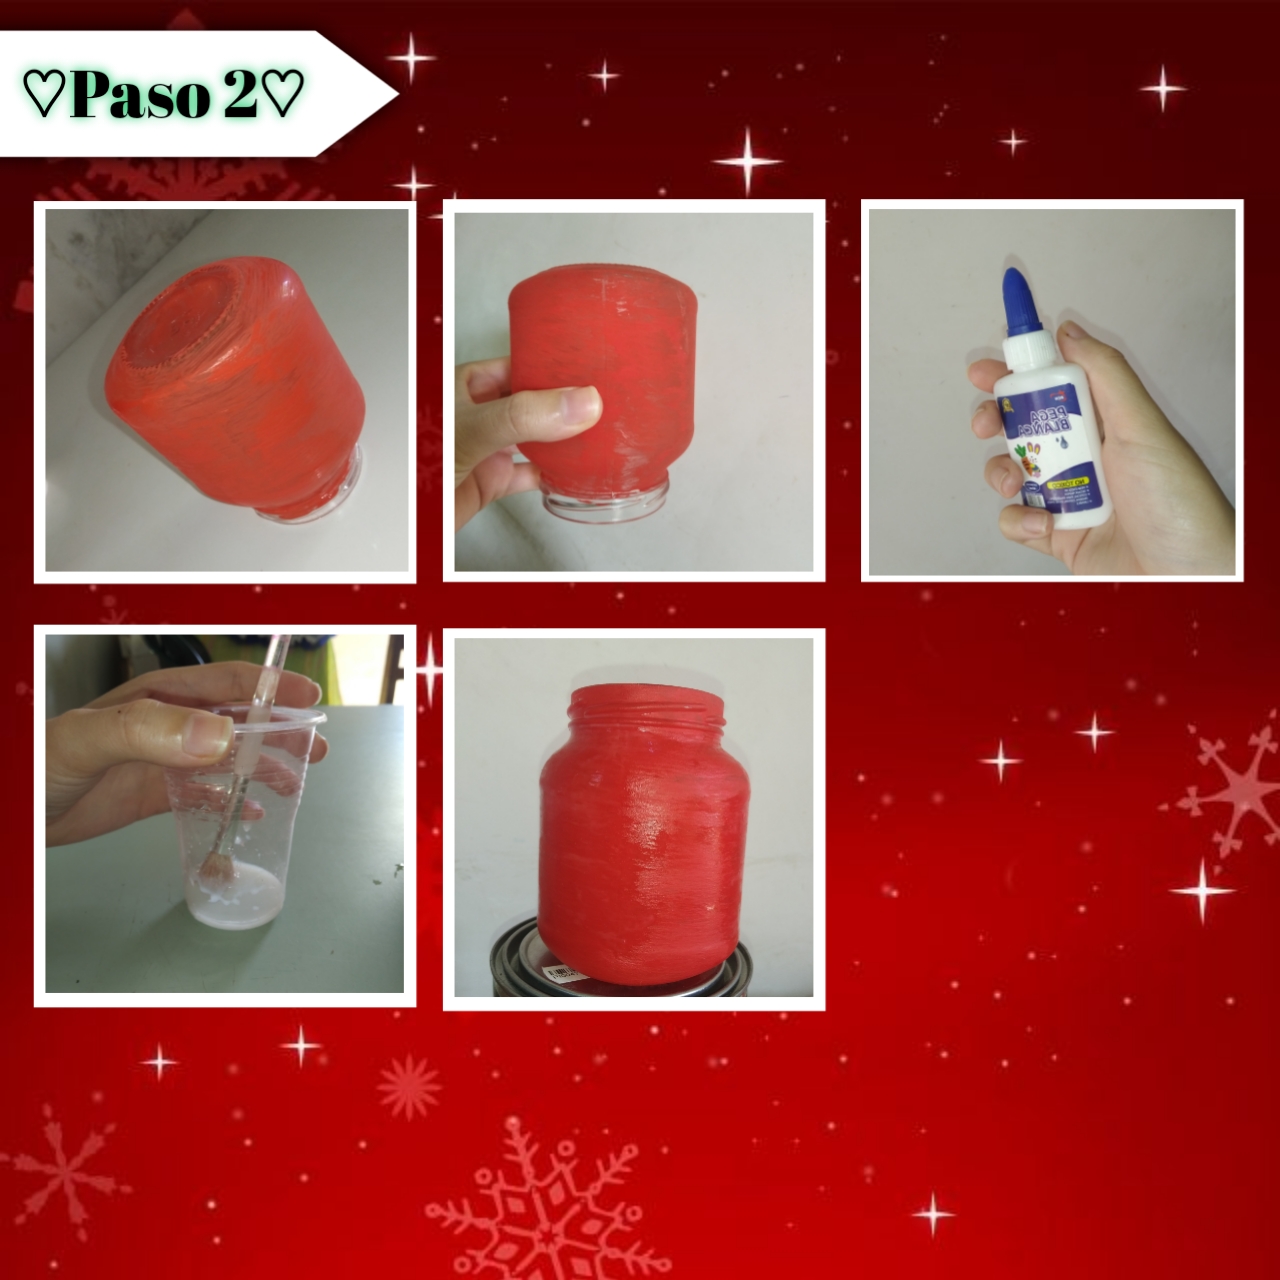
Paso 2:
Step 2:
Al terminar de secar continuamos agregando la segunda capa de la misma manera y si hace falta otra la agregamos igualmente, ya que depende la pintura, pintamos hasta que quede como queramos, yo agregué en total tres capaz. Ahora bien para sellar está pintura y darle un poco más de brillo, además de quitarle la textura áspera, tomaremos pega blanca y con un poquito de agua la agregaremos en un vaso, solo una pequeña cantidad, renovemos y la agregamos en toda la superficie con el pincel y dejamos secar.
When it has finished drying we continue adding the second layer in the same way and if we need another one we add it as well, since it depends on the paint, we paint until it is the way we want it, I added a total of three layers. Now to seal this paint and give it a little more shine, besides removing the rough texture, we will take white glue and with a little water we will add it in a glass, just a small amount, renew and add it to the entire surface with the brush and let it dry.
Paso 3:
Step 3:
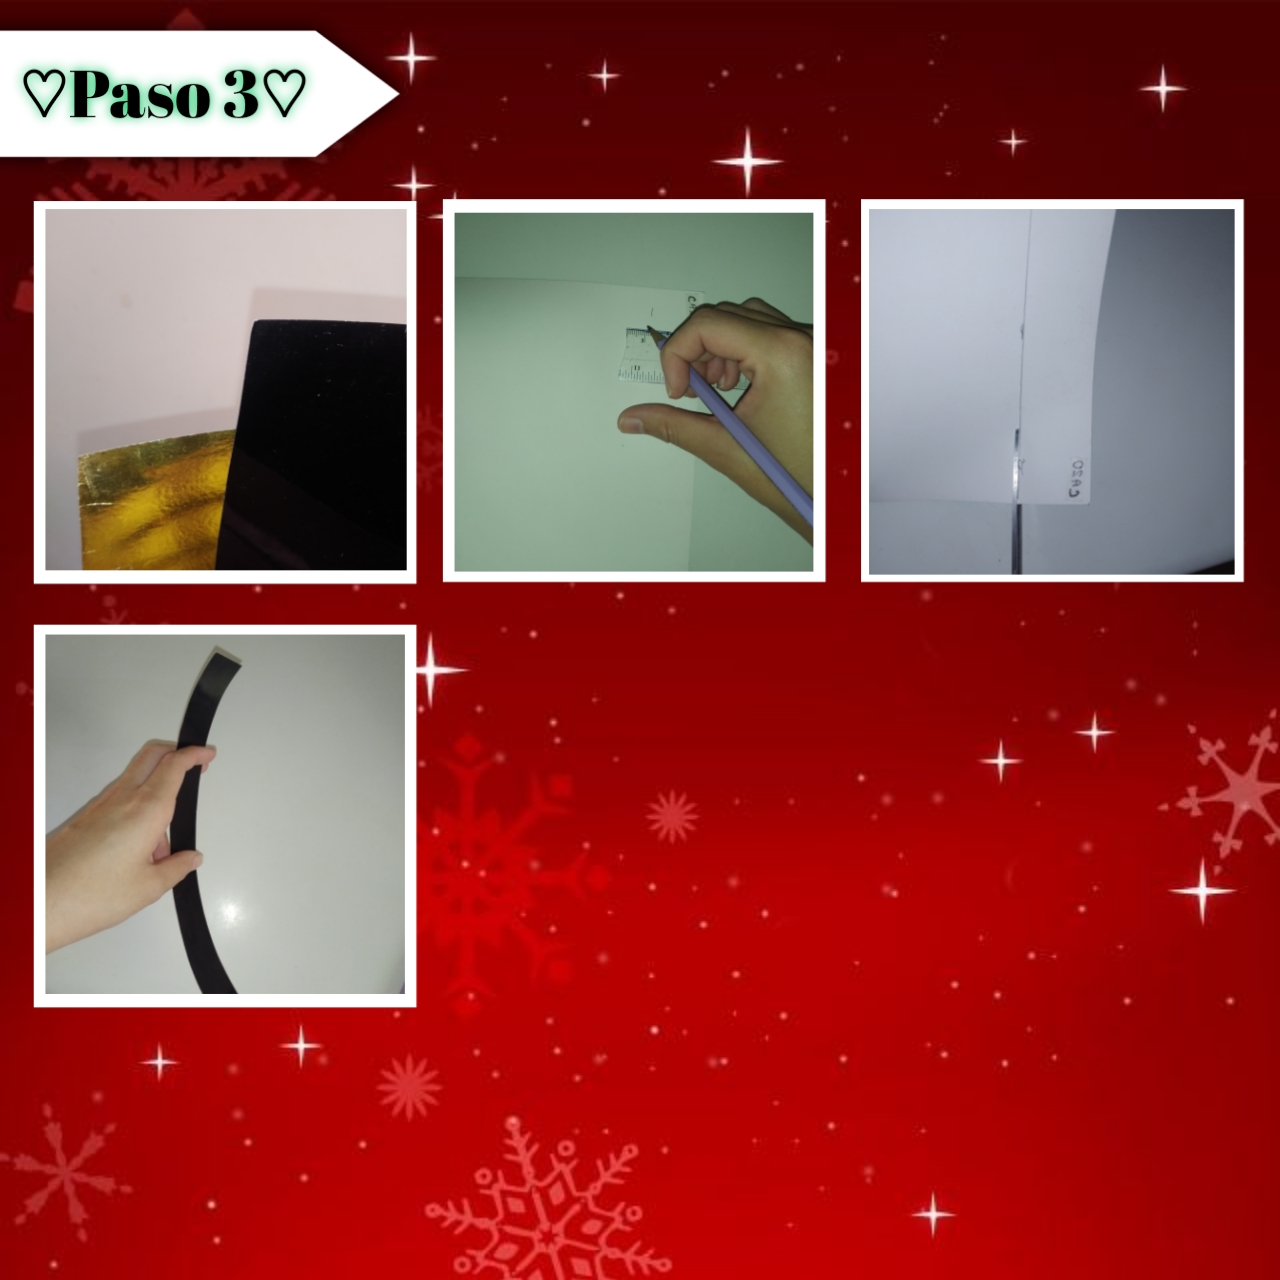
Continuamos con el siguiente paso, así tomaremos nuestras cartulinas, en este caso, color negro y dorado, igualmente lo pueden hacer con foami, pero esto es lo que tenía a la mano y me sirvió. De está manera extenderemos la cartulina negra al revés y con ayuda de una regla marcaremos una tira larga, aproximadamente del tamaño de diámetro del frasco, que lo cubra completo pues, este debe ser más o menos de 2cm o 3cm de ancho, yo lo hice de 3cm está vez, luego lo recorte.
We continue with the next step, so we will take our cardboard, in this case, black and gold, you can also do it with foami, but this is what I had on hand and it worked for me. In this way we will extend the black cardboard upside down and with the help of a ruler we will mark a long strip, approximately the size of the diameter of the jar, covering it completely, this should be more or less 2cm or 3cm wide, I did it 3cm this time, then cut it out.
Paso 4:
Step 4:
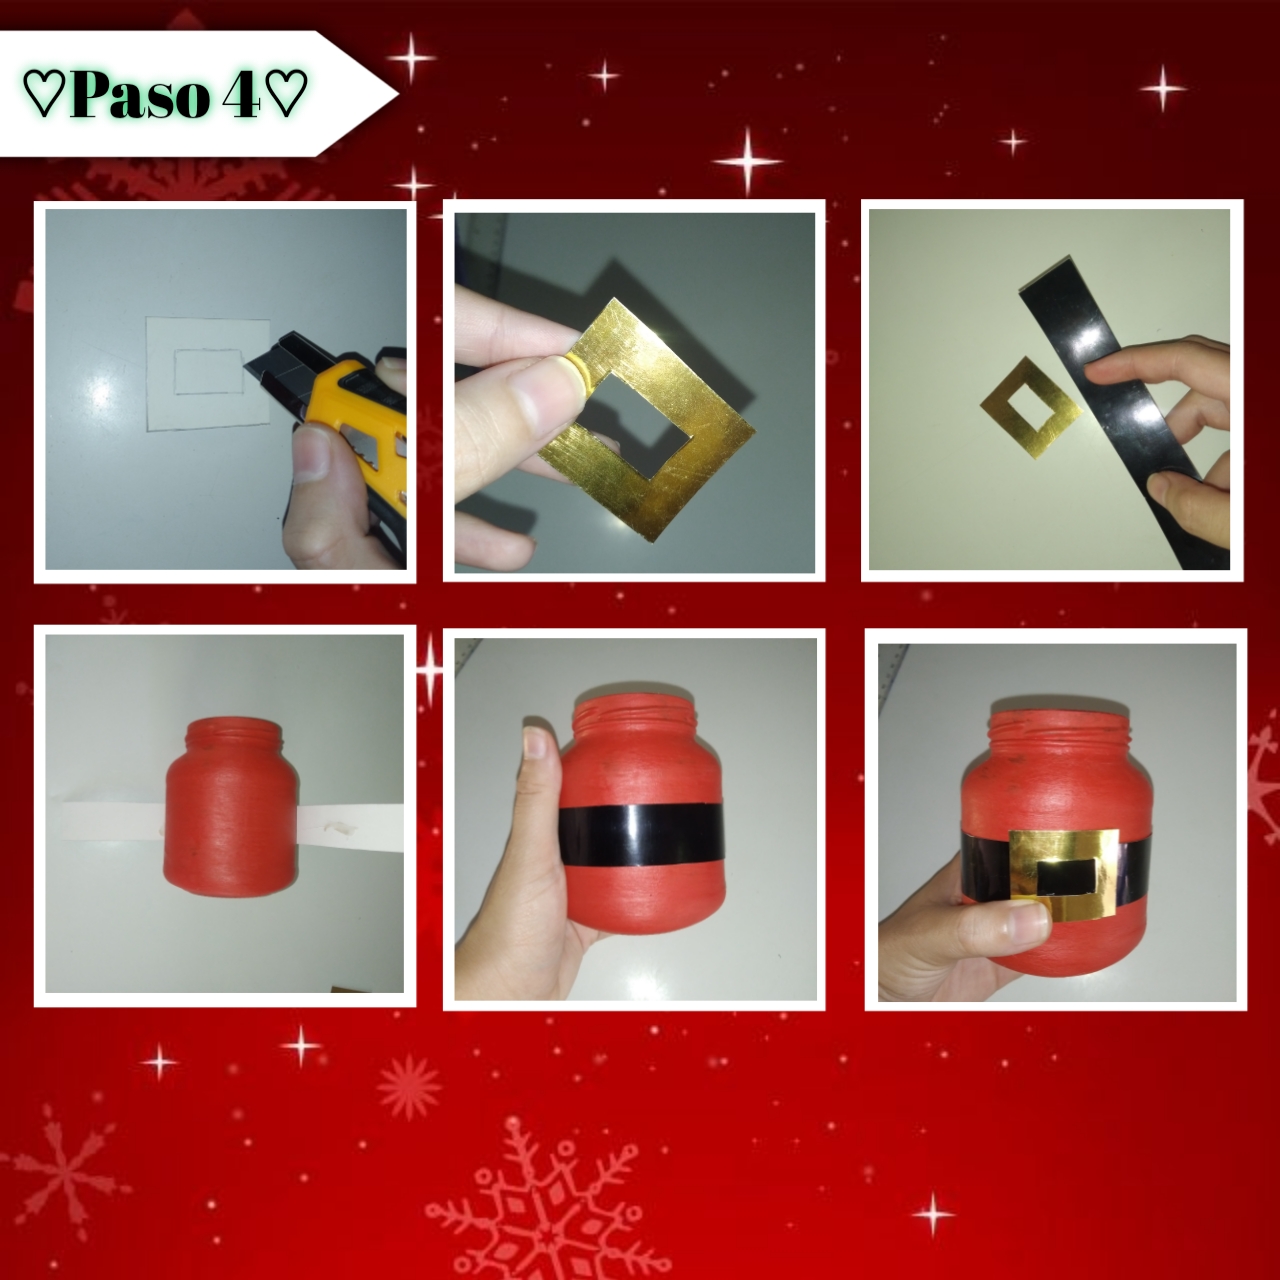
Ahora vamos con la otra pieza, así tomé solo un pequeño trozo de la cartulina dorada, y en está hice un pequeño rectángulo con un hueco en medio (rectangular) que corte con la ayuda de un exacto. Por último teniendo ambas piezas, con ayuda de silicón caliente, agregué un par de gotas por toda está y la pegué muy bien, de manera centrada y corroborando que encaje muy bien en el frasco, al tener está tira pegada, le pegaremos la otra pieza encima de manera centrada y ya está.
Now let's go with the other piece, so I took only a small piece of gold cardboard, and in it I made a small rectangle with a hole in the middle (rectangular) that I cut with the help of an exacto. Finally having both pieces, with the help of hot silicone, I added a couple of drops all over it and glued it very well, in a centered way and making sure that it fits very well in the bottle, once this strip is glued, we will glue the other piece on top of it in a centered way and that's it.
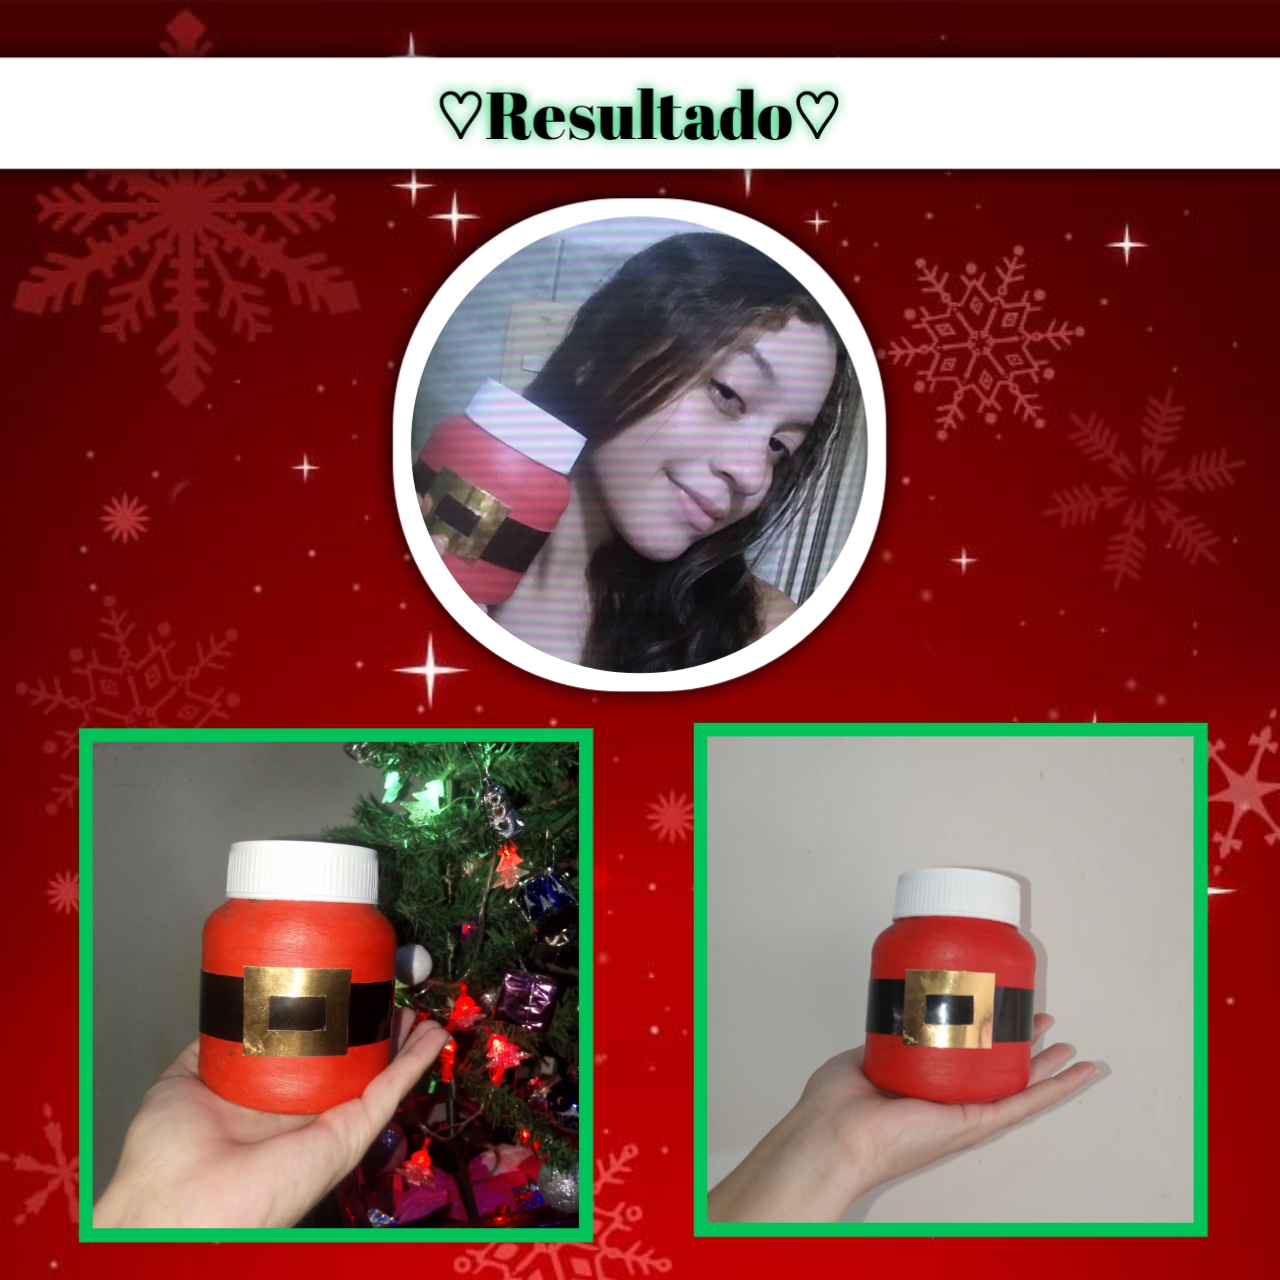
Así es como pasamos de tener un frasco transparente y común, a un hermoso frasco de navidad que nos sirve para guardar una serie de cosas en la cocina e incluso otras cosas. En este frasco venía chocolate estilo nutella, al desocuparlo le ví potencial y quise buscar una idea de cómo darle una segunda vida y que me gustará, me alegró sacarle provecho y tener un resultado que me encantó, hay muchos otros diseños con el que lo podemos hacer, sea de temática de navidad o cualquier otra, es cuestión de buscar y poner en marcha nuestra imaginación, yo tengo unos cuantos y seguiré decorando con diferentes estilos.
This is how we went from having a transparent and common jar, to a beautiful Christmas jar that can be used to store a number of things in the kitchen and even other things. In this jar came nutella style chocolate, when I vacated it I saw potential and wanted to find an idea of how to give it a second life and that I would like, I was happy to take advantage of it and have a result that I loved, there are many other designs with which we can do it, whether Christmas themed or any other, it is a matter of searching and start our imagination, I have a few and I will continue to decorate with different styles.
Así llegamos al final de está publicación, de este tutorial sencillo, pero práctico y funcional, para mí ha sido un placer poder compartir con ustedes el día de hoy, espero les guste la idea y la puedan recrear, nos vemos en una próxima manualidad familia, tengan una felíz navidad y próspero año nuevo.✨🎄
So we come to the end of this publication, this simple tutorial, but practical and functional, for me it has been a pleasure to share with you today, I hope you like the idea and can recreate it, see you in a next craft family, have a Merry Christmas and Happy New Year ✨🎄.
❤️🎄¡Gracias por leer una vez más! Hasta la próxima manualidad🎄💚
❤️🎄Thanks for reading once again! Until the next craft🎄💚
Photos of my authorship taken from my Xiaomi Redmi 7 phone, edited in the free version of PixeLab
Queda muy lindo para colocar de decoración en nuestras cocinas, gracias por compartir, saludos 👋🏻
Sii, este queda muy bien exactamente en la mesa de la cocina, gracias a ti por comentar, un abrazo.✨
¡Felicidades! Esta publicación obtuvo upvote y fue compartido por @la-colmena, un proyecto de Curación Manual para la comunidad hispana de Hive que cuenta con el respaldo de @curie.
Si te gusta el trabajo que hacemos, te invitamos a darle tu voto a este comentario y a votar como testigo por La Colmena.
Si quieres saber más sobre nuestro proyecto, te invitamos a acompañarnos en nuestro servidor de Discord.
Enhorabuena, gracias, un abrazo.💚✨
Congratulations @stefania16! You have completed the following achievement on the Hive blockchain And have been rewarded with New badge(s)
Your next target is to reach 25000 upvotes.
You can view your badges on your board and compare yourself to others in the Ranking
If you no longer want to receive notifications, reply to this comment with the word
STOP🧡🙌
Awesome work @stefania16.
20k upvotes is a major milestone.
Me encanta el reciclaje. Este envase tuvo una nueva oportunidad gracias a tu creatividad. Excelente trabajo.
Me identifico igualmente, muchas gracias, saludos 💚