Hermosa caja rosa de corazón | Te enseño a hacerla paso a paso desde el principio✨🌸 [ESP-ENG]
Hello, hello creative family! How are you doing here? I hope you are doing well, I wish you an excellent day full of blessings everywhere and the best things, I hope this day and the rest of the week will be very productive, creative and full of health, happiness and love for every creation we make.♡♡
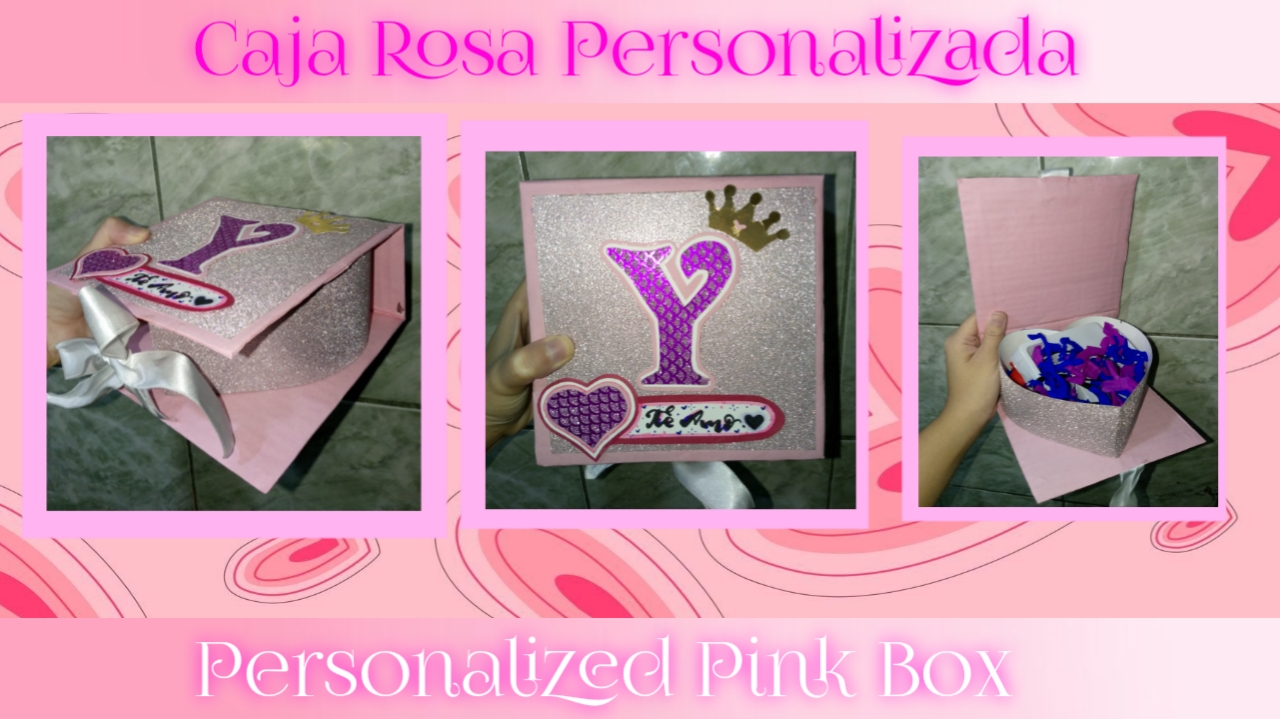
Hoy les traigo nada más y nada menos que el tutorial de una caja para regalar, pero no es cualquier caja, está es diferente y lo mejor de todo es que es personalizada, perfecta para regalar a personas especiales, que queramos impresionar con algo único y lleno de mucho amor, ya que cada detalle lo elaboramos nosotros mismos a mano y decidimos que lleva y que no. Así que si quieres aprender como realice esta hermosa caja con forma de corazón, que además es hecha principalmente con materiales de reciclaje, quédate que te muestro el paso a paso, bien explicado.
Today I bring you nothing more and nothing less than the tutorial of a gift box, but it is not just any box, this one is different and best of all is that it is personalized, perfect to give to special people, we want to impress with something unique and full of love, because every detail is handmade by ourselves and we decide what to take and what not. So if you want to learn how to make this beautiful heart-shaped box, which is also made mainly with recycled materials, stay that I show you the step by step, well explained.
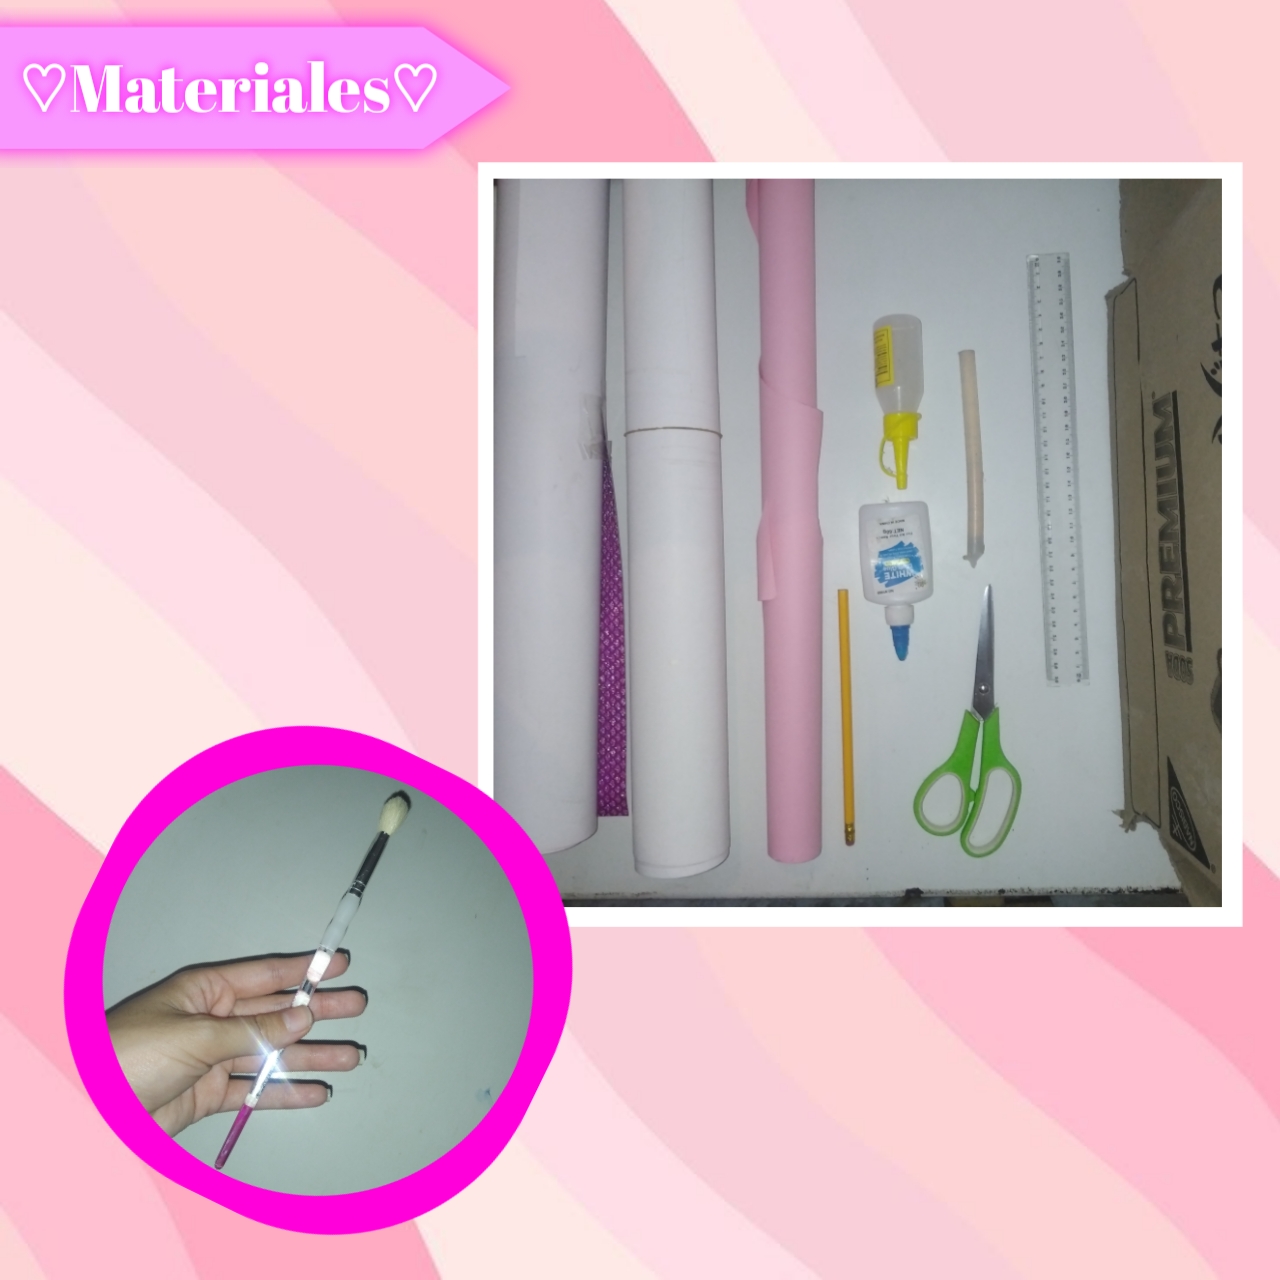
♡📑📎Materials📎📑♡
- Caja de cartón
- Cartulinas decoradas doble faz
- Cartulinas unicolor
- Cinta
- Pegamento
- Silicón
- Pincel
- Regla
- Tijeras
- Lápiz
- Cardboard box
- Double-sided decorated cardstock
- Unicolor cardboard
- Tape
- Glue
- Silicone
- Paintbrush
- Ruler
- Scissors
- Pencil
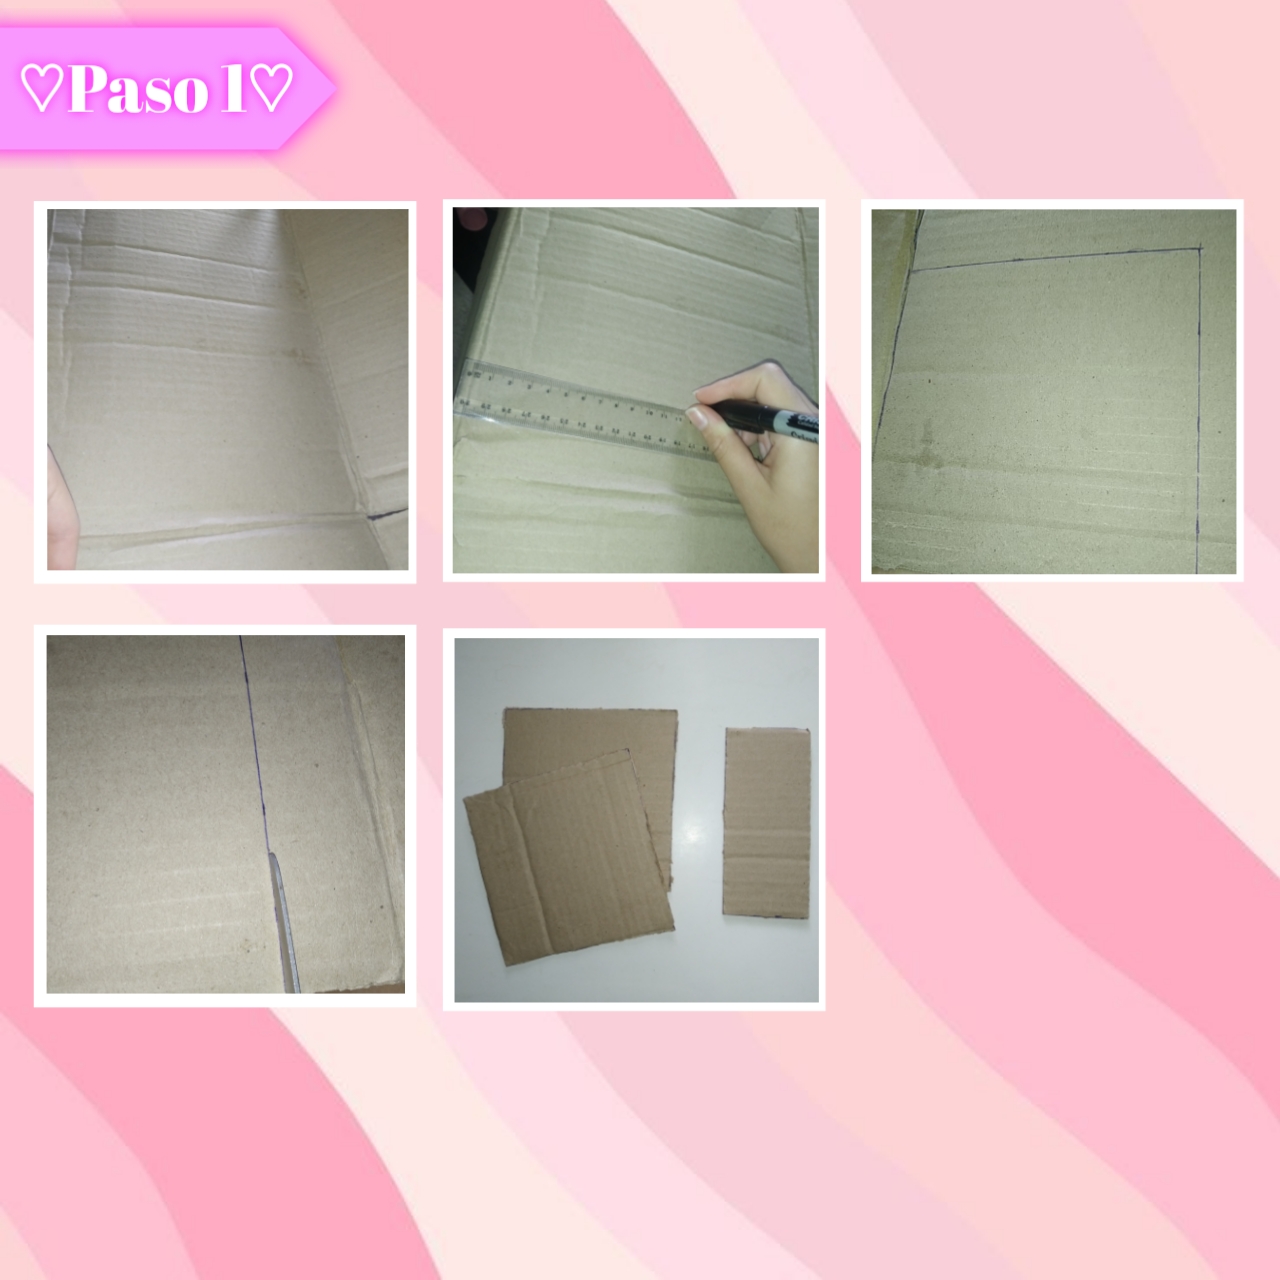
Paso 1:
Step 1:
Vamos a comenzar armando nuestra hermosa caja, para esto iniciaremos tomando nuestra caja de cartón, abriéndo y extendiendo está, luego con la ayuda de una regla y un lápiz marcaremos dos cuadrados exactamente iguales, en este caso yo los hice de 16cm de ancho por 16 cm de largo igualmente (pueden hacerlo del tamaño que deseen), también vamos a marcar un rectángulo en el cartón, con la medida de 16cm de largo por 7cm de ancho, seguidamente recortamos cada una de las piezas.
Let's start assembling our beautiful box, for this we will begin by taking our cardboard box, opening and extending it, then with the help of a ruler and a pencil we will mark two squares exactly the same, in this case I made them 16cm wide by 16cm long (you can also do the size you want), we will also mark a rectangle on the cardboard, with the measure of 16cm long by 7cm wide, then we cut each of the pieces.
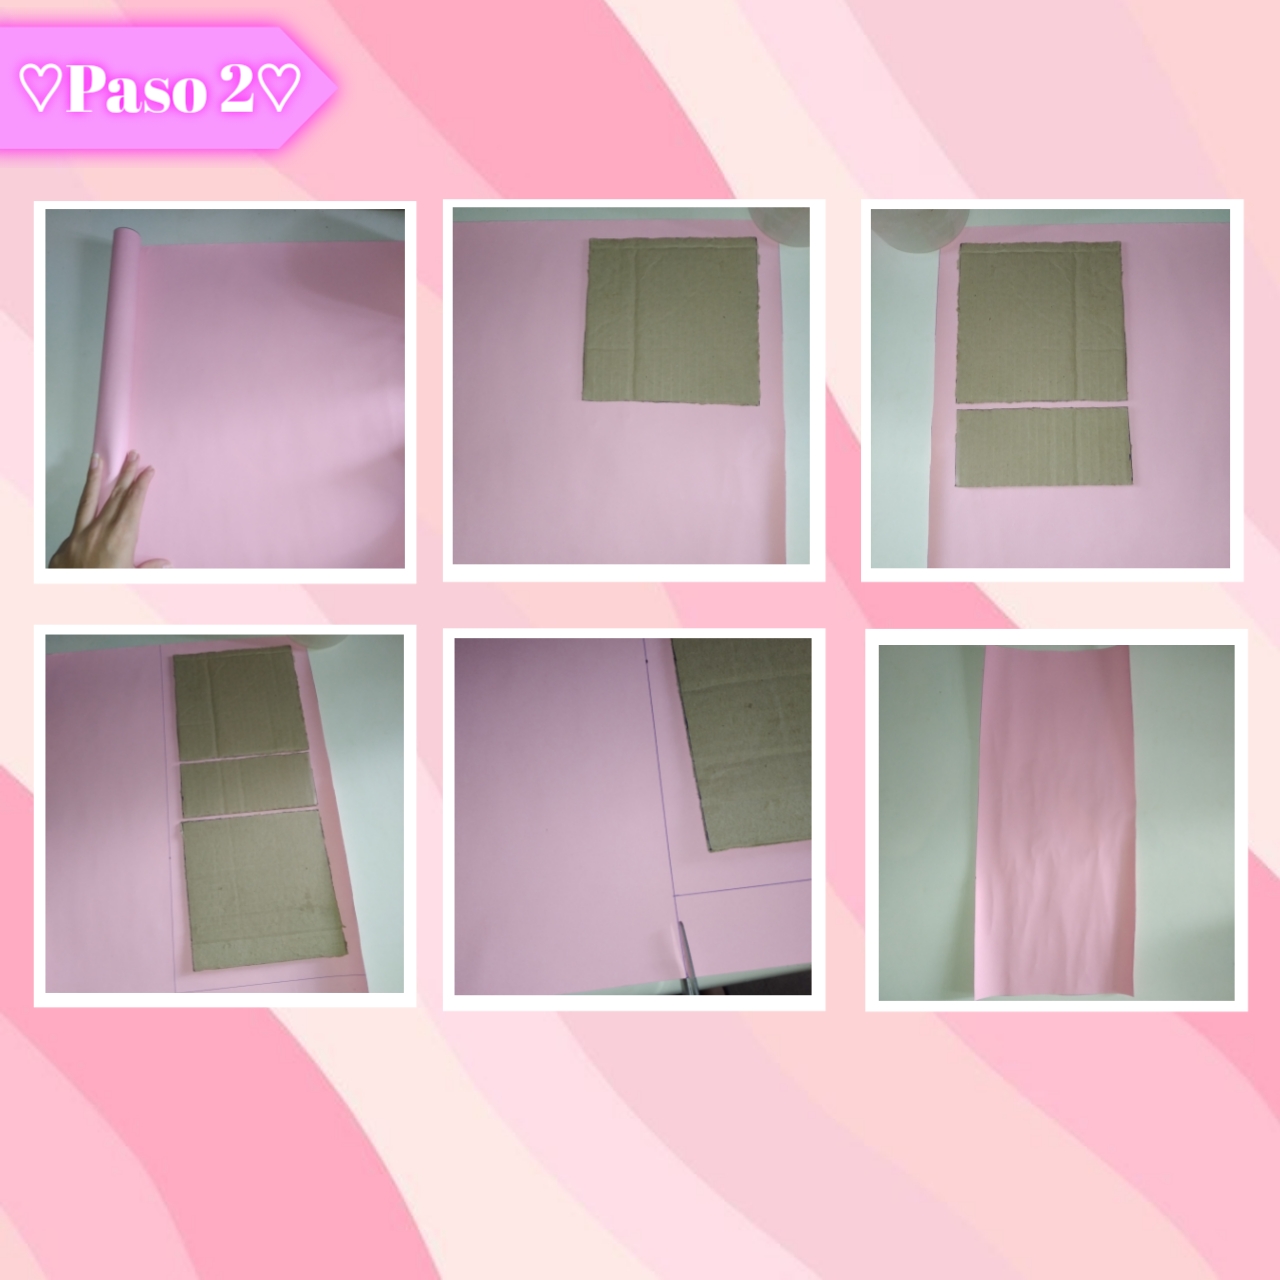
Paso 2
Step 2:
En este punto vamos a extender una de nuestras cartulinas normales unicolor, de acuerdo a la gama de colores que usaremos, después colocaremos las piezas hechas en el paso anterior encima de está, las acomodaremos verticalmente en; cuadrado, rectángulo y cuadrado, haciendo que coincidan y que tengan una separación de más o menos 0.50cm entre cada pieza. Continuamos marcando un borde dejando de cada lado aproximadamente 1.5 cm de ancho, para luego recortar con una tijera, todo como lo pueden ver en la imágen.
At this point we are going to extend one of our normal unicolor cardboard, according to the range of colors we will use, then we will place the pieces made in the previous step on top of it, we will arrange them vertically in; square, rectangle and square, making them coincide and have a separation of about 0.50cm between each piece. We continue marking a border leaving on each side approximately 1.5 cm wide, and then cut with scissors, all as you can see in the image.

Paso 3
Step 3:
Ahora bien, sigamos a forrar nuestras piezas, así pegaremos las piezas exactamente en el mismo orden en que las colocamos para recortar la cartulina, para pegarlas utilizaremos pegamento blanco con un poquito de agua para diluir un poco la mezcla y lo vamos a esparcir por toda una cara del cartón con un pincel (cualquiera), después pegaremos en el orden que les indique, daremos la vuelta a esto y con algún trozo de tela o un paño haremos movimientos por toda la superficie, para sacar las burbujas y pegar mejor , así haremos hasta terminar con cada pieza.
Now, let's continue to line our pieces, so we will glue the pieces exactly in the same order in which we place them to cut the cardboard, to glue them we will use white glue with a little water to dilute the mixture a little and we will spread it all over one side of the cardboard with a brush (any), then we will glue in the order indicated, we will turn this and with a piece of cloth or a cloth we will make movements across the surface, to remove the bubbles and glue better, so we will do until we finish with each piece.
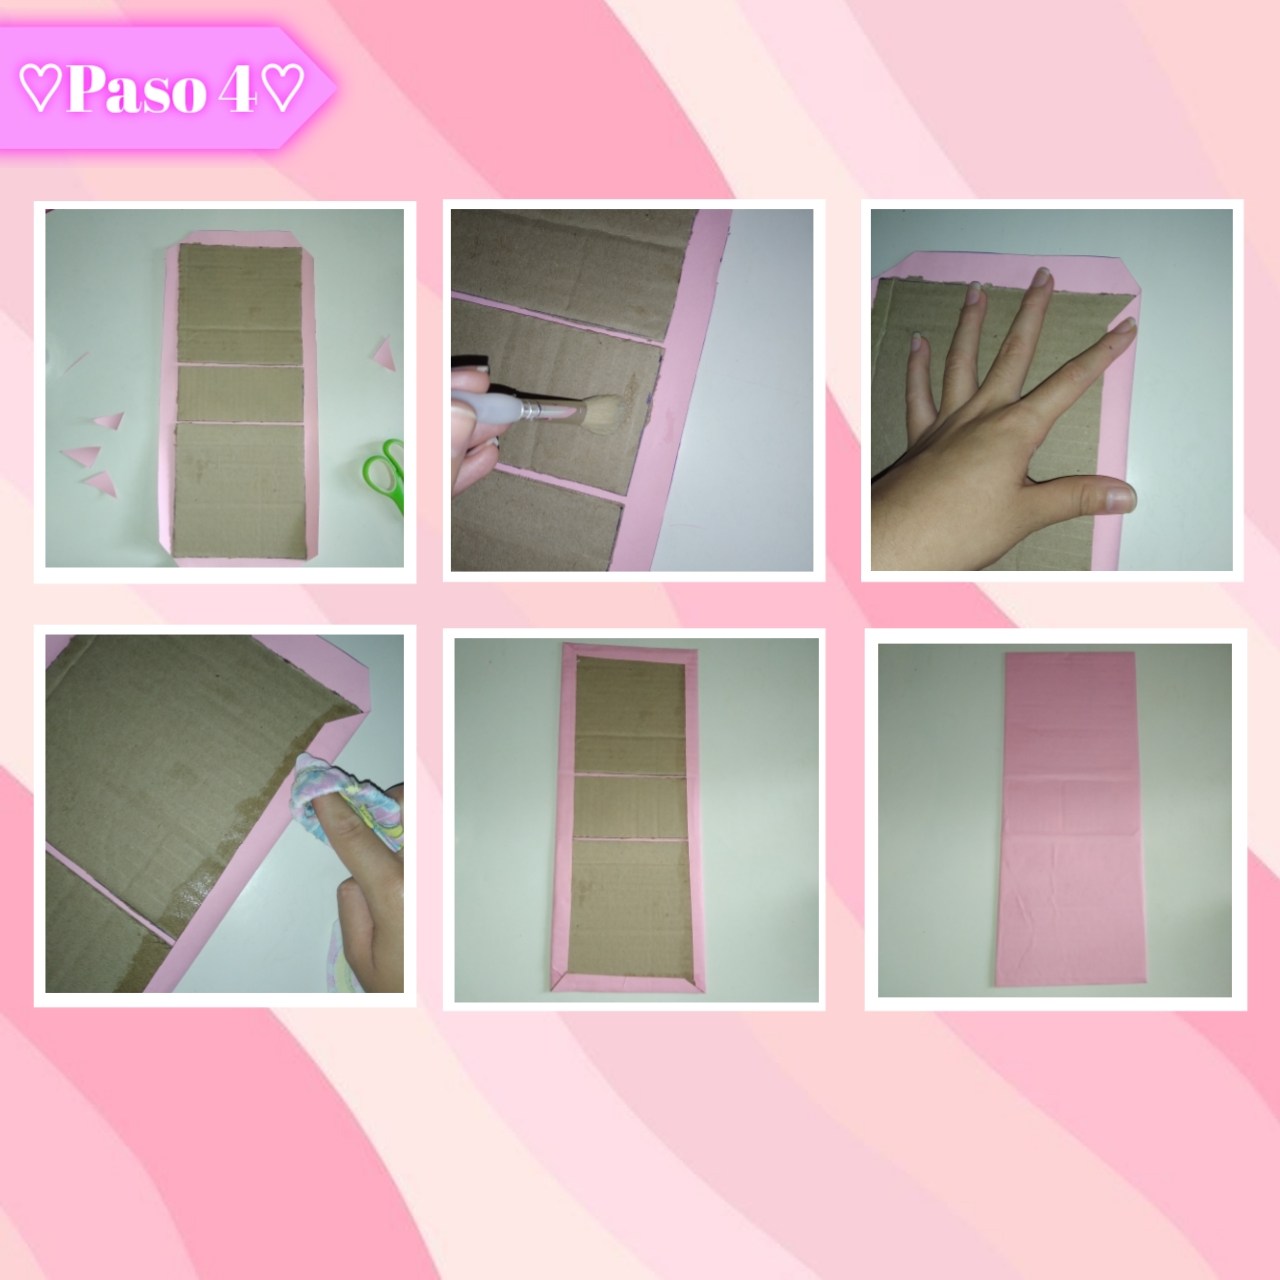
Paso 4:
Step 4:
Continuamos recortando un pequeño triángulo en cada una de las cuatro esquinas dejando un pequeñito espacio al cortar para forrar mejor, seguido tomamos nuestra mezcla y la vamos a esparcir con el pincel por el borde, para luego doblar y pegar por está parte los lados sobresalientes, además con alguna tela sacamos las burbujas de igual manera a la anterior, así haremos con cada uno de los cuatros lados hasta terminar de pegar bastante bien.
We continue cutting out a small triangle in each of the four corners leaving a small space when cutting for better lining, then we take our mixture and we will spread it with the brush along the edge, then fold and glue the protruding sides, also with some fabric we remove the bubbles in the same way as above, so we will do with each of the four sides to finish gluing pretty well.

Paso 5:
Step 5:
Justo ahora es cuando tomaremos dos trozos de cinta, lo suficiente para poder armar un lazo con ambos juntos, estos los vamos a pegar de cada lado al borde del cuadrado de manera bastante centrada, también cabe señalar que debemos pegar esto con silicón preferiblemente caliente, para que no se suelte. A continuación, recortaremos un rectángulo de más o menos 40cm x 17cm, lo suficiente para que cubra la superficie descubierta, agregamos la mezcla de pega, pegamos poco a poco hasta terminar y sacamos las burbujas.
Just now is when we will take two pieces of tape, enough to be able to assemble a loop with both together, these we will glue them on each side to the edge of the square in a fairly centered way, also note that we must paste this with silicone preferably hot, so it does not come loose. Next, we will cut out a rectangle of about 40cm x 17cm, enough to cover the uncovered surface, add the glue mixture, glue little by little until we finish and remove the bubbles.
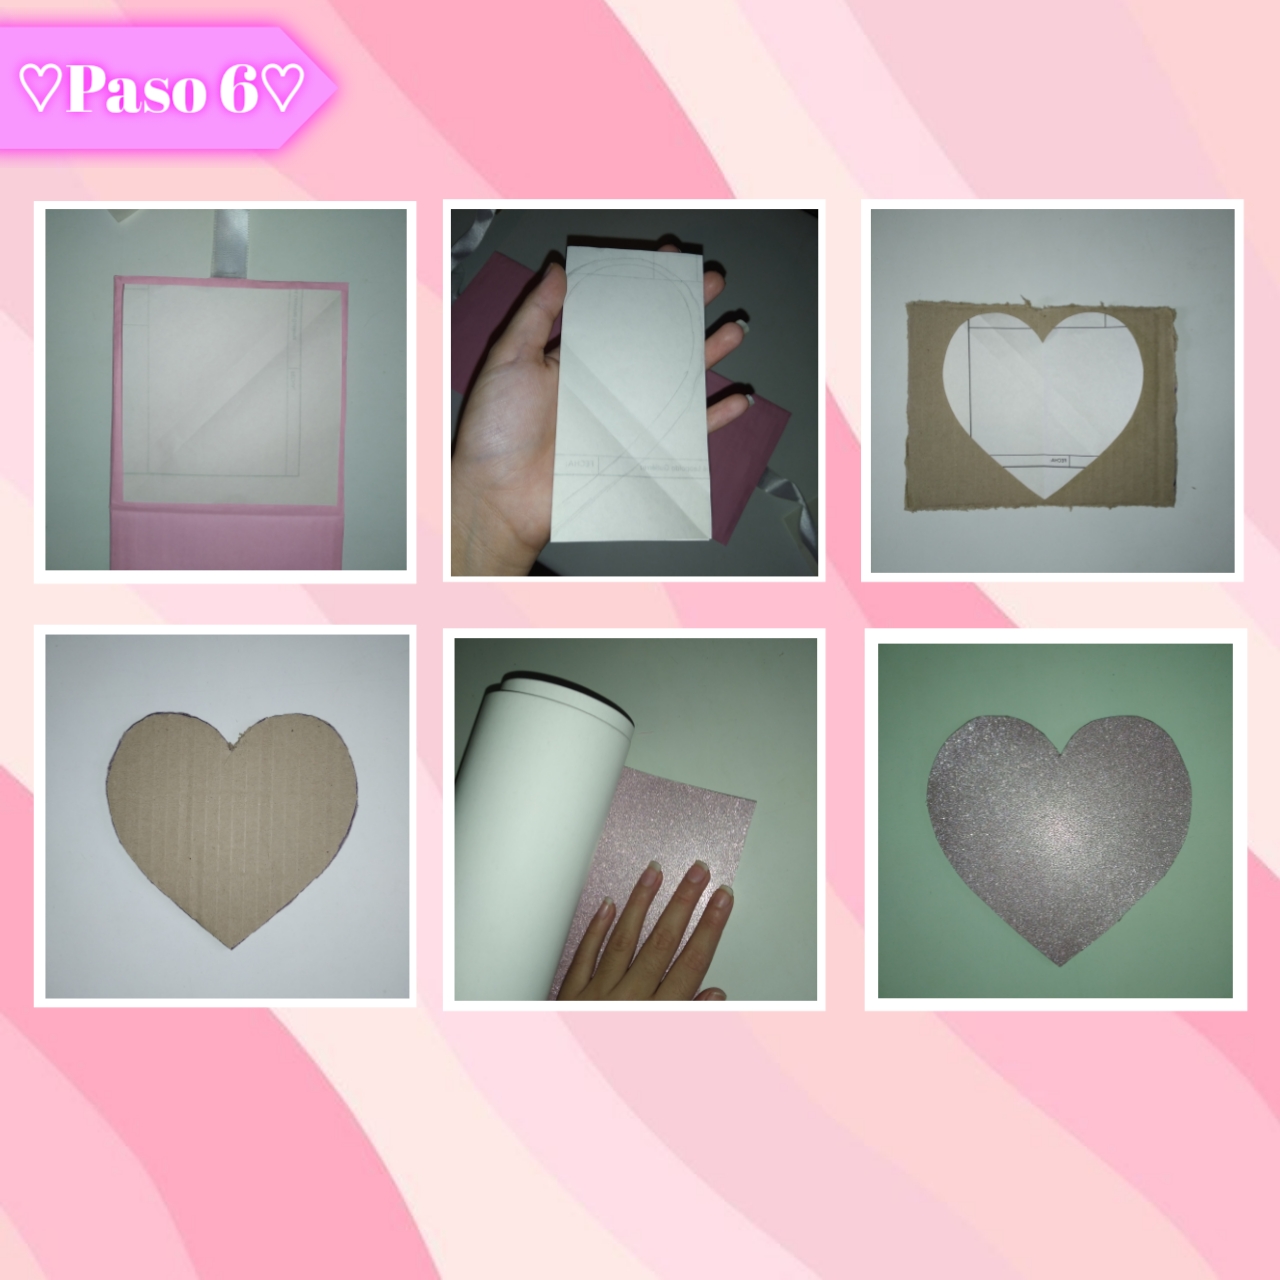
Paso 6:
Step 6:
Ahora haremos un corazón, así tomaremos un cuadrado que hayamos hecho previamente con un centímetro menos de cada lado, comparado a el de la caja (16cm x 16cm), de está forma comprobaremos y luego doblaremos la hoja a la mitad y con un lápiz marcaremos la mitad de un corazón, recortaremos y con esta guía haremos un corazón en cartón, después tomaremos cartulina decorada y lo forramos pegando con silicón.
Now we will make a heart, so we will take a square that we have previously made with one centimeter less on each side, compared to that of the box (16cm x 16cm), in this way we will check and then fold the sheet in half and with a pencil mark the half of a heart, cut out and with this guide we will make a heart in cardboard, then take decorated cardboard and cover it with silicone glue.
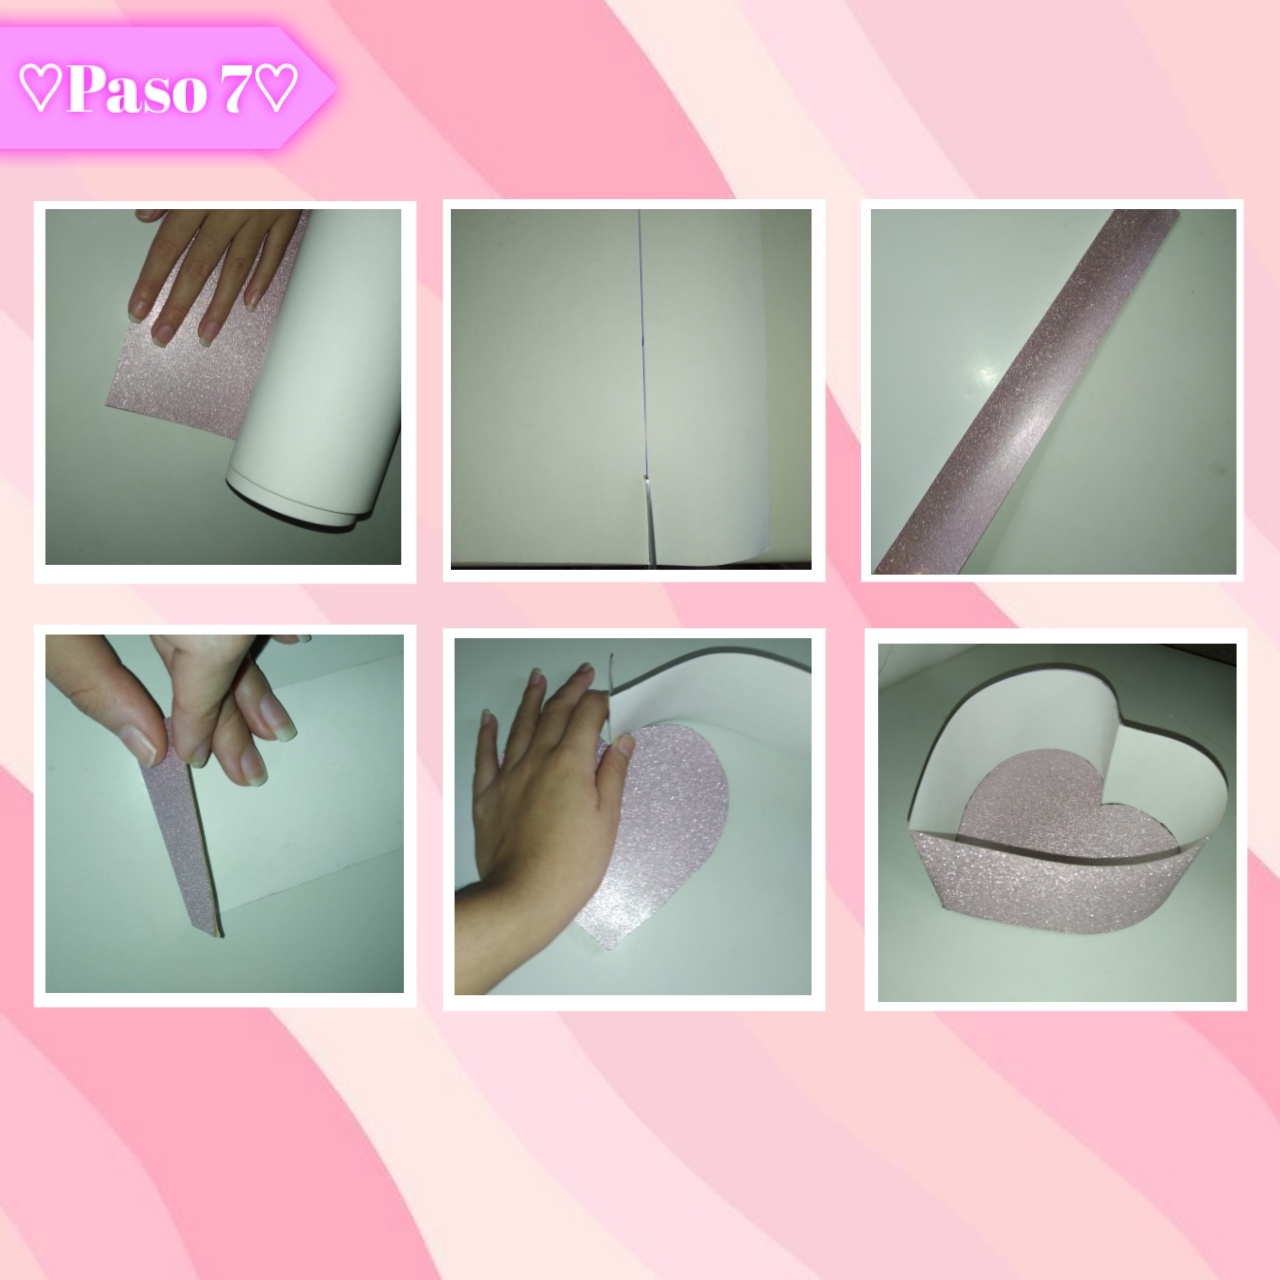
Paso 7:
Step 7:
Volvemos con la cartulina decorada rosa, con una regla y algún Lápiz, lapicero o marcador trazamos una línea recta sobre está, debe ser larga con una medida de 7cm de ancho, ya marcada la recortamos con una tijera, también haremos un pequeño dobles en uno de los extremos de 2cm de ancho. Ya lista la tira con silicón pegaremos la tira por todo el borde del corazón, formando así la cajita de corazón.
We go back to the pink decorated cardboard, with a ruler and a pencil, pen or marker we draw a straight line on it, it must be long with a measure of 7cm wide, once marked we cut it with scissors, we will also make a small double at one end of 2cm wide. Once the strip is ready, we glue the strip with silicone all around the edge of the heart, thus forming the heart box.
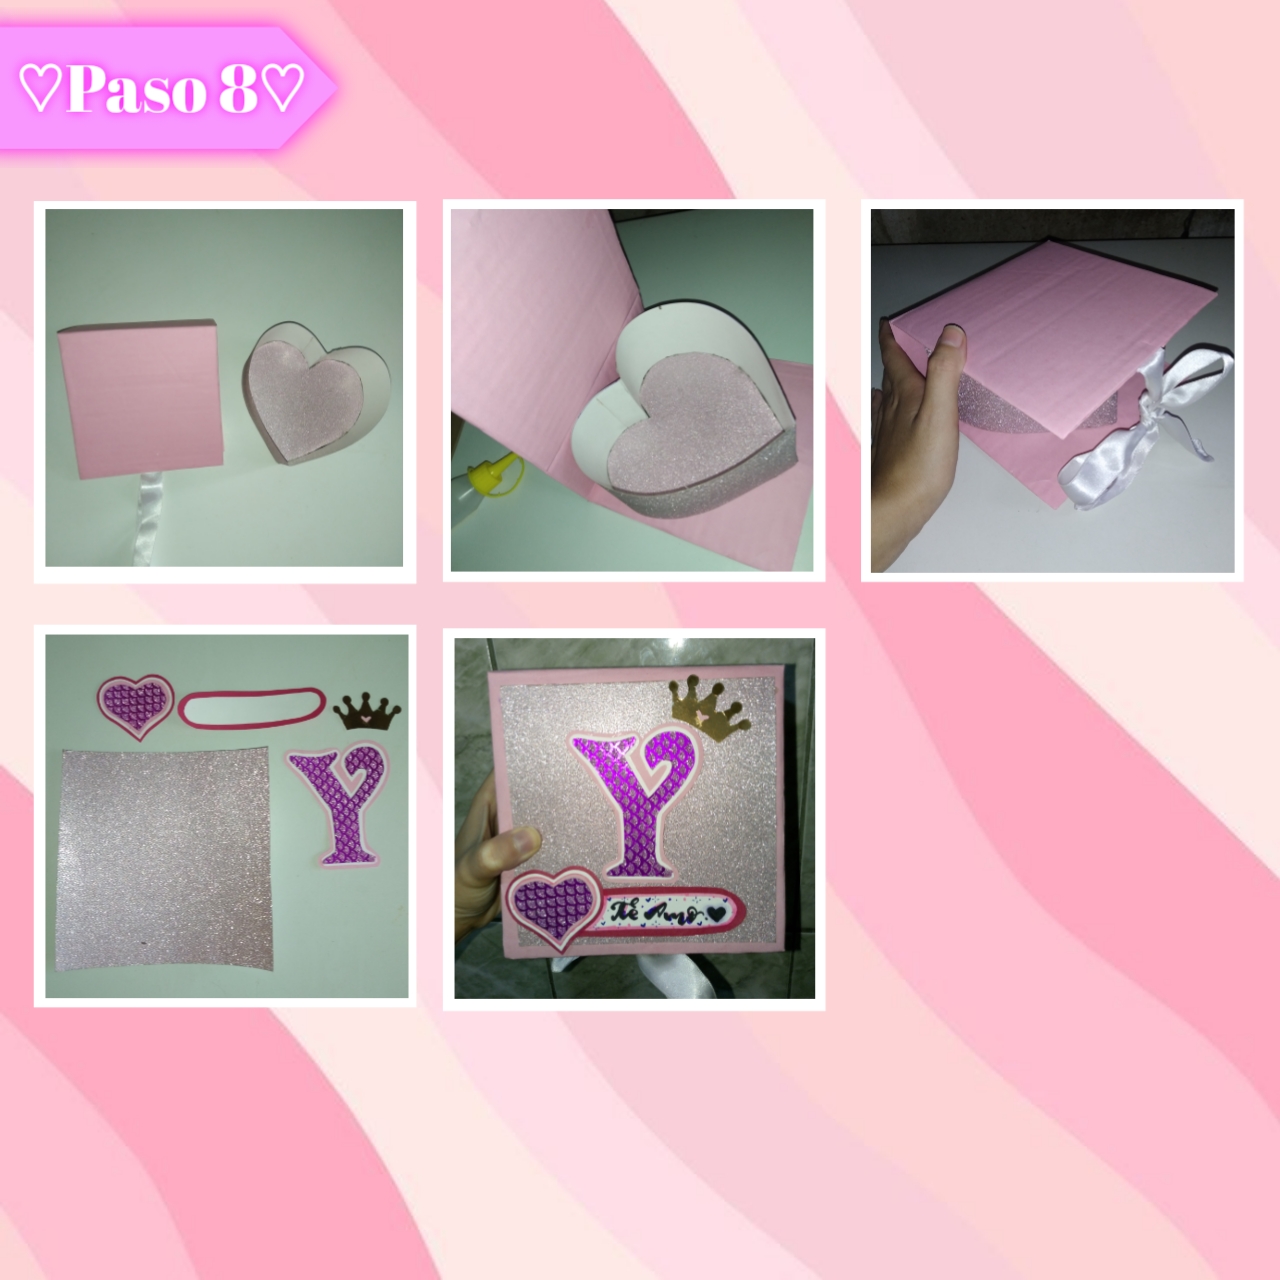
Paso 8
Step 8:
Ya teniendo nuestras dos piezas hechas, solo nos queda armar y decorar, así pegaremos con silicón la caja de corazón a la base, manteniéndolo en el margen de un solo cuadrado, además en la parte de atrás de la caja de corazón agregaremos silicón también, para lograr pegarla a la parte de atrás como se puede observar. Por último recorté un cuadrado de cartulina con 1cm menos de cada lado, comparando el de la caja, además de una inicial en mayúsculas, un corazón y otros detalles, luego los pegue en la tapa, se amarra el lazo y ya está.
Already having our two pieces made, we only have to assemble and decorate, so we will glue with silicone the heart box to the base, keeping it in the margin of a single square, also in the back of the heart box we will add silicone also, to achieve glue it to the back as you can see. Finally I cut a square of cardboard with 1cm less on each side, comparing the box, plus an initial in capital letters, a heart and other details, then glue them on the lid, tie the bow and that's it.
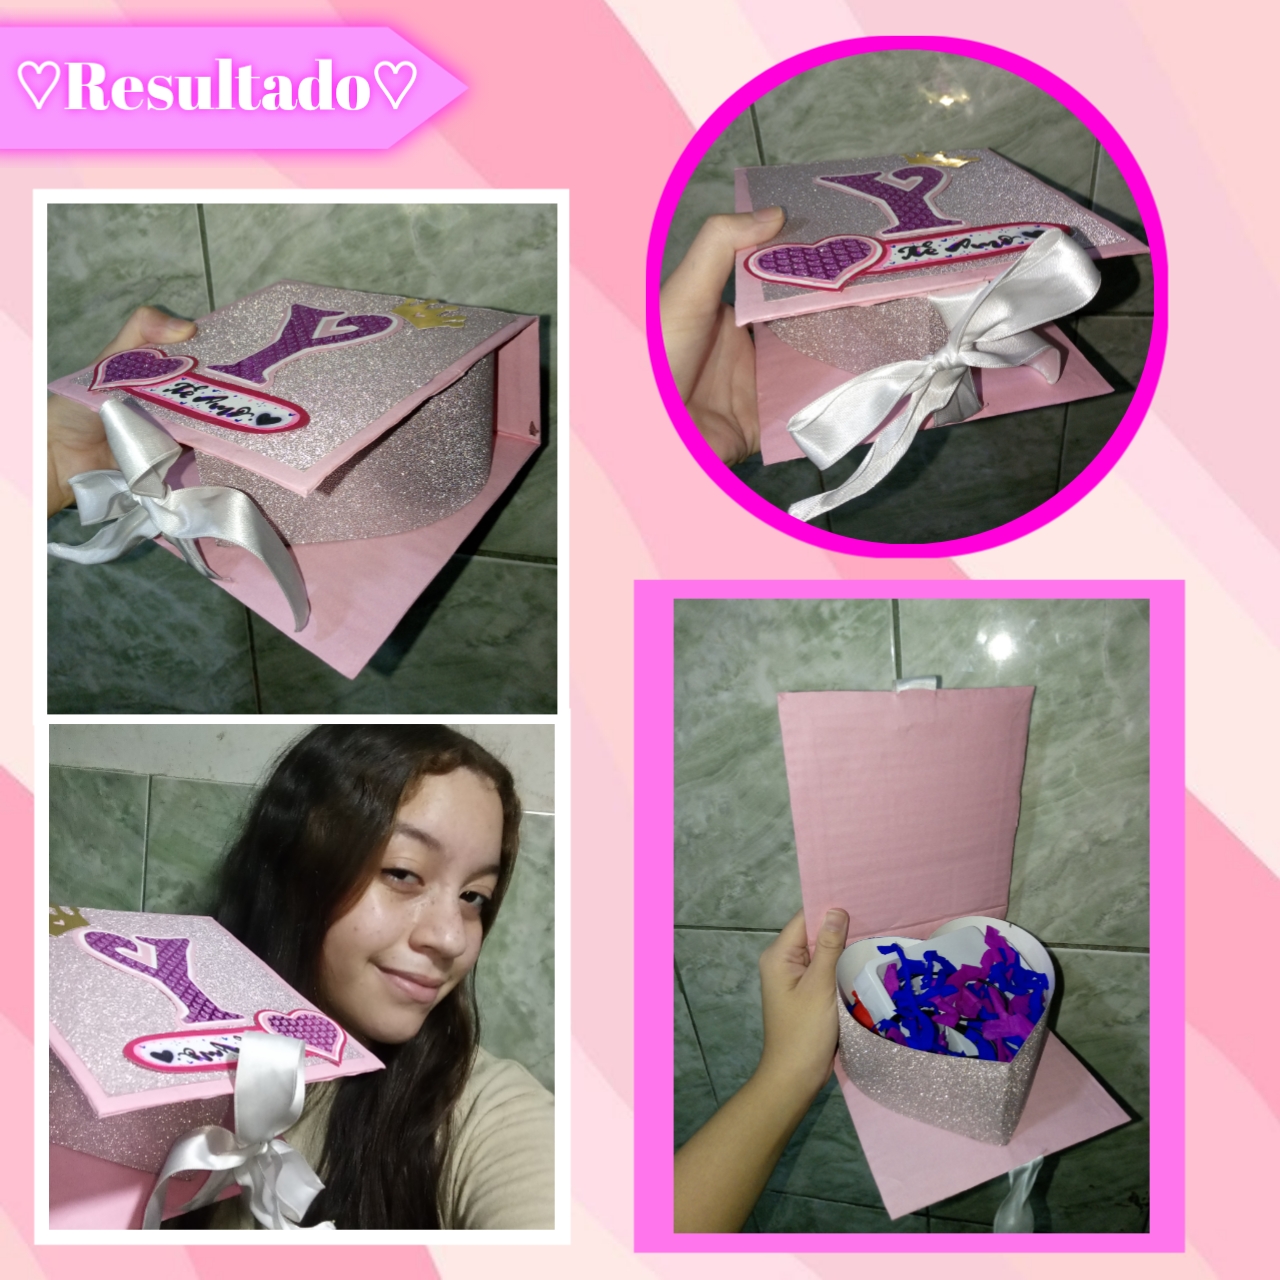
De está manera, logramos obtener una hermosa caja, fácil, rápida y linda, solo con unos cuántos sencillos pasos ya estará lista para rellenar con dulces, regalos y papelillo para dar más un toque de misterio, además se ve bonito, pueden agregar lo que deseen. Una caja muy práctica, al igual de hermosa, perfecta para regalar a las personas que más queremos, en momentos únicos, festividades o simplemente cualquier día, lo mejor de ella, es que la podemos hacer a nuestra excelencia, es decir, cada detalle lo elegimos nosotros, solo hay que ponerle creatividad, empeño y amor.
In this way, we get a beautiful box, easy, fast and cute, just with a few simple steps and will be ready to fill with candy, gifts and paper to give more a touch of mystery, plus it looks nice, you can add what you want. A very practical box, as well as beautiful, perfect to give to the people we love the most, in unique moments, holidays or just any day, the best thing about it, is that we can make it to our excellence, that is, every detail is chosen by us, we just have to put creativity, commitment and love.
Esto fue todo por la manualidad de hoy, me alegra compartirles cada creación que hago con mucho amor, espero les haya gustado tanto como a mí y que no tengan miedo de recrearla, es muy fácil y no toma una gran cantidad de tiempo. Sin más que agregar, me despido con un fuerte abrazo, hasta el siguiente Diy.💗
This was all for today's craft, I am happy to share with you every creation I make with a lot of love, I hope you liked it as much as I did and that you are not afraid to recreate it, it is very easy and does not take a great amount of time. Without more to add, I say goodbye with a big hug, until the next Diy.
💕 Gracias por leer 💕
💕 Thanks for reading 💕
Photos of my authorship taken from my Xiaomi Redmi 7 phone, edited in the free version of PixeLab
The gift box looks good and ready to go. can fill it up with candy too, bravo.
Yes, it is useful and beautiful, thanks for commenting. ❤️
Amiga, te quedo muy bonita, y el rosado es de mis colores favoritos.
Gracias por compartir
Entonces es ideal para ti, me alegra mucho que te haya gustado y gracias a ti por apoyar.💕
@stefania16
https://leofinance.io/threads/view/hive-130560/re-leothreads-2rzg29pxh
https://twitter.com/hivediy47901/status/1707629522466562330
Gracias por compartir.✨