Hermosa caja musical para obsequiar 💜🎼 | Tutorial paso a paso 🤍✨ [ESP-ENG]
Hello my amazing creative family! A big hug to everyone around here, I wish you today a happy and of course blessed Thursday, I also hope that this new month both in the community and in the life of each of you is greatly blessed, I hope you have your creativity at 100%, as well as that desire to create and continue to innovate. May it be a productive month! Best wishes always.💜🤍
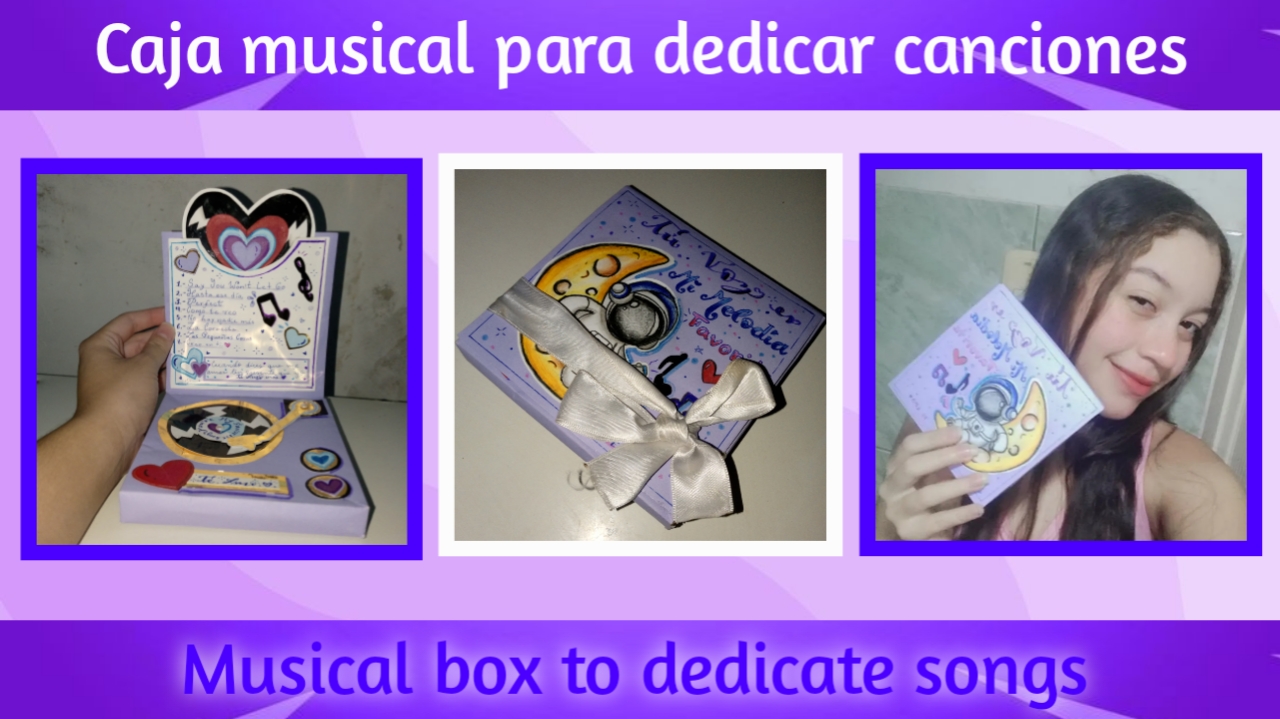
En está oportunidad les traigo una idea única, original y sobre todo hermosa, un tutorial especial para esas personas románticas que les gusta demostrar su amor con detalles hechos a mano con mucho amor para nuestras personas especiales, claro que sí. Les hablo sobre una caja musical decorativa, más que ideal para dedicar canciones a nuestra persona favorita, es bastante bonita y a cualquiera enamora, yo la usaré para formar parte de una caja de los 5 sentidos, representando está el sentido del oído, así la pueden usar de igual manera o también para regalar individualmente, sin más que decir, vamos con el Diy de está hermosa manualidad.♡
This time I bring you a unique, original and above all beautiful idea, a special tutorial for those romantic people who like to show their love with handmade details with lots of love for our special people, of course. I'm talking about a decorative musical box, more than ideal to dedicate songs to our favorite person, it is quite nice and anyone falls in love, I will use it to be part of a box of the 5 senses, representing is the sense of hearing, so you can use it in the same way or also to give individually, without more to say, let's go with the Diy of this beautiful craft.♡
♡🤍📎Materials to be used 📎🤍♡
- Cartulinas de distintos colores, entre ellos son escenciales el negro, blanco y dorado
- Tijeras
- Silicón
- Regla
- Lápiz
- Marcadores
- Cardboard of different colors, among which black, white and gold are essential.
- Scissors
- Silicone
- Ruler
- Pencil
- Marker pencils
♡💜✨Step by Step✨💜♡
Paso 1:
Step 1:
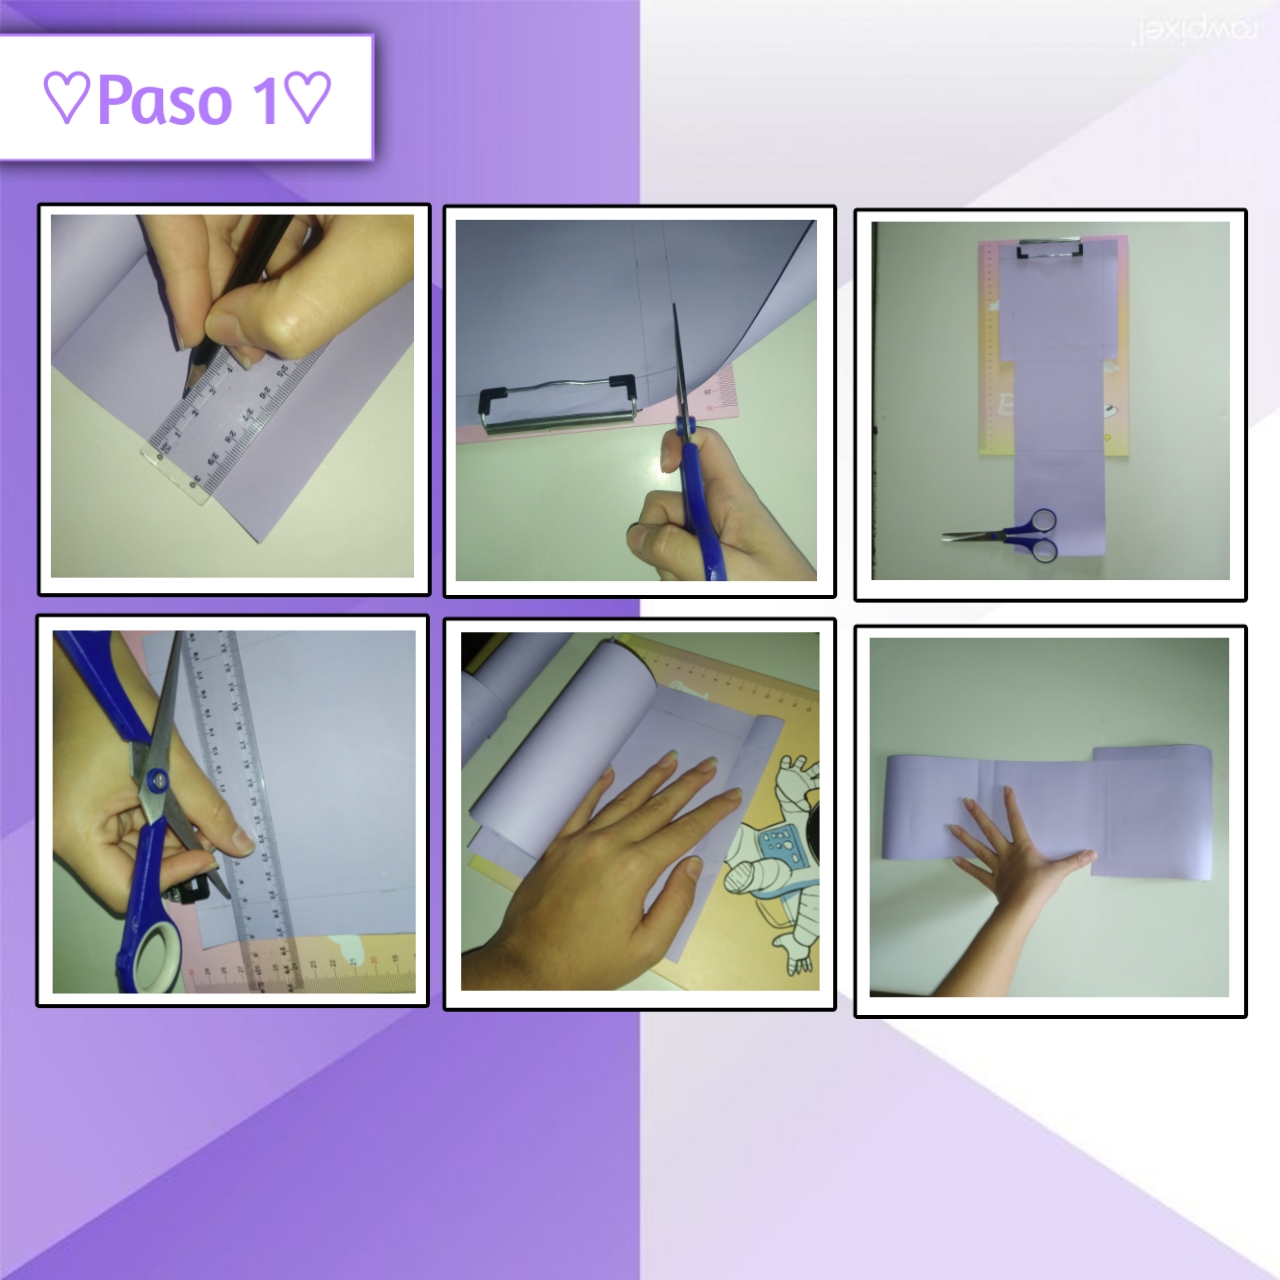
Para empezar tomaremos nuestra cartulina, al igual que la plantilla, yo en este caso la marque directamente, ya que tuve que crear la plantilla (incluso se me pasó crear las solapas que al final agregué), la cosa es que tomarán su lápiz, colocarán la plantilla encima y solo es cuestión de marcar, luego con una regla midiendo y calculando haremos las líneas de en medio hasta terminar con toda la forma. Continuaremos recortando con nuestra tijera toda la figura, luego con la misma y con el apoyo de una regla marcaremos aplicando solo un poco de presión, para marcar los dobleces.
To start we will take our cardboard, as well as the template, in this case I marked it directly, since I had to create the template (I even forgot to create the flaps that I added at the end), the thing is that you will take your pencil, place the template on top and it is only a matter of marking, then with a ruler measuring and calculating we will make the lines in the middle until finishing with the whole shape. We will continue cutting with our scissors all the figure, then with the same and with the support of a ruler we will mark applying only a little pressure, to mark the folds.
Paso 2:
Step 2:
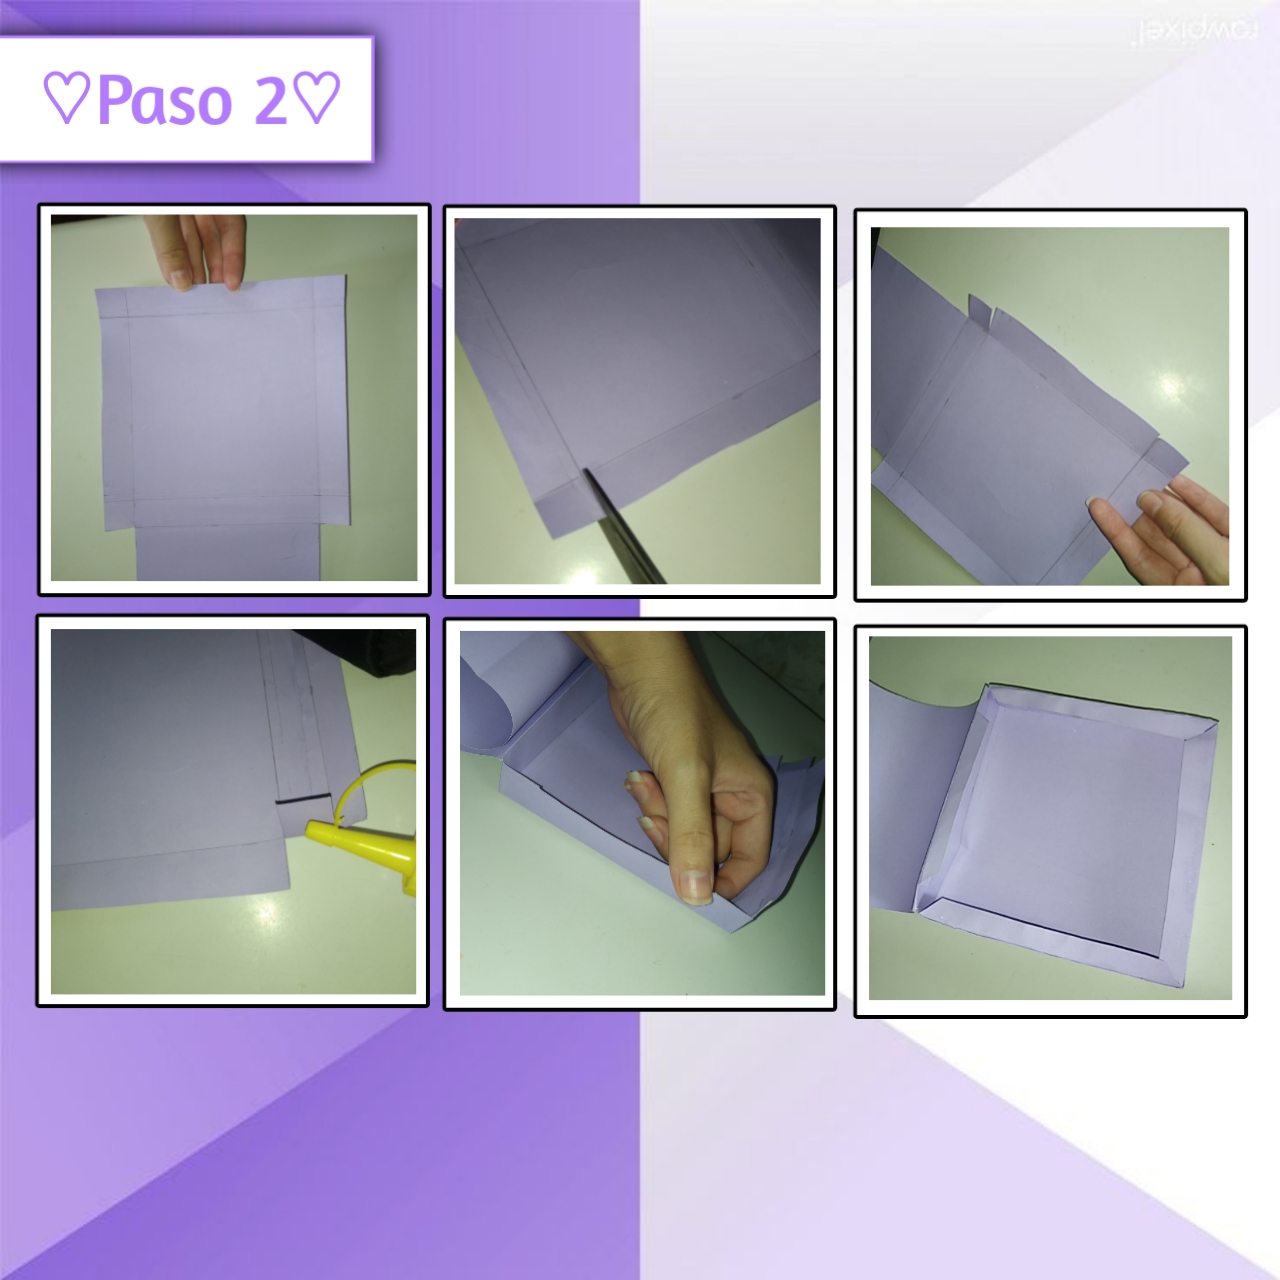
Seguimos con la parte que tiene las distintas pestañas, así recortaremos de forma recta las líneas horizontales de los lados, justamente hasta la líneas del dobles, no debemos pasarnos de ahí, así haremos con las cuatro líneas que les marcó en rojo en la plantilla. Después unimos las partes recortadas agregando una pequeña gota de silicón y sosteniendo unos cuantos segundos hasta que pegue bien, así haremos nuevamente con los cuatro lados, hasta formar en esta parte una pequeña cajita.
We continue with the part that has the different tabs, so we will cut straight the horizontal lines of the sides, just until the lines of the double, we must not go beyond there, so we will do with the four lines marked in red on the template. Then we join the cut parts adding a small drop of silicone and holding a few seconds until it sticks well, so we will do again with the four sides, to form in this part a small box.
Paso 3:
Step 3:
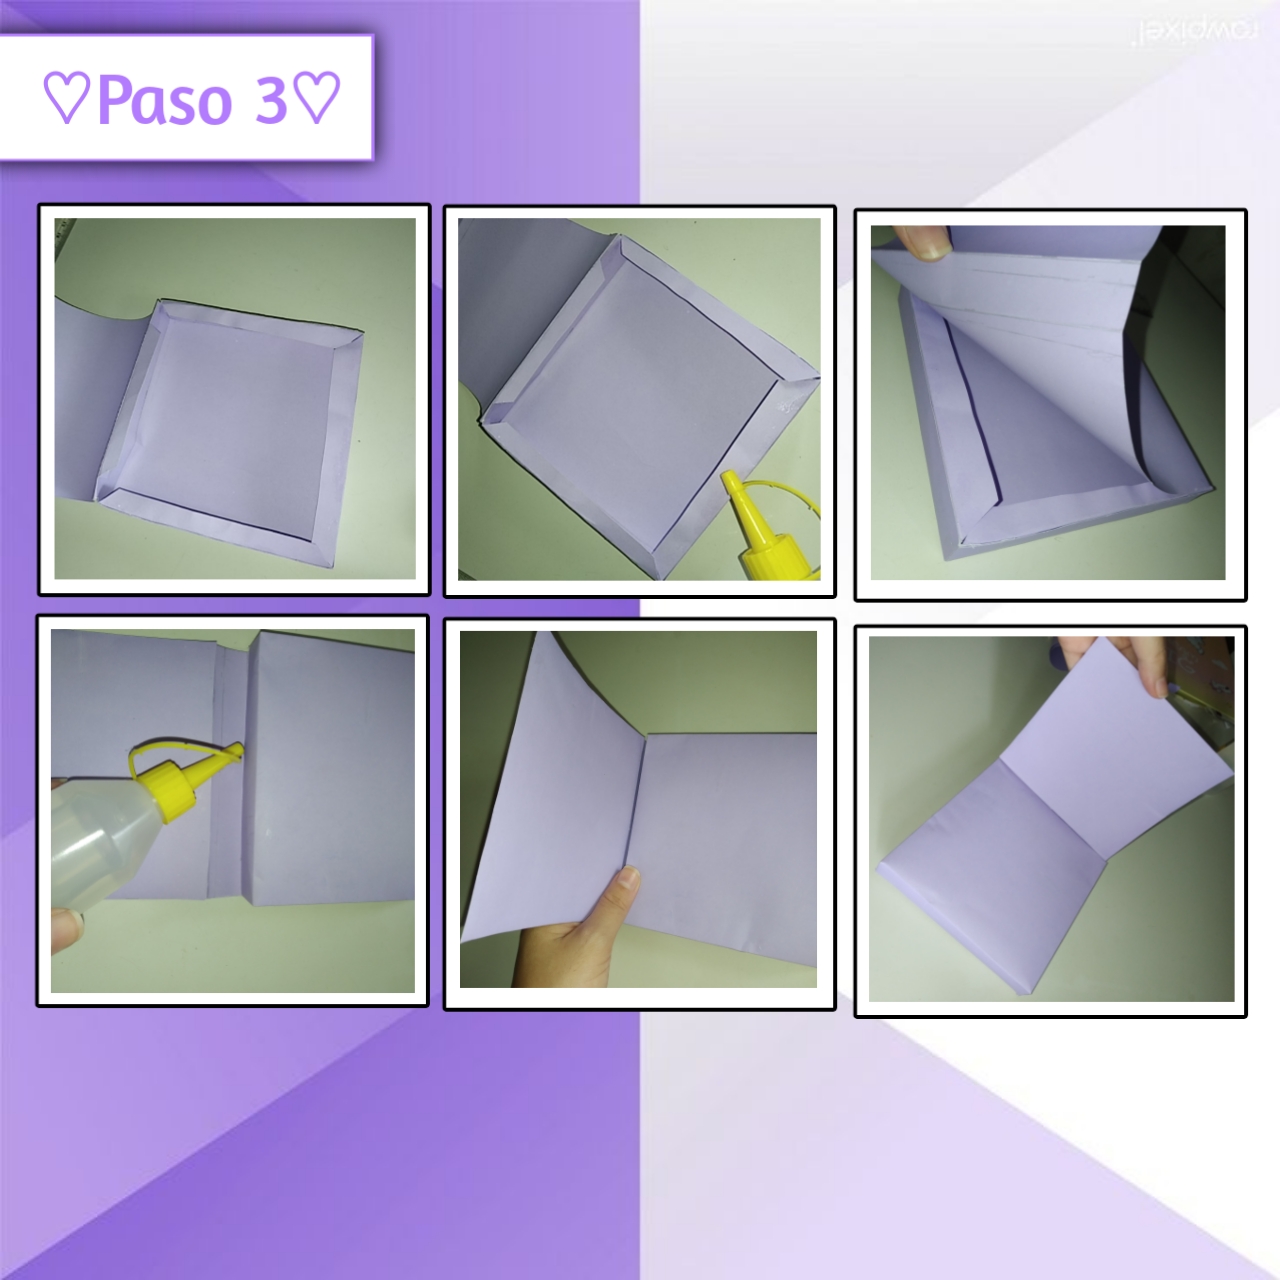
Ahora vamos a tomar nuestro silicón y agregaremos la cantidad justa en cada una de las solapas (son tres), así rápidamente lo pegaremos al siguiente cuadrado que tenemos, haciendo que quede justo y sosteniendo unos pocos segundos hasta lograr pegar esto. Cómo podemos observar nos queda un dobles de 2cm y un cuadrado, agregaremos silicón en el dobles que sigue, bien sea frío o caliente (el de nuestra preferencia), así unimos muy bien, quedando nuestra pieza en dos cuadrados unidos, uno como caja cerrada y la otra como tapa se puede decir, queda flexible.
Now we are going to take our silicone and add the right amount in each of the flaps (there are three), so we will quickly glue it to the next square we have, making it just right and holding a few seconds to achieve this glue. As we can see we have a 2cm double and a square, we will add silicone in the next double, either cold or hot (the one of our preference), so we join very well, leaving our piece in two united squares, one as a closed box and the other as a lid you can say, it is flexible.
Paso 4:
Step 4:
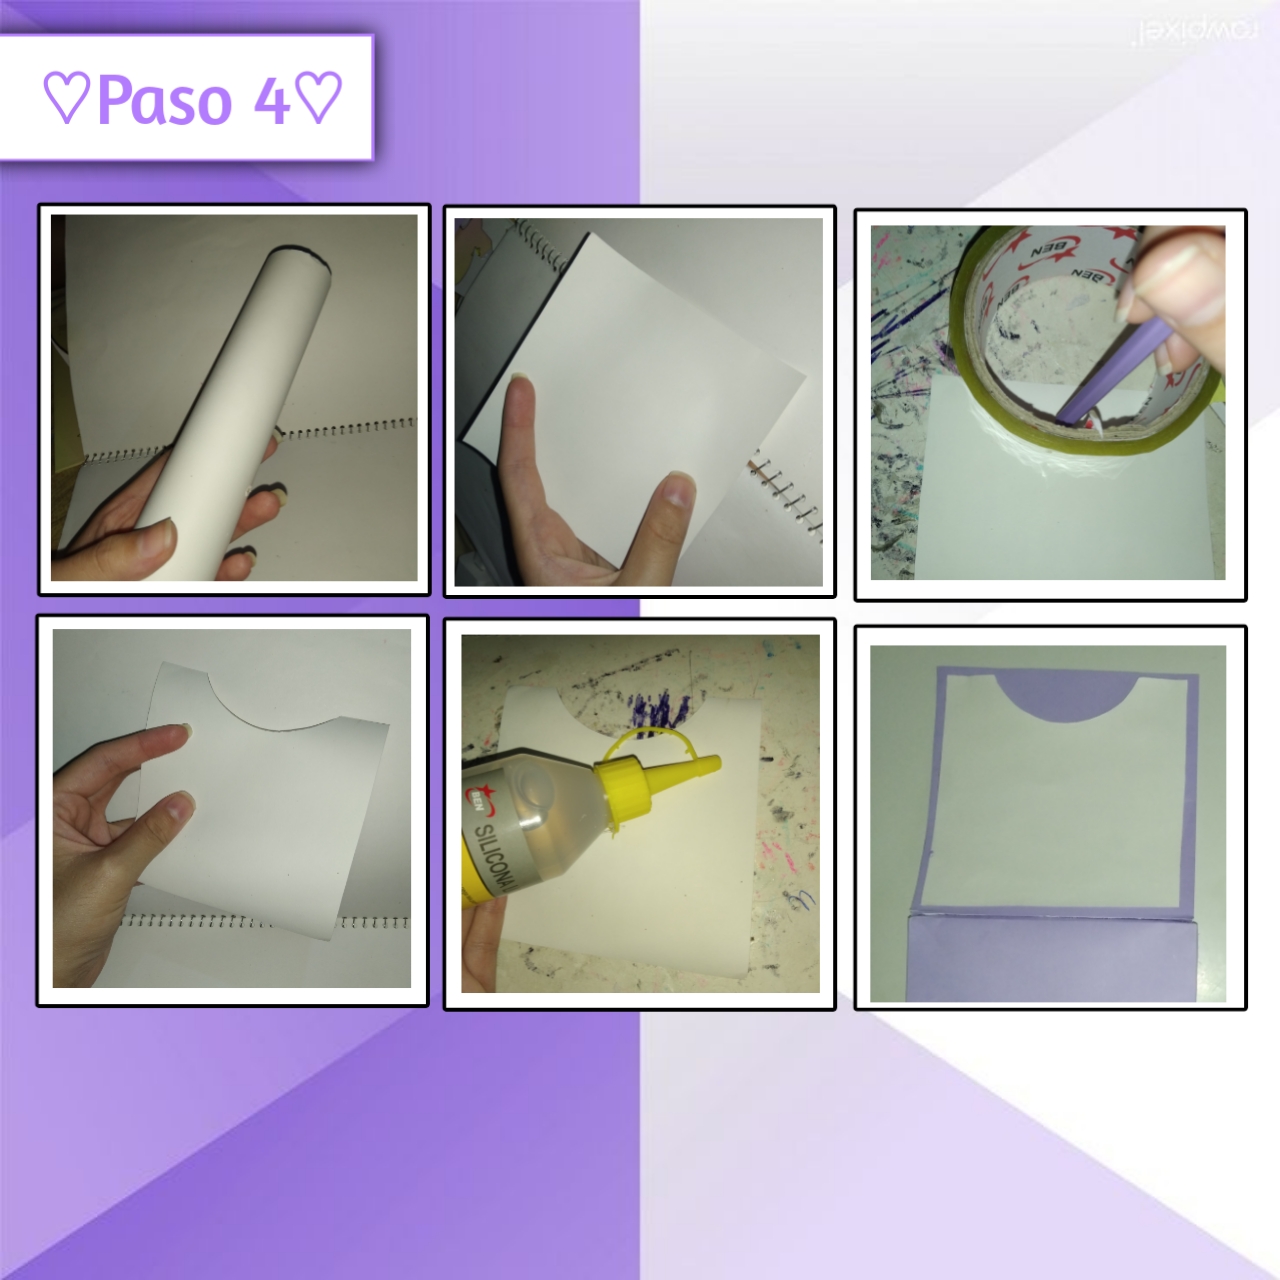
Comenzamos con los detalles, tomaremos una cartulina de color blanco, para continuar recortando un cuadrado con 1cm menos de cada lado, es decir con la medida en este caso de 12cm x 12cm, luego tomaremos algo redondo que nos sirva como guía para posicionar este sobre uno de los lados, dejando un espacio en cada esquina, marcamos con un lápiz y proseguimos a recortar, así obteniendo la forma deseada, pegaremos con silicón a la parte interna de la tapa de nuestra base, solo agregando silicón en los bordes, no pegamos por completo, para que quede como funda.
We start with the details, we will take a white cardboard, to continue cutting a square with 1cm less on each side, that is to say with the measure in this case of 12cm x 12cm, then we will take something round that will serve as a guide to position this on one of the sides, We mark with a pencil and continue to cut, thus obtaining the desired shape, we will glue with silicone to the inside of the lid of our base, only adding silicone on the edges, we do not glue completely, so that it remains as a cover.
Paso 5:
Step 5:
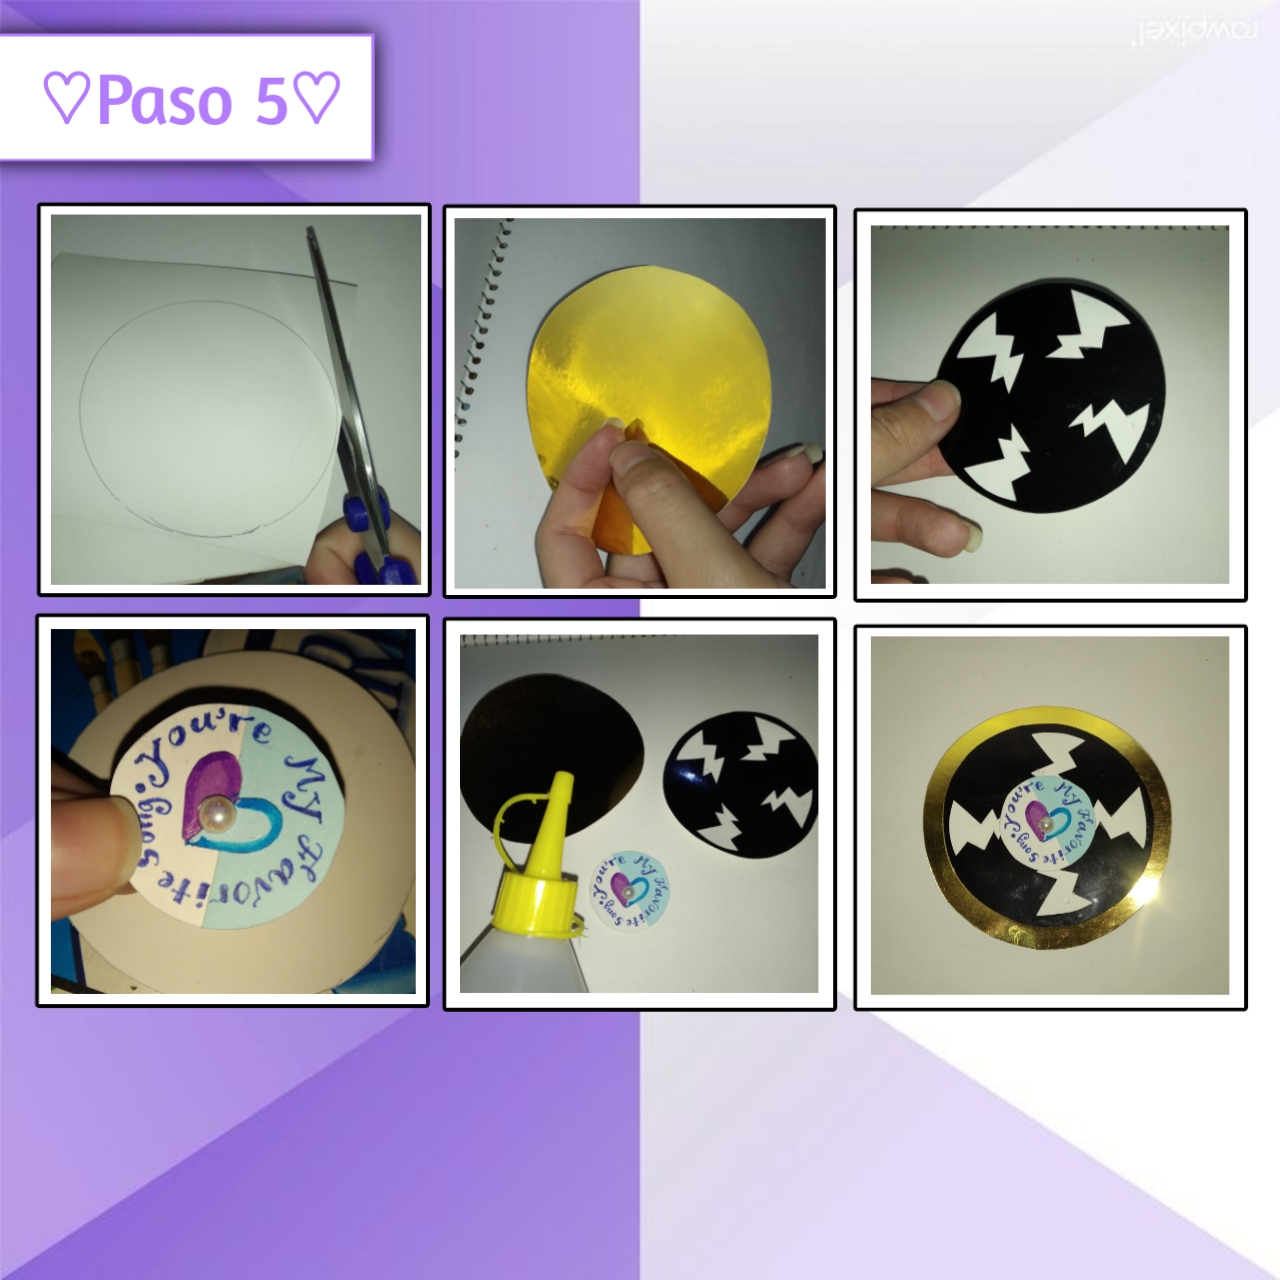
Es hora de armar una pieza nueva, para está necesitamos tres círculos cada uno más pequeño que el otro, teniendo en cuenta que el más grande debe entrar en la base de la cajita y debe dejar un poco de espacio, así marque y recorte primero un círculo dorado (el más grande), luego uno negro al cuál le agregué una especie de "rayos" blancos a los lados, para simular el disco y el último y más pequeño en dos colores: azul y blanco, además este lo decore con una frase en inglés un corazón y una perlita, teniendo estos tres agregué silicón en el mediano (negro) y lo pegue sobre el grande, continue pegando también el pequeño, pero ahora encima del mediado, todo esto centrando cada uno.
It's time to assemble a new piece, for this we need three circles each one smaller than the other, taking into account that the largest must enter the base of the box and should leave a little space, so mark and cut out first a golden circle (the largest), then a black one to which I added a kind of "rays" white on the sides, to simulate the disk and the last and smallest in two colors: blue and white, I also decorated this one with a phrase in English, a heart and a pearl, having these three I added silicone in the medium (black) and glued it over the big one, continue gluing also the small one, but now on top of the medium one, all this centering each one.
Paso 6:
Step 6:
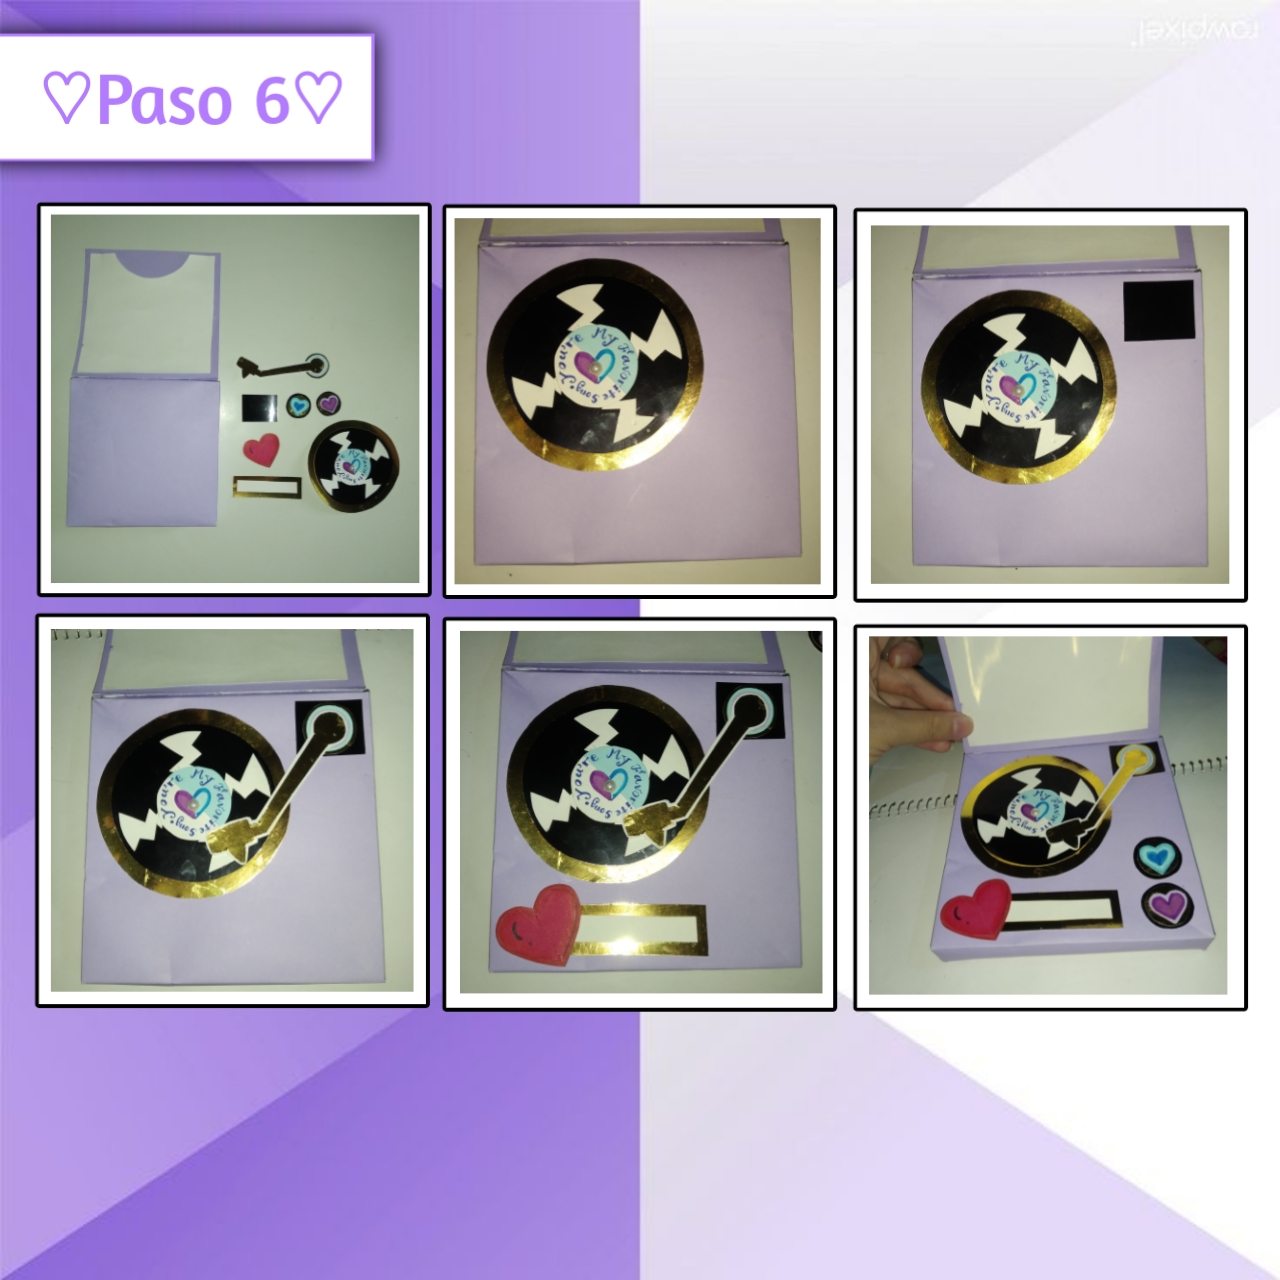
Ya teniendo la pieza anterior, haremos otras seis pequeñas piezas, dos botones pequeños (yo les agregué un corazón a cada uno), también un pequeño rectángulo, la pieza que se supone hace sonar el equipo (el cabezal) y también un corazón y un pequeño rectángulo alargado, todas estás con distintas capas y colores de cartulina, más que todo, dorado, blanco y negro. Además, también tomaremos nuestra base principal y así, comenzaremos agregando silicón al disco y pegaremos hacía el lado izquierdo dejando un poco de espacio, luego siguen las otras piezas, el rectángulo va en la esquina superior derecha, dejando un pequeño margen, encima y centrado va el cabezal, luego debajo del disco el rectángulo alargado, con el corazón encima y por último los dos botones, todo en la base de la pequeña caja.
Already having the previous piece, we will make six other small pieces, two small buttons (I added a heart to each one), also a small rectangle, the piece that is supposed to make the machine sound (the head) and also a heart and a small elongated rectangle, all of these with different layers and colors of cardboard, mostly gold, white and black. In addition, we will also take our main base and so, we will start adding silicone to the disk and glue it to the left side leaving a little space, then follow the other pieces, the rectangle goes in the upper right corner, leaving a small margin, above and centered goes the head, then below the disk the elongated rectangle, with the heart on top and finally the two buttons, all at the base of the small box.
Paso 7:
Step 7:
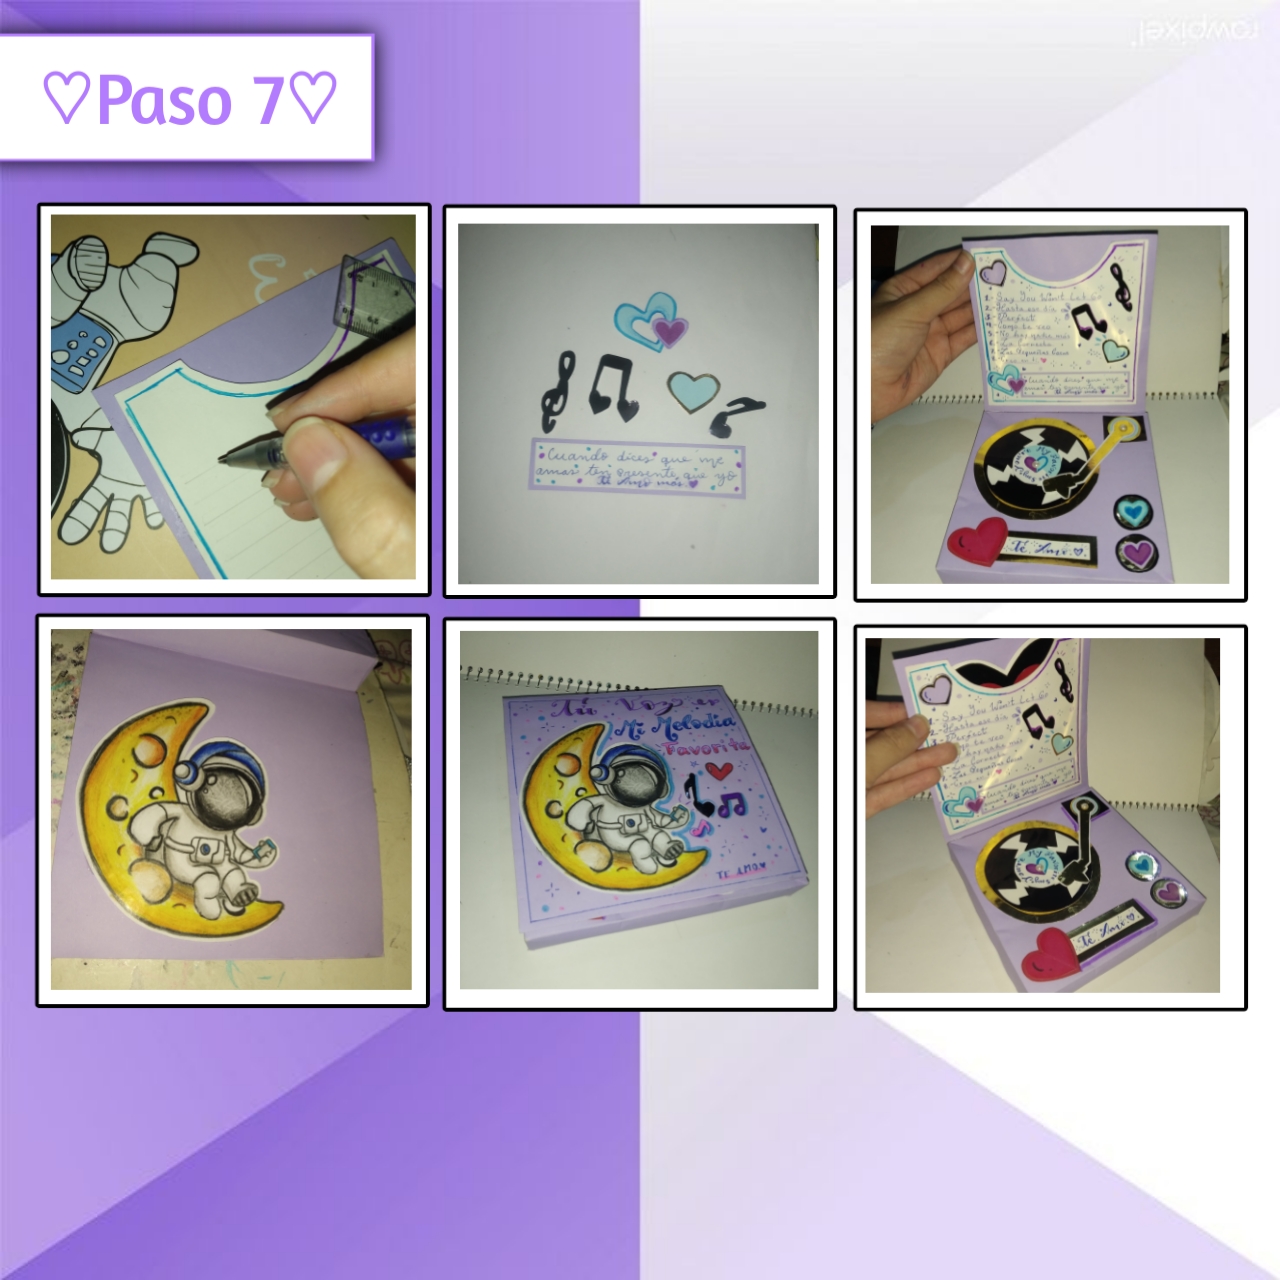
Ahora bien, vamos con la parte de arriba, así primero haremos un pequeño margen con colores o marcadores, yo lo hice con dos marcadores, me apoye de una regla, continue haciendo líneas rectas con lápiz para escribir derecho, así tome un lapicero y comencé a escribir el nombre de las canciones enumerando cada una. Después tomé pequeñas decoraciones, como corazones y notas musicales, además de un pequeño rectángulo con una frase.
Now, let's go to the top, so first we will make a small margin with colors or markers, I did it with two markers, I used a ruler, continue making straight lines with pencil to write straight, so I took a pen and began to write the name of the songs listing each one. Then I took small decorations, like hearts and musical notes, plus a small rectangle with a phrase.
Ya lista la parte anterior, vamos con la portada de nuestra cajita, así hice un dibujo de un astronauta y lo pegue en está, por último agregué una frase y pequeñas decoraciones con marcadores, además de un margen, aparte hice un corazón como un disco, para agregar está como carta en el bolsillo que dejamos en la parte de adentro y ya está.
Now that the previous part is ready, let's go with the cover of our box, so I made a drawing of an astronaut and glued it on this one, finally I added a phrase and small decorations with markers, plus a margin, besides I made a heart like a disk, to add this as a letter in the pocket that we left on the inside and that's it.
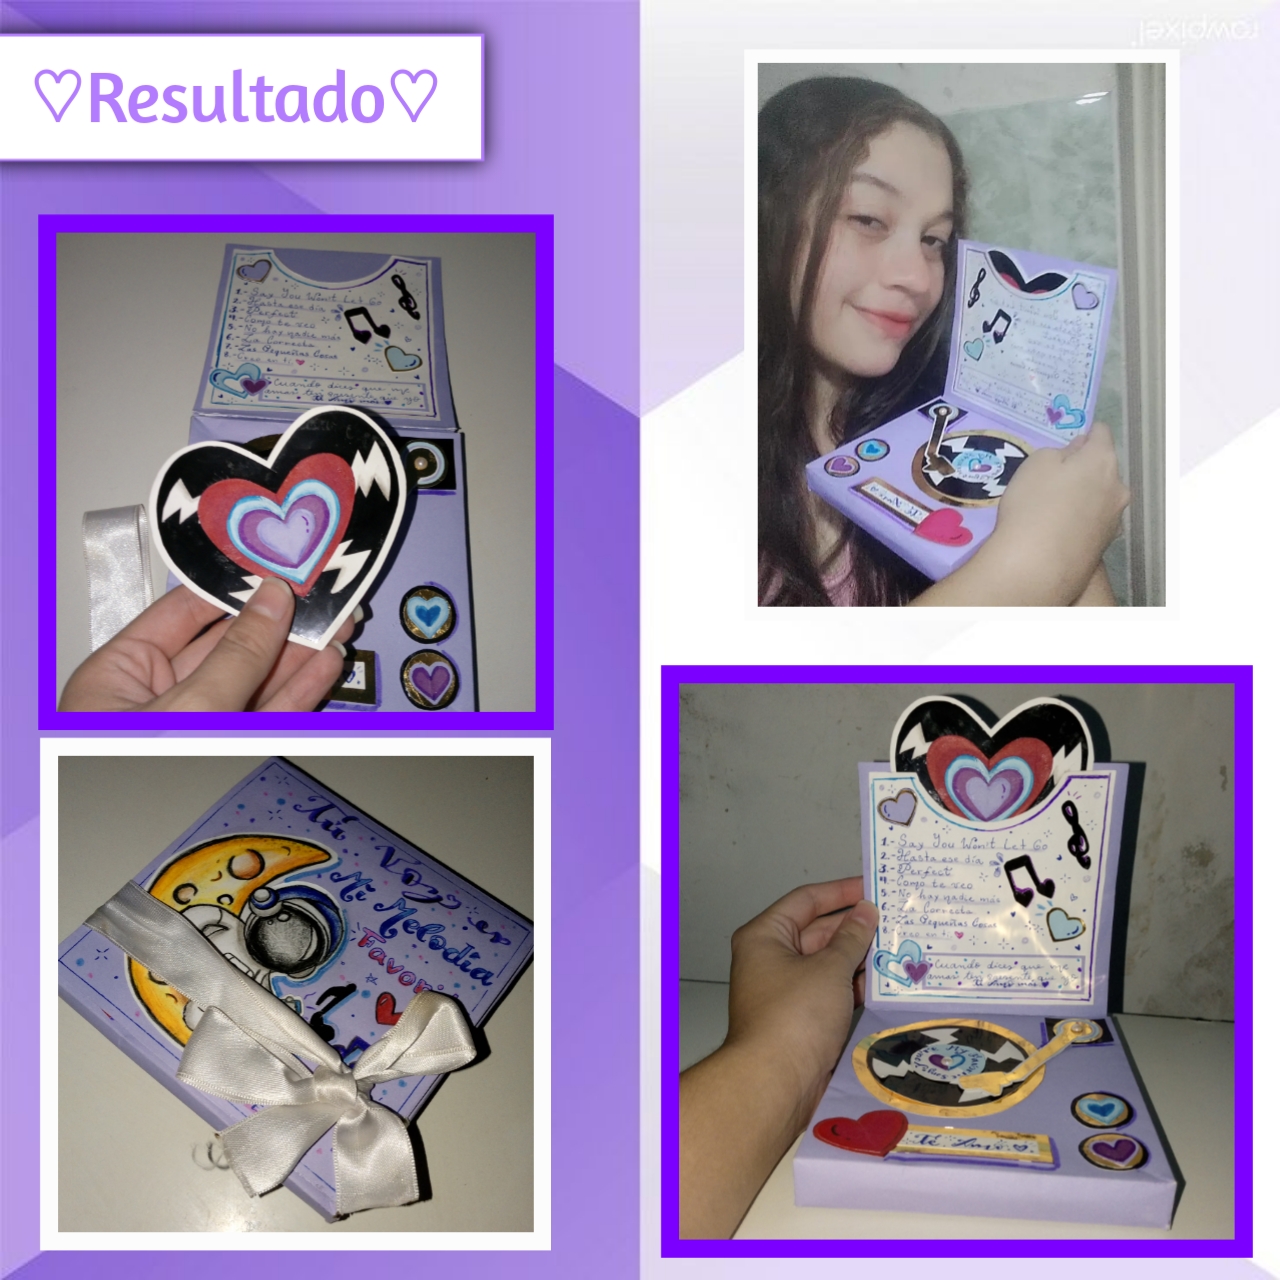
De está manera, logramos obtener como resultado una hermosa cajita decorativa musical, ideal para dedicar esas canciones especiales a nuestras personas especiales, lleva su debido proceso, pero queda preciosa y la persona a la que se la den la va a amar, porque es algo único y original. Al final le pueden amarrar un lacito también, para dar el toque final, verdaderamente vale la pena, es buena idea para vender, lo podemos hacer de diversos colores, además de distintas temáticas, todo a nuestra elección.
This way, we get as a result a beautiful decorative musical box, ideal to dedicate those special songs to our special people, it takes its due process, but it is beautiful and the person to whom you give it will love it, because it is something unique and original. At the end you can also tie a bow, to give the final touch, it is really worth it, it is a good idea to sell, we can do it in different colors, in addition to different themes, all at our choice.

Antes de despedirme, les dejó por aquí algunas ideas de las cuales me inspire, para que tengan una guía y lo vean en distintos colores.
Before I say goodbye, here are some of the ideas that inspired me, so that you can have a guide and see it in different colors.
Fuente 1
Fuente 2
Fuente 3
Así está publicación llega a su fin, un tutorial un poco largo, pero a la vez sencillo, espero les haya gustado está idea y se ayuden con ella, más aún con la plantilla, ya que la tuve que crear, porque no encontré en ningún lado. Un placer compartir con ustedes, tengan un felíz día, un abrazo familia.💜✨
So this publication comes to an end, a tutorial a little long, but at the same time simple, I hope you liked this idea and help yourself with it, even more with the template, because I had to create it, because I did not find it anywhere. A pleasure to share with you, have a happy day, a hug family.💜✨
🎵💜¡Gracias por leer!💜🎵
🎵💜Thanks for reading!💜🎵
Photos of my authorship taken from my Xiaomi Redmi 7 phone, edited in the free version of PixeLab
¡Felicidades! Esta publicación obtuvo upvote y fue compartido por @la-colmena, un proyecto de Curación Manual para la comunidad hispana de Hive que cuenta con el respaldo de @curie.
Si te gusta el trabajo que hacemos, te invitamos a darle tu voto a este comentario y a votar como testigo por La Colmena.
Si quieres saber más sobre nuestro proyecto, te invitamos a acompañarnos en nuestro servidor de Discord.
Muchas gracias ¡Un abrazo!💙
Te felicito hijita está es una idea excelente, las cajas de música son bien costosas, por eso es bien importante aprender hacerlas, gracias por compartir
Muchas gracias, un abrazo enorme abuelita hermosa.💗🥰
https://twitter.com/hivediy47901/status/1723326193158525043
¡Gracias!😍❤️
Que lindo... bueno que suene la MUSICA💿 🎼