Diy marco para fotos para darle un toque diferente a tus imágenes o dibujos ✨🖤 | En 3 sencillos pasos + plantilla⚡💛 [ESP-ENG]
Hello to my creative Hive Diy family! Have a happy and much more than blessed start of the week from me, as I usually mention, I wish you all the best things today, tomorrow, the day after and even the rest of the week and of course the month, hoping that you are doing great, that you take advantage of each day 100%, that you are productive, as well as creative and dreamers, that you are positive and that you and your loved ones have lots of health, always my best wishes family.♡
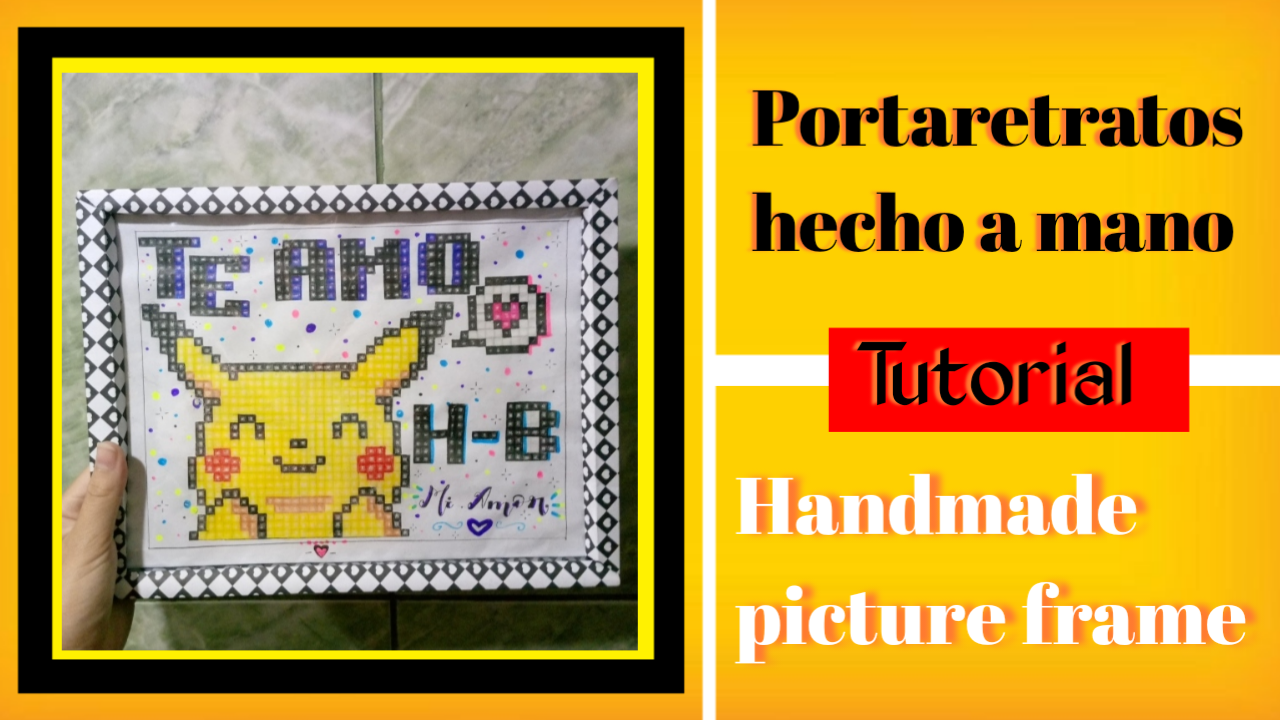
En este agradable encuentro, les tengo planeado mostrar el paso a paso bien explicado, de como realice una clase de portaretratos, es algo relativamente sencillo, pero que sin duda, le dará un toque magnífico a cualquier foto, imágen o dibujo que queramos colgar en cualquier espacio de la casa, bien sea la sala, la cocina o nuestro pequeño espacio personal. Una excelente alternativa al no tener un marco o portaretratos a la mano, nos puede sacar de apuros, lo mejor de ello, es que lo podemos hacer del color y diseño que queramos, es cuestión de elegir la cartulina y hacer magia con ella ja, ja, ja. También es importante mencionar que es posible realizarlo con un bajo presupuesto, así que es la manualidad ideal para dar ese toque diferente a nuestras imágenes y espacios.
In this pleasant encounter, I plan to show you the step by step explanation of how to make a kind of picture frame, it is something relatively simple, but without a doubt, it will give a magnificent touch to any photo, image or drawing that we want to hang in any space of the house, either the living room, kitchen or our small personal space. An excellent alternative to not having a frame or picture frame at hand, it can get us out of trouble, the best thing about it, is that we can do the color and design we want, it's a matter of choosing the cardboard and do magic with it ha, ha, ha, ha. It is also important to mention that it is possible to make it with a low budget, so it is the ideal craft to give that different touch to our images and spaces.
A continuación les muestro desde principio a fin el proceso.
Below I show you the process from start to finish.
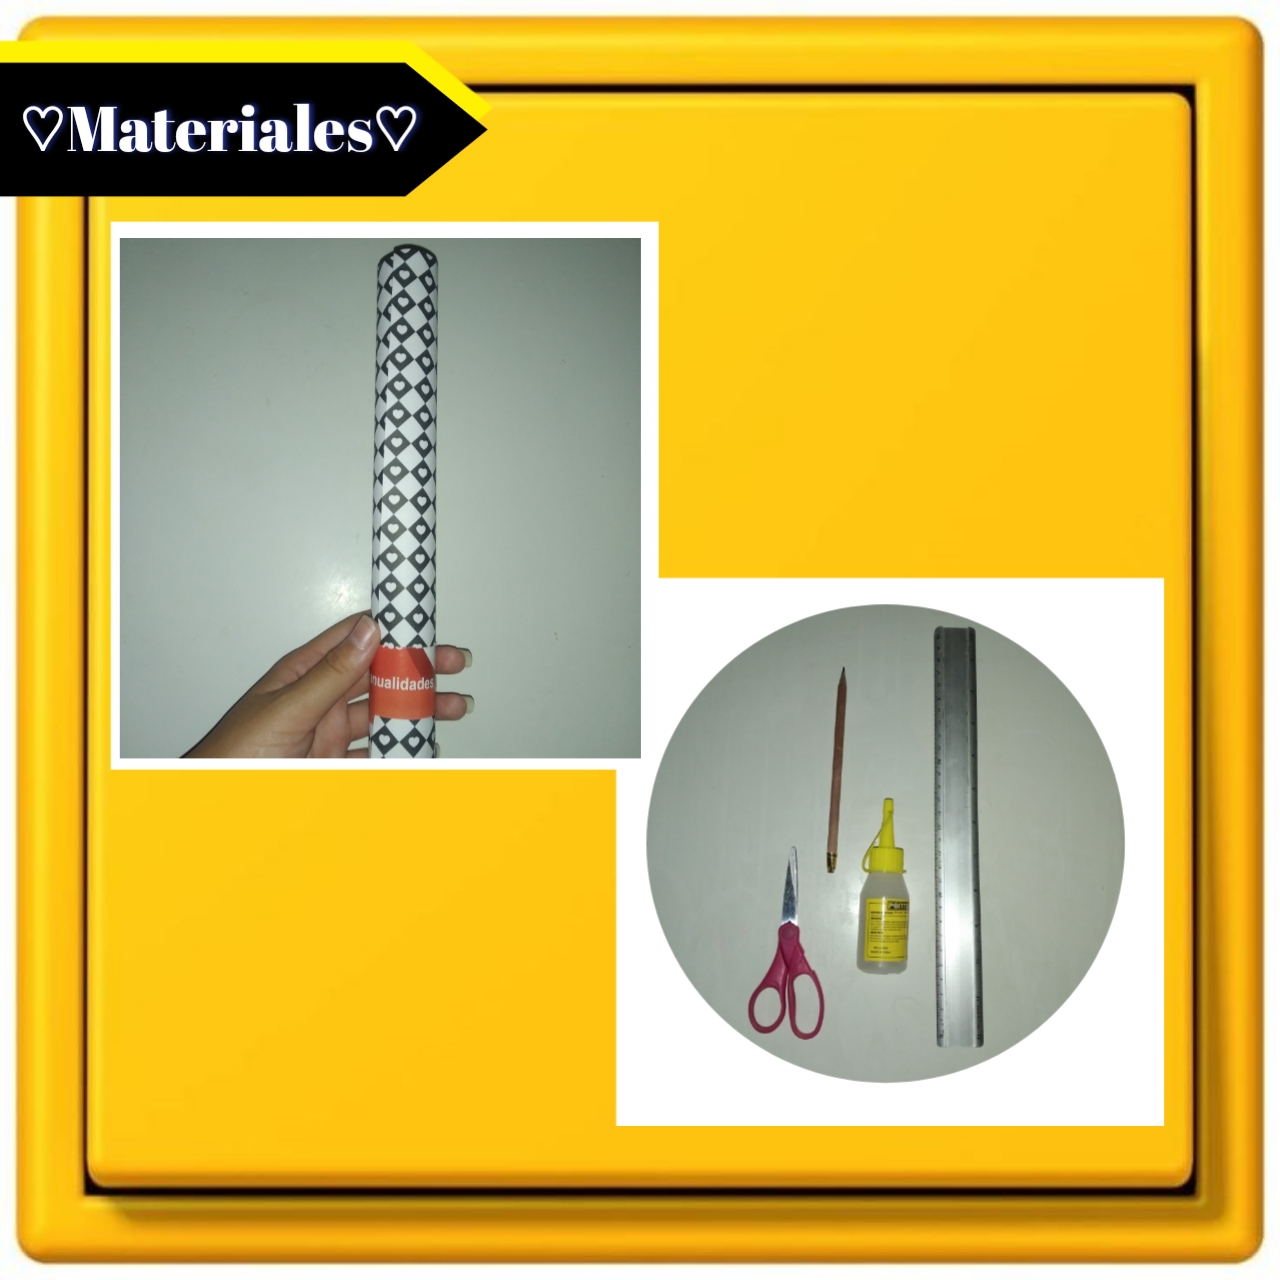
♡Materials♡
- Cartulina
- Regla
- Tijeras
- Silicón
- Teipe
- Lápiz
- cardboard
- Ruler
- Scissors
- Silicone
- Tape
- Pencil
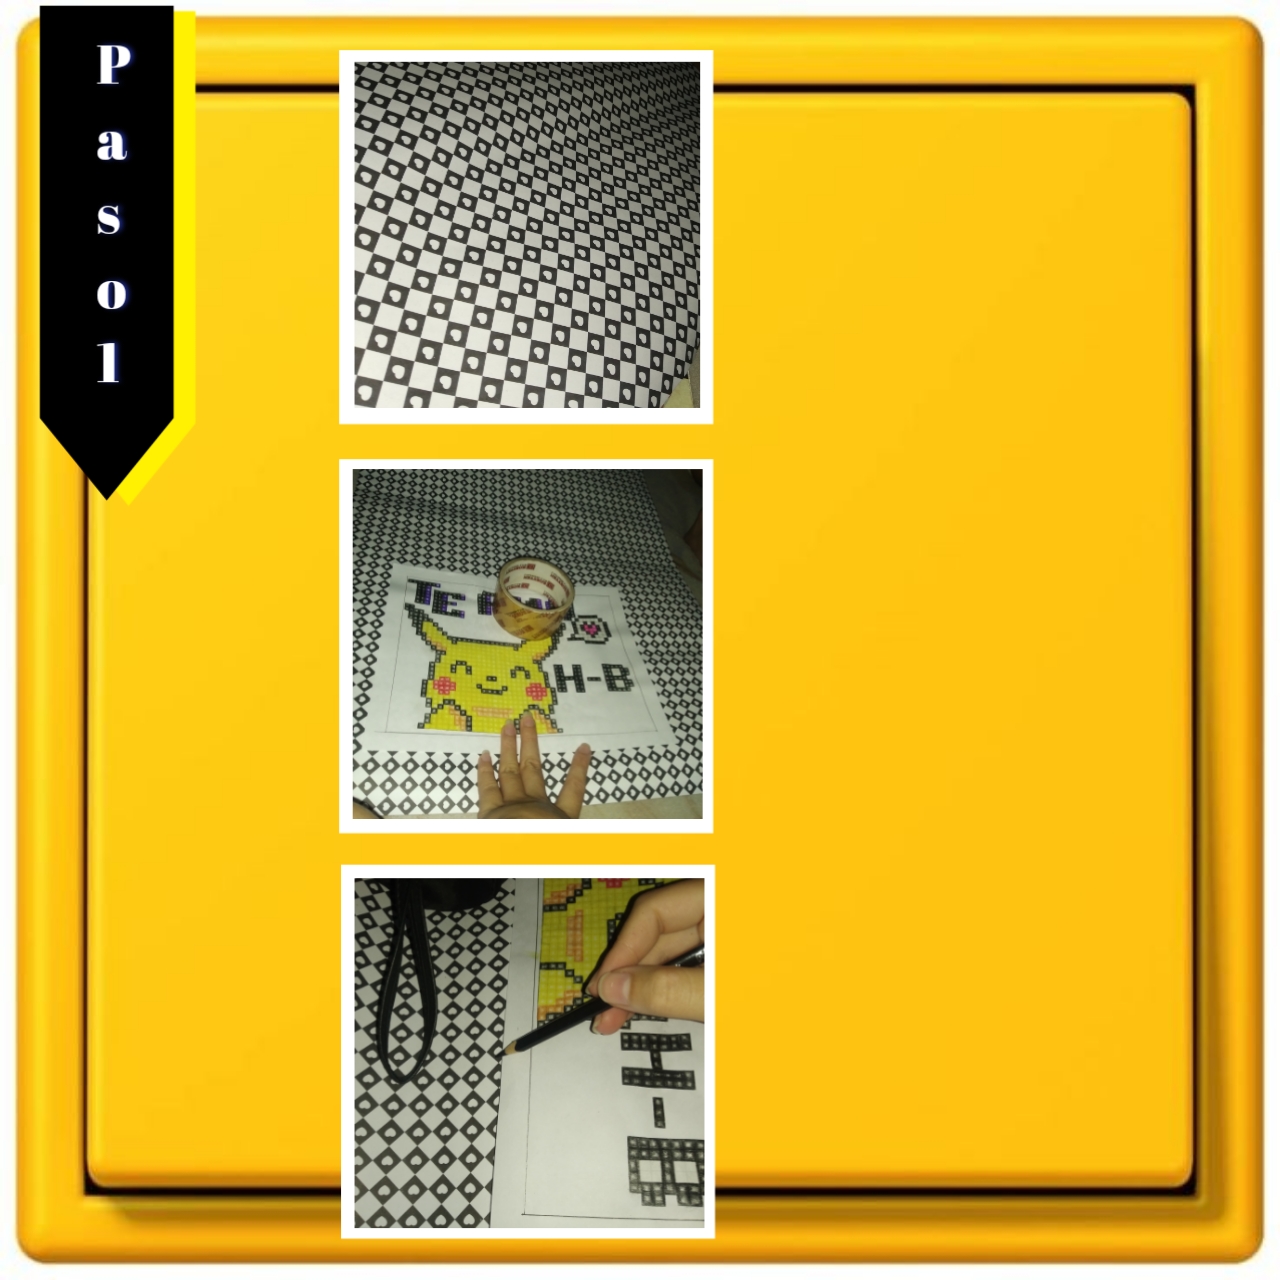
Paso 1:
Step 1:
Para empezar tomaremos nuestro dibujo de la medida que queramos, teipe, lápiz y nuestra cartulina, así extenderemos la cartulina en una superficie plana, colocaremos nuestro dibujo en está dejando espacio en cada lado y recortaremos pequeños trozos de teipe para mantener este en su sitio mientras marcamos, de esta manera con la ayuda de nuestro lápiz o algún color (la cosa es que puedan ver bien los trazos), vamos a marcar todo el contorno del dibujo, es decir, todo la figura exacta del rectángulo.
To begin we will take our drawing of the size we want, teipe, pencil and our cardboard, so we will extend the cardboard on a flat surface, we will place our drawing on it leaving space on each side and cut small pieces of teipe to keep it in place while we mark, in this way with the help of our pencil or some color (the thing is that they can see the strokes well), we will mark the entire outline of the drawing, ie all the exact figure of the rectangle.
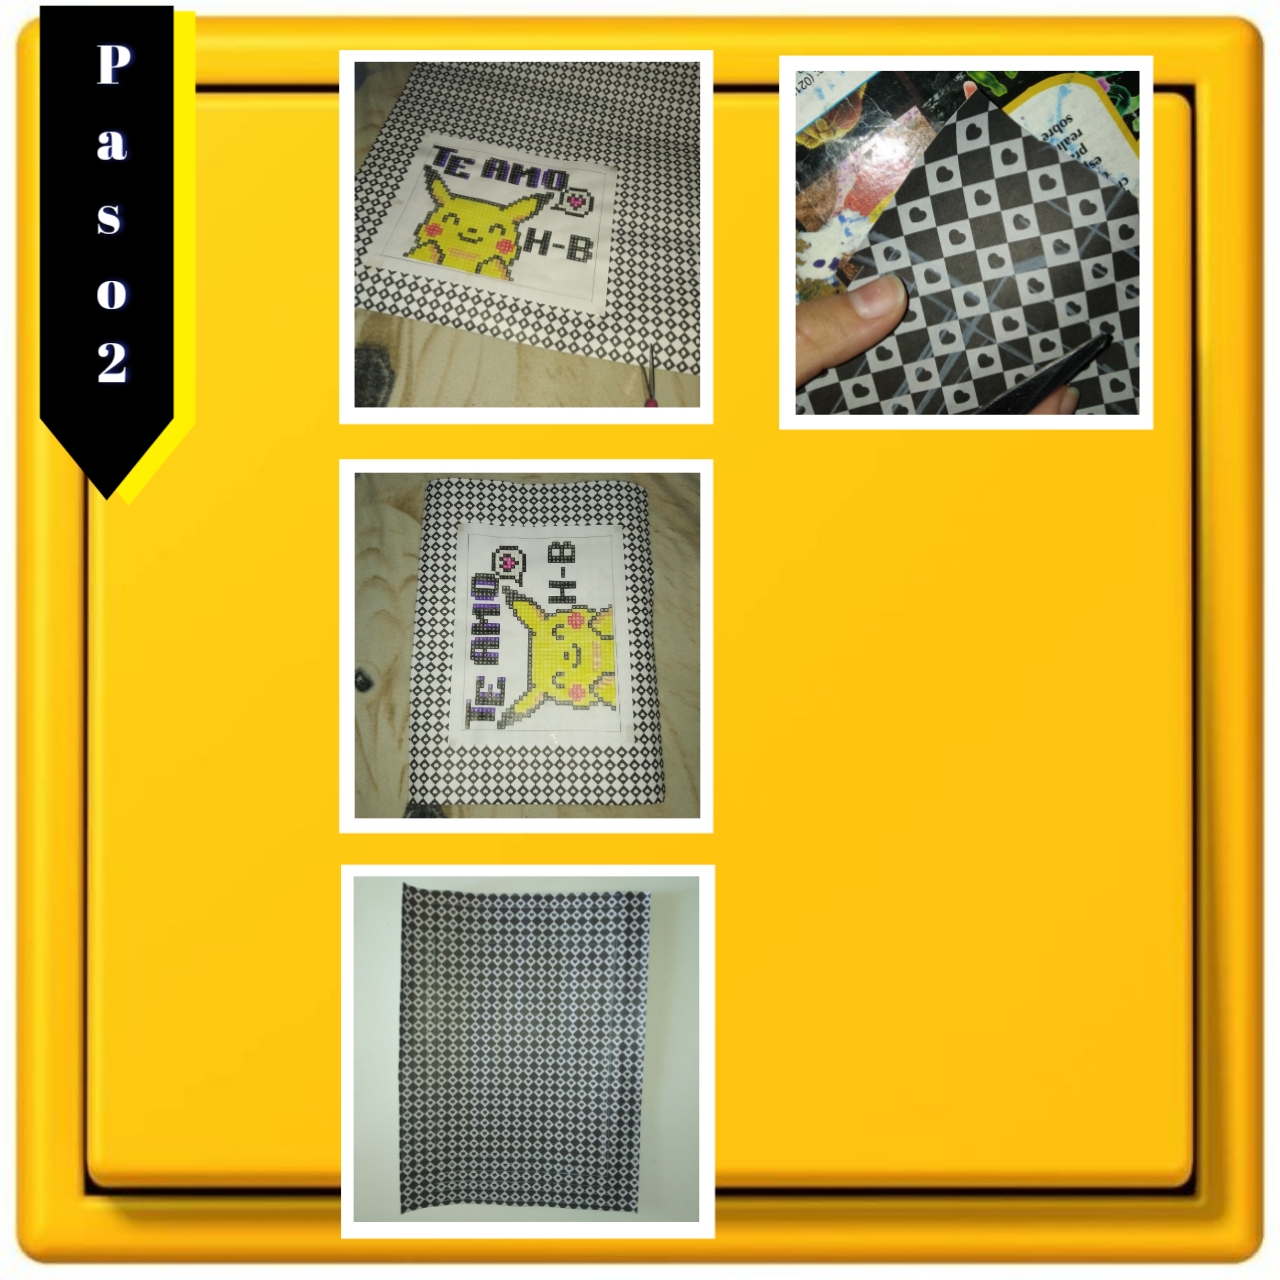
Paso 2:
Step 2:
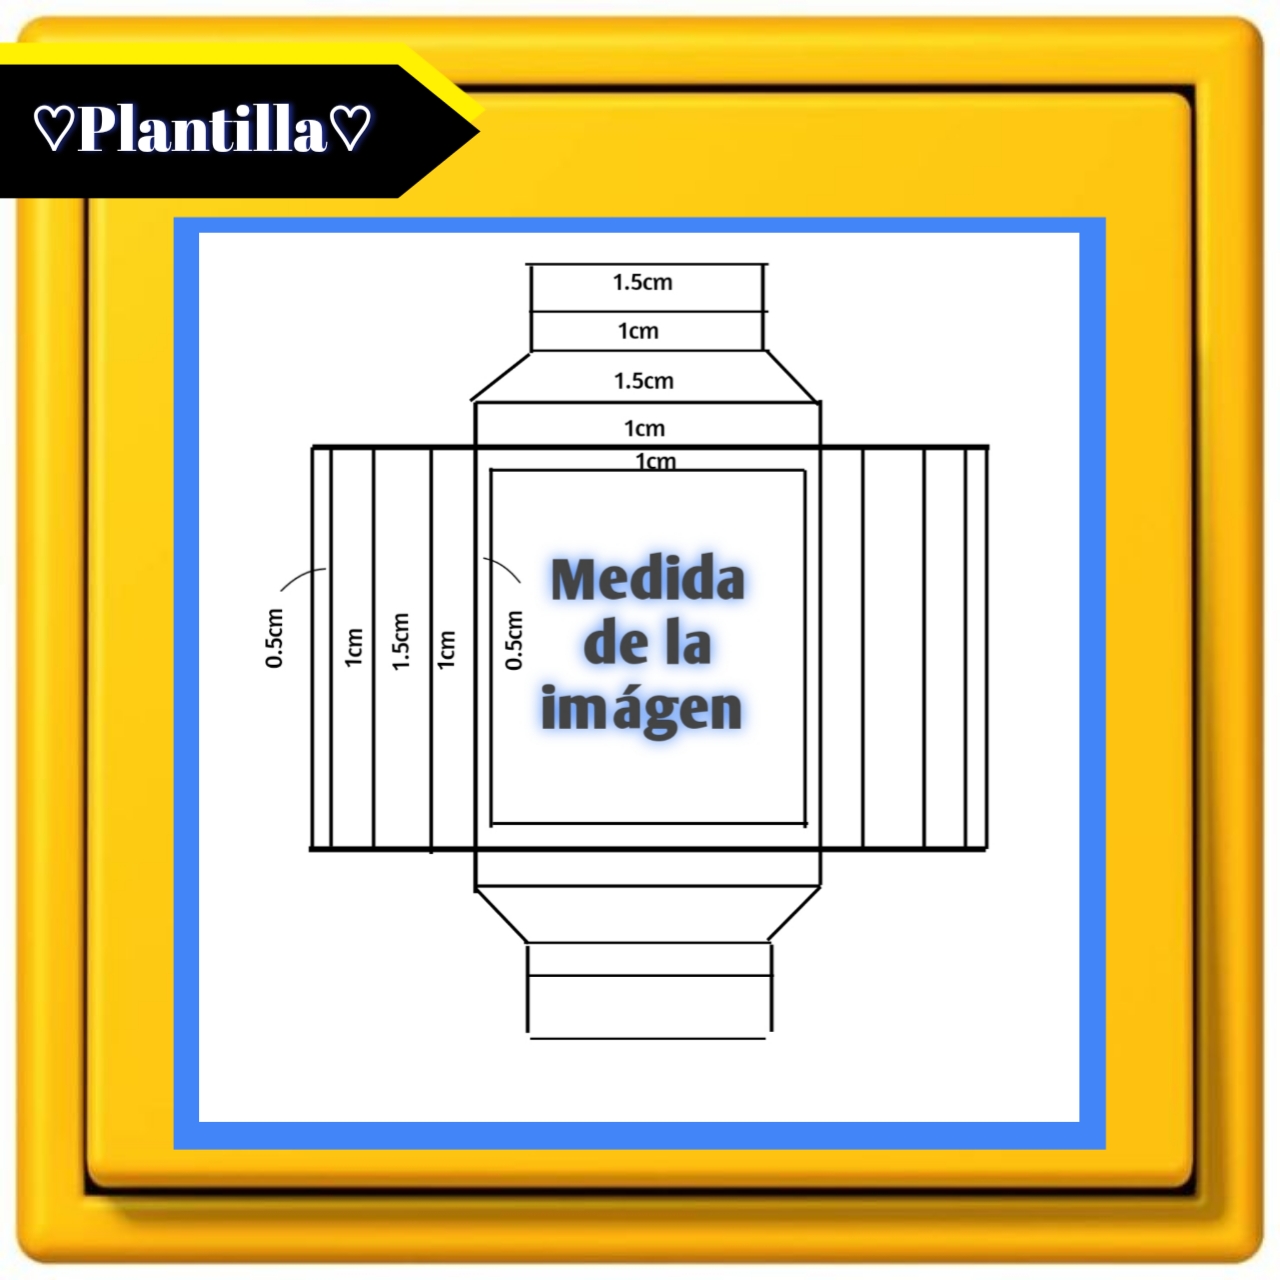
Continuando con el paso anterior, marcaremos en la parte más larga de los lados, a cada lado 4.5 cm de ancho y en los lados restantes vamos a marcar 6cm de ancho arriba y abajo, así unimos los puntos y se formará un rectángulo, el cuál procederemos a recortar con mucho cuidado con el apoyo de nuestra tijera. Ahora bien, vamos a visualizar la plantilla que les dejó justo arriba, y en la cartulina comenzaremos a marcar cada línea guiandonos por los centímetros para marcar exactamente la misma figura, yo lo marque con color blanco para que pudieran apreciar mejor, cabe mencionar que esto lo empezaremos a marcar de adentro hacía afuera, es decir partiendo desde el rectángulo de la imágen, para mayor facilidad.
Continuing with the previous step, we will mark on the longest part of the sides, on each side 4.5 cm wide and on the remaining sides we will mark 6cm wide at the top and bottom, so we join the points and a rectangle will be formed, which we will proceed to cut very carefully with the support of our scissors. Now, we are going to visualize the template that was left just above, and on the cardboard we will begin to mark each line guided by the centimeters to mark exactly the same figure, I marked it with white color so you could see it better, it is worth mentioning that we will start marking from the inside out, that is, starting from the rectangle in the image, for ease.
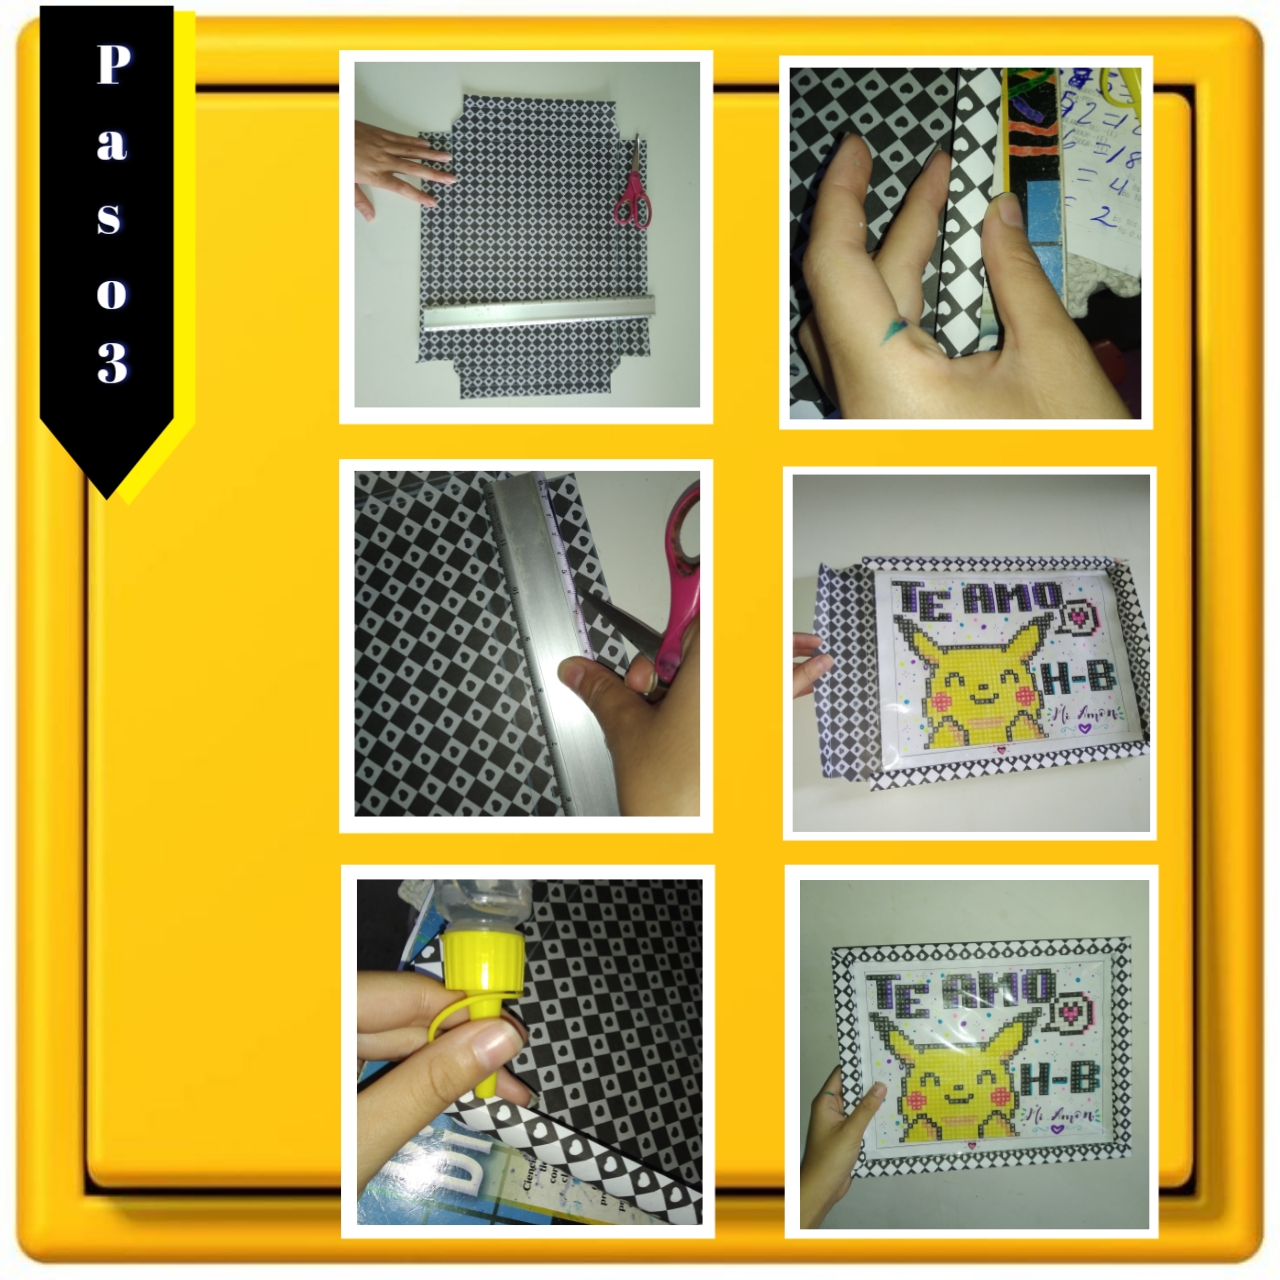
Paso 3:
Step 3:
Al tener la figura marcada vamos sencillamente a recortar toda está con la tijera, luego ya recortada tomaremos nuestra regla y la acomodaremos sobre cada linea, así con la punta de uno de los lados de la tijera vamos a remarcar aplicando un poco de presión por cada una de las líneas, para marcar el dobles. Después vamos a posicionar el dibujo en este (antes le puse una funda transparente para evitar que se ensucie), así solo nos queda doblar cada uno de los lados hasta llegar al final que es dónde agregaremos un poco de silicón y pegamos aplicando presión unos segundos y ya estaría.
Once we have the figure marked we will simply cut it all out with the scissors, then we will take our ruler and place it on each line, and with the tip of one of the sides of the scissors we will mark by applying a little pressure on each of the lines, to mark the doubles. Then we will position the drawing on this (before I put a transparent cover to prevent it from getting dirty), so we just have to fold each of the sides until we reach the end where we will add a little silicone and glue applying pressure for a few seconds and that's it.
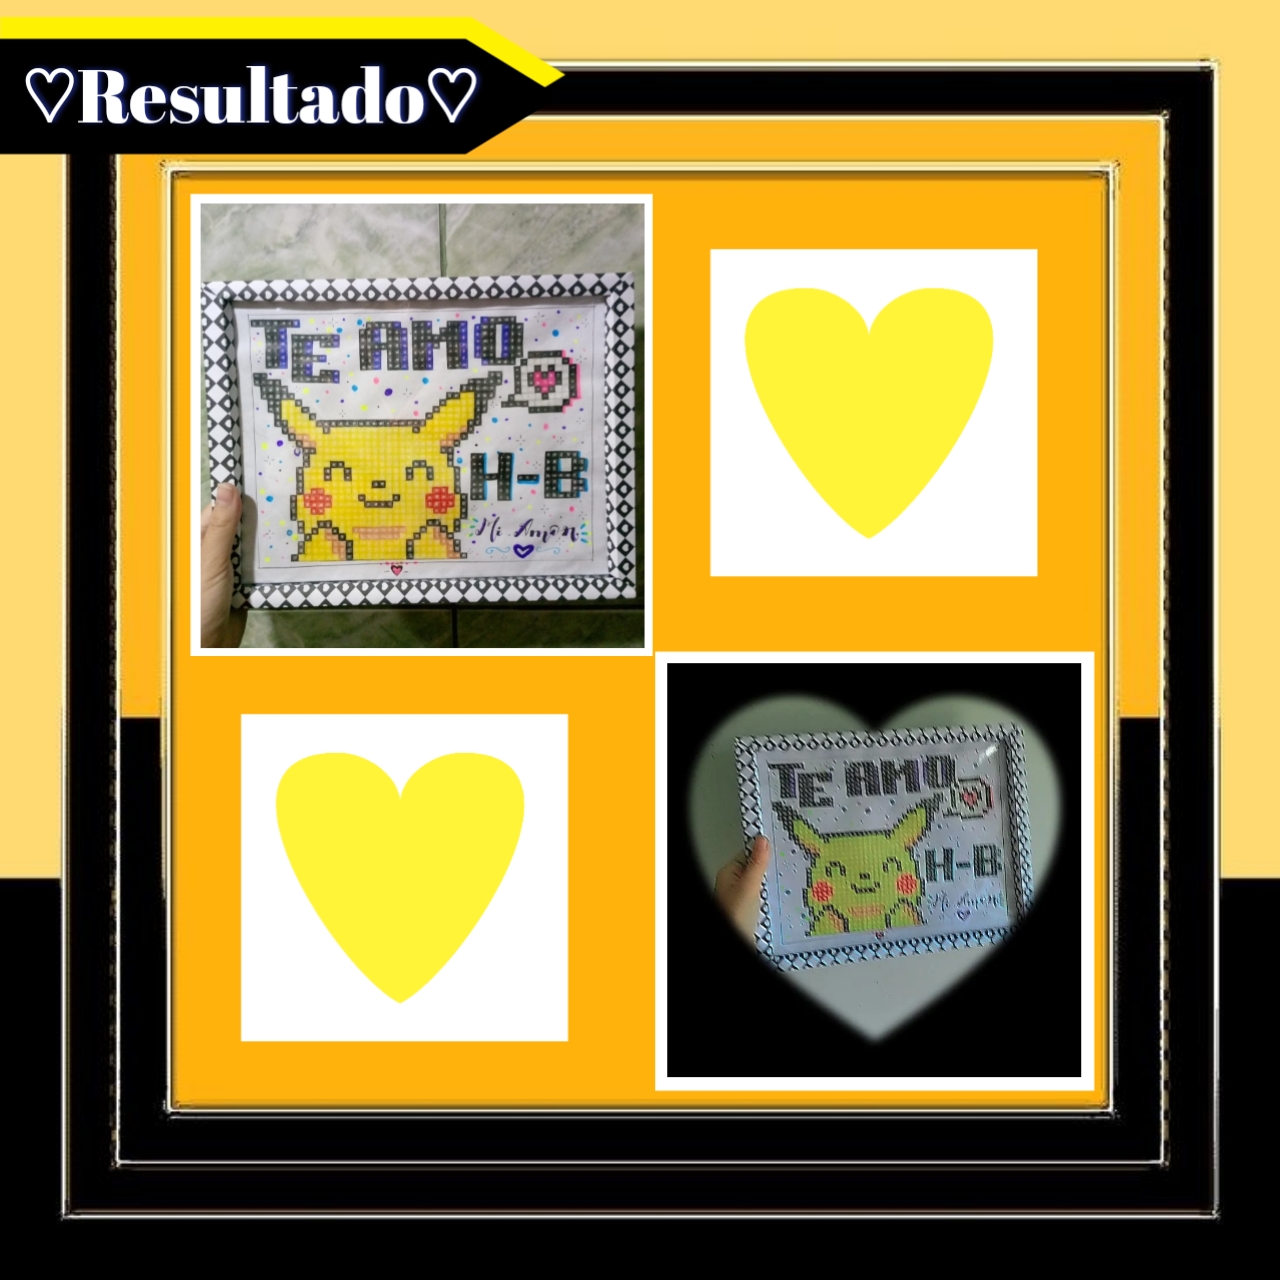
Así en tres sencillos pasos, les muestro como podemos obtener un precioso portaretratos, para darle una mejor vista a cualquier imágen que queramos, ya que este lo adaptamos al tamaño de nuestra imágen, sea cual sea, lo único que necesitamos es la cartulina y nuestros sencillos materiales. Verdaderamente se ve muy lindo y al colgarlo no parece de papel, además, como les dije anteriormente, lo mejor es que podemos personalizarlo totalmente a nuestro gusto, así que no lo piensen dos veces, es una manera de conservar nuestras preciadas imágenes y tenerlo como decoración, una maravilla.
So in three simple steps, I show you how we can get a beautiful picture frame, to give a better view to any image we want, since we adapt it to the size of our image, whatever it is, all we need is the cardboard and our simple materials. It really looks very nice and when hanging it does not look like paper, besides, as I said before, the best thing is that we can customize it completely to our liking, so do not think twice, it is a way to keep our precious images and have it as decoration, a marvel.
Esto es todo por hoy amigos, espero que les haya gustado el tutorial y más aún que lo hayan entendido y puedan ponerlo en práctica de manera fácil, es algo relativamente sencillo que nos puede servir en muchas ocasiones así que no dude en compartirlo con ustedes. Sin más que decir, me despido con un abrazo, esperando leerlos debajo en los comentarios ¡Hasta la próxima familia! Los quiero.💛✨
That's all for today friends, I hope you liked the tutorial and even more that you have understood it and can put it into practice easily, it is something relatively simple that can serve us on many occasions so do not hesitate to share it with you. Without more to say, I say goodbye with a hug, hoping to read you below in the comments ¡Hasta la próxima familia! I love you.💛✨
🌟¡Gracias por leer nuevamente!🌟
🌟Thanks for reading again!🌟
Photos of my authorship taken from my Xiaomi Redmi 7 phone, edited in the free version of PixeLab.
Que lindo quedó! Muy creativo y colorido! Saludos
¡Muchas gracias! Un abrazo.💙✨