Diy Cake Topper personalizado hecho en casa ✨🤍 | Con temática de Vaquita🐄🖤 [ESP-ENG]
Good evening my creative family! I wish you an excellent day full of the best blessings for each of you. We are starting the month this week and I want to wish you all the best, hoping that we all have a month full of joy, love, crafts, creativity, prosperity, productivity and lots of desire to continue creating manually.♡
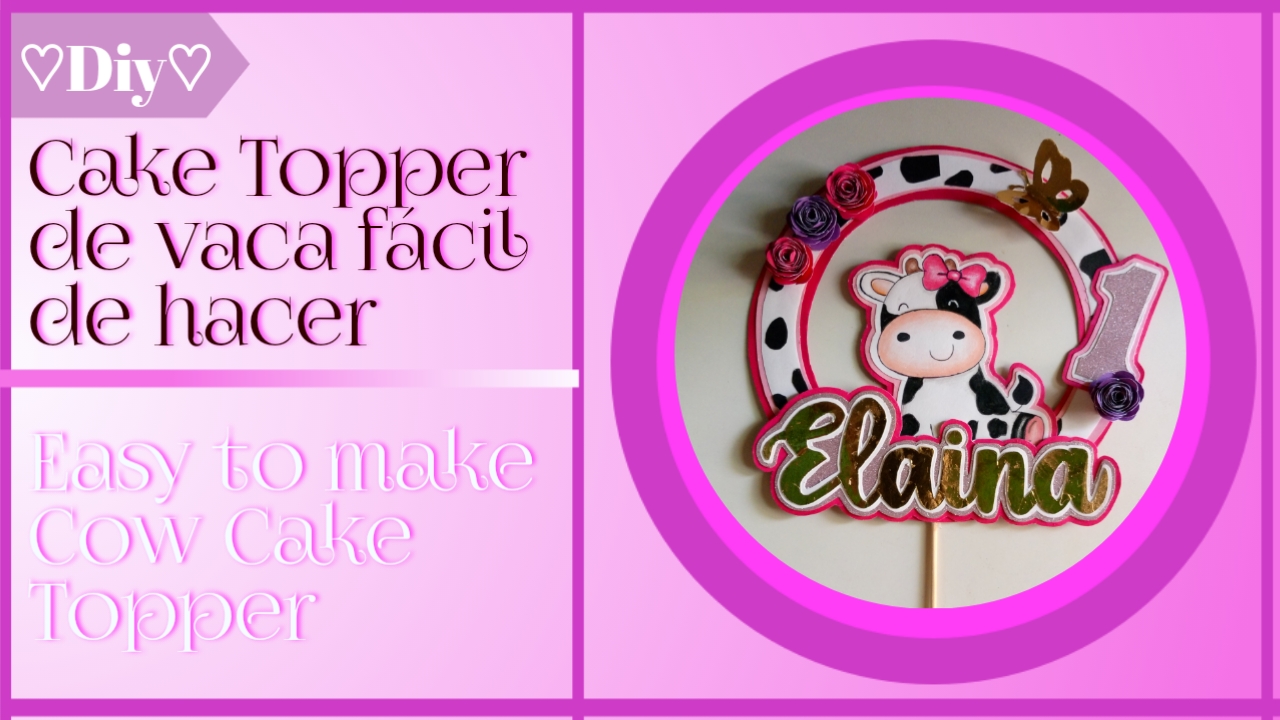
Les traigo un tutorial paso a paso sencillo, pero bastante útil que pueden realizar desde casa, así les enseñaré como realice un Cake Topper que hice por primera vez, ya que es un elemento que le da un toque espectacular a las tortas, algo que es sencillamente hermoso, porsupuesto lleva su elaboración, pero no es nada del otro mundo, solo hay que tener un poco de paciencia. Esto es más o menos una guía para que puedan seguirla y precisamente guiarse por si no tienen experiencia haciendo uno, este se lo hice como un pequeño regalo a mi primita bebé, especialmente personalizado para ella, porque le gustan la vaquitas, y bueno, para ser la primera vez que hago uno tan elaborado, me encantó el resultado, así que a continuación les voy con los materiales y los pasos a seguir.
I bring you a simple step by step tutorial, but quite useful that you can do from home, so I will show you how to make a Cake Topper that I did for the first time, as it is an element that gives a spectacular touch to the cakes, something that is simply beautiful, of course it takes time, but it is not a big deal, you just have to have a little patience. This is more or less a guide so you can follow it and be guided if you don't have experience making one, I made this as a little gift for my baby cousin, especially personalized for her, because she likes the little cow, and well, for the first time I make one so elaborate, I loved the result, so here are the materials and the steps to follow.
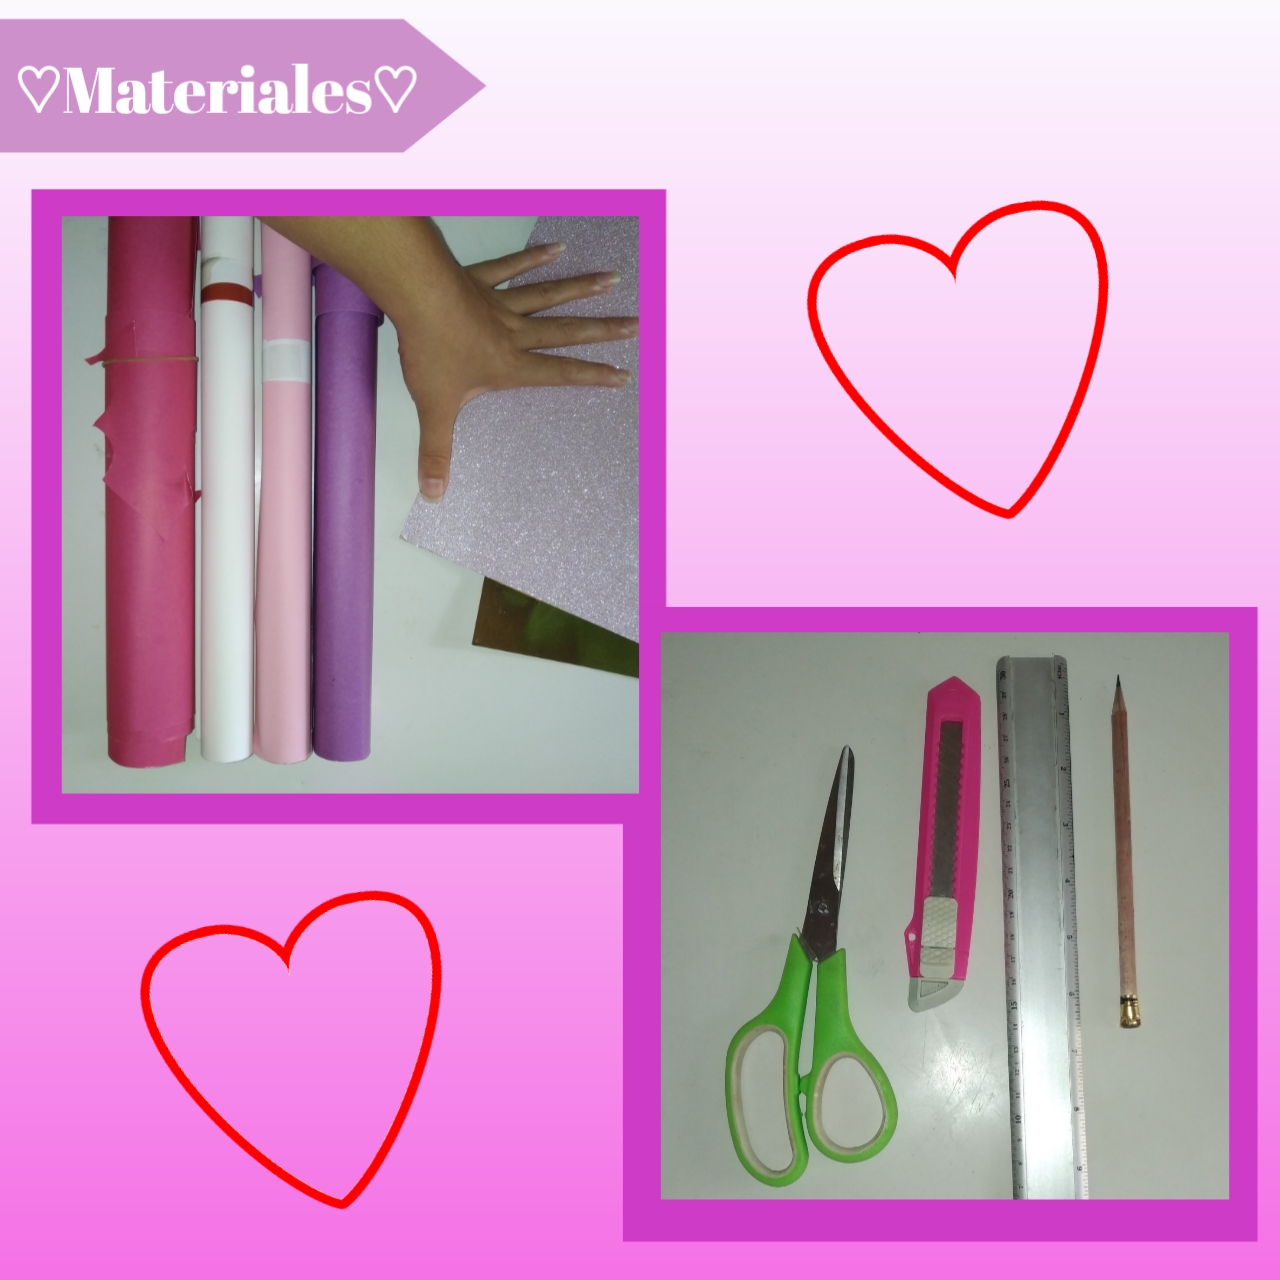
♡Materials♡
- 4 Tipos de cartulina unicolor
- 2 Cartulinas decoradas (satinadas)
- Silicón
- Regla
- Lápiz
- Cutter u exacto
- 4 Types of unicolor cardboard
- 2 Decorated cardboard (satin)
- Silicone
- Ruler
- Pencil
- Cutter or exacto
♡Step by Step♡
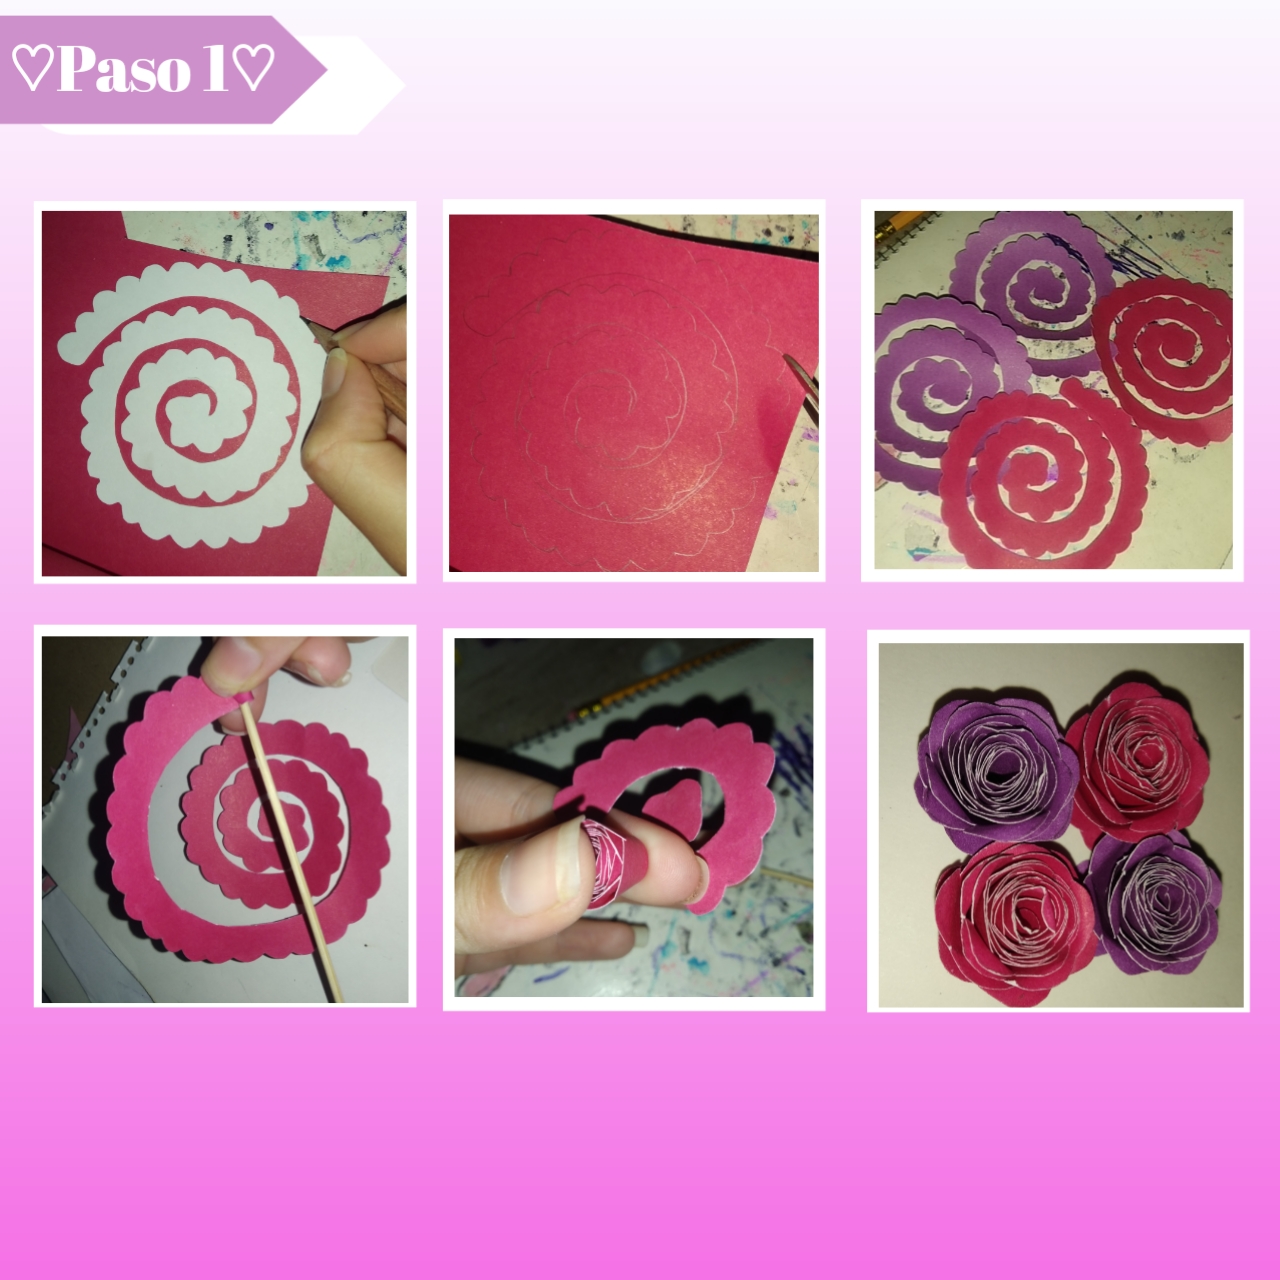
Paso 1:
Step 1:
Comenzaremos a elaborar los elementos para el topper por partes, para luego armar cómodamente, de está manera comencé haciendo unas pequeñas flores, exactamente cuatro, dos en cartulina fucsia y dos en cartulina morada, ambas unicolor. Para esto extendí cada cartulina, tome este molde sencillo de flores y lo coloque sobre cada una de estás, seguidamente con la ayuda de un lápiz, marque y recorte cada pieza, luego solo me resto tomar un palito de altura e ir enrollando está hacía adentro poco a poco, hasta llegar al final y pegar en la base con silicón frío.
I started by making some small flowers, exactly four, two in fuchsia cardboard and two in purple cardboard, both unicolor. For this I extended each cardboard, took this simple mold of flowers and placed it on each one of them, then with the help of a pencil, mark and cut out each piece, then I just had to take a stick of height and roll it inside little by little, until the end and glue it on the base with cold silicone.
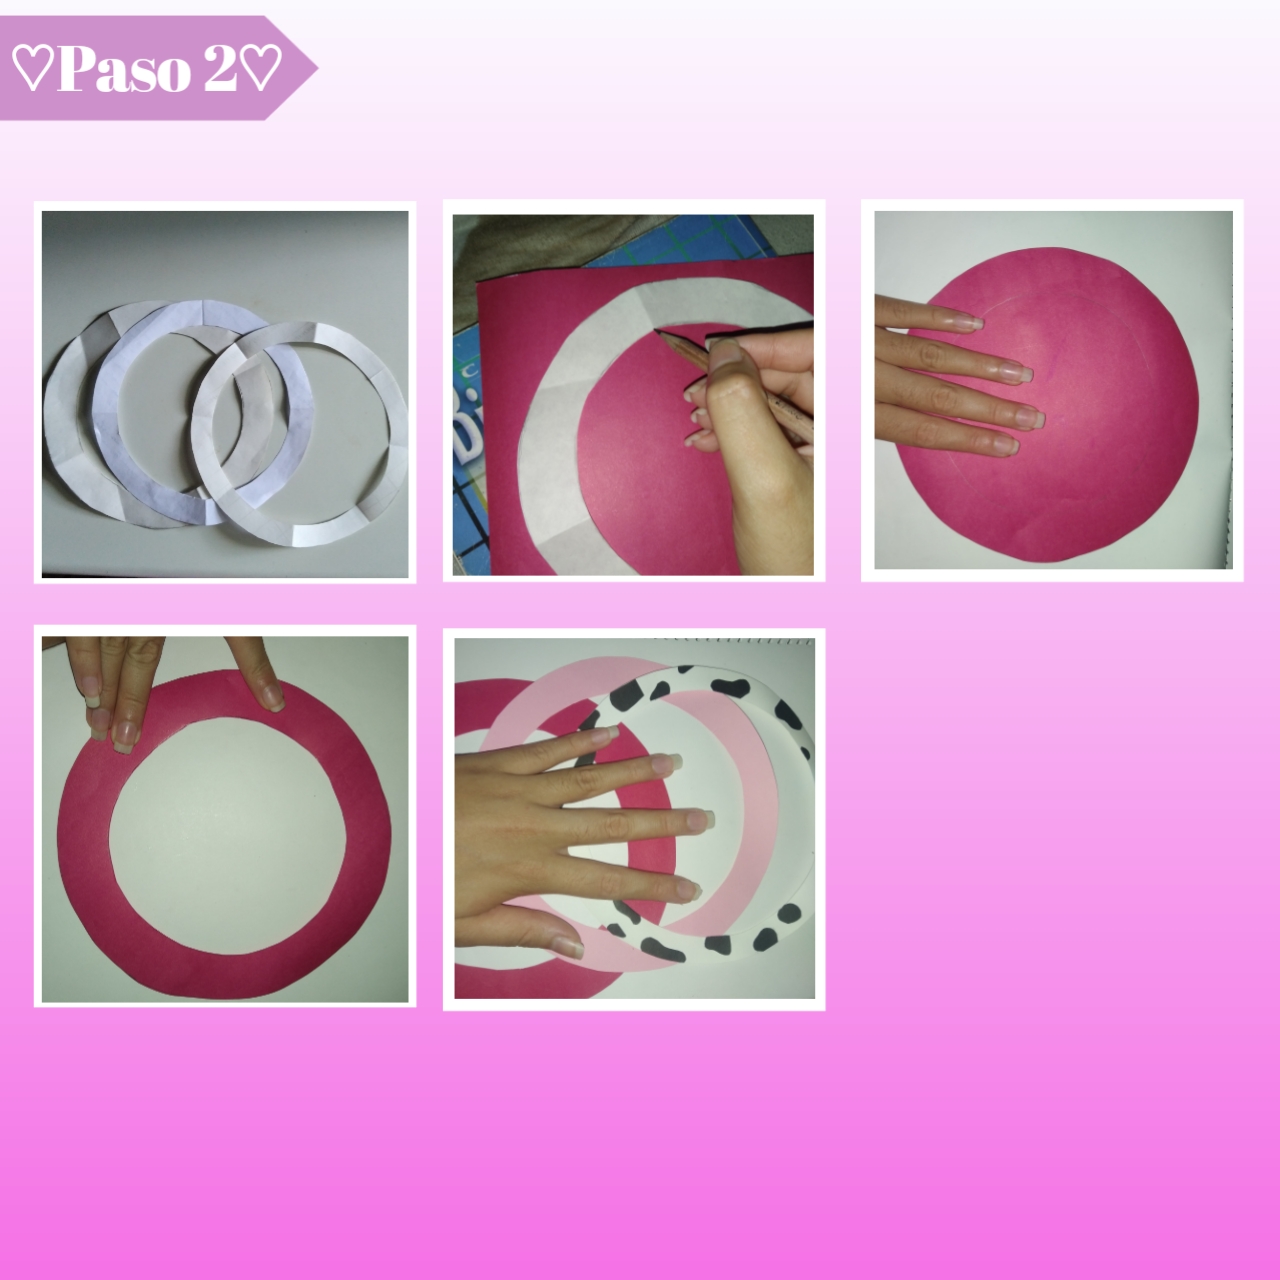
Paso 2:
Step 2:
Ahora recortaremos en papel para hacer la plantilla, tres circunferencias y les quitaremos el centro circular, haciendo que quede cada vez uno más grande que el otro, de manera de que encajen bien, que al centrar queden como dos milímetros de cada lado de espacio. Después con las plantillas hechas anteriormente, extenderemos las cartulinas, marcaremos y recortaremos con una tijera cuidadosamente, hasta obtener las tres circunferencias, cada una de diferente color, que tengan que ver con la temática o combinen, en este caso yo hice la más grande fucsia, la que le sigue rosa y la última y más pequeña fue blanca, pero le agregue manchas en cartulina negra para simular la piel de la vaca y adaptar está a la temática.
Now we will cut out three circles on paper to make the template, and we will remove the circular center, making each one bigger than the other, so that they fit well, so that when we center them there is about two millimeters of space on each side. Then with the templates made previously, we will extend the cardboard, mark and cut with scissors carefully, until we get the three circles, each one in a different color, that have to do with the theme or combine, in this case I made the biggest one fuchsia, the next one pink and the last and smallest was white, but I added black cardboard spots to simulate the cow's skin and adapt it to the theme.
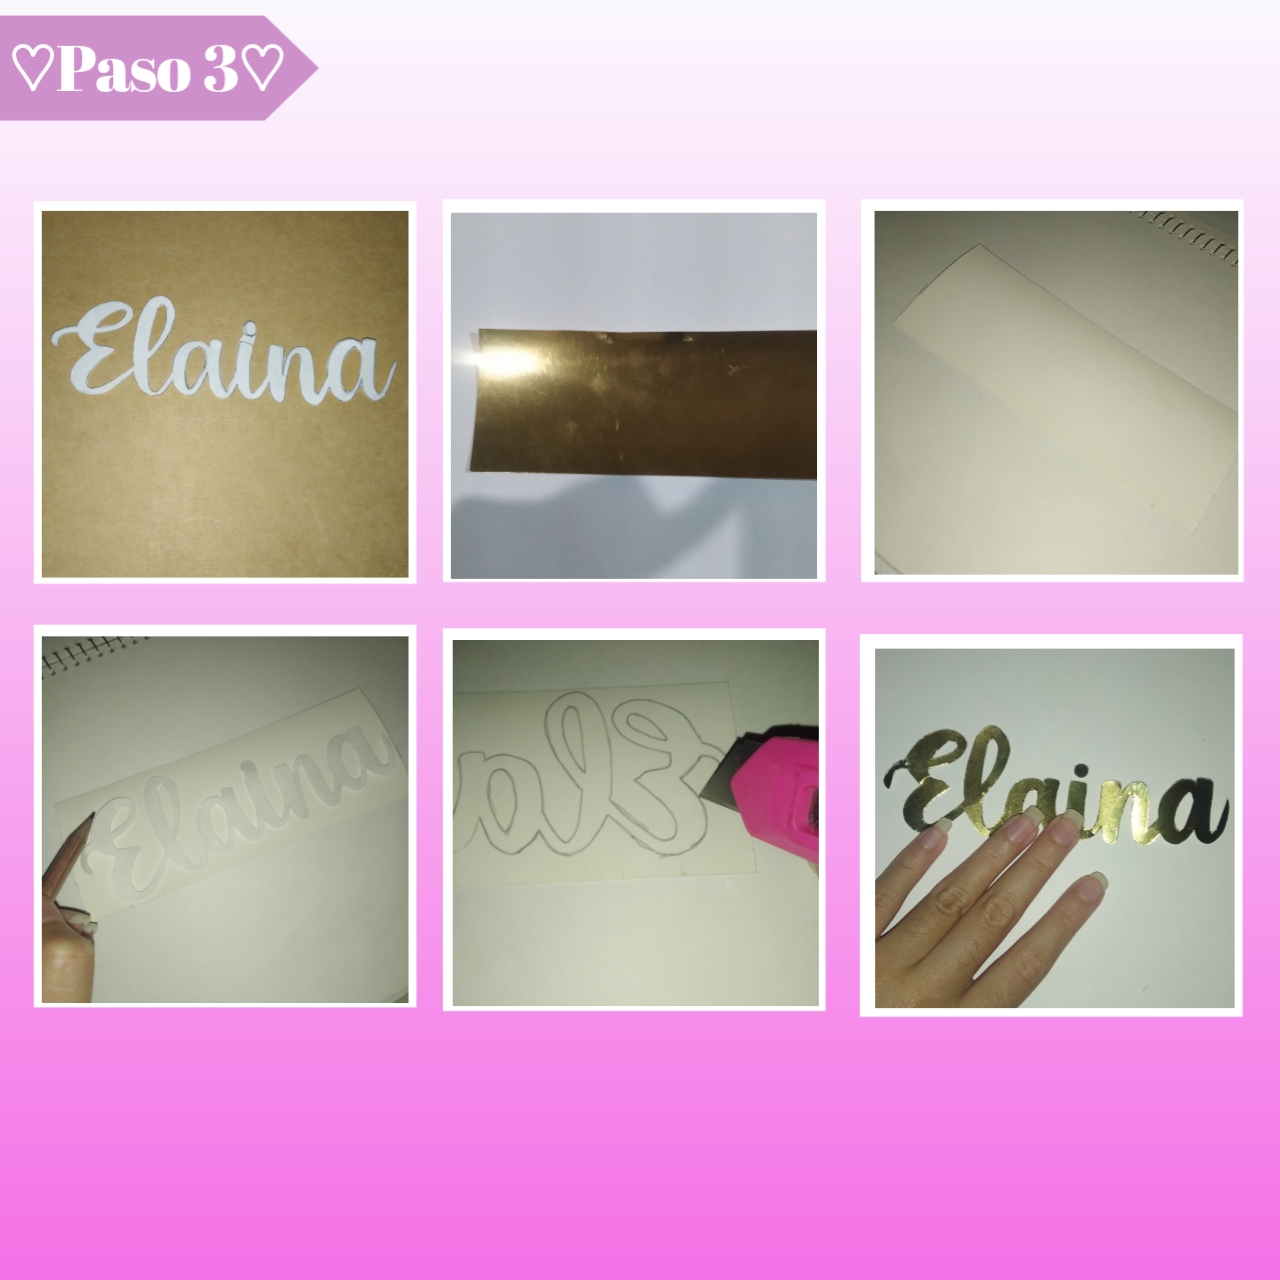
Paso 3:
Step 3:
Vamos con el nombre, para esto debemos tener nuestra plantilla en hoja de papel o cartulina, yo saqué el nombre completo en cursiva en una página, dónde escriben la palabra o el nombre que van a utilizar en la letra que elijan y les queda imprimir o calcar con una hoja encima de la pantalla y un lápiz, se las dejaré debajo por si la necesitan. Así al tener está pieza, tomaremos nuestra cartulina metalizada, la voltearemos por el lado contrario y tomaremos el nombre e igualmente lo pondremos al revés en esta parte, así con nuestro lápiz remarcamos tal cuál y seguimos a recortar con nuestro exacto muy bien.
Let's go with the name, for this we must have our template on a sheet of paper or cardboard, I took the full name in cursive on a page, where you write the word or name to be used in the letter of your choice and you have to print or trace with a sheet on the screen and a pencil, I will leave it below in case you need it. Once we have this piece, we will take our metallic cardboard, we will turn it upside down on the opposite side and we will take the name and we will also put it upside down in this part, so with our pencil we will mark it as it is and we will continue to cut it out with our exact one very well.
Página aquí
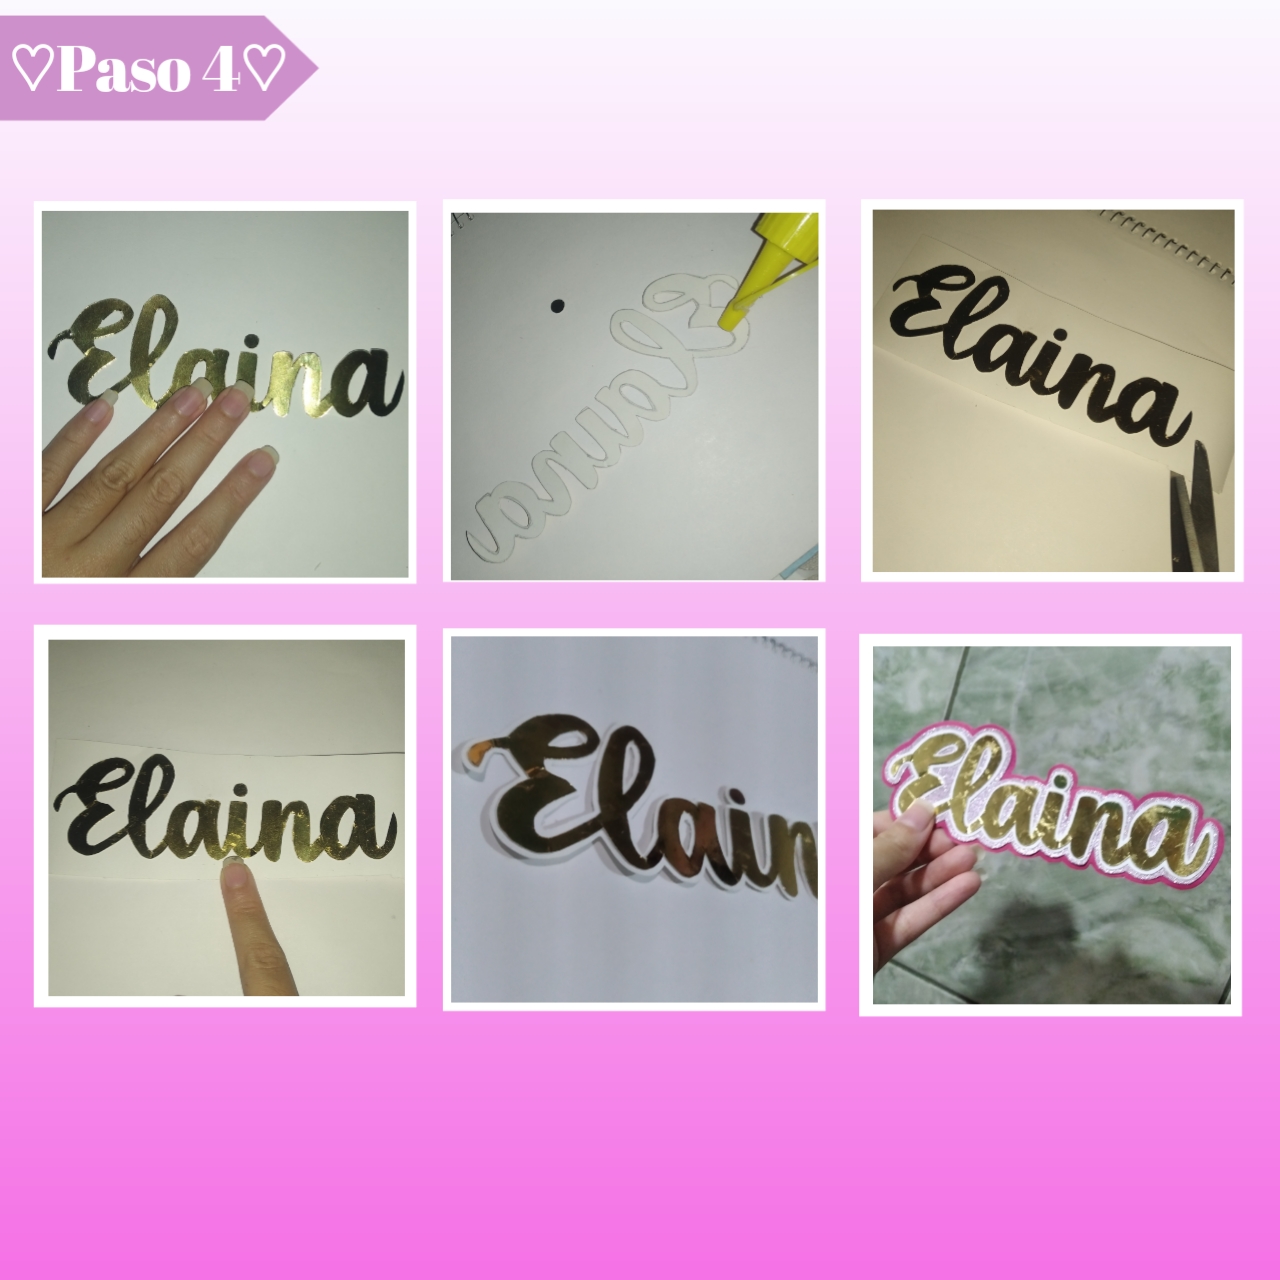
Paso 4:
Step 4:
Continuando con el nombre, le vamos agregar capas de cartulina, así aplicaremos silicón por toda la parte de atrás de está y pegaremos este encima de una cartulina unicolor, yo elegí una blanca, ya pegada muy bien recortaremos dejando un pequeño borde por toda la forma e igualmente recortaremos los pequeños orificios de las letras. Así seguimos con dos capas más de diferente color, yo seguidamente agregué la cartulina rosa escarchada y después la fucsia, cabe señalar que a estás dos últimas capas no les recorté los orificios, así terminamos el nombre.
Continuing with the name, we are going to add layers of cardboard, so we will apply silicone all over the back of it and paste it on top of a unicolor cardboard, I chose a white one, once it is very well glued we will cut leaving a small border all over the shape and we will also cut out the small holes of the letters. Then we continue with two more layers of different colors, I then added the frosted pink cardboard and then the fuchsia, it should be noted that I did not cut out the holes in these last two layers, so we finished the name.
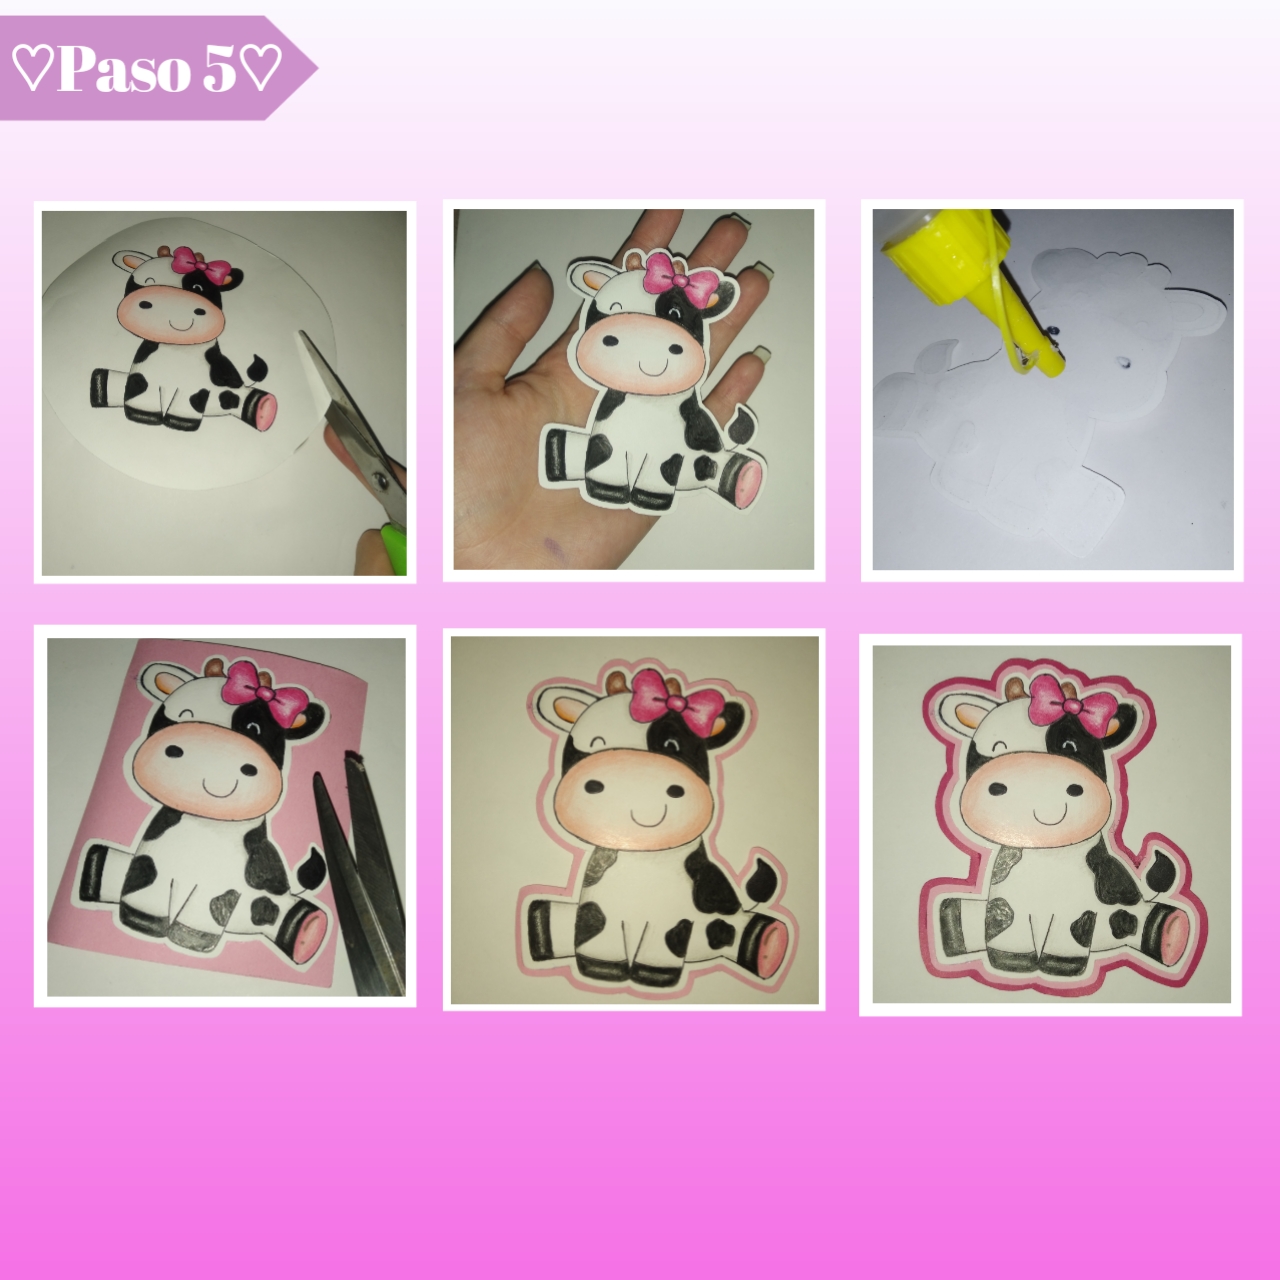
Paso 5:
Step 5:
En este paso hice una pequeña vaca, para ponerla en el centro, así la dibuje y coloree a mano con lápiz y colores, ustedes si gustan pueden imprimirlo, continúe recortando está dejando un pequeño borde blanco por todo el contorno, luego continúe agregando y esparciendo silicón por toda la parte de atrás de está, así seguidamente la pegue encima de un rectángulo de cartulina rosa, repetí lo mismo y agregué después cartulina fucsia por último y ya estaría la vaca.
In this step I made a small cow, to put it in the center, so I drew and colored it by hand with pencil and colors, if you like you can print it, continue cutting it leaving a small white border around the contour, then continue adding and spreading silicone all over the back of it, and then paste it on top of a rectangle of pink cardboard, I repeated the same and then added fuchsia cardboard finally and the cow would be already there.
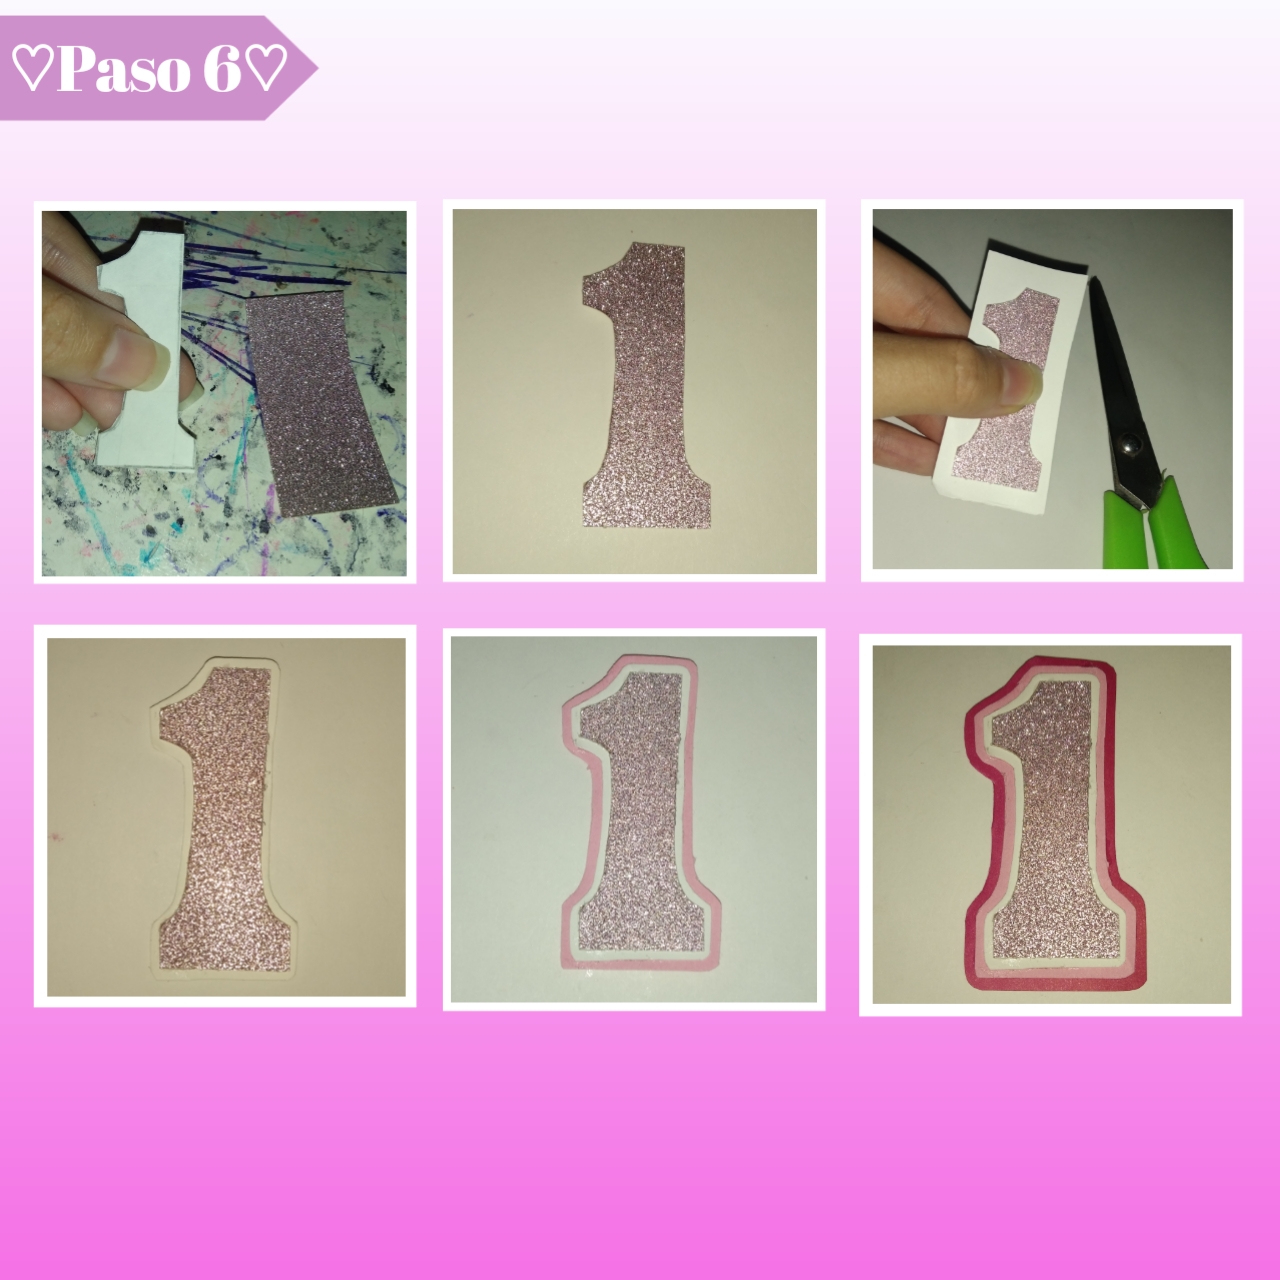
Paso 6:
Step 6:
Continuamos con los elementos, seguimos con el primer añito de la cumpleañera, para esto marque y recorté un número "1", medianamente grande en hoja blanca como plantilla, continúe tomando un pequeño rectángulo de cartulina escarchada rosa, coloque este encima e hice lo mismo que en los pasos anteriores, marcar y recortar, para continuar a agregar silicón en la superficie trasera y pegar sobre una cartulina blanca, luego una rosa y por último una cartulina fucsia, creando cada una de las capas para dar volumen.
We continue with the elements, we continue with the birthday girl's first birthday, for this I marked and cut out a number "1", medium large on a white sheet as a template, continue taking a small rectangle of pink frosted cardboard, place it on top and did the same as in the previous steps, mark and cut, to continue adding silicone on the back surface and paste on a white cardboard, then a pink and finally a fuchsia cardboard, creating each of the layers to give volume.
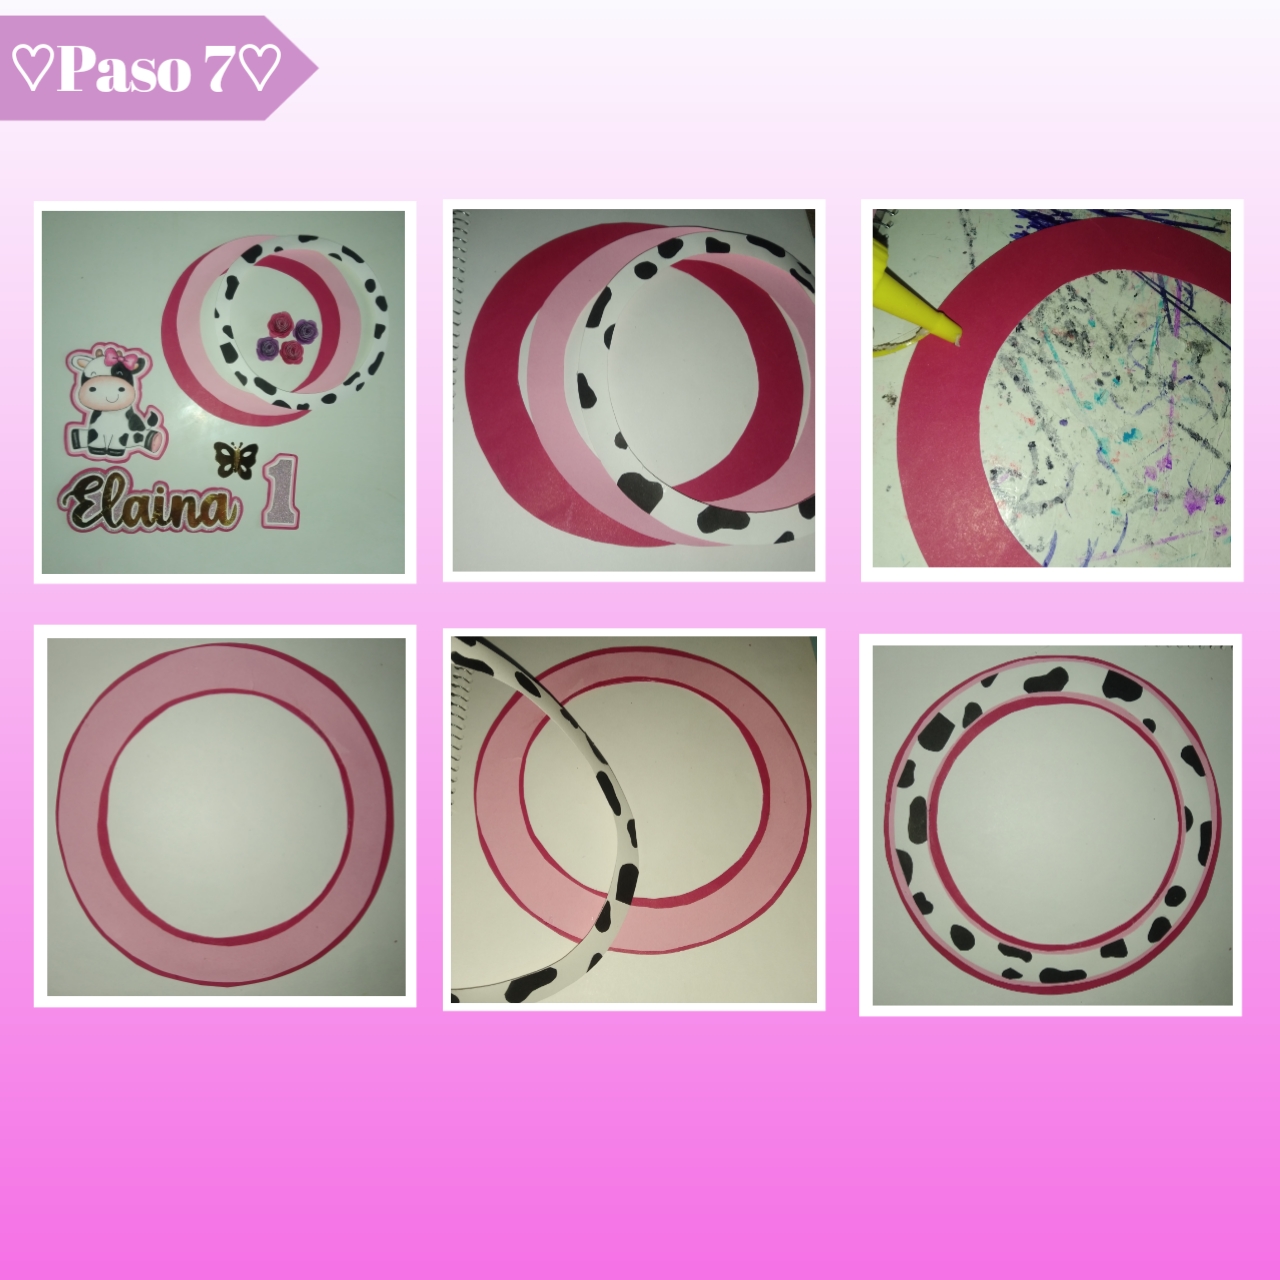
Paso 7:
Step 7:
Ahora bien, con todos los elementos ya listos es hora de empezar a armar, cabe resaltar que también hice una pequeña mariposa en cartulina dorada, entonces comenzaremos tomando el círculo fucsia que es el más grande, para seguidamente agregarle silicón por detrás al siguiente que es rosa y pegarlo encima de este centrado con cuidado, luego tomamos el círculo con la temática de vaquita, le agregamos y esparcimos silicón en la parte de atrás y volvemos a pegar de forma centrada encima del último.
Now, with all the elements ready it is time to start assembling, it is worth mentioning that I also made a small butterfly in gold cardboard, then we start by taking the fuchsia circle which is the largest, then add silicone behind the next one which is pink and paste it on top of this centered carefully, then we take the circle with the cow theme, add and spread silicone on the back and paste again centered on top of the last one.
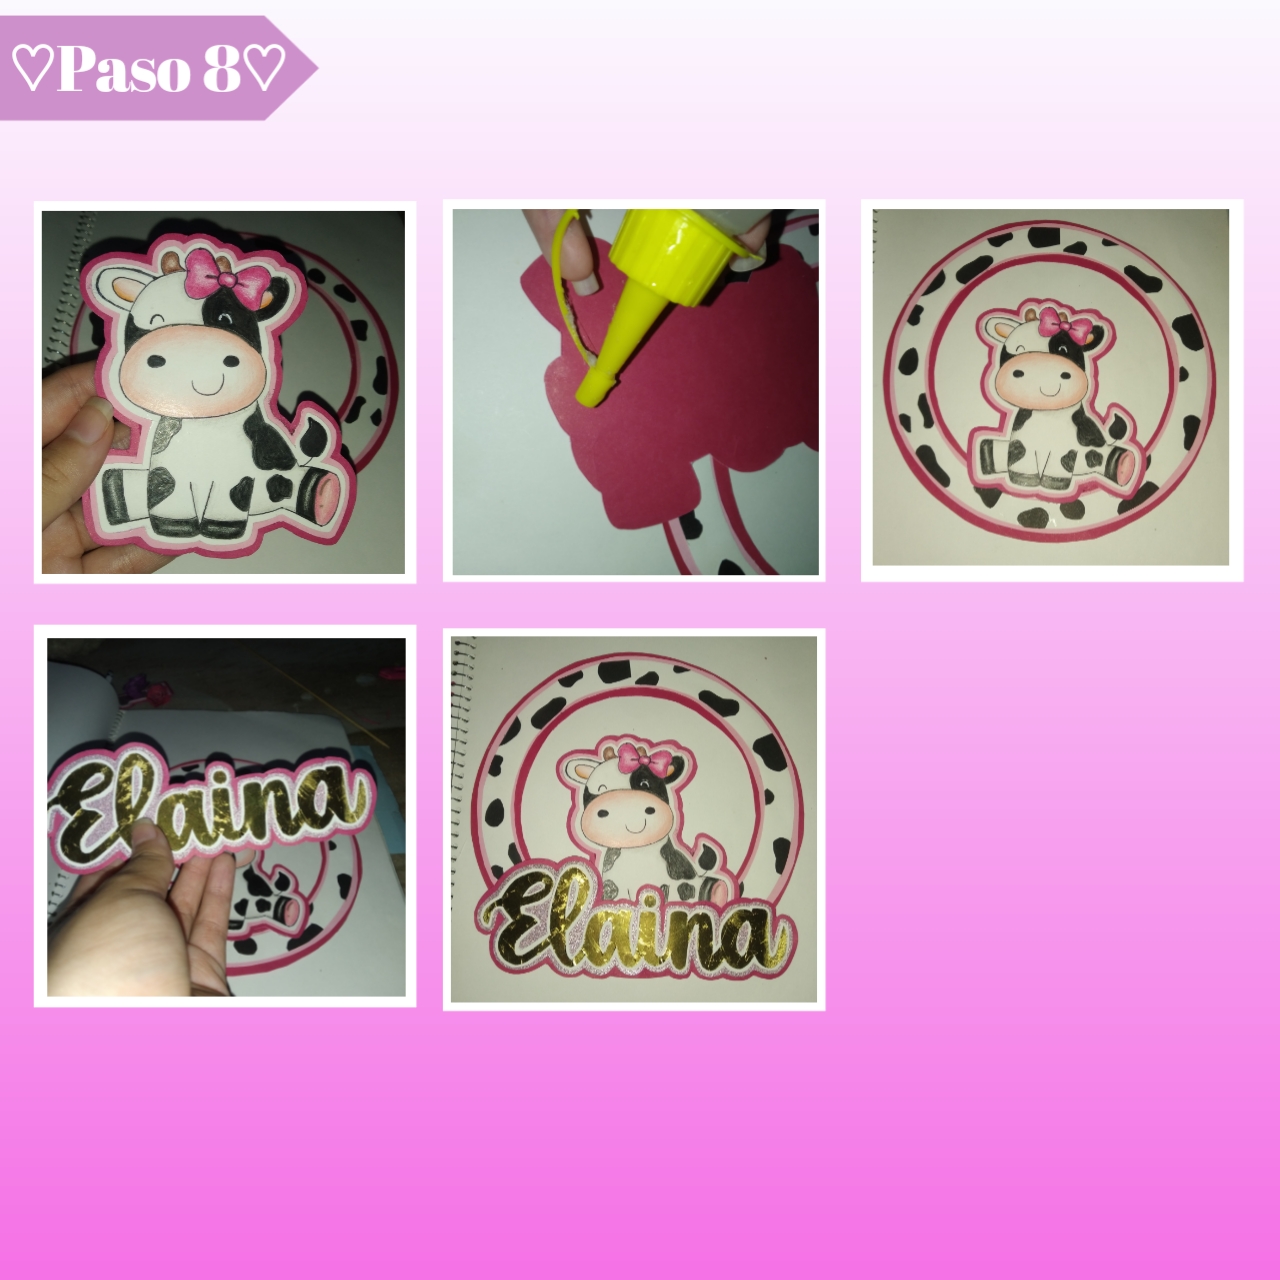
Paso 8:
Step 8:
A continuación, tomamos la vaquita previamente hecha, luego silicón de preferencia caliente (yo tengo es frío), le aplicamos un poco en la parte de abajo de la vaca y la pegaremos de forma centrada en la parte de abajo de la pieza que armamos en el paso anterior. Después agarraremos el nombre de la cumpleañera que hicimos, para agregarle muy bien silicón por toda la parte de en medio de atrás a lo largo, pegamos tapando un poco la vaca y aplicamos una leve presión unos segundos.
Next, we take the cow previously made, then we apply silicone, preferably hot (I have cold silicone), we apply a little on the bottom of the cow and we glue it centered on the bottom of the piece that we assembled in the previous step. Then we will take the name of the birthday girl that we made, to add silicone very well all over the middle part of the back lengthwise, we glue covering a little the cow and apply a slight pressure for a few seconds.
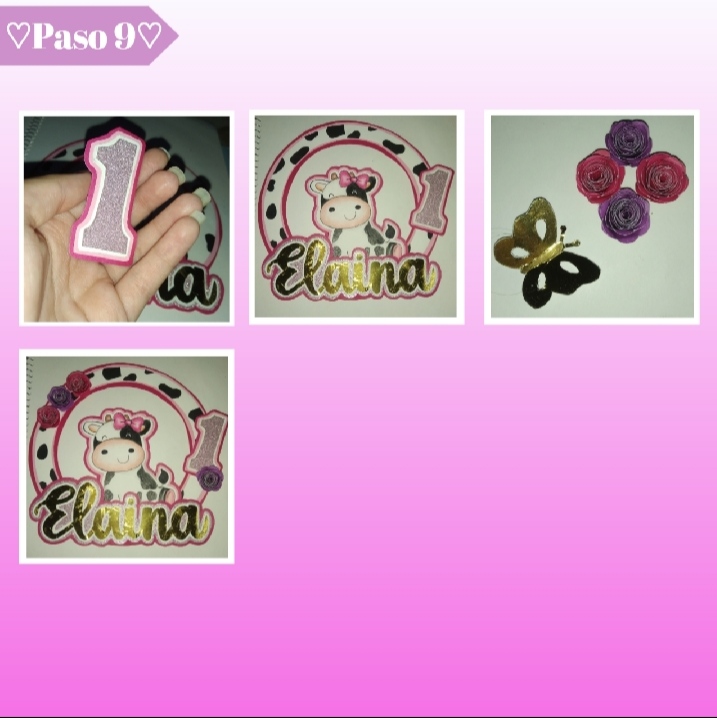
Paso 9:
Step 9:
Ahora para terminar agregaremos los pequeños detalles sobrantes, así le pegamos el número #1, a un lado o como mejor nos guste, seguido pegaremos las flores, yo pegue tres en la parte de arriba de la izquierda de forma intercalada y una más debajo, justo tapando un pequeño trozo del número #1, así por último agregué por un lado de la parte de arriba para dar el toque final la pequeña mariposa dorada que hice, todos estos detalles les recomiendo pegarlos con silicón caliente, por último le pegamos el palillo de altura bien centrado.
Now to finish we will add the small leftover details, so we glue the number #1, to one side or as we like, then we will glue the flowers, I glued three at the top of the left side in an interspersed manner and one more below, just covering a small piece of the number #1, and finally I added on one side of the top to give the final touch the small golden butterfly I made, all these details I recommend to glue them with hot silicone, finally we glue the stick well centered.
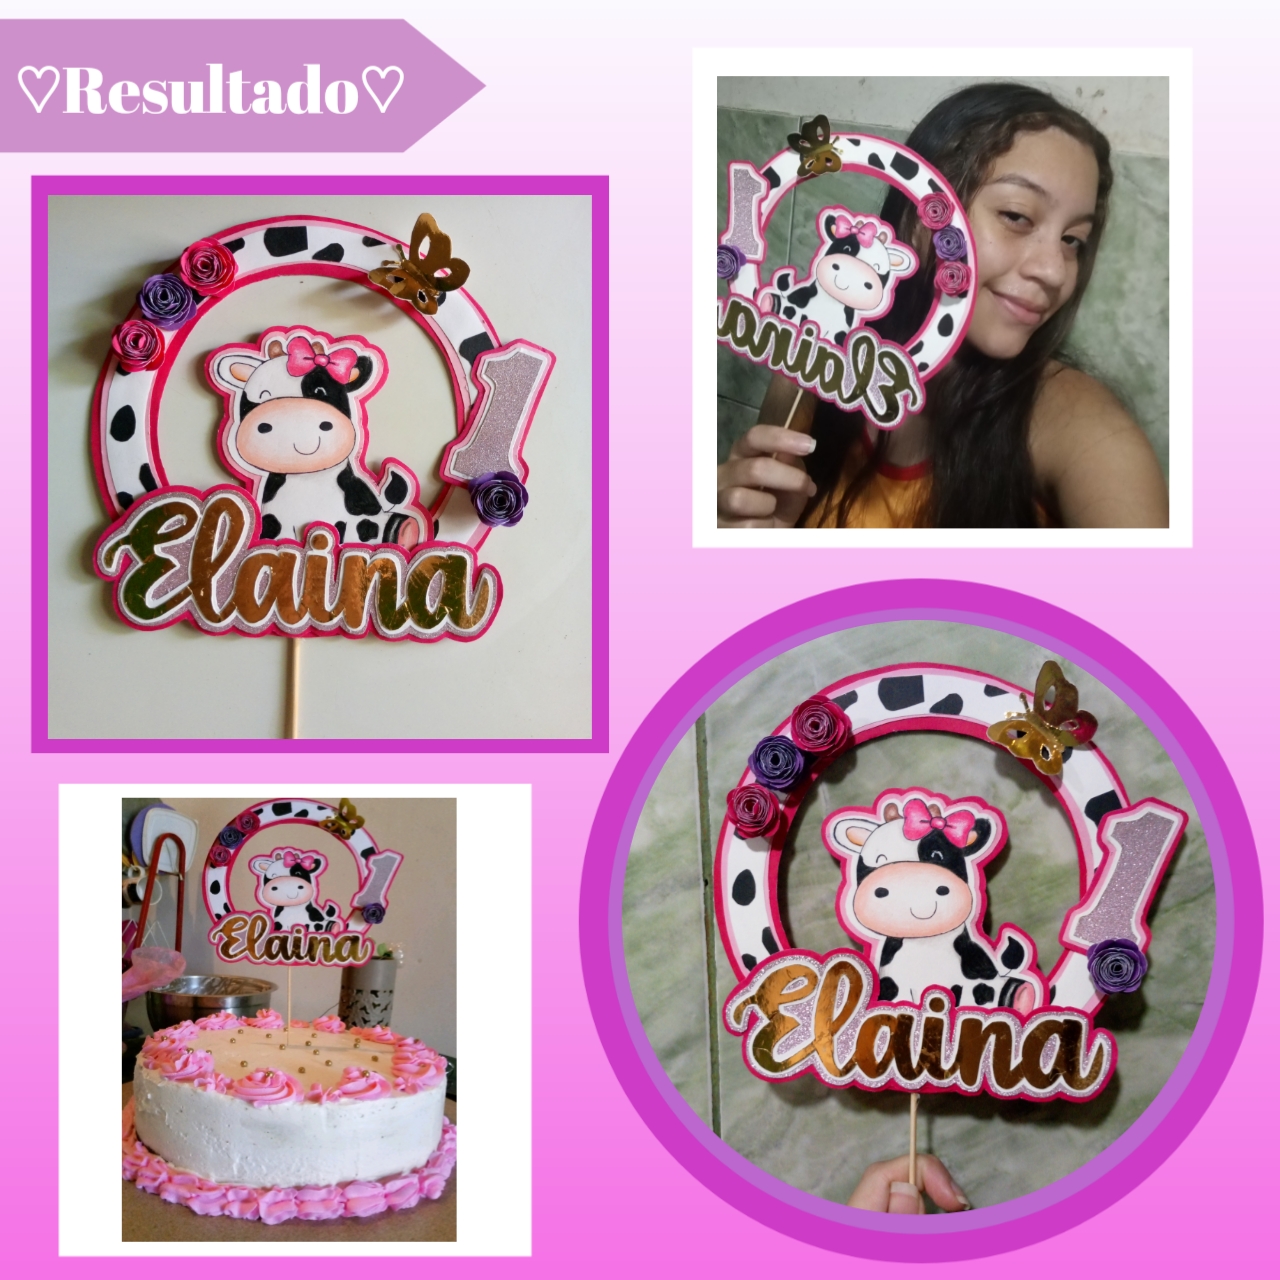
De está manera obtenemos un precioso Cake Topper, especial para agregar un detalle único y diferente a las tortas en los cumpleaños o incluso en cualquier celebración especial, lo mejor de todo es que es súper personalizable, ya que es muy versátil a la hora de escoger los colores y el tema principal, es cuestión de elegir lo que queramos y solo nos quedaría agregar imaginación.
This way we get a beautiful Cake Topper, special to add a unique and different detail to the cakes on birthdays or even in any special celebration, best of all is that it is super customizable, as it is very versatile when choosing the colors and the main theme, it is a matter of choosing what we want and we would only have to add imagination.
Esto es todo por el día de hoy, es un tutorial sencillo, pero útil a la hora de querer hacer un Cake Topper sencillo desde casa, hecho por nuestra propia mano, queda muy bonito y lo podemos utilizar cuando queramos, así que espero de corazón que les haya gustado y les sea útil el Diy de la tarde de hoy.♡
This is all for today, it is a simple tutorial, but useful when we want to make a simple Cake Topper from home, made by our own hand, it looks very nice and we can use it whenever we want, so I hope you liked it and you find it useful today's Diy of the afternoon.♡
🎂✨¡Gracias por leer! Hasta la siguiente publicación✨🎂
🎂✨ Thank you for reading! Until the next post✨🎂🎂.
Photos of my authorship taken from my Xiaomi Redmi 7 phone, edited in the free version of PixeLab.
Hi @stefania16, your post has been upvoted by @bdcommunity courtesy of @rem-steem!
Support us by voting as a Hive Witness and/or by delegating HIVE POWER.
JOIN US ON
✨❤️
¡Felicidades! Esta publicación obtuvo upvote y fue compartido por @la-colmena, un proyecto de Curación Manual para la comunidad hispana de Hive que cuenta con el respaldo de @curie.
Si te gusta el trabajo que hacemos, te invitamos a darle tu voto a este comentario y a votar como testigo por La Colmena.
Si quieres saber más sobre nuestro proyecto, te invitamos a acompañarnos en nuestro servidor de Discord.
Graciasss.✨
Hola Stefania me ha encantado mucho tu presentación, es estupenda!!1 Además de la manualidad. La combinación de colores es muy armónica. Amé la vaquita y el paso a paso, fácil de entender y seguir. Gracia spor compartir.
¡Hola! Muchas gracias, que maravillosa su manera de detallar y apreciar cada pequeña cosa.
Gracias por comentar y apoyar, saludos y un abrazo.💜✨
Está muy hermoso, me encantó tu trabajo, y te salen los recortes súper bien😊
Holaa, siento que me falta mejorar un poco el corte, pero ahí vamos mejorando, gracias por el comentario, saludos.✨
Hola muñequita, te quedó demás de precioso ese topper, con un toque sutil y delicado..
Ame como dibujaste la vaquita💗✨
Holii, me encantan esos comentarios, muchas gracias por incluso apreciar el dibujo, saludos.🥺💜
¡Hola Stefania! Que hermoso trabajo y cuantos detalles. Esa torta quedó hermosa y bien decorada con tu topper. Me gustó la tipografía y la combinación de colores, dorado y rosa quedan muy elegante. ¡Felicitaciones ❤️!
¡Hola! Muchas gracias por apreciar cada detalle, es muy bonito de tu parte, me alegra mucho que te haya gustado, gracias nuevamente, un abrazo grande amiga.💜✨
Te quedo muy bonito, me encanta, un abrazo.
¡Muchísimas gracias! También un abrazo para usted.💜
Que bello topper gracias por compartir!
Encantada, gracias a ti por pasar por mi publicación, un abrazo.💜
Esta demasiado precioso morí de ternura con esa vaquita, las letras me fascinan siempre he querido aprender a hacerlas.
Muchas gracias amigaa, bueno con la página es cuestión de imprimir, marcar y recortar, el resto es recortar bien y tener pulso, espero te sirva jajaja, saludos.💗