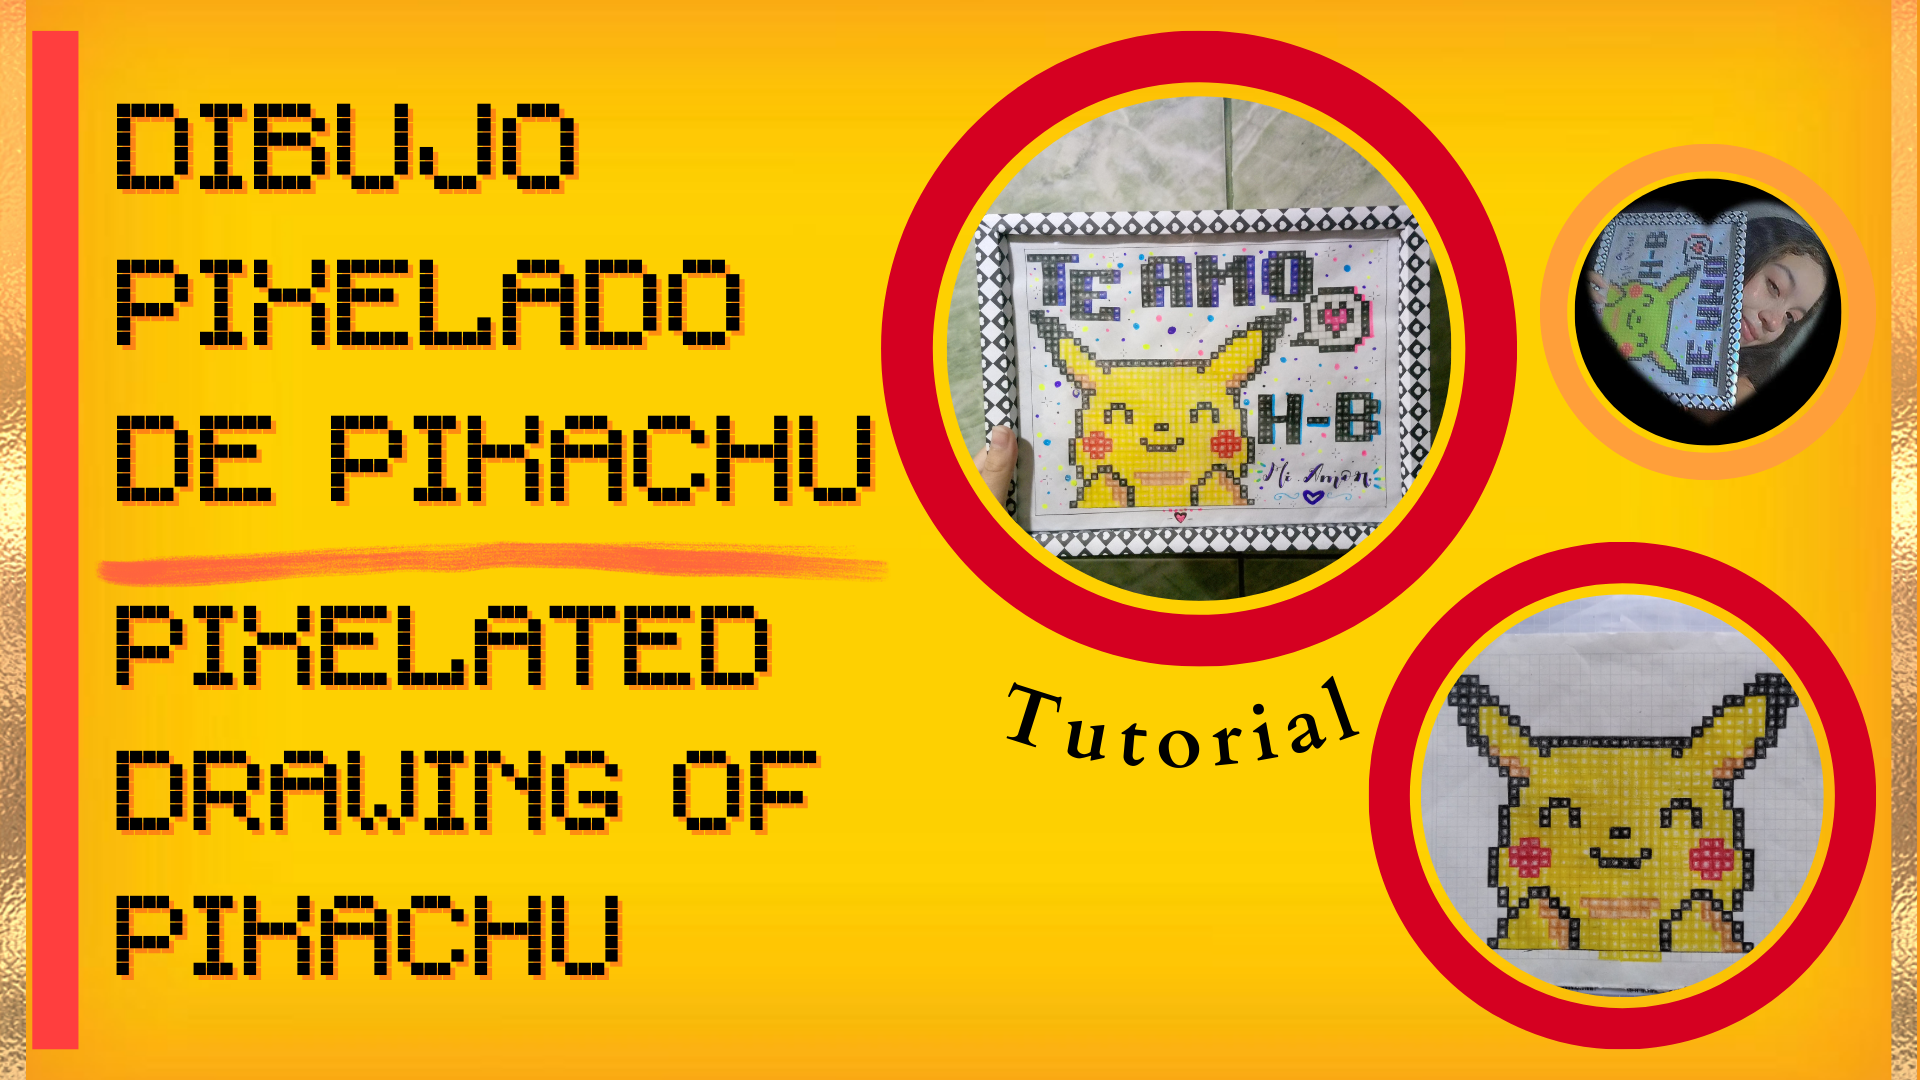
Aprende como hacer un dibujo pixelado en 5 sencillos pasos 💛✏️ | Tutorial fácil + Tips ✨⚡ [ESP-ENG]
Hello my beautiful people of Hive Diy! I am happy to share with you once again, I wish you all to be wonderful, full of blessings, always excited to create, as well as to share new things in this incredible space of creativity and productivity that this community offers to all of us.♡
En está tarde, les vengo con un pequeño paso a paso, algo sencillo, pero diferente, es una clase de tutorial de dibujo, no obstante, no es cualquier dibujo, además este tipo en específico no lleva gran dificultad de hacerlo, ya al adelantar y agarrarle el hilo, por así decirlo, poco a poco se vuelve más fácil, hablo muy directamente a cerca de los dibujos pixelados, esos que andan de moda por la redes sociales últimamente de un tiempo para acá, que se hacen apartir de una hoja de cuadrículas, osea de matemáticas.
This afternoon, I come with a small step by step, something simple, but different, it is a kind of drawing tutorial, however, it is not just any drawing, also this specific type does not carry great difficulty to do so, and to advance and grab the thread, so to speak, gradually becomes easier, I speak very directly about the pixelated drawings, those that are fashionable by social networks lately for some time now, which are made apartir of a sheet of grids, osea mathematics.
Está idea surgió porque mi novio iba a cumplir años, así unos días antes estábamos viendo imágenes en Pinterest y solamente mencionó que le gustaban ese tipo de dibujos, guarde esa información y para hacerlo parte del regalo que le hice (pronto tutorial de eso), quise hacer un dibujo de Pikachu, ya que le gustaba mucho ese programa animado de niño, entonces investigue un poco como se hacían, ya que no tenía ni idea de cómo se empezaba, además parecía súper complicado, pero encontré algunos tips y aprendí como hacerlos, y la verdad es que no es nada del otro mundo, solo hay que tener paciencia al principio más que todo, ya el resto solo es colorear y colorear, así que quise compartir con ustedes el proceso de como hice este detalle, además de dar algunas recomendaciones que encontré, a continuación les muestro todo el paso a paso.
This idea came up because my boyfriend was going to have a birthday, so a few days before we were looking at pictures on Pinterest and he only mentioned that he liked that kind of drawings, I saved that information and to make it part of the gift I made him (soon tutorial of that), I wanted to make a drawing of Pikachu, since he really liked that animated program as a child, then I researched a little how they were made, since I had no idea how to start, besides it seemed super complicated, but I found some tips and I learned how to make them, and the truth is that it is not a big deal, you just have to have patience at the beginning more than anything, and the rest is just coloring and coloring, so I wanted to share with you the process of how I did this detail, plus some recommendations that I found, then I show you the whole step by step.
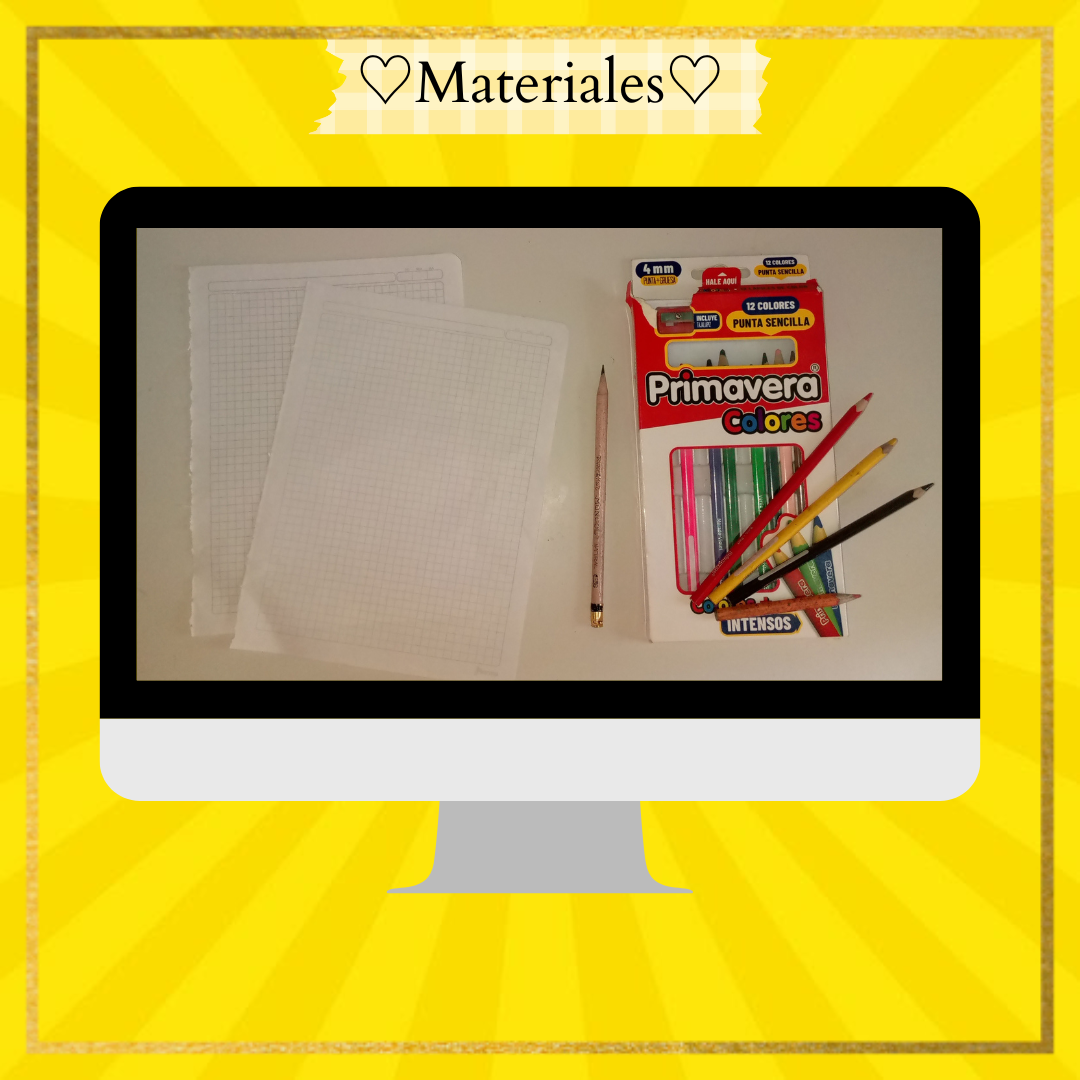
✨Materials✨
Los sencillos materiales que utilizaremos en está oportunidad son los siguientes:
The simple materials that we will use in this opportunity are the following:
- Hoja de cuadrículas (de matemáticas)
- Colores (negro, amarillo, naranja leve, rojo)
- Regla
- Lápiz
- Grid sheet (mathematics)
- Colors (black, yellow, light orange, red)
- Ruler
- Pencil
♡Procedure step-by-step♡
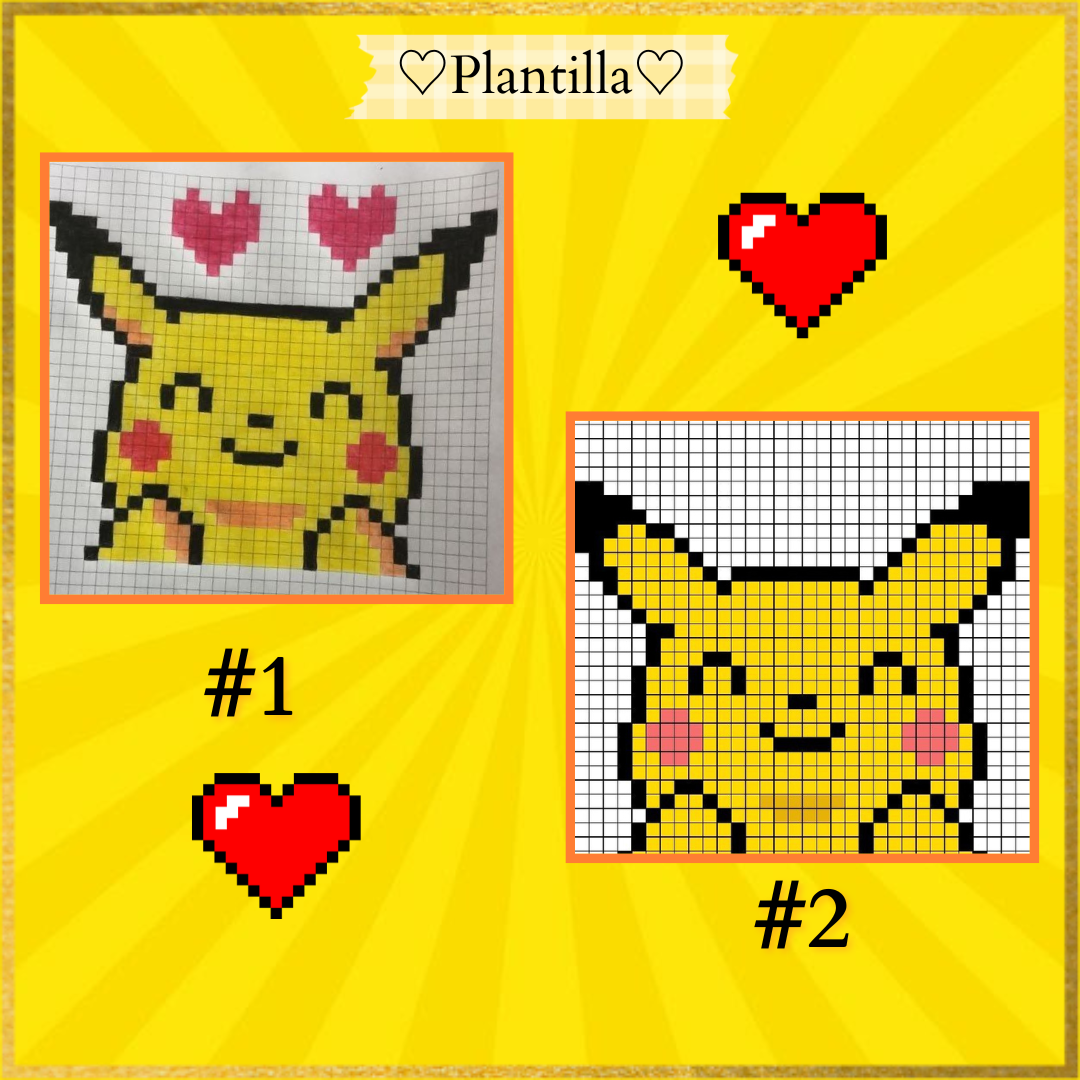
Fuente 1
Fuente 2
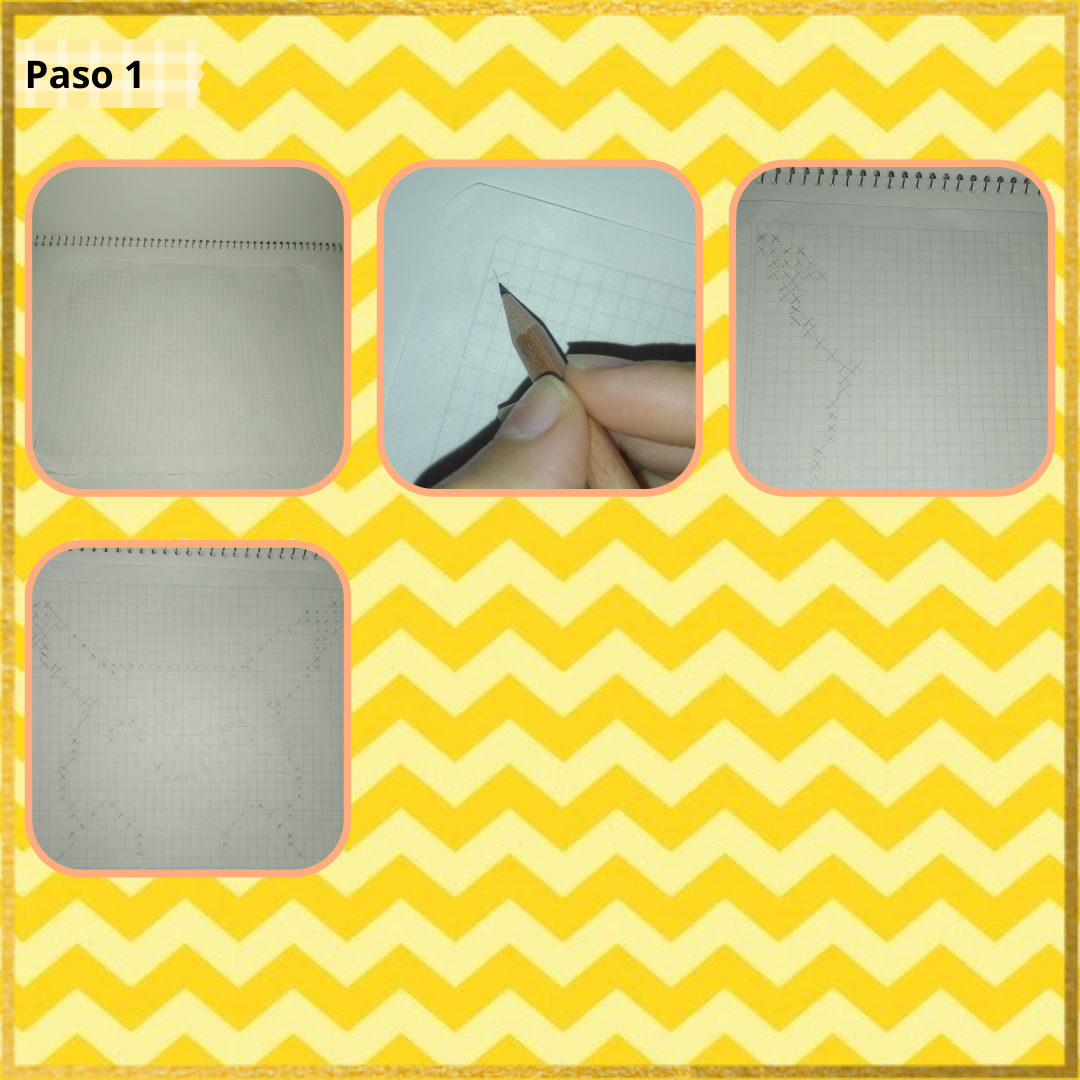
Paso 1:
Step 1:
Primeramente necesitaremos una pequeña guía que encontremos en internet (yo les dejo las que encontré arriba) para así guiarnos, se encuentran gran variedad y mientras aprendemos nos sirven de gran ayuda. Al tener nuestra guía presente, vamos a tomar nuestra hoja cuadriculada y nuestro lápiz, mediante el dibujo guía veremos los cuadros del delineado negro, seguidamente iremos marcando uno por uno, exactamente como se ve en la imágen, posicionando cuidadosamente, esto lo marcaremos con equis (x), para que se nos facilite al momento de colorear, en cada cuadro de manera clarita, al final de esto podremos observar perfectamente la figura del dibujo completa, ya agarrando vida.
First of all we will need a small guide that we find on the internet (I leave you the ones I found above) to guide us, there is a great variety and while we learn they are a great help. When we have our guide present, we will take our grid sheet and our pencil, through the guide drawing we will see the black outline squares, then we will mark one by one, exactly as shown in the image, positioning carefully, this we will mark it with an X (x), to make it easier for us when coloring, in each square in a clear way, at the end of this we can see perfectly the figure of the complete drawing, already coming to life.
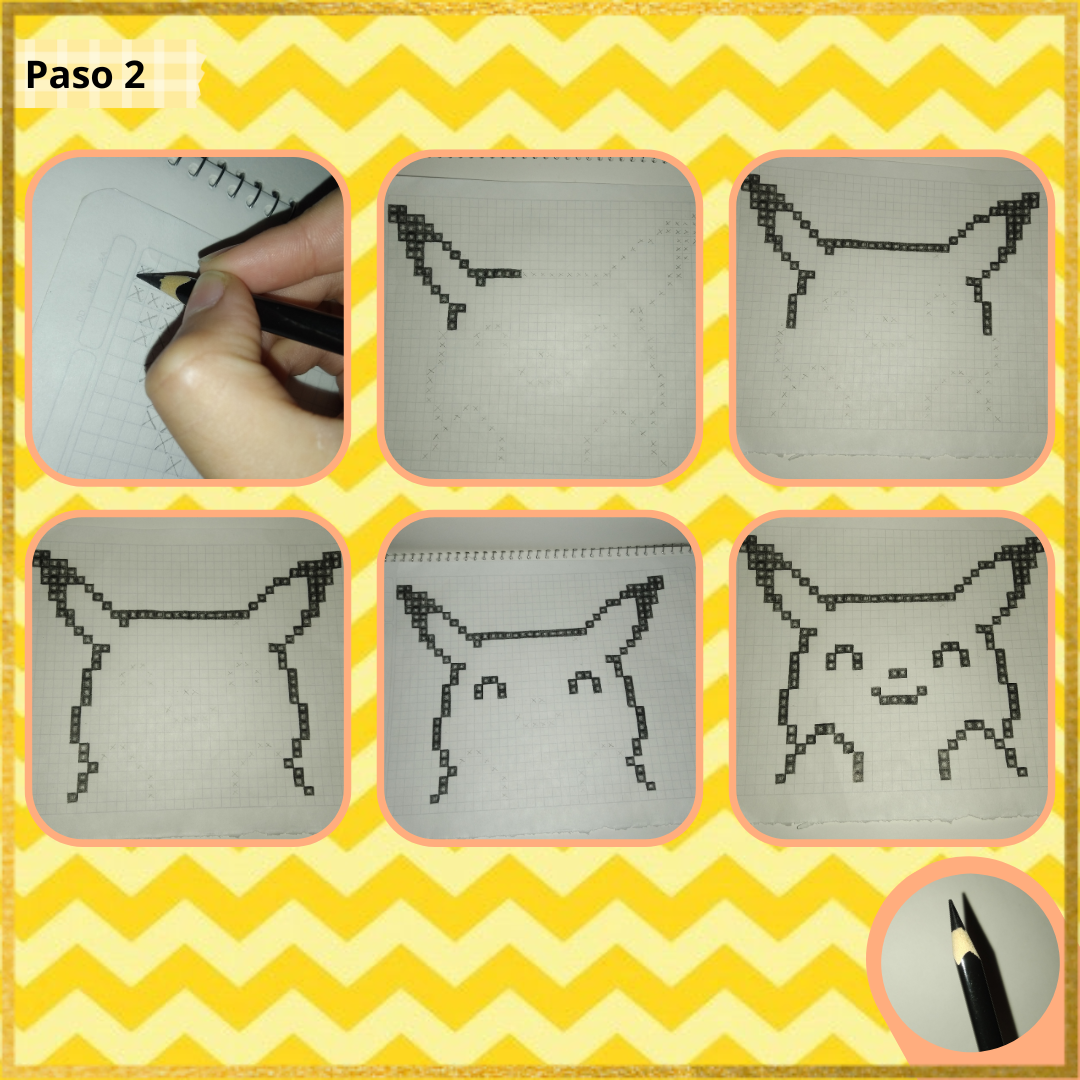
Paso 2:
Step 2:
A continuación haremos algo realmente sencillo, primero tomaremos nuestro color negro con la punta afilada para mejor trazado, también pueden utilizar marcador o lapicero, como prefieran ustedes, yo quise hacer este con color, así seguimos a rellenar cada cuadrado marcado anteriormente con lápiz, uno por uno, sin salirnos de la línea con con mucho cuidado, en este caso yo coloree a mi manera, o sea difuminado, pero ustedes pueden rellenar el cuadro completo o como más les guste, ya es cuestión de como lo quieran, nunca había visto uno así y quise hacerlo diferente al resto.
Next we will do something really simple, first we will take our black color with a sharp tip for better tracing, you can also use marker or pencil, as you prefer, I wanted to do this with color, so we continue to fill each square previously marked with pencil, one by one, without leaving the line with great care, in this case I colored my way, or blurred, but you can fill the whole picture or as you like, it is a matter of how you want it, I had never seen one like this and I wanted to make it different from the rest.
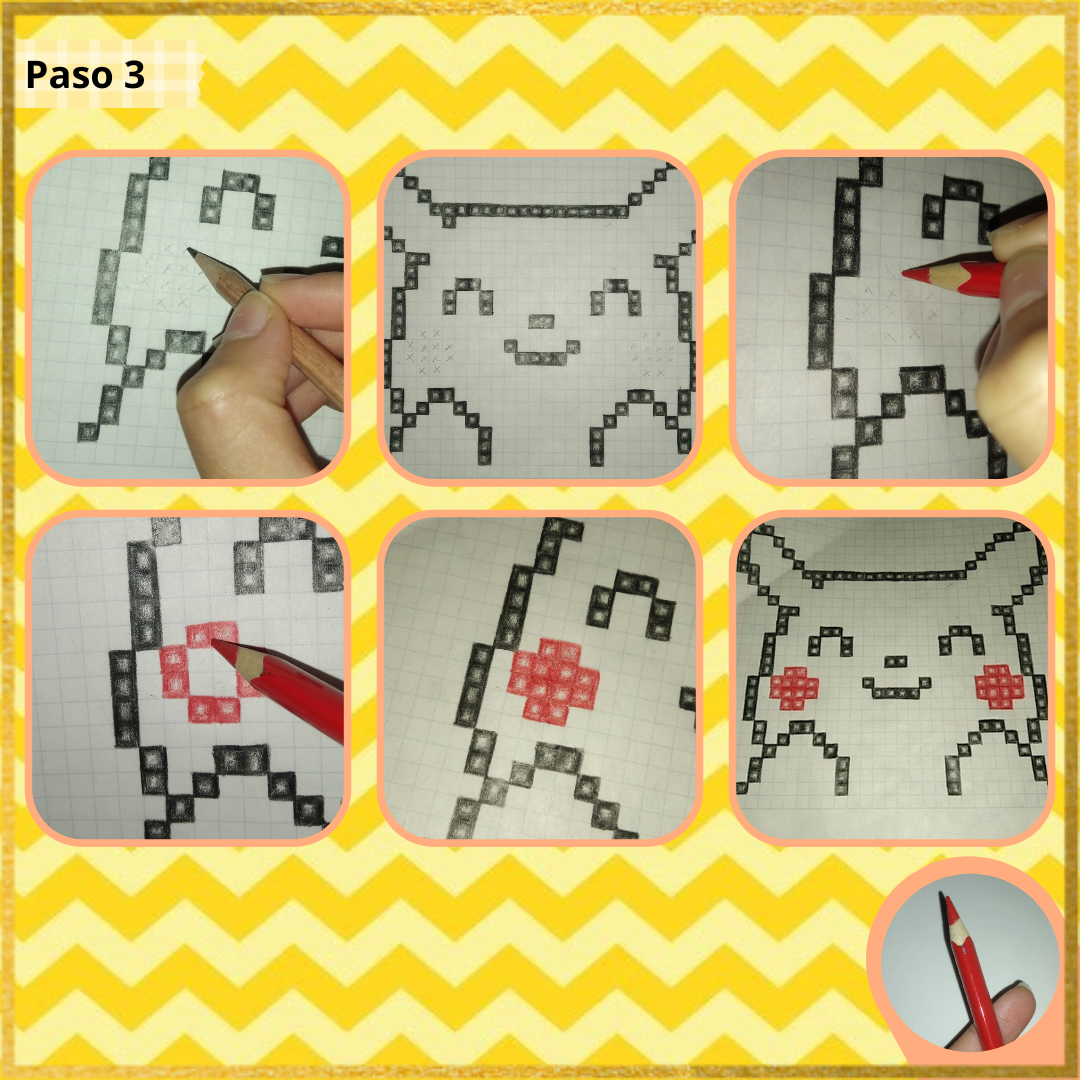
Paso 3:
Step 3:
Proseguimos a marcar cada cuadro del color en las mejillas de Pikachu, nuevamente como antes, primero rellenamos los cuadros con el lápiz, haciendo poca presión, para que no se marque demasiado, haciendo las equis en cada uno, luego solo nos queda tomar el color rojo con la punta recién sacada y rellenamos uno por uno todos estos con precaución para no salirnos de las líneas que forman todos los cuadros.
We proceed to mark each color square on Pikachu's cheeks, again as before, first we fill in the squares with the pencil, making little pressure, so that it does not mark too much, making the X's in each one, then we only have to take the red color with the tip just taken out and fill one by one all these with caution not to get out of the lines that form all the squares.
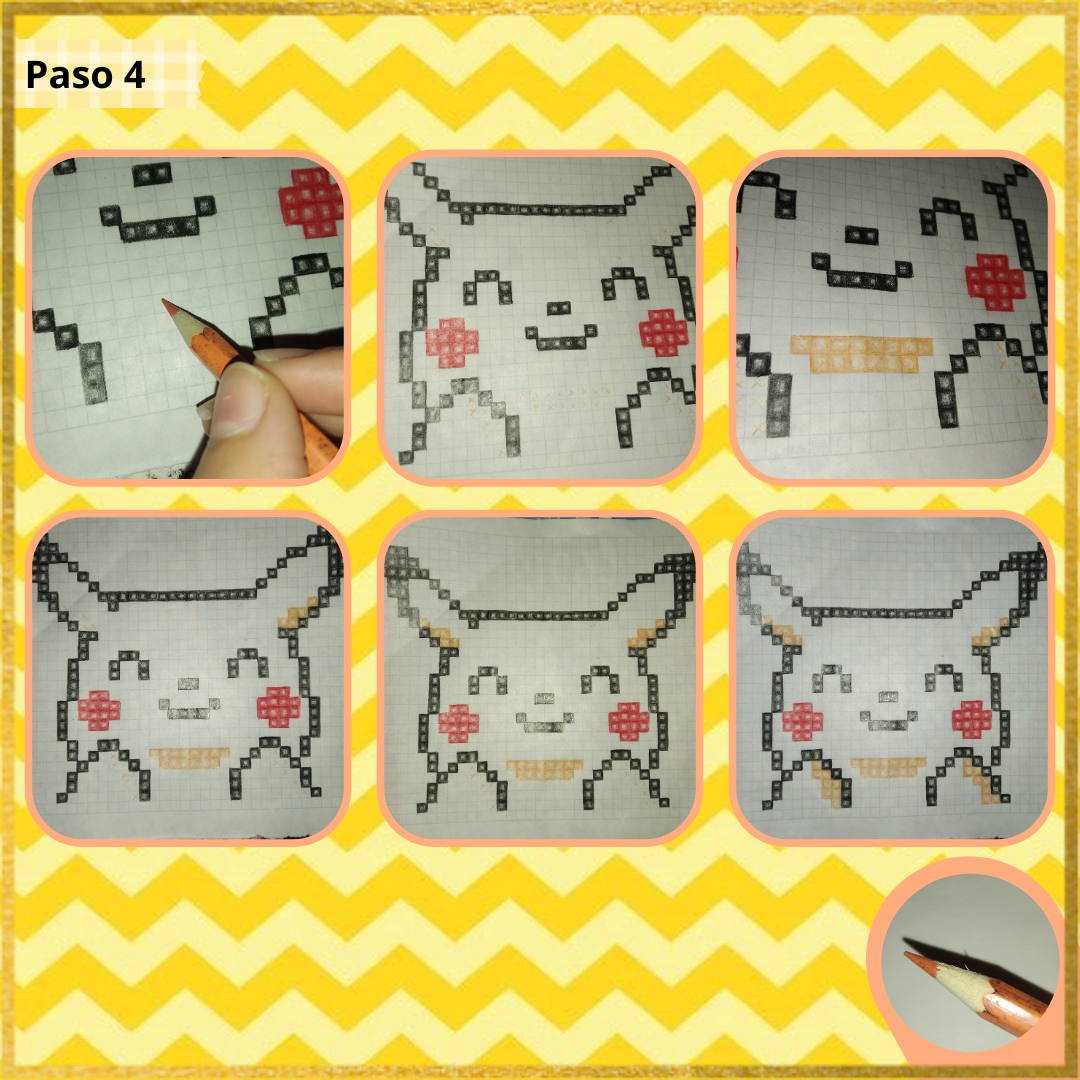
Paso 4:
Step 4:
Ahora volvemos a lo mismo, como les mencioné después de marcar, lo que queda por hacer es súper sencillo, al igual que rápido, por lo tanto, poco a poco vamos con más velocidad, así ahora marcamos con el color, cada equis dentro del cuadro, ya que es un color claro y es lo ideal para que no se marqué el lápiz, después de nuevo con el color, en esta oportunidad es un tipo de naranja clarito, y así, rellenamos otra vez cada uno, hasta terminar esta parte, siempre guiandonos del dibujo.
Now we return to the same, as I mentioned after marking, what remains to be done is super simple, as well as fast, therefore, little by little we go with more speed, so now we mark with the color, each X within the box, as it is a light color and is ideal for the pencil is not marked, then again with the color, this time is a kind of light orange, and so, we fill each one again, to finish this part, always guiding us from the drawing.
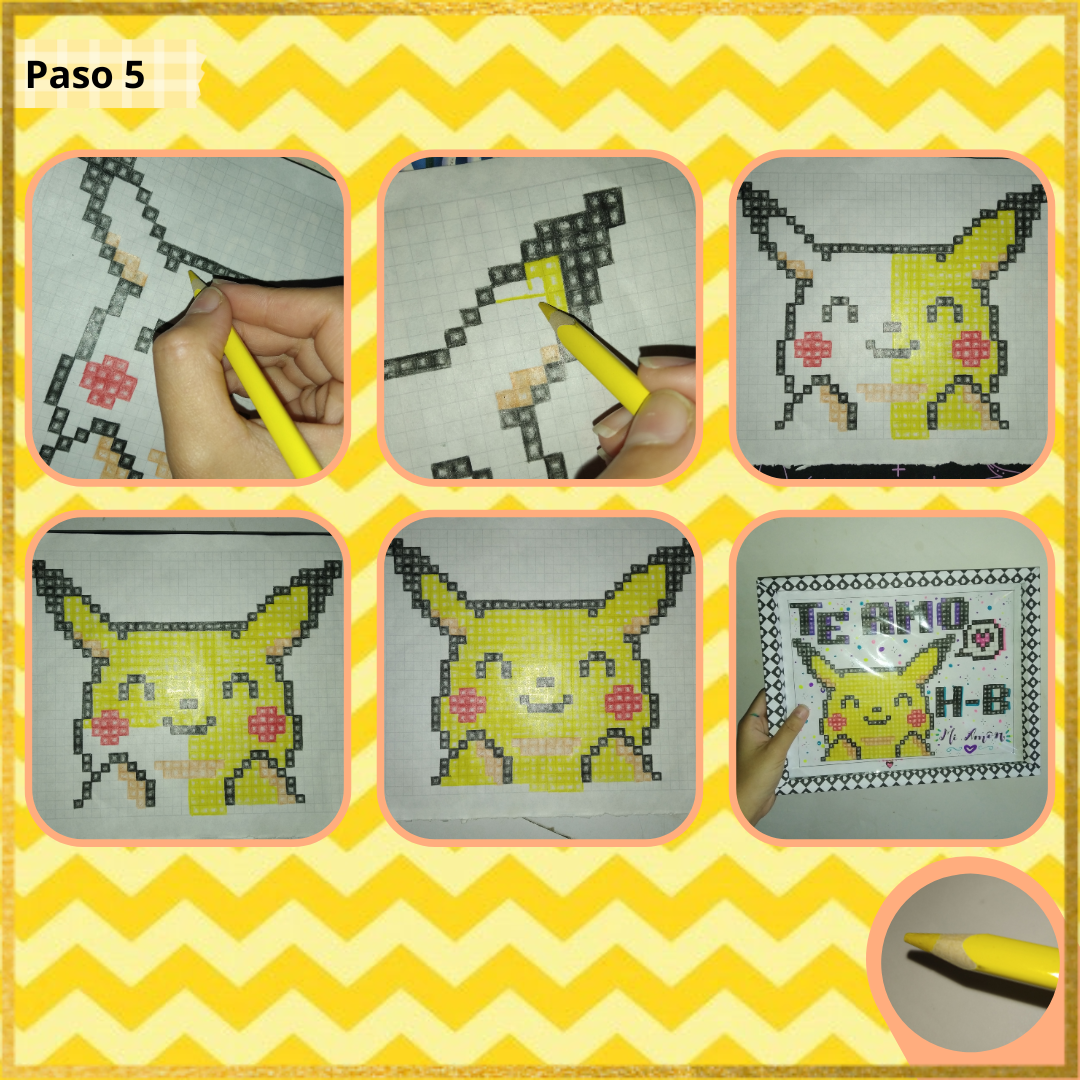
Paso 5
Step 5:
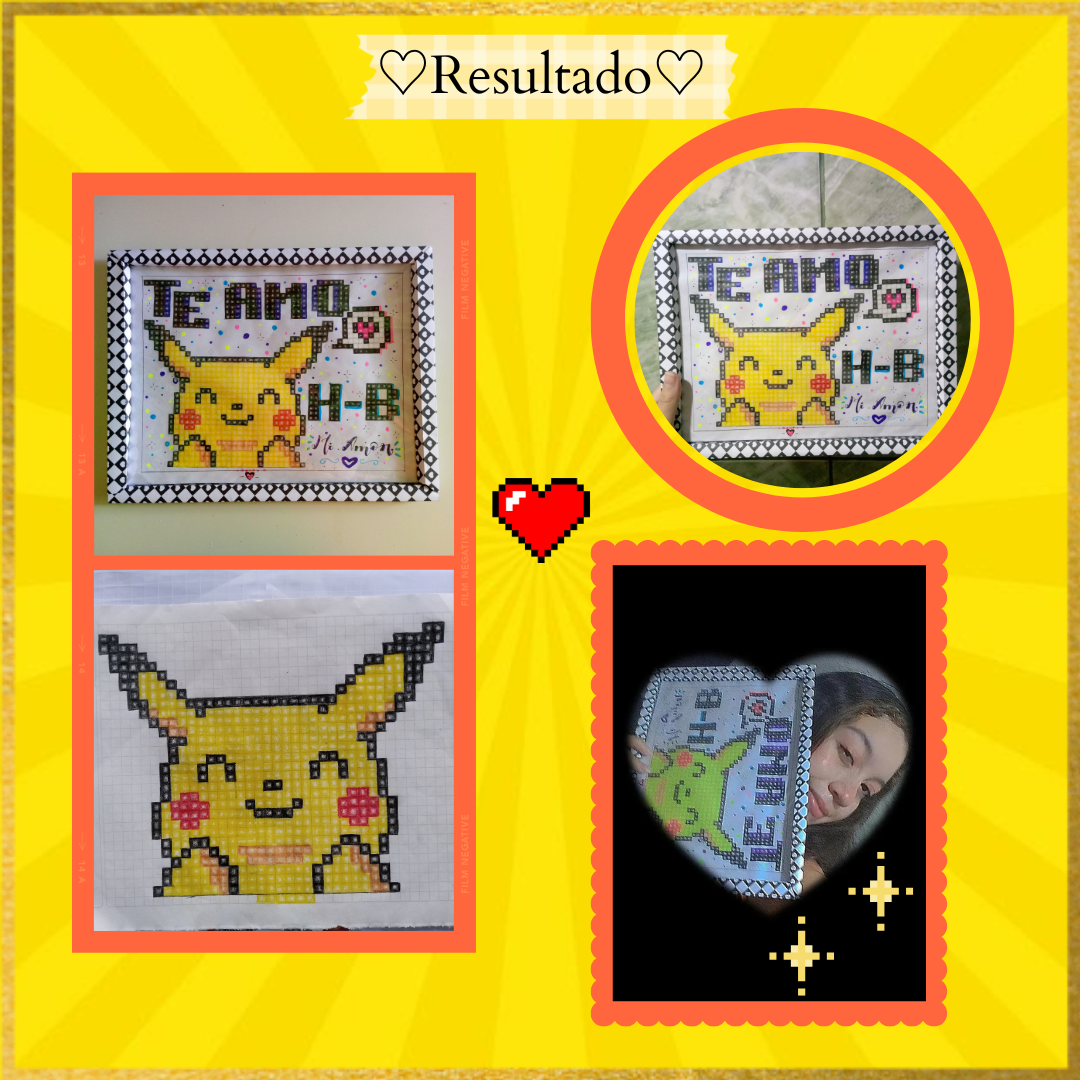
Por último solo nos queda agregar un solo color, por lo tanto, no es obligatorio marcar cada cuadrado antes con las equis, sino que podemos empezar a rellenar normal y directamente de una vez por todas, hasta terminar con cada pequeño cuadro, aún así sigan guiandose del dibujo guía precisamente, para que no se confundan, yo en la parte de abajo pase a una línea que no era, por pequeña equivocacion, pero no pasó nada, porque me tocaba recortarlo igual, así para terminar un dibujo completo, busque unas letras en pixeles, hice "H - B" ( Happy Birthday), al igual que "TE AMO", también hice un corazón en un comentario y al final recorte cada uno y los pegue en una hoja en blanco armando una linda Imágen, aún así, la metí a un portaretrato hecho a mano, como toque final, ya se los dejó a su creatividad.
Finally we only have to add a single color, therefore, it is not mandatory to mark each square before with the X's, but we can start to fill normal and directly once and for all, to finish with each small square, even so continue to be guided by the guide drawing precisely, so you do not get confused, I in the lower part went to a line that was not, by small mistake, but nothing happened, because I had to cut it anyway, so to finish a complete drawing, I looked for some letters in pixels, I made "H - B" ( Happy Birthday), as well as "I LOVE YOU", I also made a heart in a comment and at the end I cut each one and glued them on a blank sheet of paper making a nice image, even so, I put it in a handmade picture frame, as a final touch, I leave it to your creativity.
Así de manera fácil, rápida y sencilla podemos realizar muy cómodamente un dibujo de píxeles desde casa, con materiales de dibujo extra sencillos y fáciles de conseguir en nuestra propia casa, así que espero que les sea de gran ayuda este tutorial para empezar a hacer este tipo de dibujos tan tiernos y hermosos, la verdad me gustó el resultado, incluso quiero hacer cientos de estos, pero con calma JSKJA.
So in an easy, fast and simple way we can make very comfortably a pixel drawing from home, with extra simple drawing materials and easy to get in our own home, so I hope this tutorial will be of great help to start making this kind of drawings so tender and beautiful, the truth I liked the result, even I want to make hundreds of these, but calmly JSKJA.
Por último les resumiré algunos tips y recomendaciones a lo largo del tutorial, además de agregar otros aspectos importantes y sencillos:
Finally, I will summarize some tips and recommendations throughout the tutorial, as well as adding other important and simple aspects:
- Empezar marcando el contorno negro con las equis en lápiz
- Marcar el resto de las equis con los colores asignados
- Se pueden marcar todas las equis, cada una con su color o si es negra con el lápiz, de una vez, para tener toda la figura y solamente rellenar al final
- Pueden colorear de dos sólida, o a su respectiva manera
- Pueden hacer el dibujo que más les guste
- Pueden cambiar colores a su estilo y gusto
- Start by marking the black outline with the Xs in pencil.
- Mark the rest of the Xs with the assigned colors.
- You can mark all the Xs, each one with its own color or if it is black with the pencil, all at once, to have the whole figure and only fill in at the end.
- They can color in two solid colors, or in their own way.
- You can make the drawing you like the most
- You can change colors to your style and taste
Estas son solo algunas recomendaciones que les dejó, esperando que les sea útil a la hora de iniciar con estos dibujos tan bellos, como ya les dije, no tienen gran dificultad, así que espero que les haya encantado tanto como a mí, disfrute compartiendo con ustedes hoy (y siempre), nos vemos la próxima, un abrazo.♡
These are just some recommendations that he left you, hoping it will be useful when starting with these beautiful drawings, as I told you, they do not have great difficulty, so I hope you loved it as much as I did, enjoy sharing with you today (and always), see you next time, a hug.♡
✨♡¡Gracias por acompañarme en un nuevo tutorial!♡✨
✨♡Thank you for joining me in a new tutorial!♡✨
Photos of my authorship taken from my Xiaomi Redmi 7 phone, edited in the free version of Canva.
Stefanía, esta es una técnica muy genial, que lo llevaras a la dificultad del arte tradicional aun más. Me ha encantado ver todo el proceso.
Eso me alegra mucho, gracias por tomar el tiempo de visitar mi post, un abrazo.💜
¡Felicidades! Esta publicación obtuvo upvote y fue compartido por @la-colmena, un proyecto de Curación Manual para la comunidad hispana de Hive que cuenta con el respaldo de @curie.
Si te gusta el trabajo que hacemos, te invitamos a darle tu voto a este comentario y a votar como testigo por La Colmena.
Si quieres saber más sobre nuestro proyecto, te invitamos a acompañarnos en nuestro servidor de Discord.
🧡
Ya de por si hacerlo en digital cuesta... te quedó genial! Muy buenas las medidas.
Imagino que con marcadores debe quedar mucho mejor!
Pues en digital estaría increíble, pero sí, de todas formas, lleva su trabajo.
Muchas graciasss, y a lo mejor sí, era mi idea inicial, pero me hacían falta unos y terminé haciéndolo así JSJSJ.✨
Muyyy bueno, me encanta
Graciasss.✨❤️