SPK Network - Steps to Run the Testnet

If you follow along with the goings on with the SPK Network development, you'll know we've reached a fever pace with our integration of several different aspects of the network. We will lay out some of the basics here to get the capable among you into our testing program. We need to know everything about what you think, how it installs, how it runs, how it meets or misses on expectations... everything.
So, what's in the bag at this point?
- SPK Token Architecture
- Broca Token Ecosystem
- SPK Governance
- Storage Node Software
- 3rd Party Uploads
- Proof of Access Software
- Personal Content Moderation
- Validator Voting
What's left?
- DEX - This is a testnet, and attaching it to real capital at this point would be a little dangerous.
- Decentralized Validators - Ad-hoc networking between storage and validator nodes
- Maths around mining efficiency - open for discussion
- SIP Mechanics - Larynx Inflation is being spread to Broca rewards
Acquire Test LARYNX tokens
Follow or refollow @spknetwork with you new testing account. We'll send you a few (worthless) tokens to help you along in testing.
Installing
First, let's go over some of the requirements. This assumes you'll be installing all of the suites on one machine. However, it's broken into multiple pieces to be installed in several places. For instance, your storage node might be on a NAS in a data center, while your SPK node could be in your home office on a Raspberry Pi. But for the sake of testing, the only supported installation is all-in-one on a sufficiently sized Debian/Ubuntu Linux server. We want to point out that if you're keen on assisting the network to grow, you make guides for different types of installs or in different languages.
Next, you must have https for at least your storage software. This will require DNS-level access to a domain name at the very least. This is a wonderful place to start the installation.
Make DNS records for:
- Token API (https://spktest.dlux.io)
- IPFS Middleware (https://ipfs.dlux.io)
- A Validator (coming soon)
Knowing where to point your config files will be useful in the next few steps.
Now for the CLI:
Once you've ssh'd into the server, go ahead and:
git clone https://github.com/spknetwork/trole.git && cd trole
We're going to break down the install script. Hopefully, when we run into issues, we can work together to improve the install script, but this also allows you to see everything that's going on in a full install. If you want to press the I believe button:
./install.sh and follow the prompts. This takes a few minutes.
#!/bin/bash

# Formatting STDOUT
GREEN='\033[0;32m'
YELLOW='\033[0;33m'
RED='\033[0;31m'
NC='\033[0m'

whoami=$(whoami)
if [ $whoami = root ];
then
    echo -e "${RED}Can not install as root${NC}"
    exit
fi
First thing first, some colors to help pinpoint issues in the coming text wall. Then setting the variable for the account name. If you're running this script as root, it'll kick you out.
# version check
source /etc/os-release
if [ $ID_LIKE != 'debian' ];
then
    echo -e "${RED}${PRETTY_NAME}${NC} Installed"
    echo -e "${RED}Ubuntu/Debian Required for Install Script${NC}"
    exit
fi
echo -e "${YELLOW}This script may ask some questions after it installs it's first set of dependencies. Stay tuned.${NC}"
Ensure you're running debian/ubuntu.
sudo apt update &> /dev/null

# install node

if ! command -v node > /dev/null
then
    curl -s https://deb.nodesource.com/setup_16.x | sudo bash
    sudo apt install nodejs -y
fi

if ! command -v npm > /dev/null
then
    sudo apt install npm -y
fi

# Install node for Trole

NODE_VERSION=$(node -v | cut -f1 -d.)
if [ ${NODE_VERSION/v} -lt 14 ];
then
    echo -e "${RED}NodeJS version 14 or higher is Required${NC}"
    echo -e "Ensure node -v is version 14 or higher and run this script again."
    exit
fi
We will run some apt from this script, though it's generally not recommended. If npm and node.js aren't installed, we'll get it done. This is a prerequisite for using hive-js to build keys a little later.
# Install Trole

NODE_PACKAGES=node_modules
if test -d "$NODE_PACKAGES";
then
    echo -e "${GREEN}Trole is installed${NC}"
else
    echo -e "Installing Trole"
    npm i
fi
Next, we're going to make sure npm i has been run on our repo, getting the dependencies such as hive.js
# Get configs
if test -f .env;
then
    echo -e "${GREEN}Reading .env Variables${NC}"
    source .env
    if [ -z "$DOMAIN" ];
    then
        echo What is your domain name? -dlux.io
        read DOMAIN
        echo "DOMAIN=${DOMAIN}" | tee -a .env
    else
        echo "DOMAIN=${DOMAIN}"
    fi
    if [ -z "$ACCOUNT" ];
    then
        echo What is your HIVE account name? dlux-io
        read ACCOUNT
        echo "ACCOUNT=${ACCOUNT}" | tee -a .env
    else
        echo "ACCOUNT=${ACCOUNT}"
    fi
    if [ -z "$ACTIVE" ];
    then
        echo "What is the ACTIVE key for $ACCOUNT"
        read ACTIVE
        echo "ACTIVE=${ACTIVE}" | tee -a .env
    else
        echo "ACTIVE=${ACTIVE}" | cut -b 1-10
    fi
    if [ -z "$SPKPRIV" ];
    then
        echo "Please input any existing SPK Keys, or generate a new keypair..."
        while true; do
            read -p "Do you have an existing SPK keypair? " yn
            case $yn in
                [Yy]* ) KEY_GEN=true ; break;;
                [Nn]* ) KEY_PROMPT=true ; break;;
                * ) echo "Please answer yes or no.";;
            esac
        done
    else
        KEY_PROMPT=false
        echo "SPKPUB=${SPKPUB}"
        echo "SPKPRIV=${SPKPRIV}" | cut -b 1-11
    fi
    if [ -z "$KEY_PROMPT" ];
        then
            echo "What is the Private SPK key for $ACCOUNT"
            read SPKPRIV
            echo "SPKPRIV=${SPKPRIV}" | tee -a .env
            echo "What is the Public SPK key for $ACCOUNT"
            read SPKPUB
            echo "SPKPUB=${SPKPUB}" | tee -a .env
        elif [ $KEY_PROMPT = true ]
            then
                KEY_PAIR=$(node generate_key_pair.js)
                echo $KEY_PAIR
                SPKPRIV=$(echo $KEY_PAIR | cut -d " " -f1)
                SPKPUB=$(echo $KEY_PAIR | cut -d " " -f2)
                echo "SPKPRIV=${SPKPRIV}" | tee -a .env
                echo "SPKPUB=${SPKPUB}" | tee -a .env
    fi
    if [ -z "$API_PORT" ];
    then
        echo "API_PORT=5050" | tee -a .env
    fi
    if [ -z "$ENDPORT" ];
    then
        echo "ENDPORT=5001" | tee -a .env
    fi
    if [ -z "$ENDPOINT" ];
    then
        echo "ENDPOINT=http://127.0.0.1" | tee -a .env
    fi
    if [ -z "$POA_URL" ];
    then
        echo "POA_URL=ws://localhost:8000" | tee -a .env
    fi
else
    echo -e "${YELLOW}No .env found${NC}"
    echo What is your domain name? -dlux.io
    read DOMAIN
    echo "DOMAIN=${DOMAIN}" | tee -a .env
    echo What is your HIVE account name? dlux-io
    read ACCOUNT
    echo "ACCOUNT=${ACCOUNT}" | tee -a .env
    echo "API_PORT=5050" | tee -a .env
    echo "ENDPOINT=http://127.0.0.1" | tee -a .env
    echo "ENDPORT=5001" | tee -a .env
fi
source .env
echo -e "${YELLOW}Ensure ipfs.${DOMAIN} is pointed to this server${NC}"
This block will ask to build a config file to turn this node into your node. As always, we Highly recommend that you use a single-purpose Hive account with a zero balance and delegated Resource Credits(RCs). If you need help to create a Hive account, check the steps at the bottom of this post.
If you'd like to make your config file, it will look something like this. (.env)
DOMAIN=dlux.io
ACCOUNT=disregardfiat
POSTING_KEY=5trashNumbers
ACTIVE_KEY=haha
SPKPRIV=5moreTrAsH
SPKPUB=STM7
API_PORT=5050
ENDPORT=5001
ENDPOINT=http://127.0.0.1
IPFSID=12D3KooWQdHUoK9ENawgxbmfaWGAwCnv3TCJHSnkBdYCPh6koLR
POA_URL=http://localhost:3000
The script will generate a new keypair for the SPK-Network Multi-Sig Wallet, which you'll be automatically elected to hold if you're a top performer with enough collateral. Hopefully, with this out of the way, the user inputs can stop, and the rest of this build process can happen without interaction.
# install ipfs
if ! command -v ipfs > /dev/null
then
    echo -e "${YELLOW}Installing IPFS(KUBO)${NC}"
    wget https://dist.ipfs.tech/kubo/v0.17.0/kubo_v0.17.0_linux-amd64.tar.gz > /dev/null
    tar -xvzf kubo_v0.17.0_linux-amd64.tar.gz > /dev/null
    mv kubo ../kubo
    sudo bash ../kubo/install.sh > /dev/null
    rm kubo_v0.17.0_linux-amd64.tar.gz > /dev/null
    # if ! command -v ipfs > /dev/null
    # then
    #     echo -e "${GREEN} IPFS installed succesfully${NC}"
    # else
    #     echo -e "${RED} IPFS install failed${NC}"
    #     echo -e "${YELLOW}Try Installing IPFS manually and run this script again${NC}"
    #     exit
    # fi
else
    echo -e "${GREEN}IPFS is installed${NC}"
fi
IPFS_CONFIG_FILE=~/.ipfs/config
if test -f "$IPFS_CONFIG_FILE";
then
    echo -e "${GREEN}IPFS config exists${NC}"
else
    echo -e "${GREEN}Initializing IPFS${NC}"
    ipfs init --profile server > /dev/null
fi

echo 'Configuring IPFS cors'
ipfs config --json API.HTTPHeaders.Access-Control-Allow-Origin '["*"]'
ipfs config --json API.HTTPHeaders.Access-Control-Allow-Methods '["GET", "POST"]'
ipfs config --json API.HTTPHeaders.Access-Control-Allow-Headers '["Authorization"]'
ipfs config --json API.HTTPHeaders.Access-Control-Expose-Headers '["Location"]'
ipfs config --json API.HTTPHeaders.Access-Control-Allow-Credentials '["true"]'

IPFS_ID=$(ipfs id | grep ID | cut -d"\"" -f4 )
if [ -z "$IPFSID" ];
then
    echo "IPFSID=${IPFS_ID}" | tee -a .env
elif [ $IPFS_ID != $IPFSID ];
then
    while true; do
        read -p "Your IPFS ID seems to have changed. Replace IPFSID in .env(Yes / No)?" yn
        case $yn in
            [Yy]* ) REPLACE=true ; break;;
            [Nn]* ) REPLACE=false ; break;;
            * ) echo "Please answer yes or no.";;
        esac
    done
    if [ $REPLACE = "true" ];
        then
        echo "IPFSID=${IPFS_ID}" | tee -a .env
    fi
fi
Next, we will install IPFS if it's not already and move the IPFS PeerID to the config file. We currently use Websockets, but utilizing IPFS PubSub is still our goal.
IPFS_SERVICE_FILE=/lib/systemd/system/ipfs.service
if test -f "$IPFS_SERVICE_FILE";
then
    echo -e "${GREEN}IPFS service exists${NC}"
else
    echo -e "Building IPFS Service${NC}"
    echo -e IPFSSERVICE="[Unit]\nDescription=ipfs daemon\n[Service]\nExecStart=/usr/local/bin/ipfs daemon --enable-pubsub-experiment\nRestart=always\nUser=${whoami}\nGroup=${whoami}\nEnvironment=”IPFS_PATH=/home/${whoami}/data/ipfs”\n[Install]\nWantedBy=multi-user.target" | sudo tee $IPFS_SERVICE_FILE
    sudo systemctl daemon-reload
fi

ipfs_is_active=$(sudo systemctl is-active ipfs)
if [ $ipfs_is_active = 'active' ];
then
    echo -e "${GREEN}IPFS daemon is active${NC}"
else
    echo 'Starting IPFS daemon'
    sudo systemctl start ipfs
fi

ipfs_is_enabled=$(sudo systemctl is-enabled ipfs)
if [ $ipfs_is_enabled = 'enabled' ];
then
    echo -e "${GREEN}IPFS service is set to auto-start${NC}"
else
    echo 'Enabling IPFS daemon auto-start'
    sudo systemctl enable ipfs
fi

ipfs_is_active=$(sudo systemctl is-active ipfs)
if [ $ipfs_is_active != 'active' ];
then
    echo -e "${RED}IPFS failed to start${NC}"
    exit
fi
We'll configure IPFS to allow writes from our middleware Trole and build a systemd file to run it.
# install caddy
CADDY_FILE=/etc/caddy/Caddyfile
if ! command -v caddy > /dev/null
then
    echo -e "${YELLOW}Installing Caddy${NC}"
    sudo apt install -y debian-keyring debian-archive-keyring apt-transport-https
    curl -1sLf 'https://dl.cloudsmith.io/public/caddy/stable/gpg.key' | sudo gpg --dearmor -o /usr/share/keyrings/caddy-stable-archive-keyring.gpg
    curl -1sLf 'https://dl.cloudsmith.io/public/caddy/stable/debian.deb.txt' | sudo tee /etc/apt/sources.list.d/caddy-stable.list
    sudo apt update > /dev/null
    sudo apt install caddy > /dev/null
else
    echo -e "${GREEN}Caddy is installed${NC}"
fi

CADDY_PATTERN="ipfs.${DOMAIN}"
CADDY_CONFIG_EXISTS=$(grep $CADDY_PATTERN $CADDY_FILE 2> /dev/null)
if [ -z "$CADDY_CONFIG_EXISTS" ];
then
    echo Building Caddyfile
    echo -e "ipfs.${DOMAIN} {\n\t@ws {\n\t\theader Connection *Upgrade*\n\t\theader Upgrade websocket\n\t}\n\treverse_proxy /upload* localhost:${API_PORT} \n\t\treverse_proxy /ipfs/* localhost:8080\treverse_proxy @ws localhost:8001\n\t\tlog {\n\t\toutput file /var/log/caddy/ipfs.${DOMAIN}-access.log {\n\t\t\troll_size 10mb\n\t\t\troll_keep 20\n\t\t\troll_keep_for 720h\n\t\t}\n\t}\n}" | sudo tee -a $CADDY_FILE
    sudo systemctl restart caddy
else
    echo Caddy is configured
fi

caddy_is_active=$(sudo systemctl is-active caddy)
if [ $caddy_is_active != 'active' ];
then
    echo -e "${RED}Caddy failed to start${NC}"
    exit
else
    echo -e "${GREEN}Caddy is running${NC}"
fi
Installing Caddy, which should take care of the SSL certificates and connect to the ipfs.YOURDOMAIN.com you specified earlier. Also, letting systemd manage this.
TROLE_SERVICE_FILE=/lib/systemd/system/trole.service
if test -f "$TROLE_SERVICE_FILE";
then
    echo -e "${GREEN}Trole service exists${NC}"
else
    echo -e "Installing Trole"
    echo -e TROLE_SERVICE="[Unit]\nDescription=trole\n[Service]\nExecStart=/usr/bin/node /home/${whoami}/trole/index.js\nRestart=always\nUser=${whoami}\nGroup=${whoami}\n[Install]\nWantedBy=multi-user.target" | sudo tee $TROLE_SERVICE_FILE
    sudo systemctl daemon-reload
fi

trole_is_active=$(sudo systemctl is-active trole)
if [ $trole_is_active = 'active' ];
then
    echo -e "${GREEN}Trole is running${NC}"
else
    echo 'Starting Trole'
    sudo systemctl start trole
fi

trole_is_enabled=$(sudo systemctl is-enabled trole)
if [ $trole_is_enabled = 'enabled' ];
then
    echo -e "${GREEN}Trole is set to auto-start${NC}"
else
    echo 'Enabling Trole auto-start'
    sudo systemctl enable trole
fi

trole_is_active=$(sudo systemctl is-active trole)
if [ $trole_is_active != 'active' ];
then
    echo -e "${RED}Trole failed to start${NC}"
    exit
else
    echo Trole is running
fi
systemd will run Trole for us now. It should have all its dependencies now.
# PoA
which_go=$(which go)
if test -f "$which_go";
then
    echo -e "${GREEN}Go Installed${NC}"
else
    echo -e "Installing Go"
    which_snap=$(which snap)
    if test -f "$which_snap";
    then
        echo -e "${GREEN}Snap Installed${NC}"
    else
        echo -e "Installing Snap"

        sudo apt install snapd
    fi
    sudo snap install go --classic
fi

POA_SERVICE_FILE=/lib/systemd/system/poa.service
if test -f "$POA_SERVICE_FILE";
then
    echo -e "${GREEN}PoA service exists${NC}"
else
    git clone https://github.com/pknetwork/proofofaccess.git ~/proofofaccess
    /snap/bin/go build -o ~/proofofaccess/main ~/proofofaccess/main.go
    #mv proofofaccess /home/${whoami}/proofofaccess
    #rm -rf proofofaccess
    echo -e "Installing Proof of Access"
    echo -e "[Unit]\nDescription=PoA\n[Service]\nWorkingDirectory=/home/${whoami}/\nExecStart=/home/${whoami}/proofofaccess/main -node 2 -username ${ACCOUNT} -WS_PORT=8001 -useWS=true -honeycomb=true -IPFS_PORT=5001\nRestart=always\nUser=${whoami}\nGroup=${whoami}\n[Install]\nWantedBy=multi-user.target" | sudo tee $POA_SERVICE_FILE
    sudo systemctl daemon-reload
fi
Finally, we will make sure we have go(lang) installed. Download ProofOfAccess, build it.
poa_is_active=$(sudo systemctl is-active poa)
if [ $poa_is_active = 'active' ];
then
    echo -e "${GREEN}PoA is running${NC}"
else
    echo 'Starting PoA'
    sudo systemctl start poa
fi

poa_is_enabled=$(sudo systemctl is-enabled poa)
if [ $poa_is_enabled = 'enabled' ];
then
    echo -e "${GREEN}PoA is set to auto-start${NC}"
else
    echo 'Enabling PoA auto-start'
    sudo systemctl enable poa
fi

poa_is_active=$(sudo systemctl is-active poa)
if [ $poa_is_active != 'active' ];
then
    echo -e "${RED}PoA failed to start${NC}"
    exit
else
    echo PoA is running
fi
And run it in a daemon.
spk_is_active=$(sudo systemctl is-active spk)
if [ $spk_is_active = 'active' ];
then
    echo -e "${GREEN}SPK is running${NC}"
else
    echo 'Starting SPK'
    sudo systemctl start spk
fi

spk_is_enabled=$(sudo systemctl is-enabled spk)
if [ $spk_is_enabled = 'enabled' ];
then
    echo -e "${GREEN}SPK is set to auto-start${NC}"
else
    echo 'Enabling SPK auto-start'
    sudo systemctl enable spk
fi

spk_is_active=$(sudo systemctl is-active spk)
if [ $spk_is_active != 'active' ];
then
    echo -e "${RED}SPK failed to start${NC}"
    exit
else
    echo SPK is running
fi
Once more, we will run SPK node from systemd... and that almost does it.
echo -e "${YELLOW}Ensure you have made a backup of your .env file. It contains your keys and can't be recovered if lost.${NC}"
The last line is pretty important. You wouldn't want to lose your config or your keys that you've just made, so make a backup of the .env file. With this file, you can move servers in a jiffy.
Network Registration
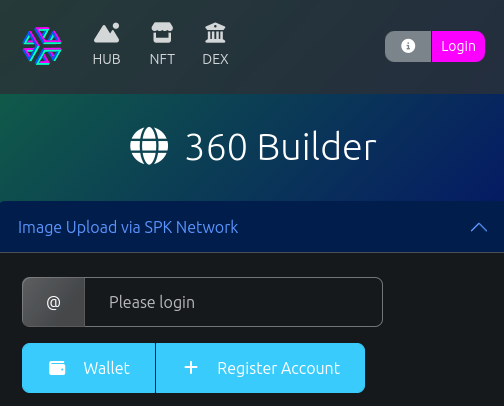
Use your .env files account to log in. You'll need to click "+ Register Account" to submit your posting key to the SPK Network to handle off-chain signing during the upload process.
- You'll need Hive Keychain, a ~metamask for Hive, to interact with this wallet.
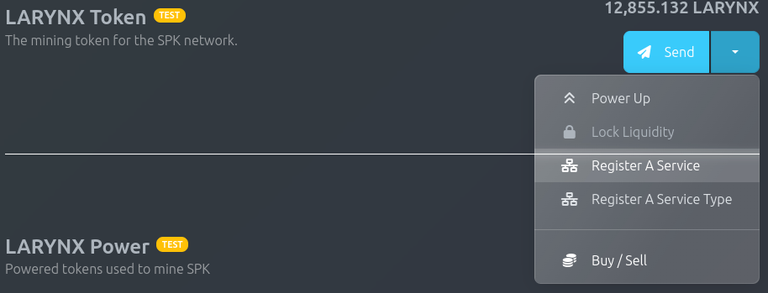
Now register your service.
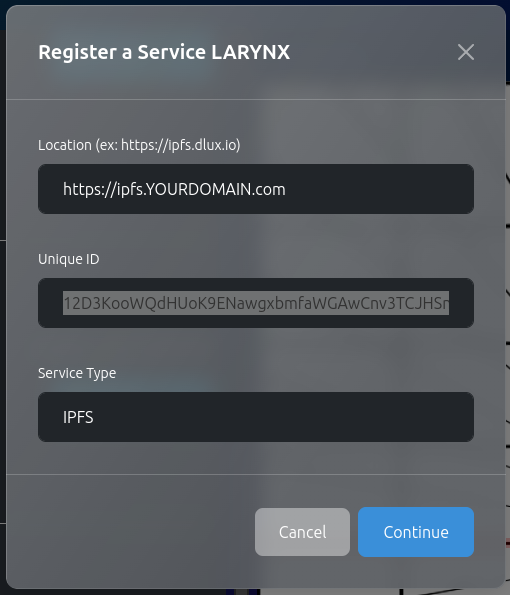
Place the ipfs domain, ipfs peerID, and "IPFS" in the service type. Then, continue to sign this transaction.
Building a Contract
Uploaders can use their BROCA, or "petition" for a Broca from a service provider. 3Speak will likely subsidize many of their users' uploads in exchange for a percentage of the Hive post's rewards or possibly for a subscription fee. Finding ways to use your tokens in a free market way will be beneficial to all.
For now, you can click petition and receive an upload contract that will let you use the @dlux-io IPFS storage as the upload point... or if you have SPK:
- Power up SPK
- Click Contract
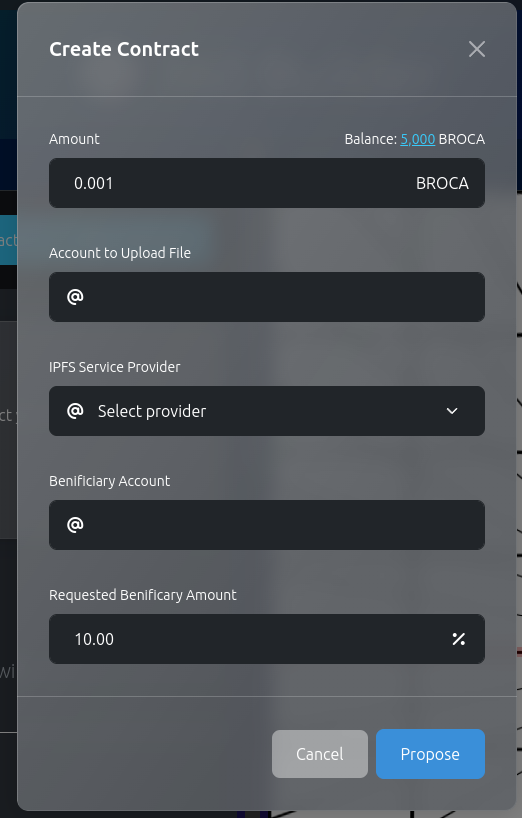
- You can pay a Broca fee to upload, roughly 1 Broca per Megabyte
- Assign an account to upload a file
- Select your IPFS service provider
- And if you wish, fill in a required benificary account for a post that must be made within 24 hours. If you leave this blank, no post will be required to finalize the contract.
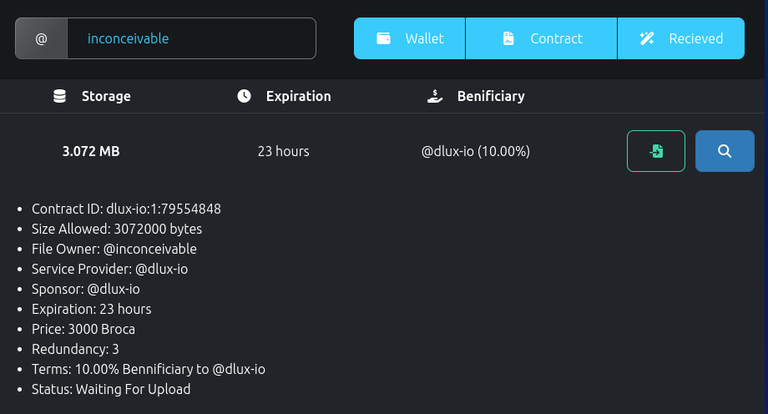
From here, you can upload to the contract with the Green button.
Only one "Waiting for Upload" contract is allowed per account pair.
If the uploader doesn't upload to the contract in 24 hours, the Broca will be refunded to your account, as will any unused Broca (1 BROCA if they only upload 2Mb to this contract)
Read the following Post for details on using this uploader.
Managing Contracts
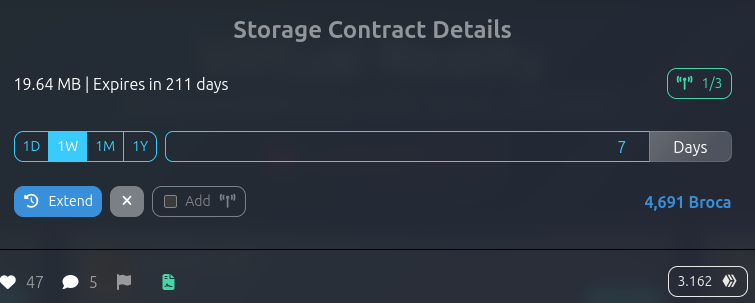
At the bottom of SPK Network posts, there is a green file icon. This will bring up the storage contract menu. The file owner can delete the contract (remain BROCA will be refunded), and anybody can pay to extend a contract or pay to increase the total number of incentive nodes. You can click to view the nodes registered to store the files, and if you are logged in as your storage node account, register to store the contracts files.
You storage node will periodically check the feed and pin content that you haven't placed in your IPFS repository.
Now, all that remains is for the network to check these files, and your storage node will be mining SPK (and currently LARYNX) rewards.
Next Steps
If you fancy yourself an alpha tester I hope you're already in contact with us. If not reach us at the SPK Network Discord Server.
How to create a Hive account:
If you already own a Hive account and want to create a new one, you can pay 3 HIVE directly on Hive Keychain or PeakD.com.
If you are brand new, check the free or paid options at https://signup.hive.io/.
If any of these options don't work, contact @eddiespino on Telegram or Discord. He can help you create an account for free.
About the SPK Network:
The SPK Network is a decentralized Web 3.0 protocol that rewards value creators and infrastructure providers appropriately and autonomously by distributing reward tokens so that every user, creator, and platform can earn rewards on a level playing field.
Check out the SPK Network Light Paper: https://peakd.com/hive/@spknetwork/spk-network-light-paper
Visit our website: https://spk.network/
Telegram Group: https://t.me/spknetwork
Discord Server: https://discord.gg/JbhQ7dREsP
Vote for our Witnesses:
Versión en Español
Si sigues de cerca el desarrollo de la red SPK, sabrás que hemos alcanzado un ritmo frenético en la integración de varios aspectos de la red. Aquí presentaremos algunos conceptos básicos para que aquellos capaces entre ustedes se unan a nuestro programa de pruebas. Necesitamos saber todo acerca de lo que piensas, cómo se instala, cómo funciona, si cumple o no con las expectativas... todo.
Entonces, ¿qué tenemos hasta ahora?
- Arquitectura de Token SPK
- Ecosistema de Token Broca
- Gobernanza de SPK
- Software de Nodo de Almacenamiento
- Cargas de Terceros
- Software de Prueba de Acceso
- Moderación de Contenido Personal
- Votación de Validadores
¿Qué queda por hacer?
- DEX - Esto es una red de pruebas, y conectarla con capital real en este momento sería un poco peligroso.
- Validadores Descentralizados - Conexión ad-hoc entre nodos de almacenamiento y validadores.
- Cálculos sobre la eficiencia de la minería - abierto a discusión.
- Mecánica de SIP - La inflación de LARYNX se está extendiendo a las recompensas de Broca.
Obtener tokens LARYNX de Prueba
Sigue o vuelve a seguir a @spknetwork con tu nueva cuenta de prueba. Te enviaremos algunos tokens (sin valor) para ayudarte en las pruebas.
Instalación
Primero, repasemos algunos de los requisitos. Esto asume que instalarás todas las suites en una misma máquina. Sin embargo, se divide en múltiples componentes que se instalarán en varios lugares. Por ejemplo, tu nodo de almacenamiento podría estar en un NAS en un centro de datos, mientras que tu nodo SPK podría estar en tu oficina en casa en una Raspberry Pi. Pero, para fines de pruebas, la única instalación soportada es la que se realiza en un servidor Debian/Ubuntu Linux lo suficientemente grande. Queremos señalar que si estás interesado en ayudar a que la red crezca, puedes crear guías para diferentes tipos de instalaciones o en diferentes idiomas.
A continuación, debes tener HTTPS al menos para tu software de almacenamiento. Esto requerirá acceso a nivel de DNS a un nombre de dominio, como mínimo. Este es un buen punto de partida para la instalación.
Crea registros DNS para:
- API de Token (https://spktest.dlux.io)
- Middleware de IPFS (https://ipfs.dlux.io)
- Un Validador (próximamente)
Saber dónde dirigir tus archivos de configuración será útil en los próximos pasos.
git clone https://github.com/spknetwork/trole.git && cd trole
./install.sh and follow the prompts. This takes a few minutes.
Ahora para la interfaz de línea de comandos (CLI):
Una vez que te hayas conectado por SSH al servidor, adelante y realiza lo siguiente:
git clone https://github.com/spknetwork/trole.git && cd trole
Vamos a desglosar el script de instalación. Con suerte, cuando nos encontremos con problemas, podremos trabajar juntos para mejorar el script de instalación, pero esto también te permite ver todo lo que sucede en una instalación completa. Si deseas presionar el botón "Creo" (I believe button):
./install.shy sigue las indicaciones. Esto tomará algunos minutos.
#!/bin/bash

# Formatting STDOUT
GREEN='\033[0;32m'
YELLOW='\033[0;33m'
RED='\033[0;31m'
NC='\033[0m'

whoami=$(whoami)
if [ $whoami = root ];
then
    echo -e "${RED}Can not install as root${NC}"
    exit
fi
Lo primero, algunos colores para ayudar a identificar problemas en el próximo texto largo. Luego, establecer la variable para el nombre de la cuenta. Si estás ejecutando este script como root, te expulsará.
# version check
source /etc/os-release
if [ $ID_LIKE != 'debian' ];
then
    echo -e "${RED}${PRETTY_NAME}${NC} Installed"
    echo -e "${RED}Ubuntu/Debian Required for Install Script${NC}"
    exit
fi
echo -e "${YELLOW}This script may ask some questions after it installs it's first set of dependencies. Stay tuned.${NC}"
Asegúrate de que estás ejecutando Debian/Ubuntu.
sudo apt update &> /dev/null

# install node

if ! command -v node > /dev/null
then
    curl -s https://deb.nodesource.com/setup_16.x | sudo bash
    sudo apt install nodejs -y
fi

if ! command -v npm > /dev/null
then
    sudo apt install npm -y
fi

# Install node for Trole

NODE_VERSION=$(node -v | cut -f1 -d.)
if [ ${NODE_VERSION/v} -lt 14 ];
then
    echo -e "${RED}NodeJS version 14 or higher is Required${NC}"
    echo -e "Ensure node -v is version 14 or higher and run this script again."
    exit
fi
Ejecutaremos algunos comandos
aptdesde este script, aunque generalmente no se recomienda. Si npm y node.js no están instalados, los instalaremos. Esto es un requisito previo para utilizarhive-jspara generar claves un poco más adelante.
# Install Trole

NODE_PACKAGES=node_modules
if test -d "$NODE_PACKAGES";
then
    echo -e "${GREEN}Trole is installed${NC}"
else
    echo -e "Installing Trole"
    npm i
fi
A continuación, nos aseguraremos de que se haya ejecutado
npm ien nuestro repositorio para obtener las dependencias, comohive.js.
# Get configs
if test -f .env;
then
    echo -e "${GREEN}Reading .env Variables${NC}"
    source .env
    if [ -z "$DOMAIN" ];
    then
        echo What is your domain name? -dlux.io
        read DOMAIN
        echo "DOMAIN=${DOMAIN}" | tee -a .env
    else
        echo "DOMAIN=${DOMAIN}"
    fi
    if [ -z "$ACCOUNT" ];
    then
        echo What is your HIVE account name? dlux-io
        read ACCOUNT
        echo "ACCOUNT=${ACCOUNT}" | tee -a .env
    else
        echo "ACCOUNT=${ACCOUNT}"
    fi
    if [ -z "$ACTIVE" ];
    then
        echo "What is the ACTIVE key for $ACCOUNT"
        read ACTIVE
        echo "ACTIVE=${ACTIVE}" | tee -a .env
    else
        echo "ACTIVE=${ACTIVE}" | cut -b 1-10
    fi
    if [ -z "$SPKPRIV" ];
    then
        echo "Please input any existing SPK Keys, or generate a new keypair..."
        while true; do
            read -p "Do you have an existing SPK keypair? " yn
            case $yn in
                [Yy]* ) KEY_GEN=true ; break;;
                [Nn]* ) KEY_PROMPT=true ; break;;
                * ) echo "Please answer yes or no.";;
            esac
        done
    else
        KEY_PROMPT=false
        echo "SPKPUB=${SPKPUB}"
        echo "SPKPRIV=${SPKPRIV}" | cut -b 1-11
    fi
    if [ -z "$KEY_PROMPT" ];
        then
            echo "What is the Private SPK key for $ACCOUNT"
            read SPKPRIV
            echo "SPKPRIV=${SPKPRIV}" | tee -a .env
            echo "What is the Public SPK key for $ACCOUNT"
            read SPKPUB
            echo "SPKPUB=${SPKPUB}" | tee -a .env
        elif [ $KEY_PROMPT = true ]
            then
                KEY_PAIR=$(node generate_key_pair.js)
                echo $KEY_PAIR
                SPKPRIV=$(echo $KEY_PAIR | cut -d " " -f1)
                SPKPUB=$(echo $KEY_PAIR | cut -d " " -f2)
                echo "SPKPRIV=${SPKPRIV}" | tee -a .env
                echo "SPKPUB=${SPKPUB}" | tee -a .env
    fi
    if [ -z "$API_PORT" ];
    then
        echo "API_PORT=5050" | tee -a .env
    fi
    if [ -z "$ENDPORT" ];
    then
        echo "ENDPORT=5001" | tee -a .env
    fi
    if [ -z "$ENDPOINT" ];
    then
        echo "ENDPOINT=http://127.0.0.1" | tee -a .env
    fi
    if [ -z "$POA_URL" ];
    then
        echo "POA_URL=ws://localhost:8000" | tee -a .env
    fi
else
    echo -e "${YELLOW}No .env found${NC}"
    echo What is your domain name? -dlux.io
    read DOMAIN
    echo "DOMAIN=${DOMAIN}" | tee -a .env
    echo What is your HIVE account name? dlux-io
    read ACCOUNT
    echo "ACCOUNT=${ACCOUNT}" | tee -a .env
    echo "API_PORT=5050" | tee -a .env
    echo "ENDPOINT=http://127.0.0.1" | tee -a .env
    echo "ENDPORT=5001" | tee -a .env
fi
source .env
echo -e "${YELLOW}Ensure ipfs.${DOMAIN} is pointed to this server${NC}"
Este bloque solicitará crear un archivo de configuración para convertir este nodo en tu nodo. Como siempre, recomendamos encarecidamente que utilices una cuenta de Hive con un propósito único, un saldo cero y Recursos de Créditos (RC) delegados. Si necesitas ayuda para crear una cuenta de Hive, consulta los pasos al final de esta publicación.
Si deseas crear tu archivo de configuración, se verá algo así. (.env)
DOMAIN=dlux.io
ACCOUNT=disregardfiat
POSTING_KEY=5trashNumbers
ACTIVE_KEY=haha
SPKPRIV=5moreTrAsH
SPKPUB=STM7
API_PORT=5050
ENDPORT=5001
ENDPOINT=http://127.0.0.1
IPFSID=12D3KooWQdHUoK9ENawgxbmfaWGAwCnv3TCJHSnkBdYCPh6koLR
POA_URL=http://localhost:3000
El script generará un nuevo par de claves para la Cartera Multi-Firma de la Red SPK, de la cual serás automáticamente elegido para ser el titular si eres un usuario destacado con suficiente garantía. Con suerte, una vez completado esto, se detendrán las solicitudes de entrada de usuario y el resto del proceso de construcción podrá continuar sin interacción.
# install ipfs
if ! command -v ipfs > /dev/null
then
    echo -e "${YELLOW}Installing IPFS(KUBO)${NC}"
    wget https://dist.ipfs.tech/kubo/v0.17.0/kubo_v0.17.0_linux-amd64.tar.gz > /dev/null
    tar -xvzf kubo_v0.17.0_linux-amd64.tar.gz > /dev/null
    mv kubo ../kubo
    sudo bash ../kubo/install.sh > /dev/null
    rm kubo_v0.17.0_linux-amd64.tar.gz > /dev/null
    # if ! command -v ipfs > /dev/null
    # then
    #     echo -e "${GREEN} IPFS installed succesfully${NC}"
    # else
    #     echo -e "${RED} IPFS install failed${NC}"
    #     echo -e "${YELLOW}Try Installing IPFS manually and run this script again${NC}"
    #     exit
    # fi
else
    echo -e "${GREEN}IPFS is installed${NC}"
fi
IPFS_CONFIG_FILE=~/.ipfs/config
if test -f "$IPFS_CONFIG_FILE";
then
    echo -e "${GREEN}IPFS config exists${NC}"
else
    echo -e "${GREEN}Initializing IPFS${NC}"
    ipfs init --profile server > /dev/null
fi

echo 'Configuring IPFS cors'
ipfs config --json API.HTTPHeaders.Access-Control-Allow-Origin '["*"]'
ipfs config --json API.HTTPHeaders.Access-Control-Allow-Methods '["GET", "POST"]'
ipfs config --json API.HTTPHeaders.Access-Control-Allow-Headers '["Authorization"]'
ipfs config --json API.HTTPHeaders.Access-Control-Expose-Headers '["Location"]'
ipfs config --json API.HTTPHeaders.Access-Control-Allow-Credentials '["true"]'

IPFS_ID=$(ipfs id | grep ID | cut -d"\"" -f4 )
if [ -z "$IPFSID" ];
then
    echo "IPFSID=${IPFS_ID}" | tee -a .env
elif [ $IPFS_ID != $IPFSID ];
then
    while true; do
        read -p "Your IPFS ID seems to have changed. Replace IPFSID in .env(Yes / No)?" yn
        case $yn in
            [Yy]* ) REPLACE=true ; break;;
            [Nn]* ) REPLACE=false ; break;;
            * ) echo "Please answer yes or no.";;
        esac
    done
    if [ $REPLACE = "true" ];
        then
        echo "IPFSID=${IPFS_ID}" | tee -a .env
    fi
fi
A continuación, instalaremos IPFS si aún no está instalado y moveremos el IPFS PeerID al archivo de configuración. Actualmente, estamos utilizando Websockets, pero nuestro objetivo sigue siendo utilizar IPFS PubSub.
IPFS_SERVICE_FILE=/lib/systemd/system/ipfs.service
if test -f "$IPFS_SERVICE_FILE";
then
    echo -e "${GREEN}IPFS service exists${NC}"
else
    echo -e "Building IPFS Service${NC}"
    echo -e IPFSSERVICE="[Unit]\nDescription=ipfs daemon\n[Service]\nExecStart=/usr/local/bin/ipfs daemon --enable-pubsub-experiment\nRestart=always\nUser=${whoami}\nGroup=${whoami}\nEnvironment=”IPFS_PATH=/home/${whoami}/data/ipfs”\n[Install]\nWantedBy=multi-user.target" | sudo tee $IPFS_SERVICE_FILE
    sudo systemctl daemon-reload
fi

ipfs_is_active=$(sudo systemctl is-active ipfs)
if [ $ipfs_is_active = 'active' ];
then
    echo -e "${GREEN}IPFS daemon is active${NC}"
else
    echo 'Starting IPFS daemon'
    sudo systemctl start ipfs
fi

ipfs_is_enabled=$(sudo systemctl is-enabled ipfs)
if [ $ipfs_is_enabled = 'enabled' ];
then
    echo -e "${GREEN}IPFS service is set to auto-start${NC}"
else
    echo 'Enabling IPFS daemon auto-start'
    sudo systemctl enable ipfs
fi

ipfs_is_active=$(sudo systemctl is-active ipfs)
if [ $ipfs_is_active != 'active' ];
then
    echo -e "${RED}IPFS failed to start${NC}"
    exit
fi
Configuraremos IPFS para permitir escrituras desde nuestro middleware Trole y crearemos un archivo de systemd para ejecutarlo.
# install caddy
CADDY_FILE=/etc/caddy/Caddyfile
if ! command -v caddy > /dev/null
then
    echo -e "${YELLOW}Installing Caddy${NC}"
    sudo apt install -y debian-keyring debian-archive-keyring apt-transport-https
    curl -1sLf 'https://dl.cloudsmith.io/public/caddy/stable/gpg.key' | sudo gpg --dearmor -o /usr/share/keyrings/caddy-stable-archive-keyring.gpg
    curl -1sLf 'https://dl.cloudsmith.io/public/caddy/stable/debian.deb.txt' | sudo tee /etc/apt/sources.list.d/caddy-stable.list
    sudo apt update > /dev/null
    sudo apt install caddy > /dev/null
else
    echo -e "${GREEN}Caddy is installed${NC}"
fi

CADDY_PATTERN="ipfs.${DOMAIN}"
CADDY_CONFIG_EXISTS=$(grep $CADDY_PATTERN $CADDY_FILE 2> /dev/null)
if [ -z "$CADDY_CONFIG_EXISTS" ];
then
    echo Building Caddyfile
    echo -e "ipfs.${DOMAIN} {\n\t@ws {\n\t\theader Connection *Upgrade*\n\t\theader Upgrade websocket\n\t}\n\treverse_proxy /upload* localhost:${API_PORT} \n\t\treverse_proxy /ipfs/* localhost:8080\treverse_proxy @ws localhost:8001\n\t\tlog {\n\t\toutput file /var/log/caddy/ipfs.${DOMAIN}-access.log {\n\t\t\troll_size 10mb\n\t\t\troll_keep 20\n\t\t\troll_keep_for 720h\n\t\t}\n\t}\n}" | sudo tee -a $CADDY_FILE
    sudo systemctl restart caddy
else
    echo Caddy is configured
fi

caddy_is_active=$(sudo systemctl is-active caddy)
if [ $caddy_is_active != 'active' ];
then
    echo -e "${RED}Caddy failed to start${NC}"
    exit
else
    echo -e "${GREEN}Caddy is running${NC}"
fi
Instalaremos Caddy, que debería encargarse de los certificados SSL y conectarse a ipfs.TUDOMINIO.com que especificaste anteriormente. Además, permitiremos que systemd gestione esto.
TROLE_SERVICE_FILE=/lib/systemd/system/trole.service
if test -f "$TROLE_SERVICE_FILE";
then
    echo -e "${GREEN}Trole service exists${NC}"
else
    echo -e "Installing Trole"
    echo -e TROLE_SERVICE="[Unit]\nDescription=trole\n[Service]\nExecStart=/usr/bin/node /home/${whoami}/trole/index.js\nRestart=always\nUser=${whoami}\nGroup=${whoami}\n[Install]\nWantedBy=multi-user.target" | sudo tee $TROLE_SERVICE_FILE
    sudo systemctl daemon-reload
fi

trole_is_active=$(sudo systemctl is-active trole)
if [ $trole_is_active = 'active' ];
then
    echo -e "${GREEN}Trole is running${NC}"
else
    echo 'Starting Trole'
    sudo systemctl start trole
fi

trole_is_enabled=$(sudo systemctl is-enabled trole)
if [ $trole_is_enabled = 'enabled' ];
then
    echo -e "${GREEN}Trole is set to auto-start${NC}"
else
    echo 'Enabling Trole auto-start'
    sudo systemctl enable trole
fi

trole_is_active=$(sudo systemctl is-active trole)
if [ $trole_is_active != 'active' ];
then
    echo -e "${RED}Trole failed to start${NC}"
    exit
else
    echo Trole is running
fi
systemd ejecutará Trole por nosotros ahora. Debería tener todas sus dependencias ahora.
# PoA
which_go=$(which go)
if test -f "$which_go";
then
    echo -e "${GREEN}Go Installed${NC}"
else
    echo -e "Installing Go"
    which_snap=$(which snap)
    if test -f "$which_snap";
    then
        echo -e "${GREEN}Snap Installed${NC}"
    else
        echo -e "Installing Snap"

        sudo apt install snapd
    fi
    sudo snap install go --classic
fi

POA_SERVICE_FILE=/lib/systemd/system/poa.service
if test -f "$POA_SERVICE_FILE";
then
    echo -e "${GREEN}PoA service exists${NC}"
else
    git clone https://github.com/pknetwork/proofofaccess.git ~/proofofaccess
    /snap/bin/go build -o ~/proofofaccess/main ~/proofofaccess/main.go
    #mv proofofaccess /home/${whoami}/proofofaccess
    #rm -rf proofofaccess
    echo -e "Installing Proof of Access"
    echo -e "[Unit]\nDescription=PoA\n[Service]\nWorkingDirectory=/home/${whoami}/\nExecStart=/home/${whoami}/proofofaccess/main -node 2 -username ${ACCOUNT} -WS_PORT=8001 -useWS=true -honeycomb=true -IPFS_PORT=5001\nRestart=always\nUser=${whoami}\nGroup=${whoami}\n[Install]\nWantedBy=multi-user.target" | sudo tee $POA_SERVICE_FILE
    sudo systemctl daemon-reload
fi
Finalmente, nos aseguraremos de que tengamos Go (Golang) instalado. Descargaremos ProofOfAccess y lo construiremos.
poa_is_active=$(sudo systemctl is-active poa)
if [ $poa_is_active = 'active' ];
then
    echo -e "${GREEN}PoA is running${NC}"
else
    echo 'Starting PoA'
    sudo systemctl start poa
fi

poa_is_enabled=$(sudo systemctl is-enabled poa)
if [ $poa_is_enabled = 'enabled' ];
then
    echo -e "${GREEN}PoA is set to auto-start${NC}"
else
    echo 'Enabling PoA auto-start'
    sudo systemctl enable poa
fi

poa_is_active=$(sudo systemctl is-active poa)
if [ $poa_is_active != 'active' ];
then
    echo -e "${RED}PoA failed to start${NC}"
    exit
else
    echo PoA is running
fi
Y lo ejecutaremos como un daemon.
spk_is_active=$(sudo systemctl is-active spk)
if [ $spk_is_active = 'active' ];
then
    echo -e "${GREEN}SPK is running${NC}"
else
    echo 'Starting SPK'
    sudo systemctl start spk
fi

spk_is_enabled=$(sudo systemctl is-enabled spk)
if [ $spk_is_enabled = 'enabled' ];
then
    echo -e "${GREEN}SPK is set to auto-start${NC}"
else
    echo 'Enabling SPK auto-start'
    sudo systemctl enable spk
fi

spk_is_active=$(sudo systemctl is-active spk)
if [ $spk_is_active != 'active' ];
then
    echo -e "${RED}SPK failed to start${NC}"
    exit
else
    echo SPK is running
fi
Una vez más, ejecutaremos el nodo SPK desde systemd... y eso casi lo hace.
echo -e "${YELLOW}Ensure you have made a backup of your .env file. It contains your keys and can't be recovered if lost.${NC}"
La última línea es bastante importante. No querrás perder tu configuración ni las claves que acabas de crear, así que haz una copia de seguridad del archivo .env. Con este archivo, puedes cambiar de servidor fácilmente.
Registro en la Red
Utiliza la cuenta de tu archivo .env para iniciar sesión. Deberás hacer clic en "+ Registrar Cuenta" para enviar tu clave de publicación a la Red SPK y manejar la firma fuera de la cadena durante el proceso de carga.
- Necesitarás Hive Keychain, una especie de Metamask para Hive, para interactuar con esta billetera.
Ahora registra tu servicio.
Coloca el dominio de IPFS, el PeerID de IPFS y "IPFS" en el tipo de servicio. Luego, continúa para firmar esta transacción.
Creando un Contrato
Los cargadores pueden usar su BROCA o "solicitar" un Broca a un proveedor de servicios. 3Speak probablemente subsidiará muchas de las cargas de sus usuarios a cambio de un porcentaje de las recompensas de las publicaciones de Hive o posiblemente de una tarifa de suscripción. Encontrar formas de utilizar tus fichas en un mercado libre será beneficioso para todos.
Por ahora, puedes hacer clic en "solicitar" y recibir un contrato de carga que te permitirá utilizar el almacenamiento IPFS de @dlux-io como punto de carga... o si tienes SPK:
- Potencia SPK
- Haz clic en Contrato
- Puedes pagar una tarifa de Broca para cargar, aproximadamente 1 Broca por megabyte.
- Asigna una cuenta para cargar un archive.
- Selecciona tu proveedor de servicios de IPFS.
- Y si lo deseas, completa una cuenta beneficiaria requerida para una publicación que debe realizarse en un plazo de 24 horas. Si dejas esto en blanco, no se requerirá una publicación para finalizar el contrato.
Read the following Post for details on using this uploader.
Desde aquí, puedes cargar en el contrato con el botón verde. Solo se permite un contrato "Esperando Carga" por par de cuentas. Si el cargador no carga en el contrato en 24 horas, el Broca se reembolsará a tu cuenta, al igual que cualquier Broca no utilizado (1 BROCA si solo cargan 2 MB en este contrato).
Lee la siguiente publicación para obtener detalles sobre cómo utilizar este cargador.
Managing Contracts
Gestión de Contratos
Una publicación de SPK Network
En la parte inferior de las publicaciones de SPK Network, hay un icono de archivo verde. Esto abrirá el menú de contrato de almacenamiento. El propietario del archivo puede eliminar el contrato (el BROCA restante se reembolsará), y cualquier persona puede pagar para ampliar un contrato o pagar para aumentar el número total de nodos incentivados. Puedes hacer clic para ver los nodos registrados para almacenar los archivos y, si has iniciado sesión con tu cuenta de nodo de almacenamiento, registrarte para almacenar los archivos del contrato.
Tu nodo de almacenamiento verificará periódicamente el feed y anclará contenido que no hayas colocado en tu repositorio de IPFS.
Ahora, todo lo que falta es que la red verifique estos archivos, y tu nodo de almacenamiento estará minando recompensas de SPK (y actualmente de LARYNX).
Próximos Pasos
Si te consideras un probador alfa, espero que ya estés en contacto con nosotros. Si no, contáctanos en el Servidor de Discord de SPK Network.
Cómo crear una cuenta de Hive:
Si ya tienes una cuenta de Hive y deseas crear una nueva, puedes pagar 3 HIVE directamente en Hive Keychain o PeakD.com.
Si eres completamente nuevo, verifica las opciones gratuitas o de pago en https://signup.hive.io/.
Si ninguna de estas opciones funciona, ponte en contacto con @eddiespino en Telegram o Discord. Él puede ayudarte a crear una cuenta de forma gratuita.
Acerca de la Red SPK:
La Red SPK es un protocolo descentralizado de la Web 3.0 que recompensa adecuada y autónomamente a los creadores de valor y a los proveedores de infraestructura al distribuir tokens de recompensa de manera que todos los usuarios, creadores y plataformas puedan ganar recompensas en un terreno equitativo.
Check out the SPK Network Light Paper: https://peakd.com/hive/@spknetwork/spk-network-light-paper
Visit our website: https://spk.network/
Telegram Group: https://t.me/spknetwork
Discord Server: https://discord.gg/JbhQ7dREsP
The Hive.Pizza team manually curated this post.
Learn more at https://hive.pizza.