Breakfast Tray (DIY)
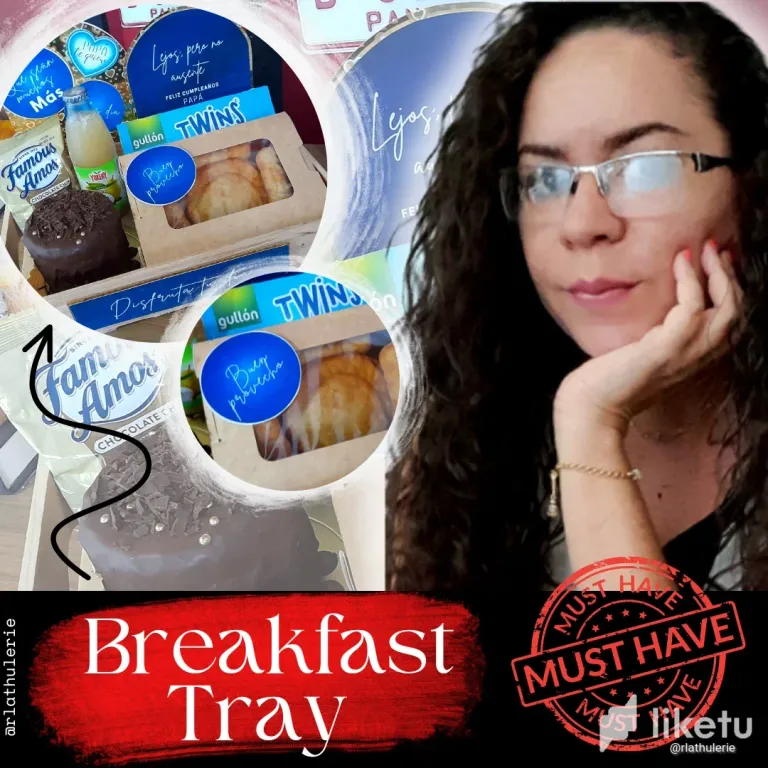

Breakfast trays have become an excellent option as a gift for any occasion, especially if you can make it yourself.
In my case, what started as a special detail to wake up my children on their birthdays, became a family venture, and today I want to show you, step by step, a breakfast presented in a pine tray, with some speakers and toppers, which apart from personalizing the gift, make it look much nicer.
What you need, first of all, is a pine tray, or a small wooden box that can be used to place inside, what you plan to give as part of the breakfast, the rest are simple materials such as cardboard, prints, glue, etc., and of course, lots of imagination.
In this tray that I show you today the materials I used were the following:
- Breakfast tray of 30x20cms.
- Holographic golden cardboard
- Prints and toppers elaborated in Canva
- White sulphated cardboard
- Silicone stick
- Skewers or height sticks
- Silicone gun
- Double-sided adhesive
- Scissors
- Containers to place the food.
The first step to make this personalized tray, is to create in Canva all the printed details that I am going to place on the tray to make it look nicer.
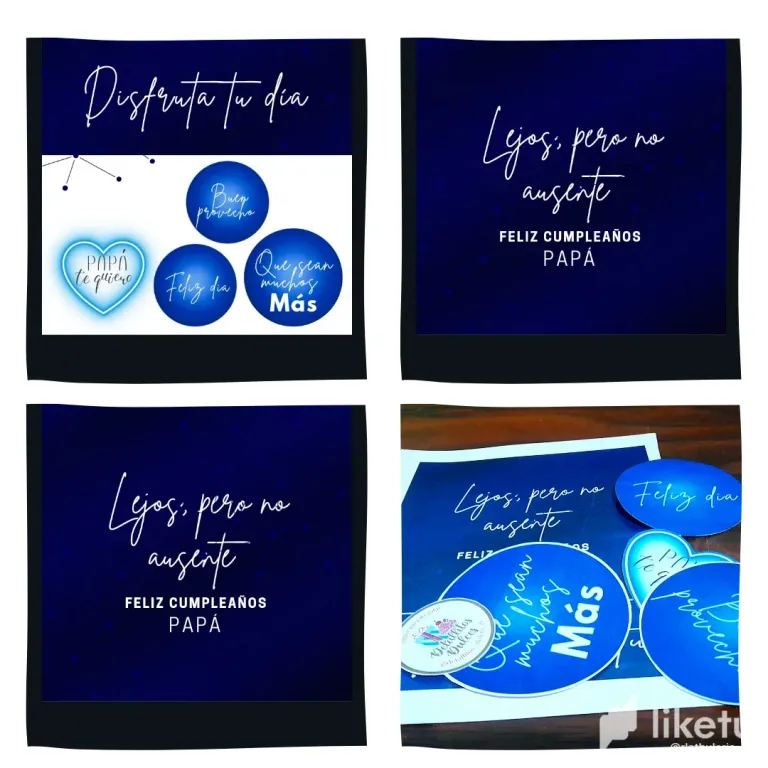
Generally, for the front of the tray I make a kind of banner with a phrase of the client's choice, and in this case, the phrase was, "Enjoy your day", in blue and gold tones.
For the back of the tray, I use two pieces with small messages dedicated to the birthday boy or girl, always respecting the selected colors. Once the designs are ready, the only thing left to do is to print.
In my case, I use the thickest icing paper, to give greater firmness and better aesthetics to the presentation of the tray. And with this step ready, the assembly of all the decorative pieces begins.
STEP BY STEP
Step 1
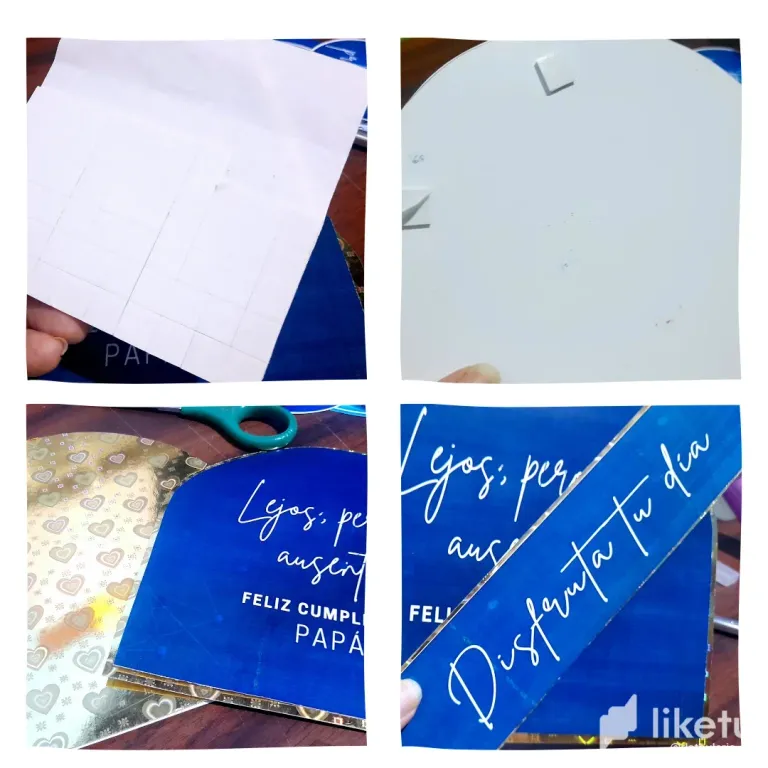
Cut out all the prints.
Step 2
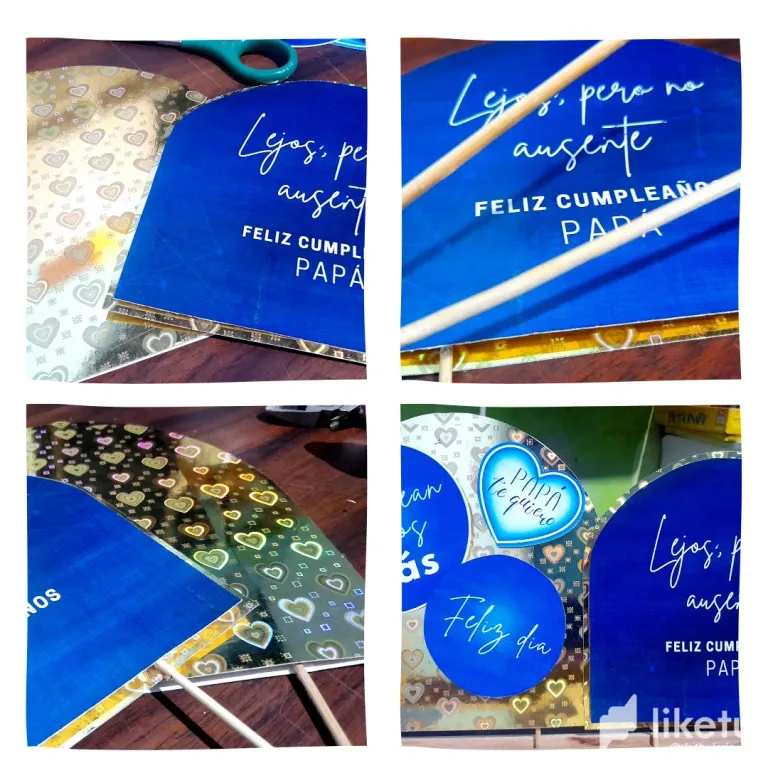
On the greaseproof cardboard, I cut out two pieces of different heights that cover almost the entire back of the tray.
In my case I usually vary the presentation, and sometimes the pieces are rectangular, and others have the curve you see in the images I show you through @liketu.
Step 3
Next, I mark on the gold cardboard, the tallest piece and cut out.
Step 4
At this point, we will have four pieces that we will join with the help of the double-sided adhesive, but if you do not have, do not worry, you can use small squares of foamy, which will fulfill the same function, which is to create some layers to the piece.
Step 5
Repeat the same process with the banner that will go in front of the tray, letting the gold cardboard overlap the blue one a bit, so that the layers can be seen more easily.
Step 6
At this point, the decorations are ready, and the next step is to attach them.
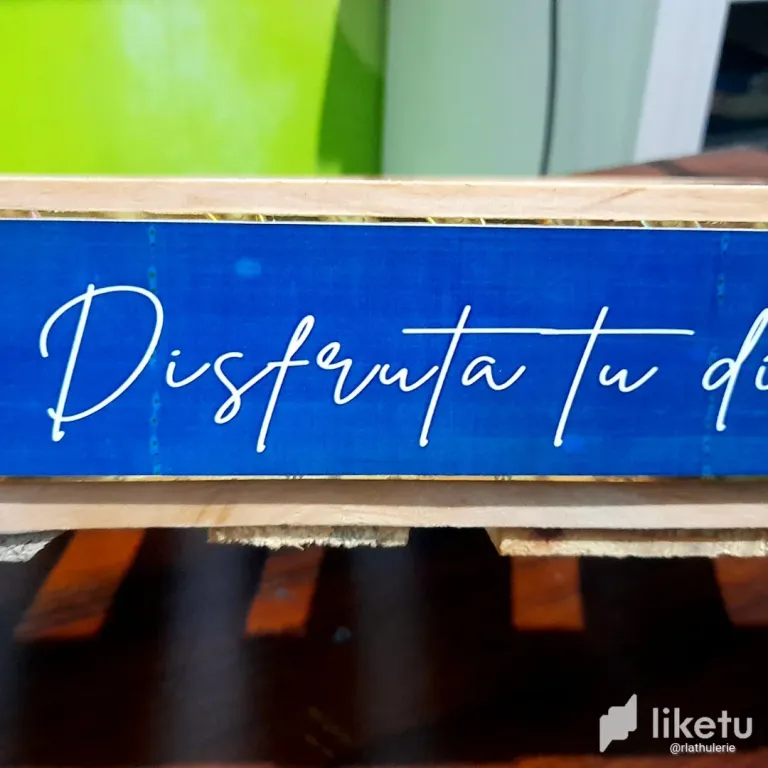
For the one on the front, what I do is to use the double-sided adhesive again, and place it in its place.
Step 7
In the case of the back pieces, I incorporate between the two layers of cardboard, two sticks of height on each side, which I fix with hot silicone, and once ready, I cut, according to the size I need.
Step 8
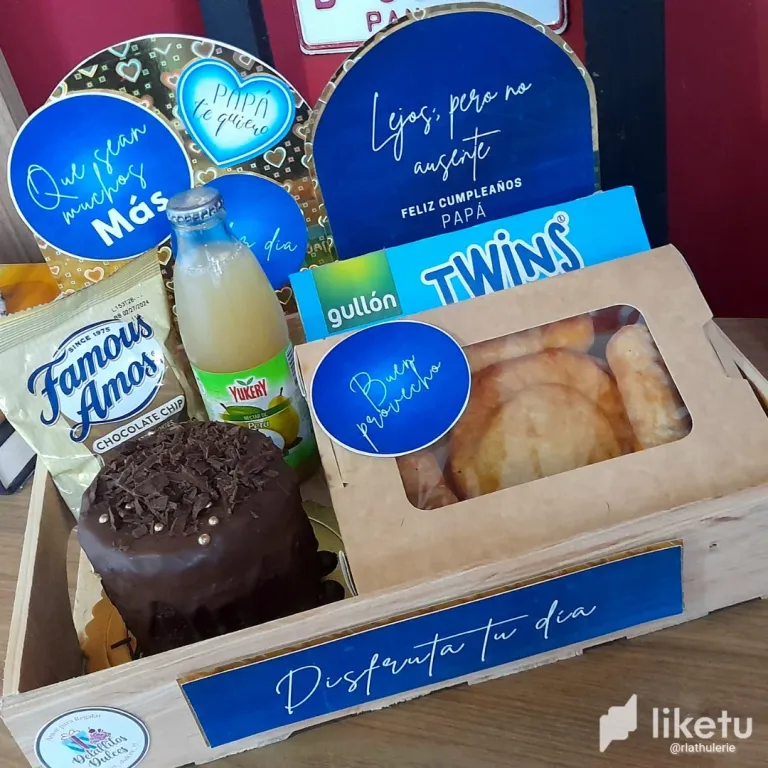
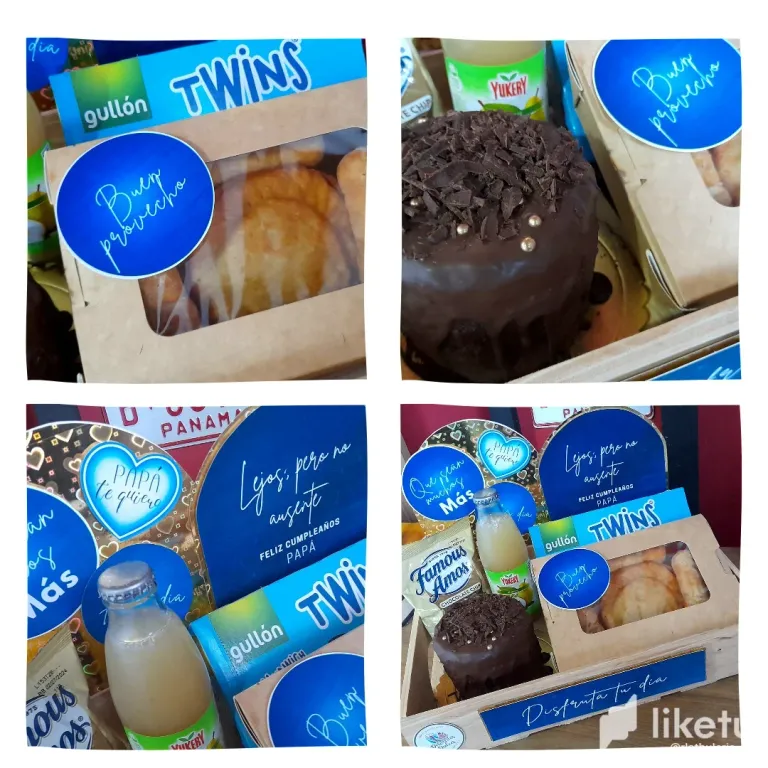
The next step is to place the decorative toppers, the golden cardboard and the food containers. Also with the help of the double-sided adhesive.
And finally I incorporate everything that will take the breakfast to the tray, and we are ready to pamper.
As you can see, although there are a few steps, it is a job well worth it, as the trays look really beautiful, I hope you can cheer up and make your own at home.
Las bandejas de desayuno, se han convertido en una excelente opción para obsequiar en cualquier ocasión, sobre todo si puedes hacerla tu mism@.
En mi caso, lo que comenzó como un detalle especial para despertar a mis hijos en sus cumpleaños, se convirtió en un emprendimiento familiar, y hoy les quiero mostrar, el paso a paso de un desayuno presentado en bandeja de pino, con algunos habladores y toppers, que aparte de personalizar el regalo, lo hacen lucir mucho más lindo.
Lo que necesitas, en primer lugar, es una bandeja de pino, o una cajita de madera que pueda servirte para colocar dentro, lo que piensas regalar como parte del desayuno, el resto, son materiales sencillos como cartulinas, impresiones, pega, etc., y por supuesto, mucha imaginación.
En esta bandeja que les muestro hoy los materiales que utilicé fueron los siguientes:
- Bandeja de desayuno de 30x20cms
- Cartulina holográfica dorada
- Impresiones y toppers elaborados en Canva
- Cartulina sulfatada blanca
- Silicona en barra
- Brochetas o palitos de altura
- Pistola de silicona
- Adhesivo doble faz
- Tijera
- Envases para colocar los alimentos.
El primer paso para realizar esta bandeja personalizada, es crear en Canva todos los detalles impresos que voy a colocar en la bandeja para hacerla lucir más linda.
Generalmente, para el frente de la bandeja realizo una especie de banner con alguna frase elección del cliente, y en este caso, la frase fue, "Disfruta tu día", en tonos azules y dorados.
Para la parte de atrás de la bandeja, utilizo dos piezas en las que van pequeños mensajes dedicados al cumpleañer@, siempre respetando los colores seleccionados. Una vez listos los diseños solo queda imprimir.
En mi caso, yo utilizo papel glasé del más grueso, para dar mayor firmeza y una mejor estética a la presentación de la bandeja. Y ya con este paso listo, comienza el armado de todas las piezas decorativas.
PASO A PASO
Paso 1
Recortar todas las impresiones.
Paso 2
En la cartulina sulfatada, recorto dos piezas de diferente altura y que cubran casi en su totalidad la parte trasera de la bandeja.
En mi caso yo suelo variar la presentación, y algunas veces las piezas son rectangulares, y otras tienen la curva que ven en las imágenes que les muestro a través de @liketu.
Paso 3
Seguidamente, marco en la cartulina dorada, la pieza más alta y recortó.
Paso 4
En este punto, tendremos cuatro piezas que uniremos con ayuda del adhesivo doble faz, pero si no tienen, no se preocupen, pueden utilizar pequeños cuadrados de foamy, que cumplirán la misma función, que es crearle algunas capas a la pieza.
Paso 5
Repito el mismo proceso con el banner que irá al frente de la bandeja, dejando que la cartulina dorada, sobrepase un poco la azul, para que las capas se puedan ver más fácilmente.
Paso 6
En este punto, ya están listas las decoraciones, y lo siguiente es fijarlas.
Para la del frente, lo que hago es utilizar nuevamente el adhesivo doble faz, y ubicarla en su lugar.
Paso 7
En el caso de las piezas traseras, incorporo entre las dos capas de cartulina, dos palitos de altura a cada lado, los cuales fijo con silicona caliente, y una vez listos, corto, según la medida que necesite.
Paso 8
El siguiente paso es colocar los toppers decorativos, la cartulina dorada y en los envases para los alimentos. También con ayuda del adhesivo doble faz.
Y finalmente incorporo todo lo que llevará el desayuno a la bandeja, y estamos listos para consentir.
Como ven, aunque son unos cuantos pasos, es un trabajo que bien vale la pena, ya que ya las bandejas lucen realmente bellas, espero puedan animarse y hacer las suyas en casa.
For the best experience view this post on Liketu
Que esperas para unirte a nuestro trail de curación y formar parte del "proyecto CAPYBARA TRAIL", se despide Capybaraexchange tu casa de cambio, rápida, confiable y segura
Gracias chicos
Te quedo demasiado hermoso ese desayuno sorpresa Rosita, me encantaría tener la oportunidad de probarlos porque a demás se ven muy buenos. Gracias por compartirnos el paso a paso ❤️
Que bella mi Vane. Ojalá un día vengas de visita y nos pongamos a cocinar juntas.
Abrazote
Estos topper le dan un toque diferente y personalizado a estos desayunos, sin duda un hermoso regalo, saludos amiga.
Gracias mi bella. Justo eso es lo que les da el toque!
Yay! 🤗
Your content has been boosted with Ecency Points, by @rsanchez0308.
Use Ecency daily to boost your growth on platform!
Support Ecency
Vote for new Proposal
Delegate HP and earn more
To think you even created the designs on Canva first is really impressive.
Thanks so much!!
Amiga que cosita más hermosa, siempre he querido preparar un desayuno de cumpleaños así de lindo, pero con el desastre de mi torta 😅 lo dudo.
Me alegra que pasó de ser el desayuno sorpresa para tus hijos a un gran emprendimiento.
Te quedó hermoso mi Rosa.💕
Ami, a ti que eres manualista, te deben quedar hermosas esas bandejas! La torta, bueno jajaja le metes otra cosa. Tu haces unos panes divinos y bellos por ejemplo.
Abrazos ami 🤗
Amiga, que lindo detalle! Hoy en día están de moda estas bandejas y la verdad no resultan complicadas de hacer. Así que gracias por compartirnos tu tutorial! 🤗
Exacto, están de moda ahorita, y son bien sencillas, solo se necesita alguito de creatividad y listo
https://twitter.com/danyramsmusic/status/1695138716765901203?t=2qcz_qiHdGMI2LD4w7tHSw&s=19
Eso quedó hermoso y delicioso 😍
Gracias ami bella
Amiga eres una dura!!! Amo cada cosa que creas, todo siempre luce hermoso, impecable y muy sabroso!
Awww qué bella. Gracias ami, abrazote 🤗
Congratulations @rlathulerie! You have completed the following achievement on the Hive blockchain And have been rewarded with New badge(s)
Your next payout target is 8000 HP.
The unit is Hive Power equivalent because post and comment rewards can be split into HP and HBD
You can view your badges on your board and compare yourself to others in the Ranking
If you no longer want to receive notifications, reply to this comment with the word
STOPTo support your work, I also upvoted your post!
Check out our last posts:
Hola amiga. Te quedó linda esa bandeja de desayuno..
Felicidades te botas 😁
Besitos
Gracias Yrianna, a mi me encanta hacerlas, y hace rato que quería compartir el turorial y me olvidaba jeje.
Abrazos amiga bella
Con una bandeja así me hacen feliz lo que me resta de vida. Esos detalles son demasiado hermosos y tu amiga mía si que sabes darle tu toque de personalidad a todo lo que haces, todo realmente hermoso, perfecto y de seguro sabroso 🤭🤤
Ay, yo no había leído esto vale.
Tan bella amiga!! Todo hecho con amor 😍
Gracias por el tutorial mi Rosita, esos desayunos son un detalle bien lindo para cualquier ocasión, este que has elaborado te quedó hermoso y delicioso 🤩🤩
Ya tienes una idea para sorprender a Daniel, a ti que te gusta hacerle detalles 😉
Ciertoooo me toca hacer algo así ahora 😉