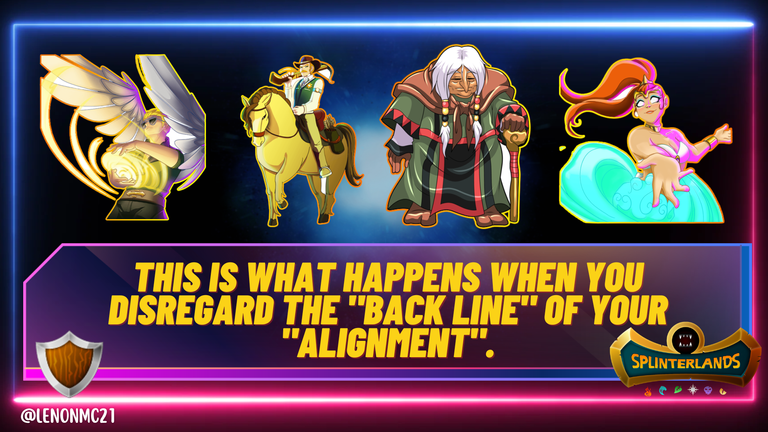
Esto es lo que pasa cuando no tomas en cuenta la “Línea Trasera” de tu “Alineación” [ES-EN]
Cover created in Canva

En un juego del estilo de “Splinterlands” que requiere jugar con mucha estrategia e inteligencia, no se puede dejar nada al azar, ya que un mínimo error puede ser perjudicial para la partida, puesto que el mismo puede ser la diferencia entre ganar y/o perder, ademas, en reiteradas ocasiones he mencionado que la “Estructura o Formación” de juego es muy importante para lograr aumentar nuestras probabilidades de éxito en el mismo, por lo que, si queremos ganar, debemos llevar una alienación balanceada que nos permita tener tanto ataque como defensa en una solo, por supuesto, depende mucho de las reglas y/o condiciones que tengamos, pero, esta es la base para lograr avanzar, lo demas como las reglas y las habilidades se ven aprendiendo con el tiempo.
Es por eso que, en esta oportunidad, les traigo una batalla que dispute contra un gran jugador, el cual, pertenece a uno de los gremios que hemos enfrentando en muchas ocasiones como lo es “Roaring Twenties”, en esta batalla mostrare un ejemplo de porque es tan importante tener una formación o “Estructura” como también suelo llamarla, de forma balanceada, ya que, no basta solo con ir al ataque sin tener defensa, y tampoco se trata de solo defender y no tener ataque, debe haber un equilibrio en los tipos de cartas que seleccionemos y es lo que quiero explicar y mostrar en esta publicación.
En tal sentido, de acuerdo a lo comentado en la “Introducción” anterior, en esta publicación está explicando él porque es tan importante tener una “Formación de Juego” balanceada al momento de jugar, ya que, esto nos permite estar preparados para cualquier tipo de “Estrategia” que pueda aplicar el oponente en nuestra contra. Ademas, para lograr detallar esto, responderé los siguientes puntos:
1. ¿Por qué es importante tener una “Formación de Juego” balanceada?

 2. Batalla contra “DoctorCrypto” de (Roaring Twenties)

 3. Consideraciones Finales

¿Por qué es importante tener una “Formación de Juego” balanceada?
Jugar con una “Formación” del tipo balanceada o general como a veces la llamo, es muy importante para lograr obtener récords positivos en nuestras batallas del día a día, en especial si jugamos en ligas altas, aunque no me malentiendan, no estoy menos preciando las ligas más bajas, como “Bronce o Plata”, al contrario, son buenas ligas para ir aprendiendo más sobre el juego, pero, la realidad es que, en esas ligas las cartas no tienen muchas de las habilidades que pudieran tener en ligas de “Oro” en adelante, por otro lado, la cantidad de reglas que te pueden salir en las bajas, se limita a solo 1 y maximo 2 si estas en “Plata”, por lo que, mientras más arriba se este, más jugadores experimentados se encontraran, es por eso que, es muy importante tener en cuenta este concepto, así que, sabiendo esto, explicare la importancia del juego balanceado:

Defensa en los “Extremos”

Como dice el título de este post, tienen que ver qué pasa cuando no cuidan correctamente la “Línea Trasera” de la alienación, por lo que, básicamente lo que sucede es que, no tenemos “Defensa” en contra de los ataques “Furtivos” que puede propinar el enemigo, o también aquellos ataques bajo la habilidad de “Snipe”, que se centran en derrotar a las cartas de ataque a distancia y más si las posicionamos en las últimas posiciones, por lo que, bajo esta premisa, lo que debemos hacer es colocar una carta fuerte en “Defensa” tanto en la primera posición como en la última.
Cartas de “Soporte”

Cuando estamos armando la “Estructura” de nuestro juego, no solo debemos pensar en la “Defensa” de los 2 puntos que comente anteriormente, también es importante que incluyamos lo que yo llamo cartas de “Soporte”, ya que, por si solas, pudieran ser a pesar de su “Defensa” muy poco resistentes a varios ataques seguidos de nuestro oponente, bajo esta premisa, es imperativo que juguemos con cartas de este tipo, para poder proteger a toda nuestra “Formación”, o al menos a las cartas que reciban el mayor daño, por supuesto, debemos saber dónde posicionarlas para evitar que se arriesguen demasiado en la batalla, recordemos que la idea de esto es que, logremos soportar más cantidad de rondas con vida con el mayor número de cartas de nuestro lado del campo.
Saber posicionar nuestras cartas

A pesar de que suene que no tiene mucha importancia, la realidad es que esto es realmente importante para poder sobresalir en una batalla, ya comenté que en los extremos debemos de colocar una buena “Defensa”, pero ¿El resto de nuestras cartas para tener la “Estructura” balanceada donde las ubicamos? Pues, esto dependera de los puntos de vida que tengan las mismas, por lo que, si estamos ubicando una carta “Ofensiva”, es de entender que tiene más puntos de vida que una carta de “Soporte”, en ese caso, debemos colocarlas lo más cercanas posible a las cartas de los “Extremos”, esto para que cuando sean derrotadas estas tomen su lugar, por otro lado, las cartas de (Soporte), deben siempre ir en medio, para evitar que sean atacadas tan temprano en la batalla.
Batalla contra “DoctorCrypto” de (Roaring Twenties)
Antes de explicar o iniciar con el resumen de lo que fue la batalla, en esta oportunidad, explicare primero las reglas y/o condiciones que me tocaron, de esta forma podrán ver nuevamente de qué forma analizarlas y juntar todo este conocimiento para seleccionar las cartas correctas, seguir la “Estructura de Juego” que mencione en la sección anterior, con el objetivo de aumentar nuestras probabilidades de ganar la batalla:
Condiciones de la Batalla
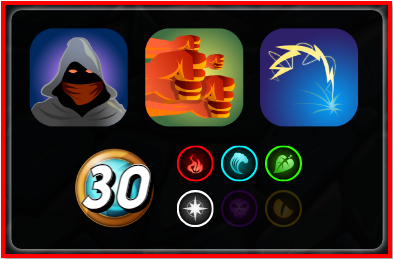
Silenced Summoners: Esta regla es bastante sencilla de entender, solo se trata de que los “Invocadores” no podrán utilizar sus efectos en el campo de batalla, sin embargo, sabiendo esto, es crucial jugar con los “Invocadores” correctos, a lo que me refiero es que, si estos no tendrán ningún efecto en el campo salvo poder invocar a los monstruos de su elemento, entonces debemos utilizar el que menos cantidad de mana consuma, para de esta forma administrar el mana disponible de la batalla de manera óptima, esto quiere decir que, siempre con esta regla de batalla el mejor invocador a utilizar es el que menos mana consuma.
Heavy Hitters: Esta regla la he comentado en muchas publicaciones, pero, no es realmente relevante en el “Meta” del juego actualmente, ya que es complicado lograr que se logre activar, no explicare en detalle de que forma funciona, pero, se me ocurre hacer una publicación donde solo detalle y/o explique esas reglas que necesitarían alguna actualización para funcionar mejor, sin embargo, en este post y análisis de batalla, quedaría descartada, no la tome en cuenta para el juego.
Weak Magic: Esta regla si que debemos tomarla en cuenta, ya que su funcion es debilitar el ataque magico, ademas, como la mayoría debe de saber, cuando esta regla esta activa, el ataque magico impacta primero en el “Escudo” que tenga la carta en lugar de los puntos de vida como normalmente sucede, por lo que, jugar con “Weak Magic”, representa una buena oportunidad para defenderse de los ataques “Mágicos” y tener una mayor oportunidad de ganar la batalla dando resistencia, pero, hay que jugar con monstruos que tengan “Escudo”, o por medio de una carta aplicarle escudo.
Cantidad de mana y Splinters disponibles: La cantidad de mana para esta batalla era de 30 puntos, los cuales considero que son mas que suficientes para poder aplicar una “Estructura de Juego” adecuada siguiendo los parámetros que mencione en la sección anterior, ahora bien, con respecto a los “Splinters” que tenemos disponibles, de acuerdo las reglas de la batalla, las mejores opciones eran “Fuego y Vida”, a pesar de que “Tierra y Agua” son excelentes equipos, el tener “Weak Magic” como regla y sin poder aumentar el poder de ataque de nuestros monstruos gracias a “Silenced Summoners”, lo ideal seria jugar con cartas que tengan sinergia en los otros 2 tipos de ataque.
Explicación de batalla contra “DoctorCrypto”
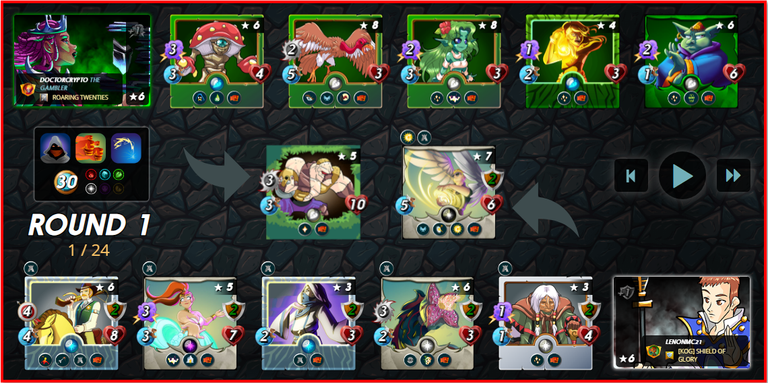
Esta batalla es un muy buen ejemplo del porque no debemos descuidar los puntos extremos de nuestra formación, ya que, si observan bien la imagen anterior con las alienaciones de ambos, mi oponente jugo de forma exagerada con cartas de “Soporte”, enfocado solo en curar a su “Tanque” de batalla, descuidando totalmente su “Línea Trasera” dejándola expuesta a cualquier tipo de ataque, bien sea con “Opportunity, Sneak e inclusive Snipe”.
Por otro lado, si observan bien mi formación, jugué exactamente con cartas que podrían hacer un importante daño a la “Línea Trasera” de mi oponente, las cuales tienen las habilidades de “Sneak y Snipe”, por otro lado, aprovechando que tenemos la regla “Weak Magic” activa, coloque una carta con la habilidad de “Protect” para darle a todos mis monstruos +2 puntos de escudo, esto me daría el suficiente tiempo para responder a hipotéticos ataques mágicos de mi oponente, sin mencionar que jugué con 2 cartas de “Soporte, teniendo en cuentas las habilidades de “Tank Heal y Triage”, tomando en consideración si algo salía mal.
Por último, pueden ver la batalla dando click debajo de la imagen para que puedan analizar las formaciones de ambos y comparen la “Estructura”, recuerden que, esa es la clave del éxito en la jugabilidad.

Consideraciones Finales

Espero que esta publicación les haya aclarado la forma en la que debe analizar, aunque, lo más importante de la información que transmití en esta oportunidad, es que hayan entendido la importancia de proteger los puntos extremos de la “Formación” que utilicemos, ya que cualquier mínimo error nuestro oponente puede usarlo en nuestra contra y así disminuiría las posibilidades de ganar la batalla, recordando que, es imperativo jugar de forma segura nuestras alienaciones, y para eso debemos analizar bien todas las condiciones de la batalla. No olviden seguirme y activar las notificaciones para que estén al tanto del nuevo contenido, estaré trayendo nueva información próximamente.
No olviden consultar mi perfil y ver mis ultimas publicaciones, quizás puedan encontrar información de interés que te ayude a mejorar con respecto a “Splinterlands” en general.
Enlace directo a mi Perfil

In a game like "Splinterlands" that requires playing with a lot of strategy and intelligence, you can not leave anything to chance, since a minimal error can be detrimental to the game, since it can be the difference between winning and/or losing, in addition, I have repeatedly mentioned that the "Structure or Formation" of the game is very important to increase our chances of success in it, So, if we want to win, we must have a balanced alignment that allows us to have both attack and defense in one, of course, it depends a lot on the rules and / or conditions we have, but this is the basis for progress, the rest as the rules and skills are learned over time.
That is why, in this opportunity, I bring you a battle that I dispute against a great player, which belongs to one of the guilds that we have faced on many occasions as it is "Roaring Twenties", in this battle I will show an example of why it is so important to have a formation or "Structure" as I also usually call it, in a balanced way, because, it is not enough just to go to attack without having defense, and it is not just defend and not have attack, there must be a balance in the types of cards that we select and that is what I want to explain and show in this publication.
In this sense, according to what was commented in the previous "Introduction", this publication is explaining why it is so important to have a balanced "Game Formation" when playing, since this allows us to be prepared for any type of "Strategy" that the opponent may apply against us. In addition, in order to detail this, I will answer the following points:
1. Why is it important to have a balanced "Game Formation"?

 2. Batalla contra "DoctorCrypto" de (Roaring Twenties)

 3. Final Considerations
Why is it important to have a balanced "Game Formation"?
Playing with a "Formation" of the balanced or general type as I sometimes call it, is very important to achieve positive records in our daily battles, especially if we play in high leagues, but do not misunderstand me, I am not underestimating the lower leagues, such as "Bronze or Silver", on the contrary, they are good leagues to learn more about the game, but, the reality is that, in those leagues the cards do not have many skills that they could have in "Gold" leagues, on the other hand, the amount of rules that you can get in the lower leagues, is limited to only 1 and a maximum of 2, in those leagues the cards do not have many of the skills that they could have in leagues of "Gold" and up, on the other hand, the amount of rules that you can get in the lower leagues, is limited to only 1 and maximum 2 if you are in "Silver", so, the higher you are, the more experienced players you will find, that is why, it is very important to take into account this concept, so, knowing this, I will explain the importance of balanced play:
Defense in the "Extremes
As the title of this post says, you have to see what happens when you do not properly take care of the "Back Line" of the alienation, so, basically what happens is that, we have no "Defense" against the "Furious" attacks that can propel the enemy, or also those attacks under the "Snipe" ability, which are focused on defeating the attack cards at a distance and more if we position them in the last positions, so, under this premise, what we must do is to place a strong card in "Defense" both in the first position and in the last one.
"Support" Cards
When we are putting together the "Structure" of our game, we must not only think about the "Defense" of the 2 points I mentioned above, it is also important that we include what I call "Support" cards, since, by themselves, they could be despite their "Defense" very little resistant to several attacks in a row from our opponent, under this premise, it is imperative that we play with cards of this type, to be able to protect all our "Formation", or at least the cards that receive the most damage, of course, we must know where to position them to prevent them from risking too much in the battle, remember that the idea of this is that we manage to withstand more rounds alive with the largest number of cards on our side of the field.
Knowing how to position our cards
Although it sounds that it is not very important, the reality is that this is really important to excel in a battle, I already mentioned that at the extremes we must place a good "Defense", but the rest of our cards to have a balanced "Structure" where we place them? Well, this will depend on the life points they have, so if we are placing an "Offensive" card, it is understood that it has more life points than a "Support" card, in that case, we must place them as close as possible to the cards of the "Extremes", this so that when they are defeated these take their place, on the other hand, the (Support) cards, should always be in the middle, to avoid being attacked so early in the battle.
Battle against "DoctorCrypto" of (Roaring Twenties)
Before explaining or starting with the summary of the battle, in this opportunity, I will first explain the rules and/or conditions that I had to deal with, so you can see again how to analyze them and gather all this knowledge to select the right cards, follow the "Game Structure" that I mentioned in the previous section, with the objective of increasing our probabilities of winning the battle:
Battle Conditions
Silenced Summoners: This rule is quite simple to understand, it is only that the "Summoners" will not be able to use their effects on the battlefield, however, knowing this, it is crucial to play with the correct "Summoners", what I mean is that, if they will not have any effect on the field except to summon the monsters of their element, then we must use the one that consumes the least amount of mana, in order to manage the available mana of the battle in an optimal way, this means that, always with this battle rule the best summoner to use is the one that consumes the least amount of mana.
Heavy Hitters: I have commented on this rule in many publications, but it is not really relevant in the "Meta" of the game currently, since it is complicated to get it to activate, I will not explain in detail how it works, but it occurs to me to make a publication where only detail and/or explain those rules that would need some update to work better, however, in this post and battle analysis, it would be discarded, do not take it into account for the game.
Weak Magic: This rule should be taken into account, since its function is to weaken the magic attack, besides, as most of you should know, when this rule is active, the magic attack hits first the "Shield" that the card has instead of the life points as it normally happens, so, playing with "Weak Magic", represents a good opportunity to defend against "Magic" attacks and have a better chance to win the battle by giving resistance, but, you have to play with monsters that have "Shield", or by means of a card to apply shield to it.
Amount of mana and Splinters available: The amount of mana for this battle was 30 points, which I consider to be more than enough to be able to apply an adequate "Game Structure" following the parameters that I mentioned in the previous section, now, regarding the "Splinters" that we have available, according to the rules of the battle, the best options were "Fire and Life", although "Earth and Water" are excellent teams, having "Weak Magic" as a rule and not being able to increase the attack power of our monsters thanks to "Silenced Summoners", the ideal would be to play with cards that have synergy in the other 2 types of attack.
Explanation of battle against "DoctorCrypto".
This battle is a very good example of why we should not neglect the extreme points of our formation, because, if you look closely at the previous image with the alignments of both, my opponent played exaggeratedly with "Support" cards, focused only on healing his "Tank" battle, totally neglecting his "Back Line" leaving it exposed to any kind of attack, either with "Opportunity, Sneak and even Snipe".
On the other hand, if you look closely at my formation, I played exactly with cards that could do significant damage to my opponent's "Back Line", which have the "Sneak and Snipe" abilities, on the other hand, taking advantage that we have the "Weak Magic" rule active, I placed a card with the "Protect" ability to give all my monsters +2 shield points, this would give me enough time to respond to hypothetical magic attacks from my opponent, not to mention that I played with 2 "Support" cards, taking into account the "Tank Heal and Triage" abilities, taking into consideration if something went wrong.
Finally, you can see the battle by clicking below the image so you can analyze the formations of both and compare the "Structure", remember that, that is the key to success in the gameplay.
Final Considerations
I hope this publication has clarified the way in which you should analyze, although, the most important of the information that I transmitted in this opportunity, is that you have understood the importance of protecting the extreme points of the "Formation" that we use, since any slightest mistake our opponent can use it against us and thus decrease the chances of winning the battle, remembering that it is imperative to play safely our alienations, and for that we must analyze well all the conditions of the battle. Don't forget to follow me and activate the notifications to be aware of new content, I will be bringing new information soon.
Don't forget to check my profile and see my latest publications, maybe you can find interesting information that will help you to improve with respect to "Splinterlands" in general.
Direct link to my profile

If you are new, I invite you to register in this LINK

Proud Member of "Shield of Glory".
Veo la pelea y me dejó pensando que a pesar de que el oponente tenía un sanador, un fortificador, un tanque con buena vida (y que se curaba a sí mismo), además de un atacante que reducía el ataque mágico de todos sus oponentes... pues, a pesar de todo eso, igual recibió una paliza.
Stay !ALIVE
!Gif fantasy card player
!LOLZ !PGM !CTP !BBH
Via Tenor
En esta oportunidad la elección del Bot de GIF no me parece muy acertada.
BUY AND STAKE THE PGM TO SEND A LOT OF TOKENS!
The tokens that the command sends are: 0.1 PGM-0.1 LVL-0.1 THGAMING-0.05 DEC-15 SBT-1 STARBITS-[0.00000001 BTC (SWAP.BTC) only if you have 2500 PGM in stake or more ]
5000 PGM IN STAKE = 2x rewards!
Discord
Support the curation account @ pgm-curator with a delegation 10 HP - 50 HP - 100 HP - 500 HP - 1000 HP
Get potential votes from @ pgm-curator by paying in PGM, here is a guide
I'm a bot, if you want a hand ask @ zottone444
@lenonmc21! You Are Alive so I just staked 0.1 $ALIVE to your account on behalf of @ pedrobrito2004. (7/10)
The tip has been paid for by the We Are Alive Tribe through the earnings on @alive.chat, feel free to swing by our daily chat any time you want, plus you can win Hive Power (2x 50 HP) and Alive Power (2x 500 AP) delegations (4 weeks), and Ecency Points (4x 50 EP), in our chat every day.

!1UP Good work!
!PGM !PIZZA
BUY AND STAKE THE PGM TO SEND A LOT OF TOKENS!
The tokens that the command sends are: 0.1 PGM-0.1 LVL-0.1 THGAMING-0.05 DEC-15 SBT-1 STARBITS-[0.00000001 BTC (SWAP.BTC) only if you have 2500 PGM in stake or more ]
5000 PGM IN STAKE = 2x rewards!
Discord
Support the curation account @ pgm-curator with a delegation 10 HP - 50 HP - 100 HP - 500 HP - 1000 HP
Get potential votes from @ pgm-curator by paying in PGM, here is a guide
I'm a bot, if you want a hand ask @ zottone444
$PIZZA slices delivered:
underlock tipped lenonmc21
@curation-cartel(11/20) tipped @lenonmc21
You have received a 1UP from @underlock!
@monster-curator, @oneup-curator, @leo-curator, @ctp-curator, @thg-curator, @neoxag-curator, @fun-curator
And they will bring !PIZZA 🍕.
Learn more about our delegation service to earn daily rewards. Join the Cartel on Discord.