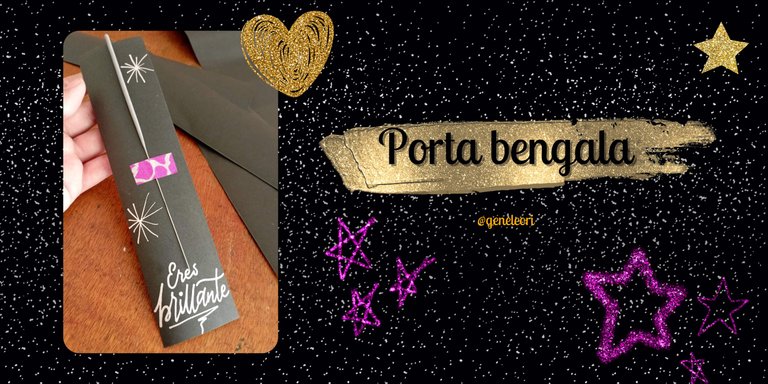
Porta Bengalas: tutorial (ESP-ENG)
¡Hola hivers!💜
Estoy encantada de volver a esta hermosa comunidad. En esta ocasión para enseñarles como hice estos hermosos porta bengalas de regalo para mi taller de lettering. Por si no me habías leído antes, tengo un emprendimiento llamado Poeticabyg, donde además de vender materiales de arte, lapiceros, marcadores, lienzos y caballetes, también dictó talleres de lettering.
Este es el arte de dibujar letras y tiene muchísimas aplicaciones.
La idea de estos porta bengalas surgió porque el taller tenía como tema el glitter y lo brillante y genial que puede ser cada quien, así como la importancia que tiene cada uno. El lettering es una forma muy bonita de comunicar las cosas. Así que cada porta bengala tenía la misión de recordarle a cada participante que no olvidara lo importante, maravilloso y brillante que es. Me gusta que cada participante tenga un detalle único que le haga sentir bien.


MATERIALES
- Bengalas
- Cartulina (yo use de color negro)
- Lápiz
- Goma
- Regla
- Marcadores de pintura acrilica (use de color plateado y dorado)
- Washi tape (en este caso use uno estampado escarchado) o silicona caliente.
PASO A PASO

PASO 1
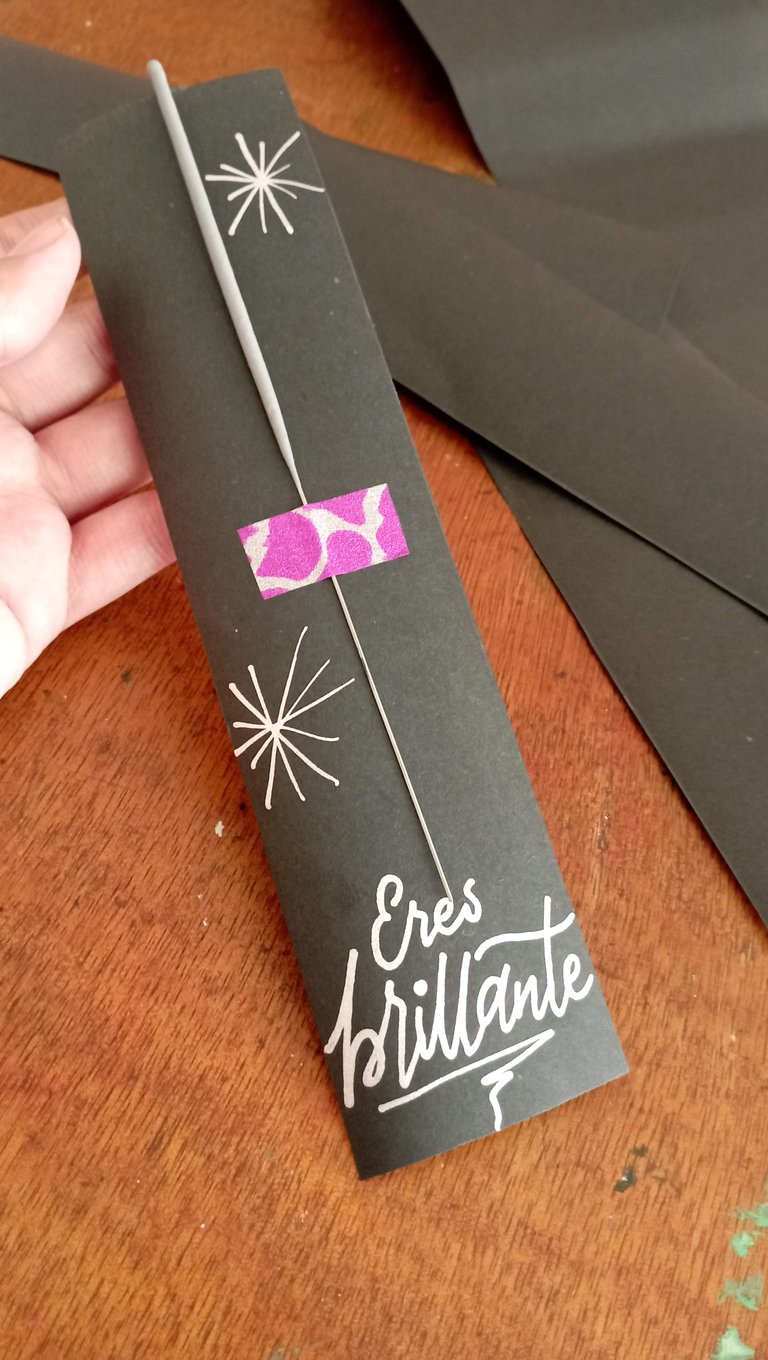
Lo primero fue medir las bengalas para así determinar el tamaño de las porta bengalas. En mi caso, las medidas que utilicé fueron 5 cm de ancho por 20 cm de alto. Procedí a marcarlas en el papel.

PASO 2
Recorte todos los porta bengalas. La idea era que lo brillante de la bengala se asocia con lo genial, increíble y brillante que puede ser una persona y que sea un pequeño recordatorio. Así que prepare una lista de frases para colocar en cada uno, entre las que prepare estaban: “siempre brillante”, “no te olvides de brillar”, “eres brillante”, “hecha para brillar”, “nacida para brillar”, “brilla bonito”, “es hora de brillar”.
Ya que use cartulina negra, tuve que usar marcadores de pintura acrílica (estos marcadores son una forma más fácil de dibujar letras con pintura) y justo tenía dos colores brillantes: dorado y plateado. Marque con lápiz la frase para evitar equivocaciones y procedí a dibujarla con los marcadores.
TIP: si usas un color de fondo diferente, puedes usar gama más amplia de marcadores y lapiceros.

PASO 3
Una vez seca la pintura, solo me faltaba añadir la bengala. Para esto, utilice unos washi tapes con estampados brillantes (estas son cintas decorativas hechas con papel de arroz, que tienen una cantidad menor de pegamento y te permiten cortarla con facilidad), para hacerle continuidad al tema. Funciono genial para darle un toque de color, brillo y sujetar bien la bengala que es liviana.
TIP 2: en caso de que no tengas washi tape, puedes utilizar silicona caliente. Solo debes cuidar que sea colocado en la base y no en la parte que contiene la pólvora.
Una vez fijada, ¡tenemos nuestros porta bengalas listos!
Un último tip es que no necesariamente tienen que hacerlo con bengalas. También puedes aplicarlo con velas de cumpleaños, lápices y lapiceros. Es un detalle que acompañado con una frase significativa puede alegrar y cambiar el estado de ánimo de cualquiera.
Esta idea me pareció genial para compartirla con ustedes. Soy fiel creyente de que los detalles a mano son de los mejores regalos a recibir.
Gracias por leerme
Con cariño, G.

Hi hivers!💜
I am delighted to return to this beautiful community. This time to show you how I made these beautiful gift sparkler holders for my lettering workshop. In case you haven't read me before, I have a business called Poeticabyg, where besides selling art supplies, pens, markers, canvases and easels, I also teach lettering workshops.
This is the art of drawing letters and has many applications.
The idea for these flare holders came about because the workshop had the theme of glitter and how brilliant and cool everyone can be, as well as the importance of each one. Lettering is such a beautiful way to communicate things. So each flare holder was on a mission to remind each participant not to forget how important, wonderful and shiny they are. I like each participant to have a unique detail that makes them feel good.
MATERIALS.
Flares
Card stock (I used black)
Pencil
Eraser
Ruler
Acrylic paint markers (I used silver and gold colored)
Washi tape (in this case I used a frosted patterned one) or hot silicone.
STEP BY STEP
STEP 1
The first thing to do was to measure the sparklers to determine the size of the sparkler holders. In my case, the measurements I used were 5 cm wide by 20 cm high. I proceeded to mark them on the paper.
STEP 2
Cut out all the sparkler holders. The idea was that the brightness of the sparkler is associated with how cool, awesome and brilliant a person can be and to be a little reminder. So I prepared a list of phrases to put on each one, among the ones I prepared were: "always sparkle", "don't forget to sparkle", "you are sparkly", "made to sparkle", "born to sparkle", "shine pretty", "it's time to sparkle".
Since I used black cardstock, I had to use acrylic paint markers (these markers are an easier way to draw letters with paint) and I just happened to have two shiny colors: gold and silver. I marked the phrase with pencil to avoid mistakes and proceeded to draw it with the markers.
TIP: if you use a different background color, you can use a wider range of markers and pens.
STEP 3
Once the paint was dry, I just needed to add the flare. For this, I used some brightly patterned washi tapes (these are decorative ribbons made with rice paper, which have a smaller amount of glue and allow you to cut them easily), to give continuity to the theme. It worked great to give it a touch of color, glitter and hold the light sparkler well.
TIP 2: in case you don't have washi tape, you can use hot silicone. Just make sure it is placed on the base and not on the part that contains the powder.
Once set, we have our flare holders ready!
One last tip is that you don't necessarily have to do it with sparklers. You can also apply it with birthday candles, pencils and pens. It is a detail that accompanied with a meaningful phrase can brighten and change anyone's mood.
I thought this idea was great to share with you. I am a true believer that handmade details are among the best gifts to receive.
Thank you for reading me
With love, G..
FUENTE
Fotos: tomadas por mi desde mi redmi 10
Traducción: Deepl
SOURCE
Photos: taken by me from my redmi 10
Translation: Deepl

que bonito!! puede darse como detalle para la salida de los novios en una boda o en unos 15 años
siii, es una excelente idea tambien
Grandioso para regalar bengalas conestilo, luce bastante glamuroso.Me encanta.
sii, es un detalle bastante bonito
Congratulations @geneleori! You have completed the following achievement on the Hive blockchain And have been rewarded with New badge(s)
Your next target is to reach 70 posts.
Your next target is to reach 300 replies.
You can view your badges on your board and compare yourself to others in the Ranking
If you no longer want to receive notifications, reply to this comment with the word
STOPhttps://twitter.com/hivediy47901/status/1779025182142677267
¡¡¡Buen trabajo!!! Gracias por publicar tu excelente contenido en Hive Diy, hermosa manualidad, te quedo muy llamativo.
Tu comunidad artesana ahora es testigo

Muchas gracias💜 encantada de compartir en esta hermosa y creativa comunidad