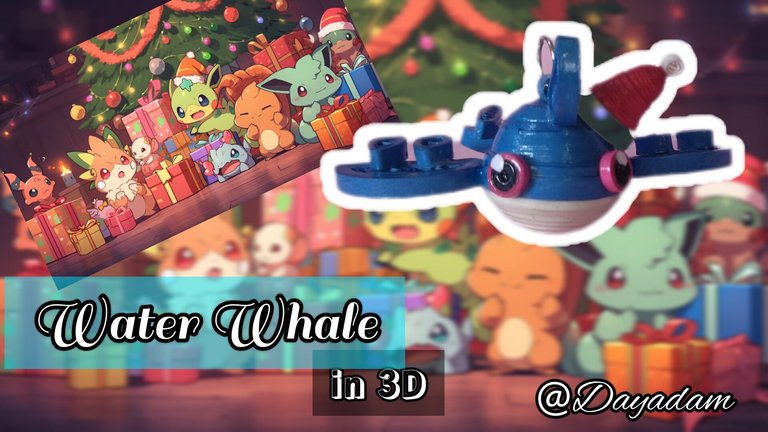
Water Whale in 3D // Quilling Technique // Delegating to Holizing and claiming Christmas rewards [Eng-Esp]
Hello everyone... 💙
Hello to my dear Hivers and the dear community of Holozing, very pleased and excited to be here for the first time, to show you a work made with love and especially for you.
At the time when everything related to POSH was very active, I was participating a lot in contests, in Twitter promotions among other things, they were a very attractive project to win, this way you helped our blockchain to be known, you helped your colleagues, and you also won, until everything was changed and we know why.
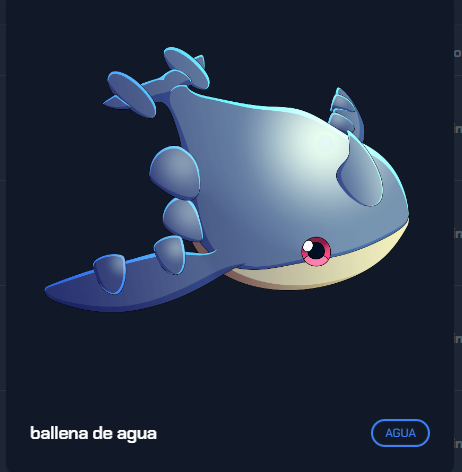
Well, Mr. @acidyo did not stay with his hands crossed and came this new and also attractive project, and I'm not going to lie, when I saw the game and its characters, I did not investigate so much in the game as such, but immediately my eyes went to my art, and I fell in love with the creatures that make it up and much more to be inspired by Pokemon, with which I have worked, materialized in some of my posts and I said to myself at some point I have to do them.
Then I began to see the enthusiasm of so many, towards the game, the project and everything in general, so today reading a little more I got excited and I wanted to start being part of it delegating for the first time 500HP and starting to claim rewards, because I already had in my credits even 10 POSH tokens which allowed me to claim some ZING tokens.
For those who know me know that the niche in which I am primarily characterized in hive is the manual arts, and in greater proportion I work with the technique of quilling which are strips of paper which you can mold to your liking and since it is very versatile you can create many things.
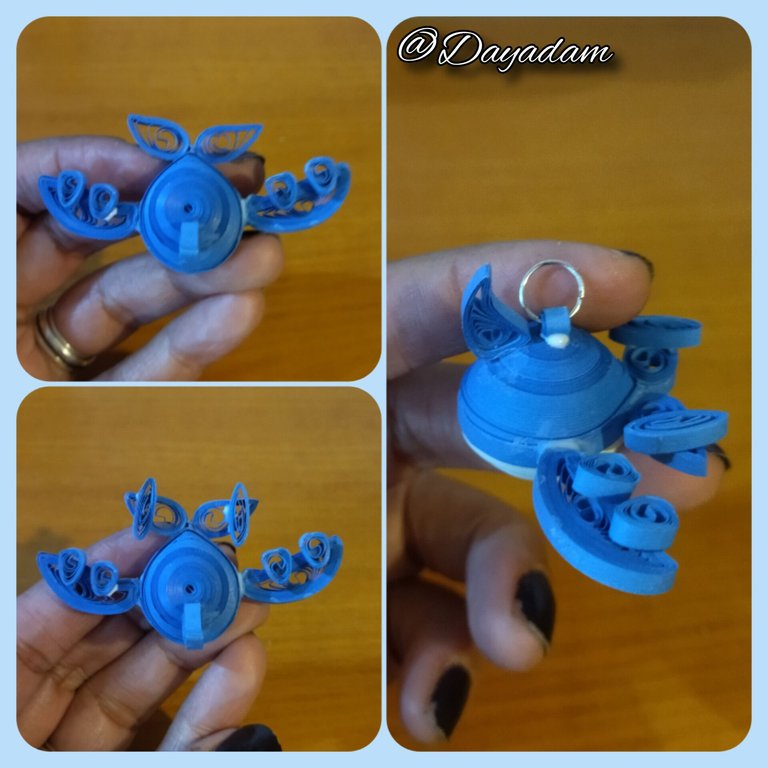
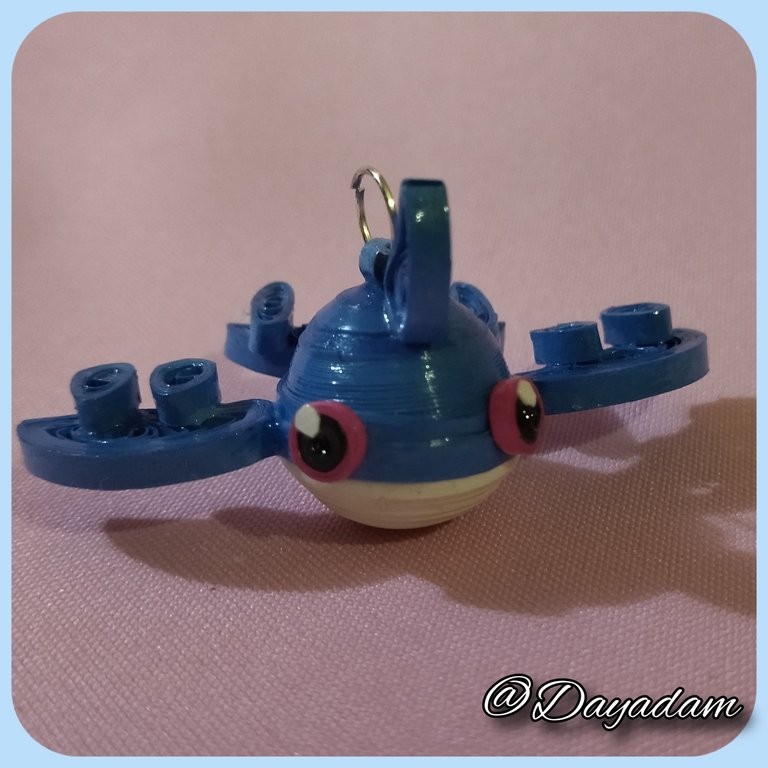
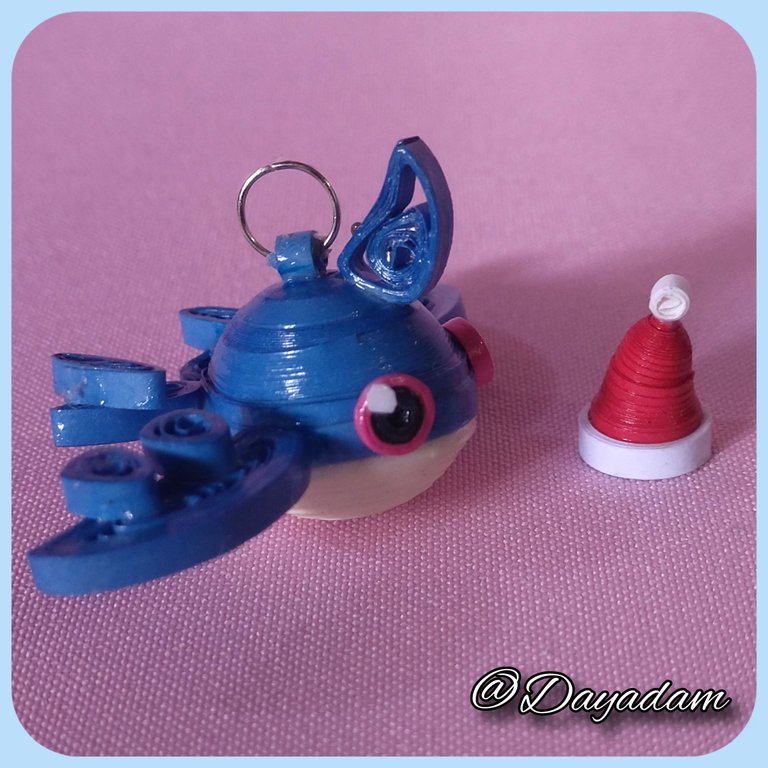
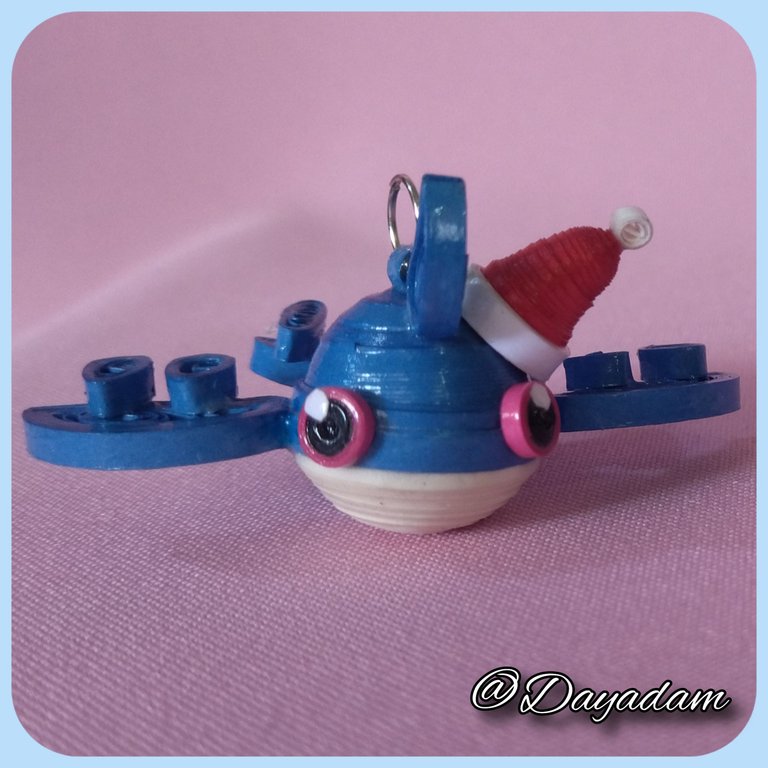
Well, to celebrate my entry to the community and the project I wanted to make the creature Water Whale in 3D in the quilling technique.
I leave you photos of my delegation, and what I have claimed so far. I hope that little by little I will be able to bring out in my style each beautiful creature of this attractive set, which by the way love the new creature in all its phases, that beautiful cat named Miu, Miumiu and Miumiumiu.
I hope you like my work, join me in this creative process.
Let's get started:😃

Hola a Todos... 💙
Hola a mis queridos Hivers y a la querida comunidad de Holozing, muy complacida y emocionada de encontrarme por acá por primera vez, para mostrarles un trabajo hecho con mucho amor y especialmente para ustedes.
En su momento cuando estuvo muy activo todo lo relacionado con POSH, estuve participando mucho en concursos, en las promociones por Twitter entre otras cosas, eran un proyecto bastante atractivo para ganar ganar, de esta manera ayudabas a nuestra blockchain a darse a conocer, ayudabas a tus compañeros, y tu también ganabas, hasta que todo se cambio ya sabemos porque.
Pues el Señor @acidyo no se quedo de manos cruzadas y vino este nuevo y también atractivo proyecto, y no les voy a mentir, al ver el juego y sus personajes, no indague tanto en el juego como tal, si no que de manera inmediata mis ojos se fueron a mi arte, y me enamore de las criaturas que lo conforman y mucho mas al ser inspiradas en Pokemon, con las cuales he trabajado, materializado en algunos de mis post y me dije en algun momento debo hacerlos.
Luego comencé a ver el entusiasmo de tantos, hacia el juego, el proyecto y todo en general, pues hoy leyendo un poco mas me entusiasmé y quise comenzar a ser parte de el delegando por primera vez 500HP y empezando a reclamar recompensas, pues ya tenia en mis haberes aun 10 tokens POSH lo que me permitía reclamar algunos tokens ZING.
Para los que me conocen saben que el nicho en el que primordialmente me caracterizo en hive es el de las artes manuales, y en mayor proporción trabajo con la técnica de quilling que son tiras de papel las cuales puedes moldear a tu gusto y ya que es muy versátil puedes crear muchísimas cosas.
Pues para celebrar mi ingreso a la comunidad y al proyecto quise elaborar a la criatura Water Whale en 3D en la técnica de quilling.
Les dejo fotos de mi delegación, y de lo que he reclamado hasta el momento. Espero que poco a poco pueda ir sacando a mi estilo cada hermosa criatura de este atractivo juego, que por cierto ame la nueva criatura en todas sus fases, ese bello gato llamado Miu, Miumiu y Miumiumiu.
Espero sea de su agrado mi trabajo, acompáñenme en este proceso creativo.
Comencemos:😃


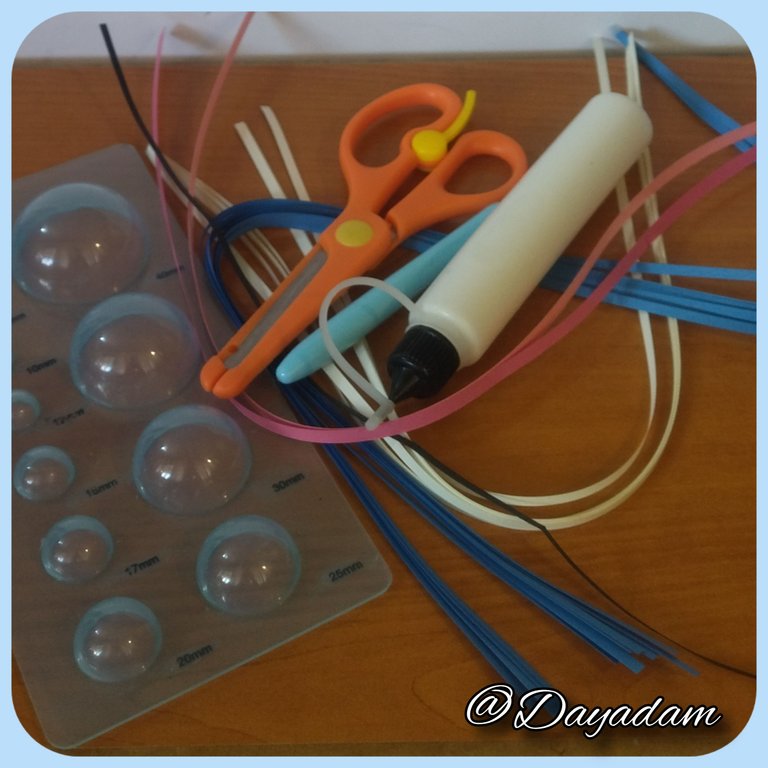
• Cintas de quilling de diversos colores y medidas de ancho.
• Aguja para quilling.
• Plantilla para moldear círculos.
• Pega blanca extra fuerte (de carpintería).
• Tijera.
• Pincel.
- Quilling ribbons of different colors and widths.
- Quilling needle.
- Template to mold circles.
- Extra strong white glue (carpentry glue).
- Scissors.
- Paintbrush.

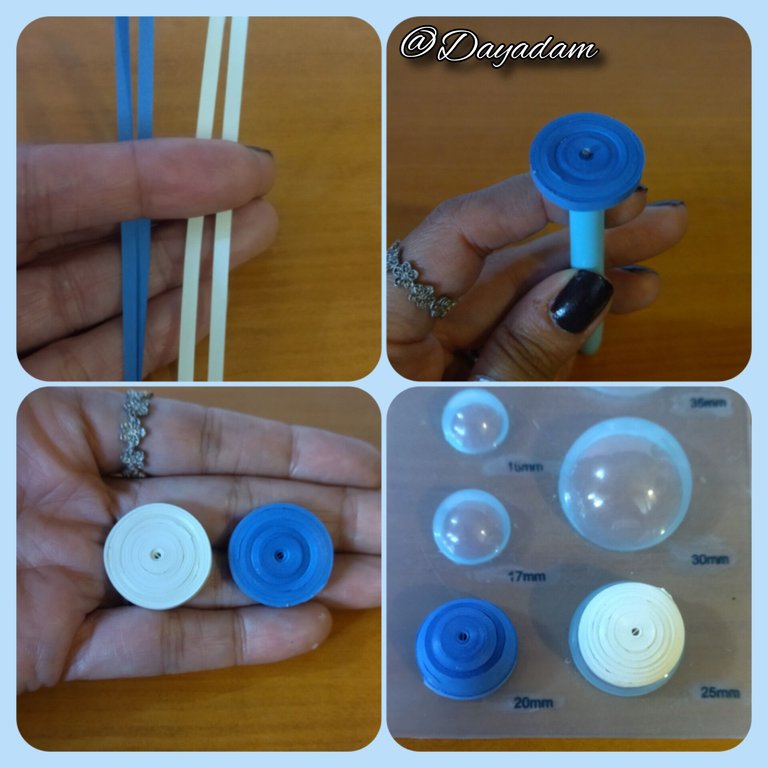
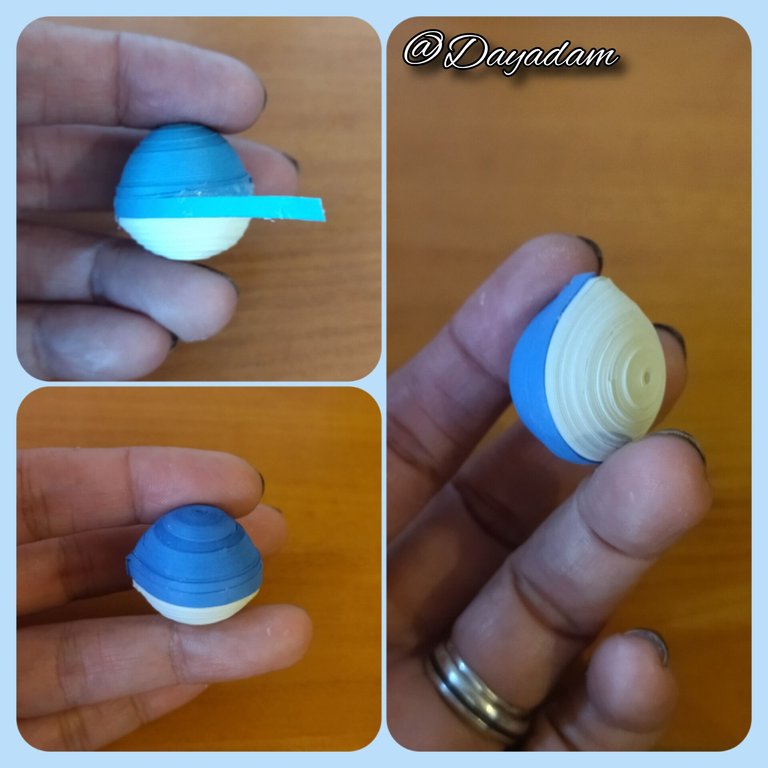
- We are going to start by taking blue quilling tape and another one of beige color of 3mm wide x 300cms long each one, we roll with the quilling needle until we reach the end of the tape, we seal with extra strong white glue, we take out the needle, we will obtain a closed circle. For each whale we are going to make we will need a circle of each color.
- We are going to mold the circles, placing the blue one in the 20mm circle template and the beige one in the 25mm circle template, once molded we take it out of the template and add a little glue on the inside, let it dry to prevent the pieces from moving.
- We are going to take the pieces and mold them in the shape of a drop, then we will join them with a small piece of blue quilling tape, 3mm wide, we join both pieces passing the tape through the middle with extra strong white glue (reserve).

• Comenzamos tomando cinta para quilling de color azul y otra de color beige de 3mm de ancho x 300cms de largo cada una, enrollamos con la aguja para quilling hasta llegar al final de la cinta, sellamos con pega blanca extra fuerte, sacamos de la aguja, obtendremos un círculo cerrado. Por cada ballena que vayamos a realizar necesitaremos un circulo de cada color.
• Vamos a moldear los círculos, colocando en la plantilla de círculos en la medida 20mm la de color azul y en la medida 25mm la color beige, una vez moldeada sacamos de la plantilla y en la parte de adentro agregamos un poco de pega, dejamos secar para evitar que se muevan las piezas.
• Vamos a tomar las piezas y moldearemos en forma de gota, luego uniremos con un pequeño trozo de cinta de quilling azul, de 3mm de ancho, acoplamos ambas pasando la cinta por el medio con pega blanca extra fuerte (reservamos).
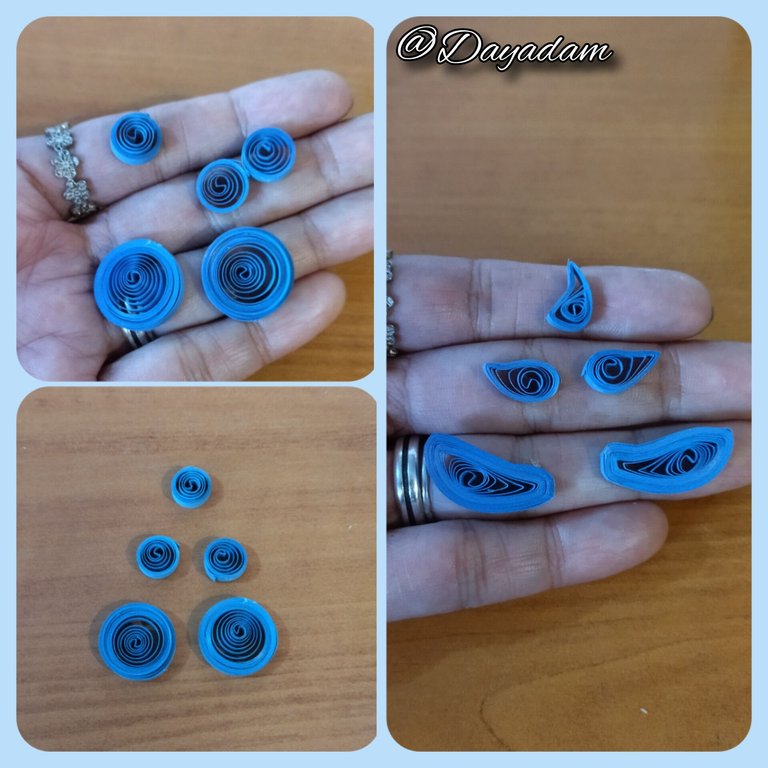
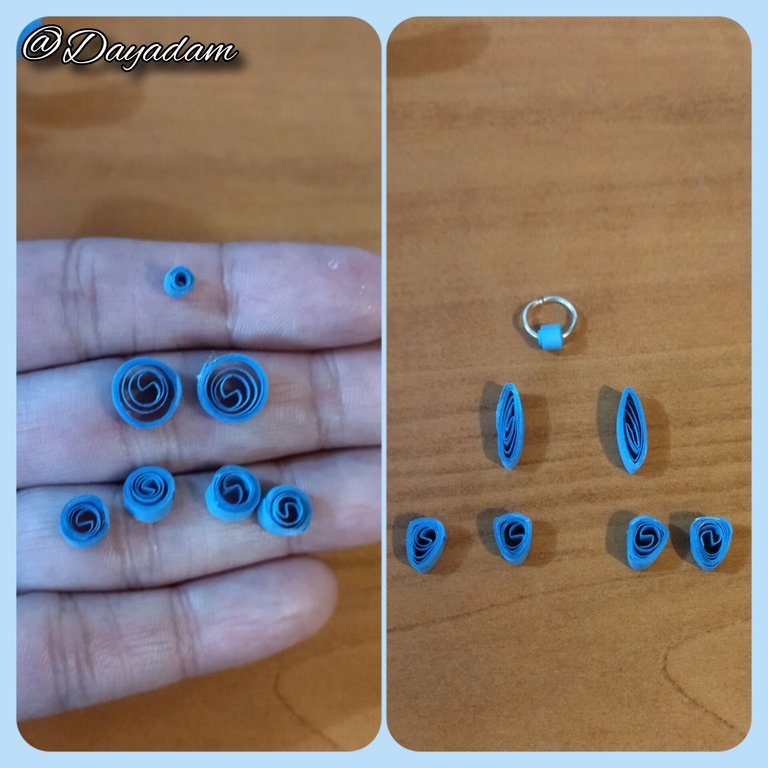
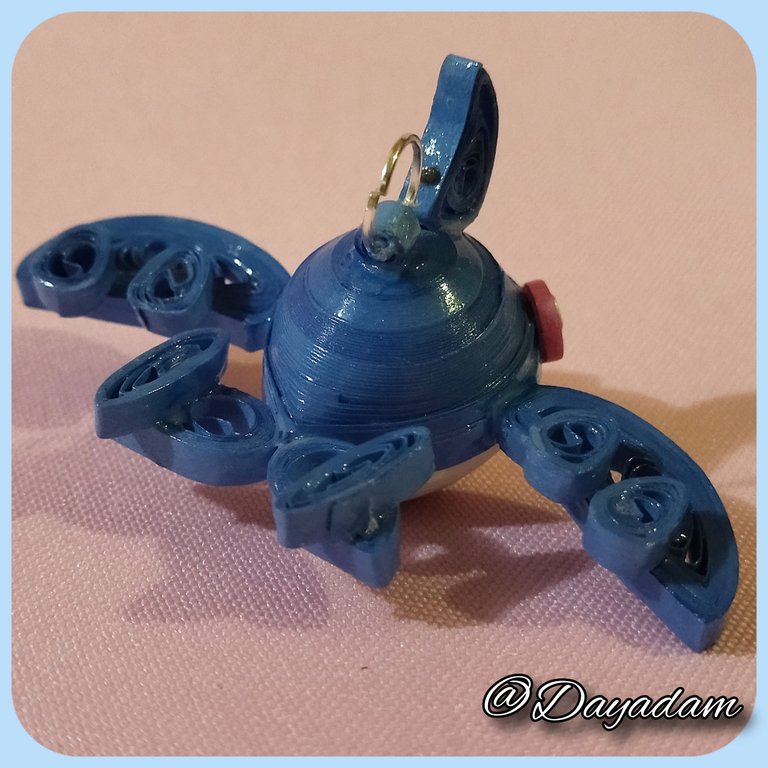
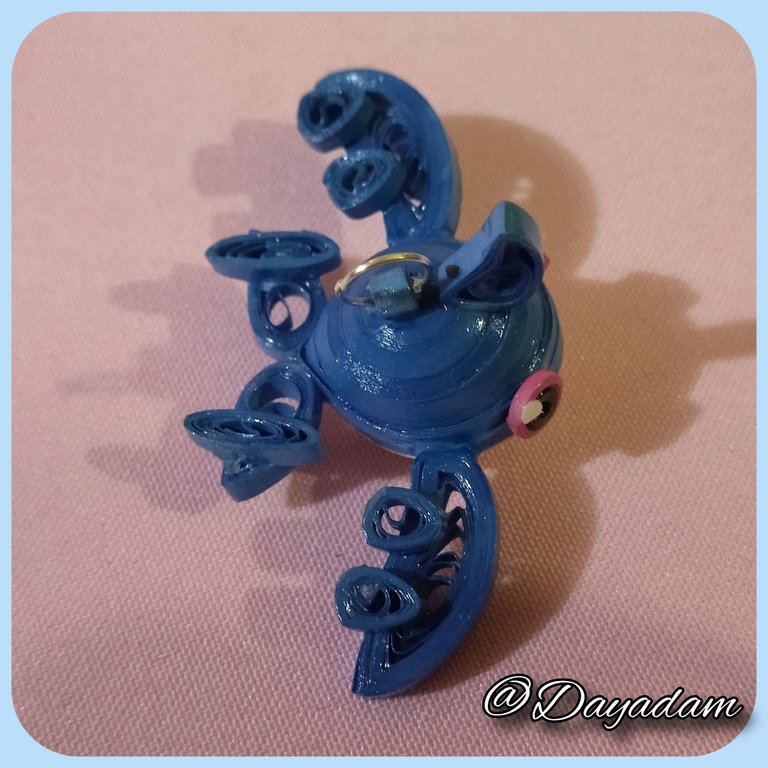
- We are going to take 5 pieces of quilling tape of different sizes, with them we are going to make 5 open circles of different sizes.
- Once the circles are ready, we will mold them to our liking to form the different fins of the whale, ready we will glue them to the piece.
- Make 6 small blue circles of 3mm wide to make the additional details of the fins, and 1 to place on the whale to make it hanging, once finished glue them to the whale.
• Vamos a tomar 5 trozos de cinta para quilling de diversas medidas, con ellas vamos a realizar 5 círculos abiertos, de diferentes tamaños.
• Listos los círculos los moldearemos a nuestro gusto para formar las diversas aletas de la ballena, listas pegaremos a la pieza.
• Realice 6 pequeños círculos de color azul de 3mm de ancho para realizar los detalles adicionales de las aletas, y 1 para colocarlo en la ballena para hacerla colgante, una vez finalizado los pegue a la ballena.
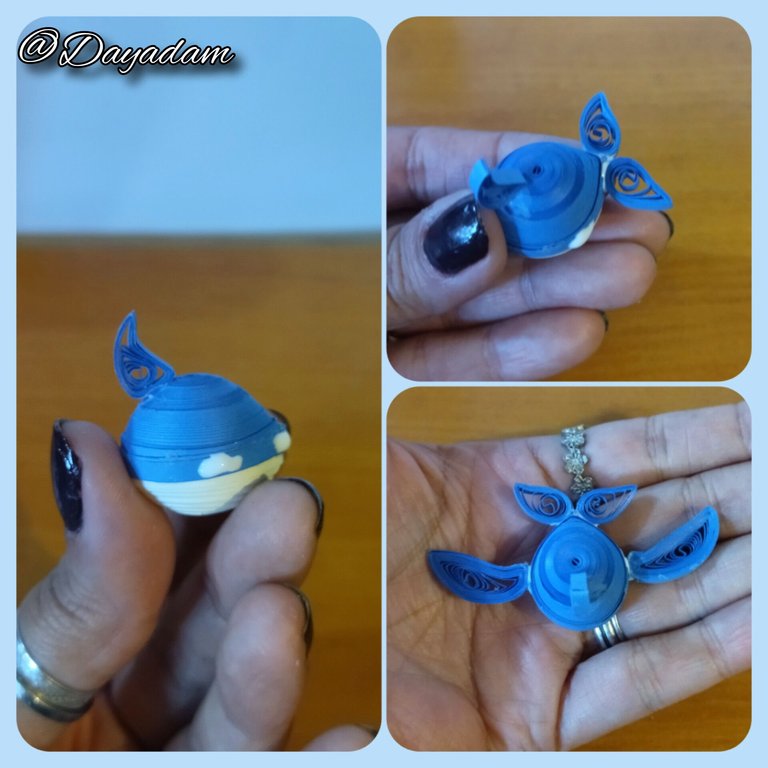
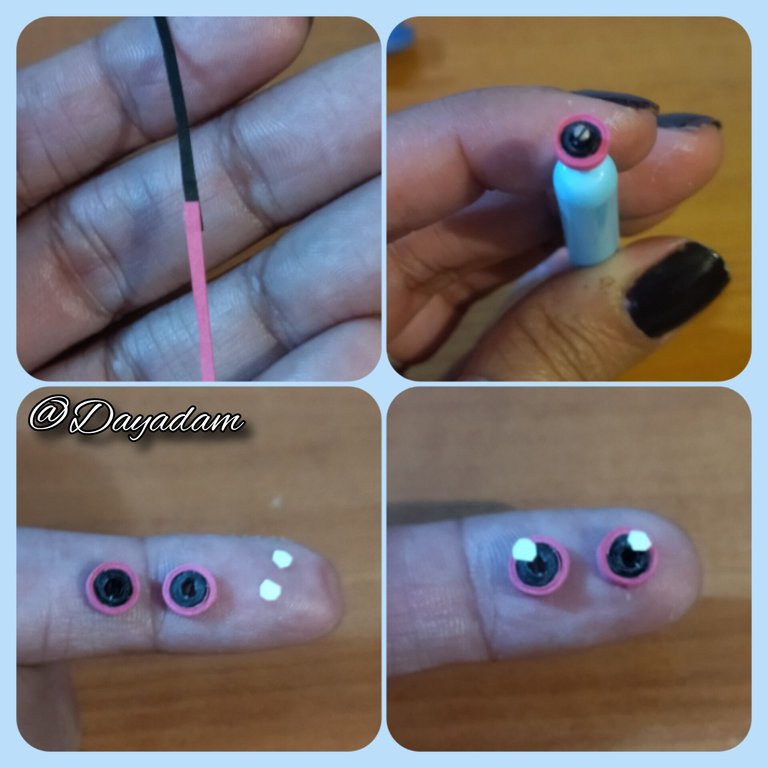
- To finish with the elaboration of the pieces we will make the eyes with 2 small pieces of 1mm wide pink and black ribbon, we will roll with the quilling needle and form a closed circle, we will cut a tiny circle of white ribbon and glue it to the pieces, we will place the eyes on the sides of the whale.
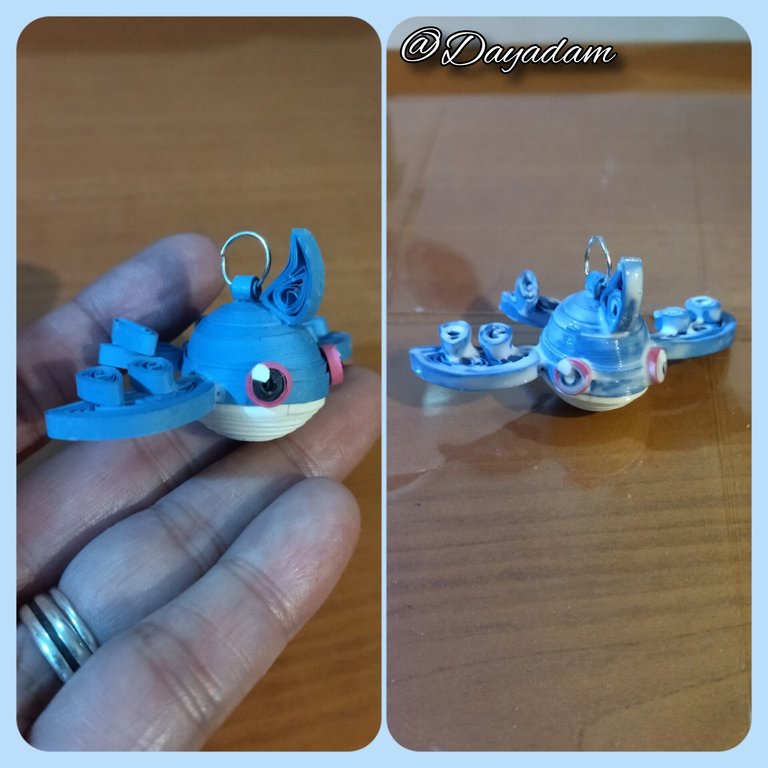
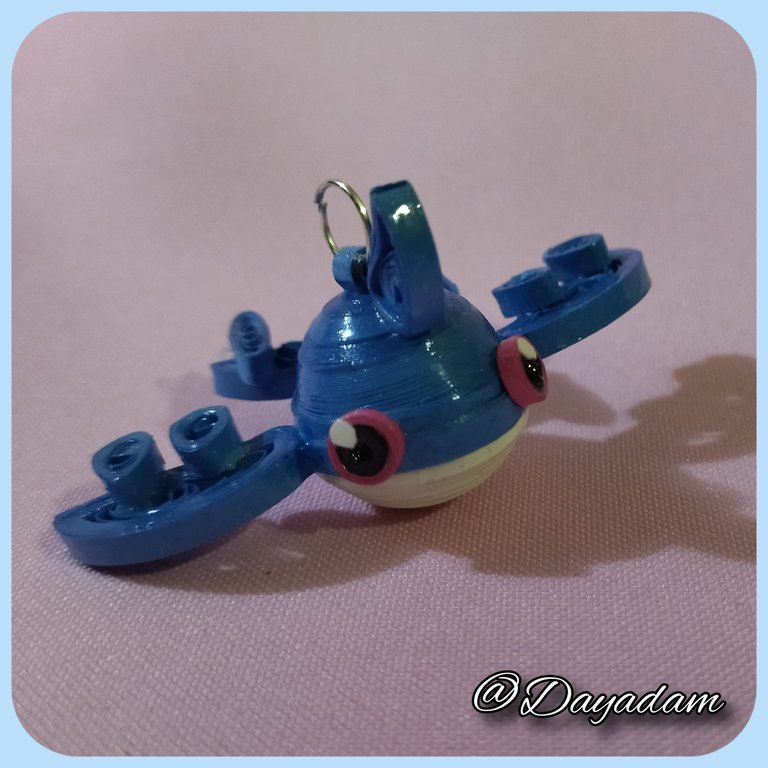
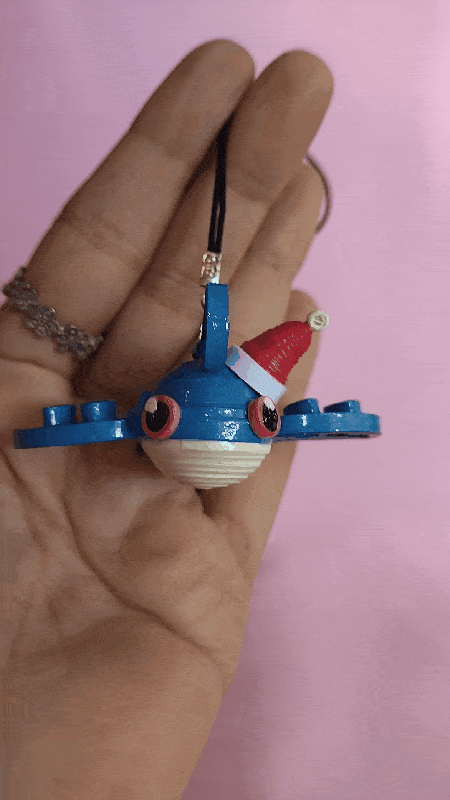
- To protect and plasticize the whale, apply a layer of extra strong white glue, let it dry very well and place a small thin black Chinese thread for hanging.
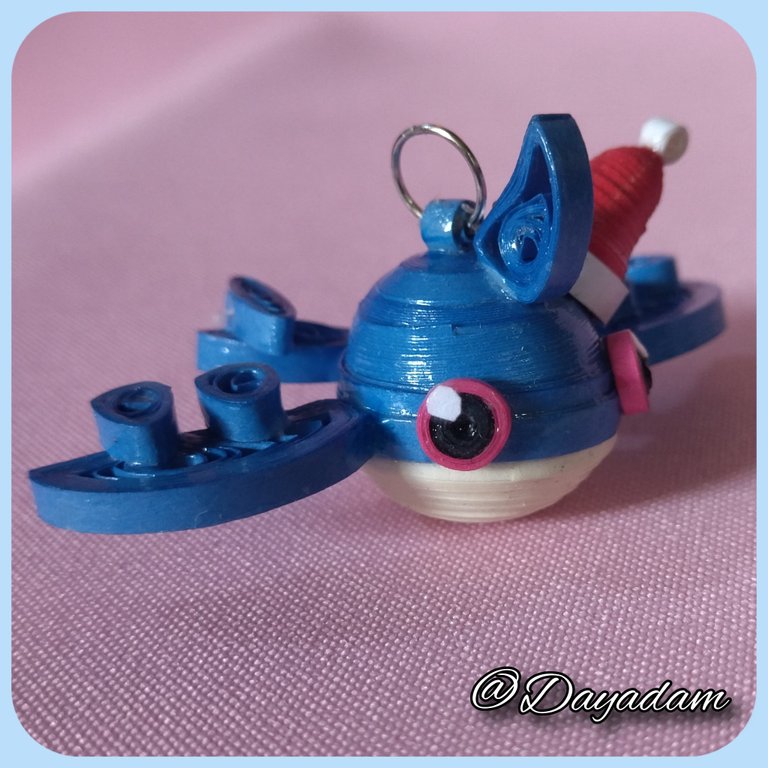
- In addition, make a small Christmas hat to put on the little whale.
b
• Para finalizar con la elaboración de piezas realizaremos los ojos con 2 pequeños trozos de cinta de 1mm de ancho color rosada y negra, enrollaremos con la aguja para quilling y formaremos un circulo cerrado, recortaremos un diminuto circulo de cinta blanca y pegaremos a las piezas, colocaremos los ojos a los lados de la ballenita.
• Para proteger y plastificar la ballena aplique una capa de pega blanca extra fuerte deje secar muy bien y coloque un pequeño hilo chino fino de color negro para colgar.
• Adicionalmente elabore un pequeño gorrito de navidad para colocas a la ballenita.


What did you think, did you like it?
I hope you did, I hope you liked my explanation, procedure and photos, I made them with love for you.
"Let out that muse that inspires you, and let your imagination fly".
Thank you all, see you next time.💙
¿Qué les pareció, les gustó?
Espero que sí, que les haya gustado mi explicación, procedimiento y fotos, los hice con mucho cariño por y para ustedes.
"Deja salir esa musa que te inspira, y deja volar tu imaginación".
Gracias a todos, nos vemos en la próxima.💙
Todas las fotos usadas en este post son de mi autoría y han sido sacadas en mi celular personal un Redmi 9T y editadas en Canva y en Inshot Banner hecho por mí en Canva Separador hecho por @saydie Water Whale Source / Fuente
Traducido con la ayuda de DeepL

Posted Using InLeo Alpha
Te quedó hermosaaaaaa. Que trabajo tan lindo. Amé el gorrito de navidad. Me encanta tu arte en quilling.
Un abrazo y bendiciones para tus manos creadoras
!VSC
!PIZZA 🍕
@chacald.dcymt has sent VSC to @dayadam
This post was rewarded with 0.1 VSC to support your work.
Join our photography communityVisual Shots
Check here to view or trade VSC Tokens
Be part of our Curation Trail
@chacald.dcymt ha enviado VSC a @dayadam
Éste post fue recompensado con 0.1 VSC para apoyar tu trabajo.
Únete a nuestra comunidad de fotografía Visual Shots
Consulte aquí para ver o intercambiar VSC Tokens
Se parte de nuestro Trail de Curación
Thanks @visualbot and @chacald.dcymt ✨
Gracias hermosa por tanto, palabras, deseos, apoyo, infinitamente por todoooo, La verdad hasta a mi me encanto el resultado quedo muy cuchi.
Amen, mil bendiciones de vuelta para ti también...
@chacald.dcymt !LADY
View or trade
LOHtokens.@dayadam, you successfully shared 0.1000 LOH with @chacald.dcymt and you earned 0.1000 LOH as tips. (2/3 calls)
Use !LADY command to share LOH! More details available in this post.
$PIZZA slices delivered:
speedtuning tipped dayadam
@dayadam(3/5) tipped @rzc24-nftbbg
rzc24-nftbbg tipped dayadam
dayadam tipped speedtuning
chacald.dcymt tipped dayadam
Thanks @pizzabot ✨
¡Felicidades! Esta publicación obtuvo upvote y fue compartido por @la-colmena, un proyecto de Curación Manual para la comunidad hispana de Hive que cuenta con el respaldo de @curie.
Si te gusta el trabajo que hacemos, te invitamos a darle tu voto a este comentario y a votar como testigo por La Colmena.
Si quieres saber más sobre nuestro proyecto, te invitamos a acompañarnos en nuestro servidor de Discord.
Gracias por el apoyo @la-colmena ✨
Es una gran pieza de arte, un gusto disfrutar de tu talento.
!discovery 45
Ainssss tan lindo @gaboamc2393. Gracias por tus palabras y el apoyo 💙
!LUV
@dayadam sent you LUV 🙂 (1/1)
Made with LUV by crrdlx
This post was shared and voted inside the discord by the curators team of discovery-it
Join our Community and follow our Curation Trail
Discovery-it is also a Witness, vote for us here
Delegate to us for passive income. Check our 80% fee-back Program
Thanks @discovery-it and @gaboamc2393 ✨
https://inleo.io/threads/dayadam/re-dayadam-a5jmqmzq
The rewards earned on this comment will go directly to the people ( dayadam ) sharing the post on LeoThreads,LikeTu,dBuzz.
Thanks @poshthreads ✨
This is another level of art, I didn't know the technique but I loved the result. It would be nice if you could make a video tutorial of the technique as such to learn it and teach it to my children, although I don't know if you already have it but I would like it.
Thank you very much for your words, I am very happy that you liked my creation in this technique, I invite you to visit my humble blog, where you will get much more.
The videos will be a future project because for now I don't have enough resources to do it, but God willing I will do it very soon...
Success, and thank you very much for appreciating my work @cjlugo ✨
Desconocía esta técnica, y me encanta porque mi hijo pequeño está haciendo cosas similares pero con tiras de papel común.
Gracias por compartirlo, indagaré un poco más para ayudar a mi hijo a incursionar en ella, porque realmente le encanta.
Hola bella. Que bueno que te haya interesado la técnica por tu bebe, en mi blog puedes ver los diversos trabajos con ella que he venido mostrando desde hace casi dos años, hay muchos tutoriales que puedes visualizar con el.
Y en realidad son tiras de papel común, pasa que en su momento compre ya cortadas, pero hoy día me faltan muchos colores y compro cartulina de construcción, y las pico de la medida que desee con una guillotina o también con una tijera, de echo puedes utilizar el papel que desees, yo he realizado hasta perlas, o trabajos con papel de revista.
Cualquier duda por aqui estoy a la orden para lo que desees. Siempre seras bienvenida a mi humilde blog.
Gracias por pasar por tu comentario hacia mi trabajo.
Bendiciones @mamaemigrante 🌈
Wow! That keychain was really cute and adorable. That Santa hat makes it just right for the season.
Ainsssss thank you so much what a lovely comment. I'm so glad you liked it. Thanks for stopping by. Have a wonderful day @saydie 🌈
May you have a wonderful day too.
Very cool little figurine <3
Got to keep claiming the Zing tokens daily, the christmas special is only once a year :D
Thanks for stopping by. I'm so glad you liked it. Gotta keep reclaiming those precious Christmas gifts. Have a wonderful day.
This is amazing! :D
Thank you very much, for me it is an honor your comment Mr. @acidyo, and that you liked the work that I did with so much affection. I hope little by little, I will be showing much more.
Many blessings, and a thousand successes in your project... ✨
Oops, voted this comment with the wrong account, anyway, thanks! ^^
Oh God. Thank you very much to you! 😊 🐾🐱💕
Te quedo hermoso, tienes mucho talento, sigue explotando esta faceta.
Muchas gracias cariño por tus lindas palabras. Seguiré adelante mejorando mas, y trabajando lo mejor posible para uds.
Que tengas bello día... 🌈
muy bueno, esta mucho parecido, tienes mucho talento 👍👍🫣
!PIZZA
Muchísimas gracias por tus palabras, me gratifican mucho 😊
Que tengas un bello día @speedtuning 🌈
!PIZZA
sheeshhh thats pretty cool art! 😍
Thank you very much for your words. How nice.
Have a nice day. Success @julsdraws ✨
hola dayana que vaina mas arrecha ojala mi mama se inspire con tu contenido a publicar, un saludo!
Hola @joseacabrerav que placer verte por aqui visitando mi blog. Jajajaja, realmente me encanto el resultado final, hasta yo quede impresionada no me lo esperaba, como dices quedo (arrechisismo jajajaj).
Ojala tu mami se entusiasme, y si hace manualidades estoy por aqui a la orden para cualquier asesoría en cuanto a comunidades, nichos, reglas, actividades, entre otras cosas, soy colaboradora, y curadora de la comunidad de DiyHUB...
Un abrazo...
Hola Daya! oye laverdad es que creo que si tu le explicas a mi mami ella quizas te entienda mejor y se sienta apoyada,ella cree quizas que aqui no hay oportunidades para ella y a ella le gusta trabajarmanualidades, canciones y se que le daria un bienestar, tienes discord donde pueda contactarte? o twitter?
Si tengo. En mi perfil esta vinculado mi twitter escríbeme por allí. Igual seria bueno conversar antes tu y yo...
Qué increíble resultado!!!😍
Gracias Muñeca @shinfxx 🌱
That's a rare skill. Beautiful!
!BBH
!PIZZA
@dayadam! Your Content Is Awesome so I just sent 1 $BBH (Bitcoin Backed Hive) to your account on behalf of @rzc24-nftbbg. (1/1)
Thanks @bbhbot ✨
Thank you very much for the comment and the tokens. I'm glad you liked it @rzc24-nftbbg ✨
!PIZZA