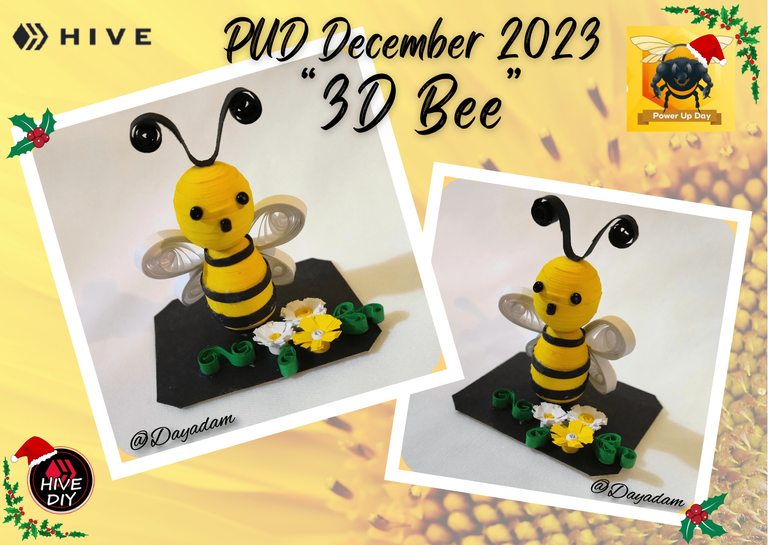
Bee in 3D // Quilling Technique // PUD December 2023 [Eng-Esp]
Hello everyone... ⚡️🐝⚡️💕
Hello to my dear Hivers and the dear community of artists #HiveDIY, as always very pleased and excited to be here again, showing you my work made with love and especially for you.
Finally begins the last month of the year, and we are very close to conclude a year full of experiences in my beautiful world of Hive, so let's celebrate in style our last #PowerUpDay (PUD) of this 2023.
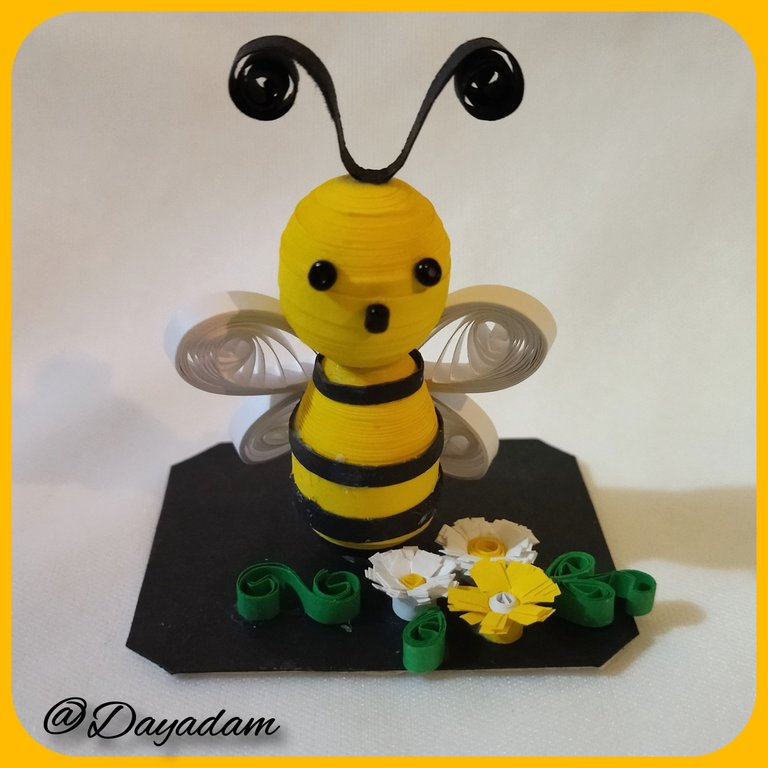
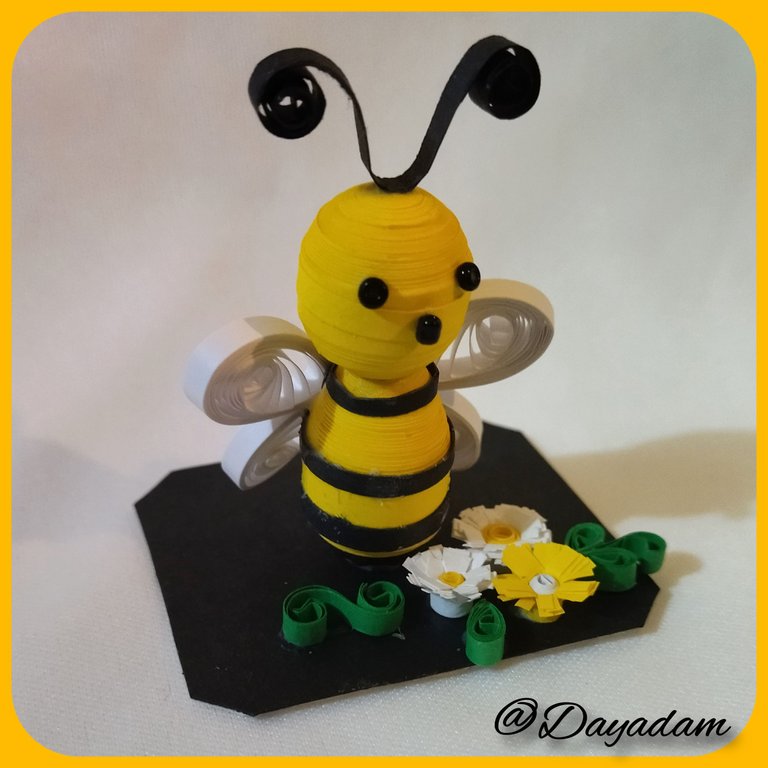
It has become a habit, not only to make my respective PowerUp, but also to make something to commemorate this special day, and today I bring you again a 3D decorative bee model in the quilling technique.
I make you a cordial invitation, to participate in the PUD every time you can and if possible do it month by month, this way you make your HP grow and so you go hand in hand so that our wonderful blockchain becomes stronger every day.
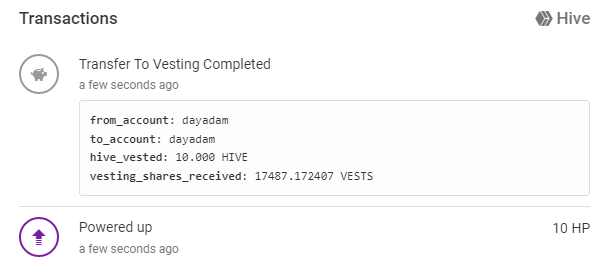
Below is an image of my respective PowerUp with a small contribution of 10 Hive.
Hoping you like it, I leave you my creative process:
Let's start:😃

Hola a Todos... ⚡️🐝⚡️💕
Hola a mis queridos Hivers y a la querida comunidad de artistas #HiveDIY, como siempre muy complacida y emocionada de encontrarme por acá nuevamente, mostrándole mi trabajo hecho con mucho amor y especialmente para ustedes.
Finalmente comienza el ultimo mes del año, faltando muy poco para concluir un año lleno de experiencias en este mi mundo bonito de Hive, asi que celebremos por todo lo alto nuestro ultimo #PowerUpDay (PUD) de este 2023.
Ya se me hizo una total costumbre, no solo realizar mi respectivo PowerUp, si no también llevar a cabo algo para conmemorar este día especial, y pues hoy nuevamente les traigo un modelo de abejita en 3D decorativo en la técnica de quilling.
Les hago una cordial invitación, a que participen en el PUD cada vez que puedan y si es posible lo hagan mes a mes, de esta manera haces de que tu HP crezca y así vas de la mano para que nuestra maravillosa blockchain se fortalezca cada día más.
Más abajo les dejo una imagen de mi respectivo PowerUp con un pequeño aporte de 10 Hive.
Esperando que sea de su agrado, les dejo mi proceso creativo:
Comencemos:😃

• Cintas de quilling de amarillo, negro y blanco.
• Cartón.
• Aguja para quilling.
• Plantilla para moldear círculos.
• Mostacillas color negro.
• Pega blanca extra fuerte (de carpintería).
• Tijera.
• Pincel.
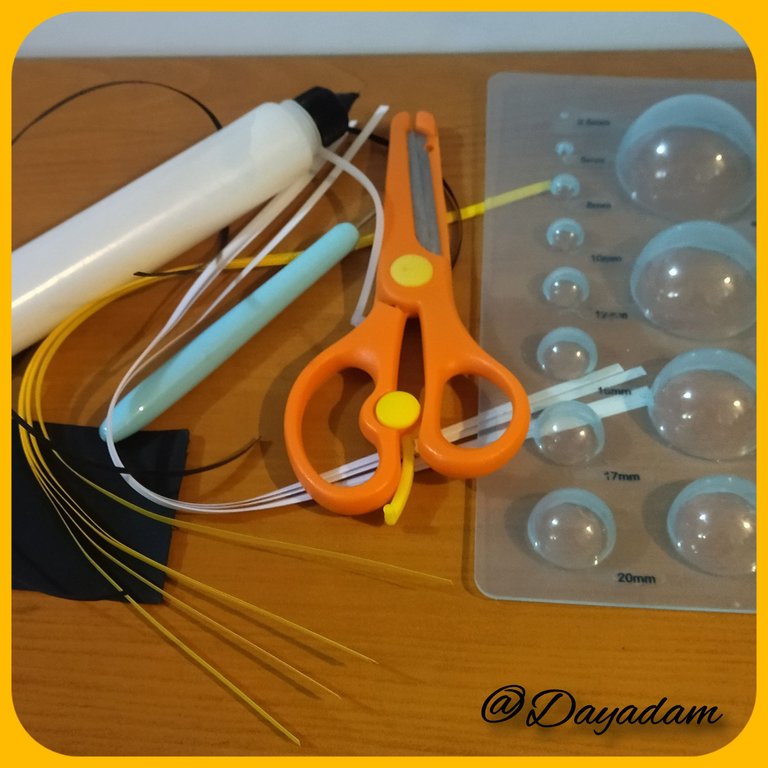
- Yellow, black and white quilling ribbons.
- Cardboard.
- Quilling needle.
- Template to shape circles.
- Black beads.
- Extra strong white glue (carpentry glue).
- Scissors.
- Paintbrush.

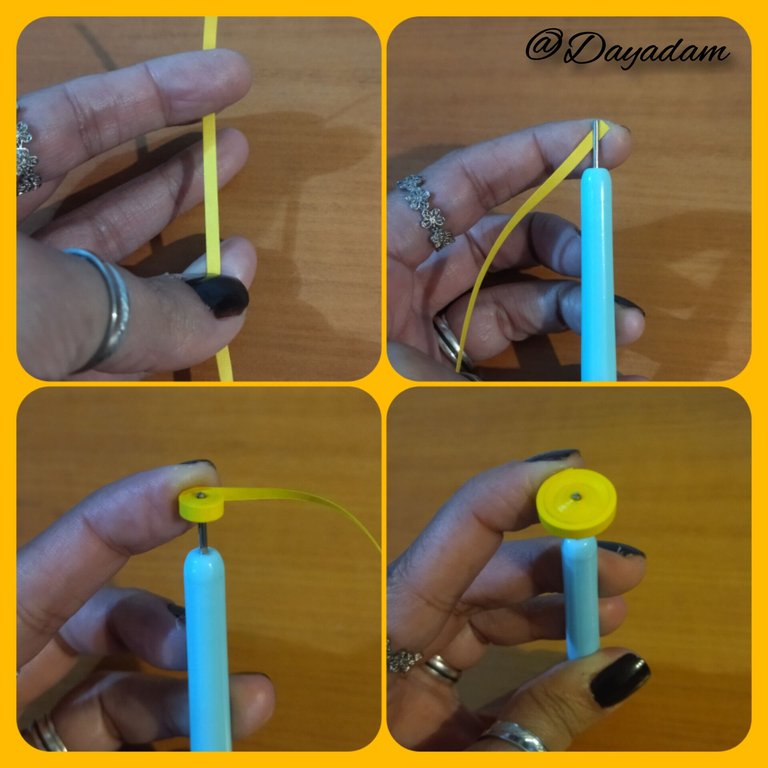
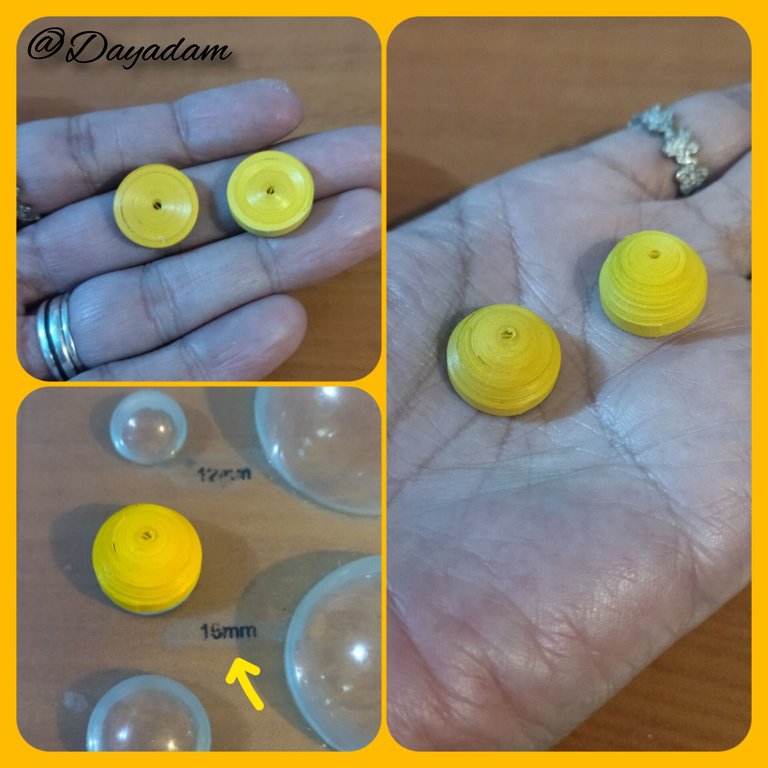
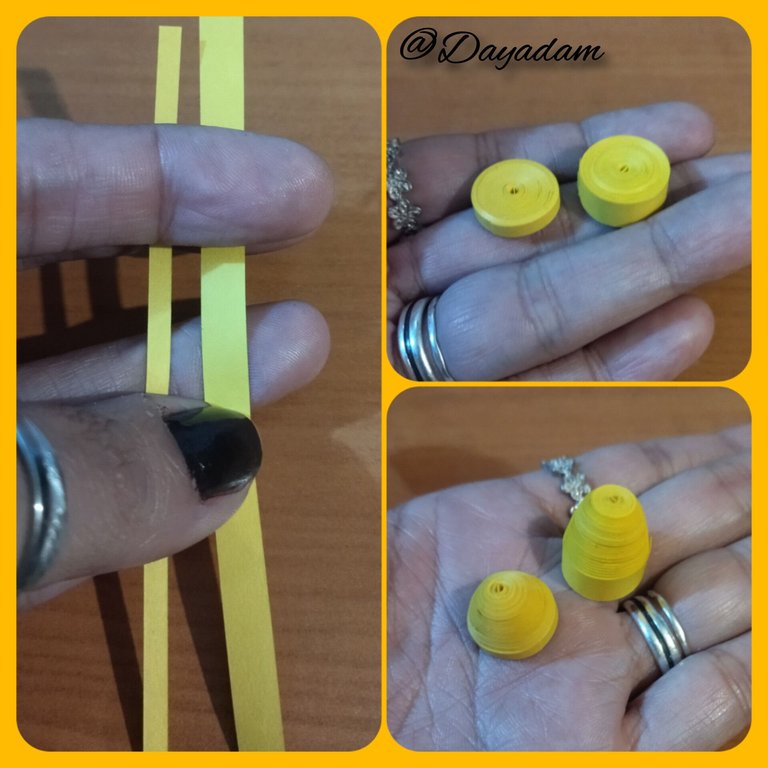
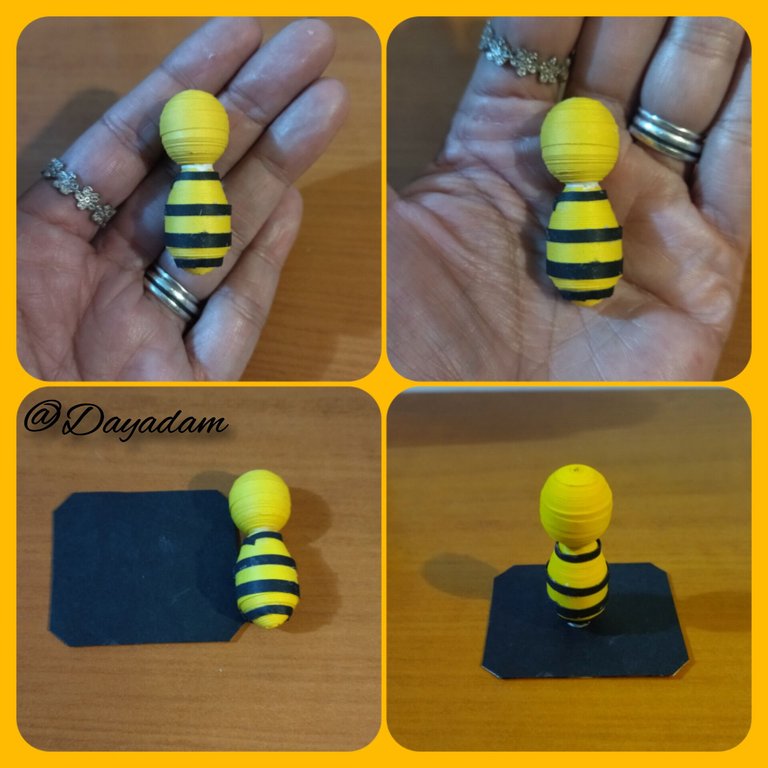
- We start by taking yellow quilling tape 3mm wide x 150cms long, we roll with the quilling needle until we reach the end of the tape, we seal with extra strong white glue, we take it out of the needle, we will obtain a closed circle. For each bee we are going to make we will need two circles like this one.
- We are going to mold the circles, placing them in the circle template in the 15mm size, once molded we take them out of the template and on the inside we add a little glue, let it dry to prevent the pieces from moving.
- We are going to take a small piece of yellow quilling tape, 3mm wide to join the pieces we made, we join both pieces passing the tape through the middle with extra strong white glue (reserve).

• Comenzamos tomando cinta para quilling de color amarilla de 3mm de ancho x 150cms de largo, enrollamos con la aguja para quilling hasta llegar al final de la cinta, sellamos con pega blanca extra fuerte, sacamos de la aguja, obtendremos un círculo cerrado. Por cada abejita que vayamos a realizar necesitaremos dos círculos como este.
• Vamos a moldear los círculos, colocando en la plantilla de círculos en la medida 15mm, una vez moldeada sacamos de la plantilla y en la parte de adentro agregamos un poco de pega, dejamos secar para evitar que se muevan las piezas.
• Vamos a tomar un pequeño trozo de cinta de quilling amarillo, de 3mm de ancho para unir las piezas que elaboramos, acoplamos ambas pasando la cinta por el medio con pega blanca extra fuerte (reservamos).
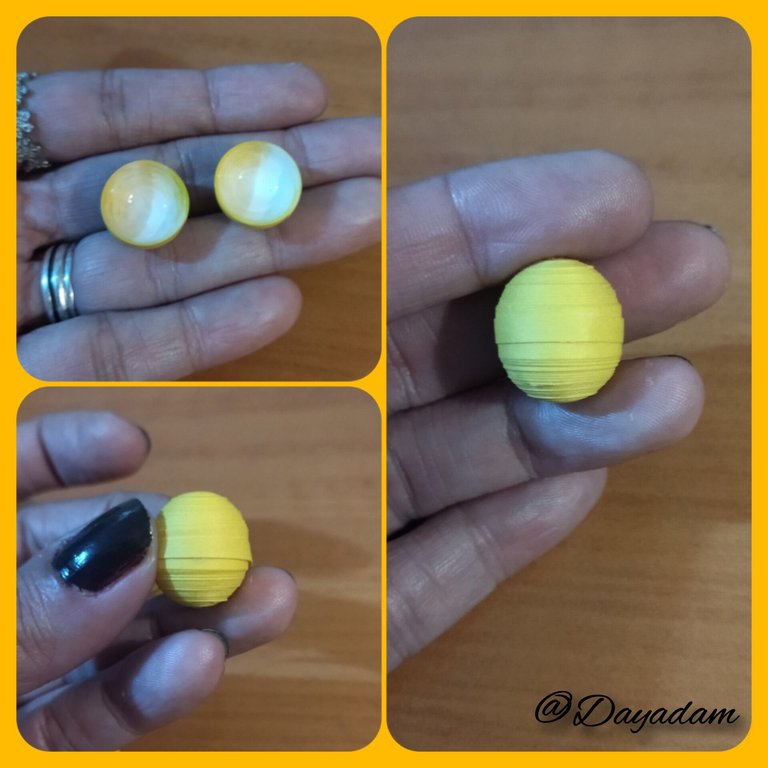
- We are going to take a yellow ribbon of 6mm wide and another one of 3mm wide x 140cms long, under the same parameters we will make two closed circles.
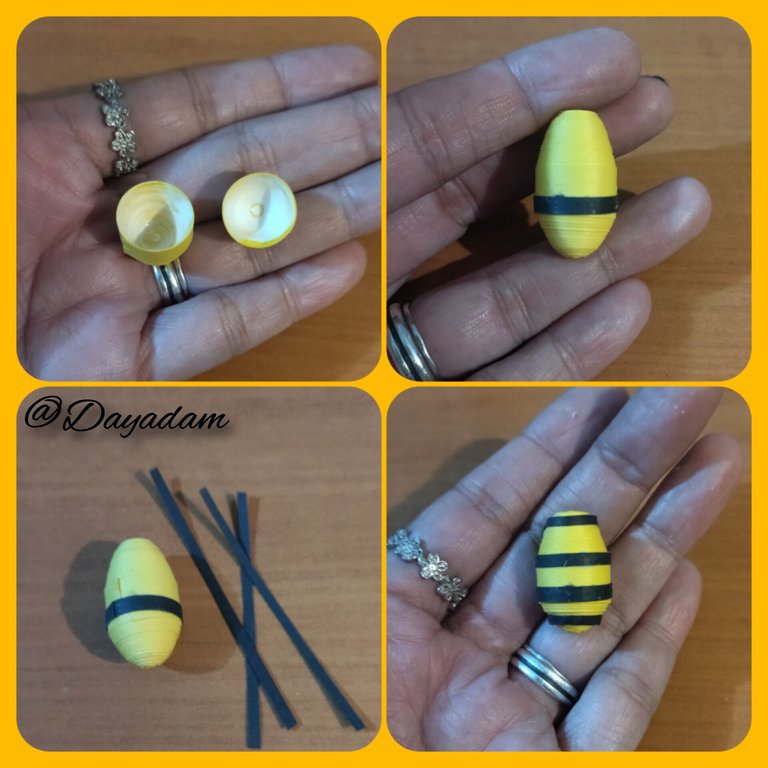
- The 3mm circle we will mold it as well as the previous one in the mold for circles although it should not be so rounded but rather a little pointy that we will do it with our fingers, and the 6mm circle we will mold it so that it is higher like a cone. We will apply glue on its inner part so that it does not deform, and we will join it with a black ribbon.
- We will take other pieces of black ribbon and we will pass them as we like around the body of the bee, we will join the head and the body.
- We will glue the piece of a piece of cardboard, and let it dry very well.
• Vamos a tomar una cinta amarilla de 6mm de ancho y otra de 3mm de ancho x 140cms de largo, bajo los mismos parámetros anteriores realizaremos dos círculos cerrados.
• El circulo de 3mm lo moldearemos tan cual como el anterior en el molde para círculos aunque esta no debe quedar tan redondeada si no mas bien un poco puntiagudo eso lo haremos con los dedos, y la de 6mm la moldearemos de manera que quede mas alta como un cono. Aplicaremos pega en su parte interna para que no se deforme, y uniremos con una cinta negra.
• Tomaremos otros trozos de cinta negra y los pasaremos a nuestro gusto alrededor del cuerpo de la abeja, uniremos la cabeza y el cuerpo.
• Pegaremos la pieza de un trozo de cartón, y dejamos secar muy bien.
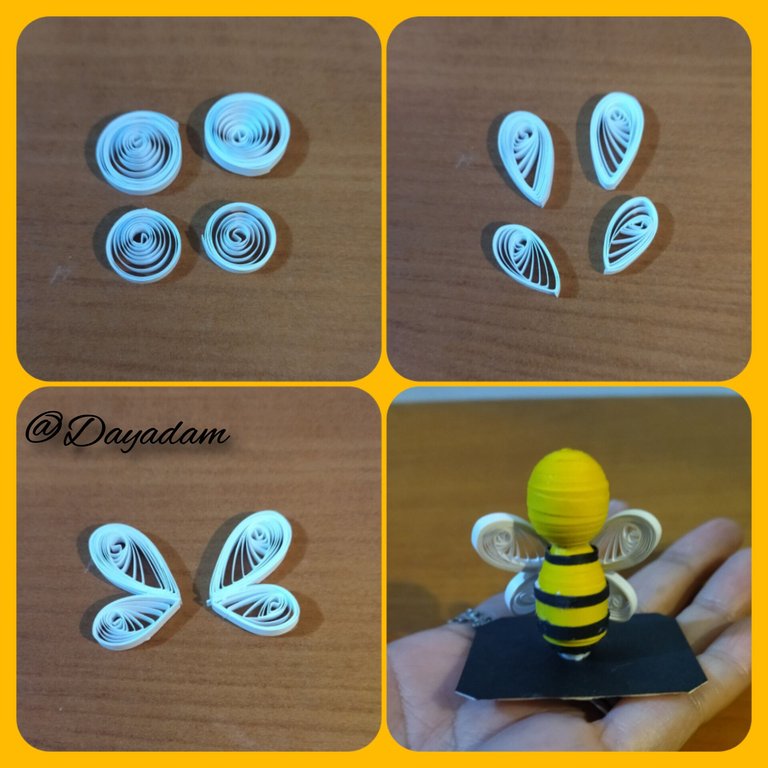
- Let's proceed to make the wings, we will take 3mm wide white quilling tape, with it we will make 4 open circles, 2 medium and two smaller ones, we will mold them in the shape of a leaf, we will join a big one and a small one, once ready we will glue them on the back of the bee's body.
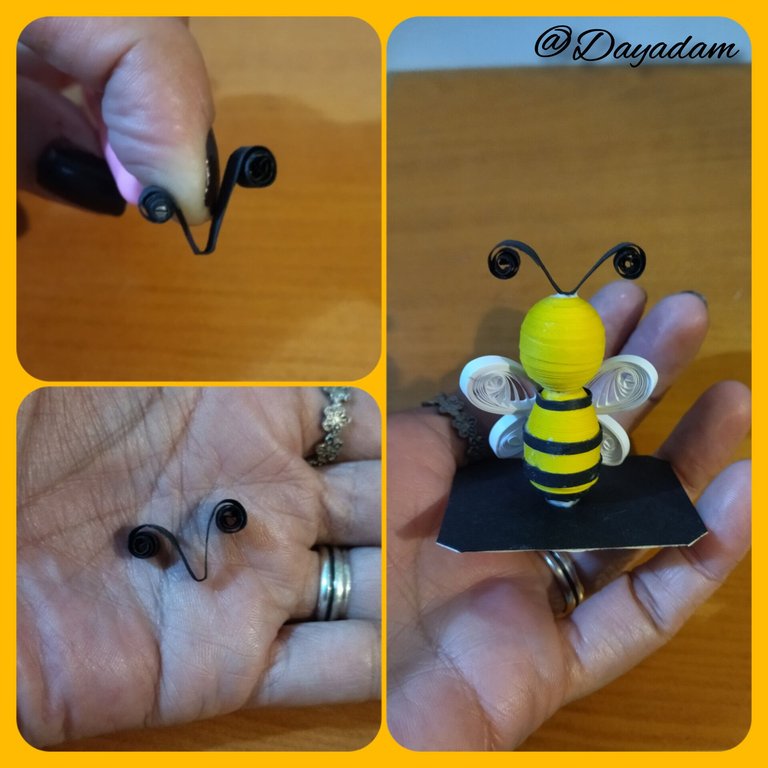
- Make the antennae with a piece of black ribbon 4mm wide, fold it in half and mold it into a spiral shape at both ends, glue it to the head of the bee.
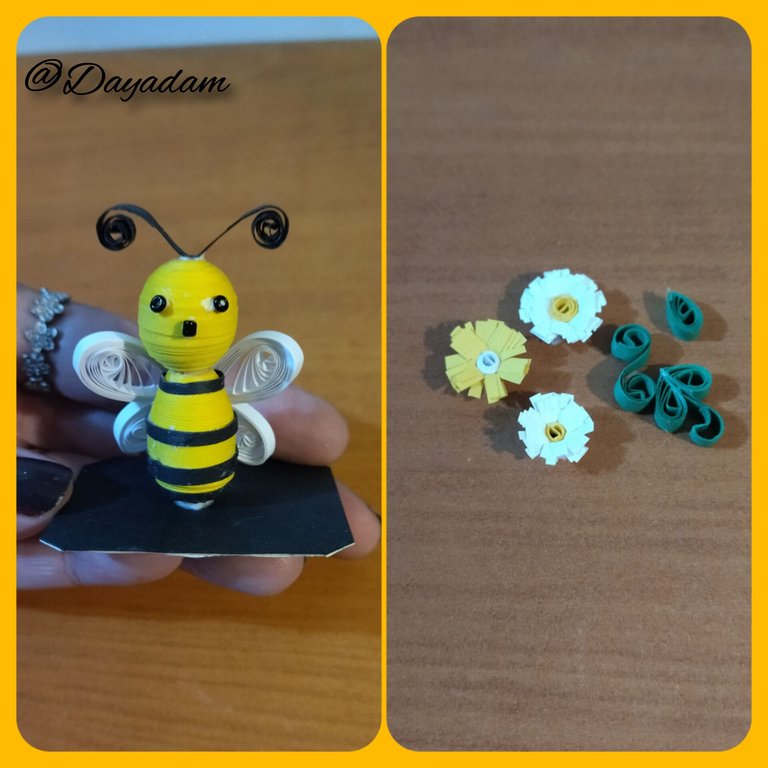
- Place some small black beads on the face to resemble eyes and nose.
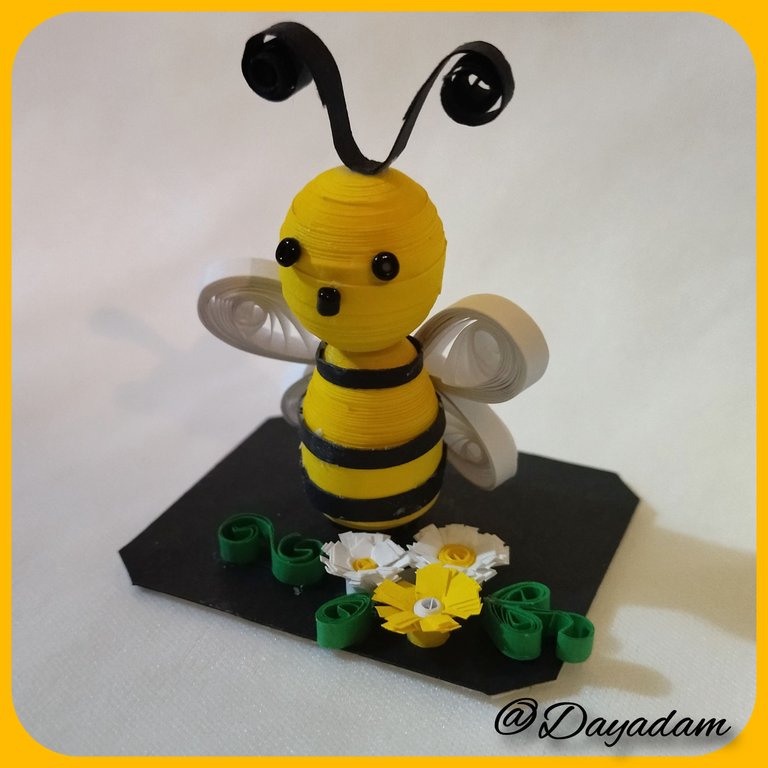
- To finish, decorate with some flowers and leaves that I made previously, to make it more colorful.
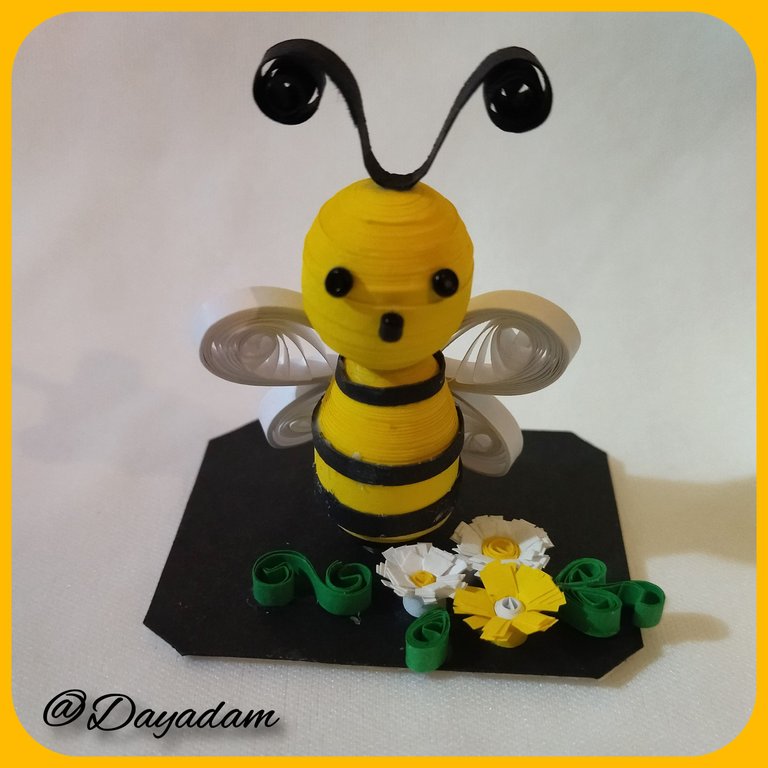
This is the end of this new bee that I made with much affection, to commemorate our PUD of this last month of 2023 ⚡️🐝⚡️
• Procedamos a hacer las alas, tomaremos cinta para quilling de color blanco de 3mm de ancho, con ella haremos 4 círculos abiertos, 2 medianos y dos más pequeños, los moldearemos en forma de hoja, uniremos uno grande y uno pequeño, una vez listos los pegaremos en la parte de atrás del cuerpo de la abejita.
• Realice las antenas con un trozo de cinta negra de 4mm de ancho la cual doble a la mitad y moldee en forma de espiral en las dos puntas, pegue a la cabeza de la abeja.
• Coloque unos pequeños canutillos negros en la cara para asemejar ojos y nariz.
• Para finalizar adorne con algunas flores y hojas que hice previamente, para dar mayor vistosidad.
De esta manera esta finalizada esta nueva abejita que realice con mucho cariño, para conmemorar nuestro PUD de este ultimo mes del 2023 ⚡️🐝⚡️


What did you think, did you like it?
I hope you did, I hope you liked my explanation, procedure and photos, I made them with love for you.
"Let out that muse that inspires you, and let your imagination fly".
Thank you all, see you next time. Happy PowerUpDay ⚡️🐝⚡️
¿Que les pareció, les gustó?
Espero que sí, que les haya gustado mi explicación, procedimiento y fotos, los hice con mucho cariño por y para ustedes.
"Deja salir esa musa que te inspira, y deja volar tu imaginación".
Gracias a todos, nos vemos en la próxima. Feliz PowerUpDay ⚡️🐝⚡️
Todas las fotos usadas en este post son de mi autoría y han sido sacadas en mi celular personal un Redmi 9T, editadas en InShot y Canva Banner y separador hecho por mí en Canva Traducido con la ayuda de DeepL

The cutest HPUD Power Up Day bee ever created! @dayadam
🐝📈💰📈🐝
Thank you friend @ninahaskin for your beautiful comment. A very tender little bee especially for PUD day ⚡️🐝⚡️💕
https://reddit.com/r/hivevlog/comments/187y5ny/bee_in_3d_quilling_technique_pud_december_2023/
The rewards earned on this comment will go directly to the people( @leticiapereira ) sharing the post on Reddit as long as they are registered with @poshtoken. Sign up at https://hiveposh.com.
Thanks @redditposh ⚡️🐝⚡️💕
Que bello amiga! Me encanta cómo celebras el PUD! Es un ejemplo a seguir.
Dios te bendiga.
Gracias hermosa @equipodelta. Mientras que pueda seguiré celebrando de esta manera.
Bendiciones infinitas para ti... 💕⚡️🐝⚡️💕
https://twitter.com/Chacald1/status/1730393734443880872
Gracias por el apoyo mi bella. Bendiciones hermosa @chacald.dcymt ⚡️🐝⚡️💕
https://inleo.io/threads/dayadam/re-dayadam-2ri1y5s3u
The rewards earned on this comment will go directly to the people ( dayadam ) sharing the post on LeoThreads,LikeTu,dBuzz.
Thanks @redditposh ⚡️🐝⚡️💕
¿Sabes quien es? ¡Laaa abejitaaa Dayaaaa!
😍 Ainssss, gracias preciosa @yenmendt ⚡️🐝⚡️💕
Es un hermoso trabajo
Gracias bella ⚡️🐝⚡️💕
Que hermosa te quedó amiga , Exitos !!
Gracias mi linda. Amen ⚡️🐝⚡️💕
What a seeet power up bee 🐝
Happy pudding
!LADY
View or trade
LOHtokens.@brittandjosie, you successfully shared 0.1000 LOH with @dayadam and you earned 0.1000 LOH as tips. (3/16 calls)
Use !LADY command to share LOH! More details available in this post.
Thanks @ladytoken ⚡️🐝⚡️💕
Thank you beautiful friend for your beautiful comment. A little bee especially for PUD day, as long as I can I will do it ⚡️🐝⚡️💕
!HUG @brittandjosie
!LADY
View or trade
LOHtokens.@dayadam, you successfully shared 0.1000 LOH with @brittandjosie and you earned 0.1000 LOH as tips. (1/3 calls)
Use !LADY command to share LOH! More details available in this post.
I sent 1.0 HUG on behalf of @dayadam.
(1/3)
Que belleza de abeja amiga esta precioso como siempre, me encanta los detalles con las flores, muy creativo 💫
Gracias mi linda @yolimarag, espero seguir celebrando este gran día de esta manera con abejitas especiales ⚡️🐝⚡️💕
Muy tierna! Me encanta
Gracias linda, me alegra que te gustara ⚡️🐝⚡️💕
Siiiii, me encantó..excelente trabajo amiga, hermoso e impecable con tu técnica!
Muchísimas gracias cariño, me complace mucho que te gustara mi trabajo y tus palabras. Saluditos @tesoro4 ⚡️🐝⚡️💕
Las manos más bendecidas que he visto 😍😍 quedó muy hermosa
Amen amen querido amigo @fixie ⚡️🐝⚡️💕
!HUG
I sent 1.0 HUG on behalf of @dayadam.
(2/3)
https://twitter.com/hivediy47901/status/1730577235977871867
Gracias por el apoyo @hive-130560 ⚡️🐝⚡️💕
Such a cute bee for a PUD. I like it. !DIY
Thank you sweetie for your beautiful comment. A little bee especially for PUD day. ⚡️🐝⚡️💕
Hugs
You can query your personal balance by
!DIYSTATSThanks @diyhub ⚡️🐝⚡️💕
Ya es inolvidable el Power Up de todos los meses, tambien se me hizo costumbre aunque puede que en algun momento me olvide por distraida jaja
Hermosa abejita con sus florcitas, esta divina 😍
Gracias cariño. Una abejita especialmente para el día del PUD. Espero seguir creando y celebrando el día de esta manera...
Abrazos ⚡️🐝⚡️💕
Congratulations @dayadam! You received a personal badge!
Participate in the next Power Up Day and try to power-up more HIVE to get a bigger Power-Bee.
May the Hive Power be with you!
You can view your badges on your board and compare yourself to others in the Ranking
Check out our last posts:
Gracias @hivebuzz ⚡️🐝⚡️💕
De nada @dayadam 😊👍 ¡Le deseamos un buen día! 🌹🌹🌹
Una cuchitura esas flores 🐝🍯
Gracias muñeca ⚡️🐝⚡️💕