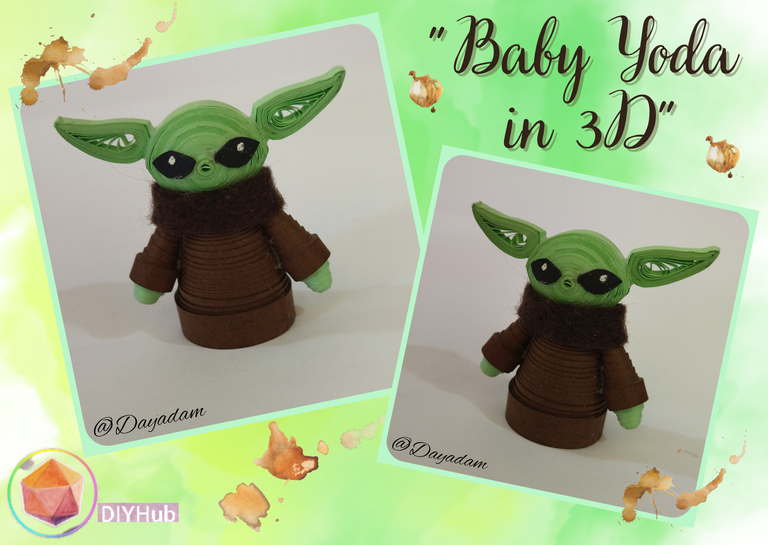
Baby Yoda in 3D / Quilling Technique [Eng-Esp]
Hello everyone... 🐱🐾💕
Hello to my dear Hivers and the dear community of artists #DIYHub, as always very pleased and excited to be here again, showing you my work made with love and especially for you.
For today I wanted to bring you a small 3D decorative Baby Yoda made in the quilling technique, the truth was a project that I had not planned to do, but as it happens in this creative world suddenly came to my mind this little character from the famous Star Wars saga, and I did not hesitate to carry it out to share with you.
I hope you like the work, join me in this creative process.
Let's begin:😃

Hola a todos... 🐱🐾💕
Hola a mis queridos Hivers y a la querida comunidad de artistas #DIYHub, como siempre muy complacida y emocionada de encontrarme por acá nuevamente, mostrándole mi trabajo hecho con mucho amor y especialmente para ustedes.
Para hoy quise traerles un pequeño Baby Yoda decorativo en 3D elaborado en la técnica de quilling, la verdad fue un proyecto que no tenía previsto realizar, pero así como pasa en este mundo creativo repentinamente me vino a la cabeza este pequeño personaje de la conocida saga de Star Wars, y no dude en llevarla a cabo para compartir con ustedes.
Espero sea de su agrado el trabajo, acompáñenme en este proceso creativo.
Comencemos:😃

• Cintas de quilling de diversos mm de ancho verde, marrón, negra.
• Cartulina negra, roja, marrón, amarilla.
• Trocito de tela o fieltro marrón.
• Aguja para quilling.
• Lápiz de color blanco.
• Pega blanca extra fuerte (de carpintería).
• Tijera.
• Pintura blanca al frio.
• Palito de altura.
• Pincel.
• Alicate punta fina.
- Quilling ribbons of different widths of green, brown, black.
- Black, red, brown, brown, yellow cardboard.
- Piece of fabric or brown felt.
- Quilling needle.
- White pencil.
- Extra strong white glue (carpentry glue).
- Scissors.
- White cold paint.
- Height stick.
- Paintbrush.
- Fine-nosed pliers.

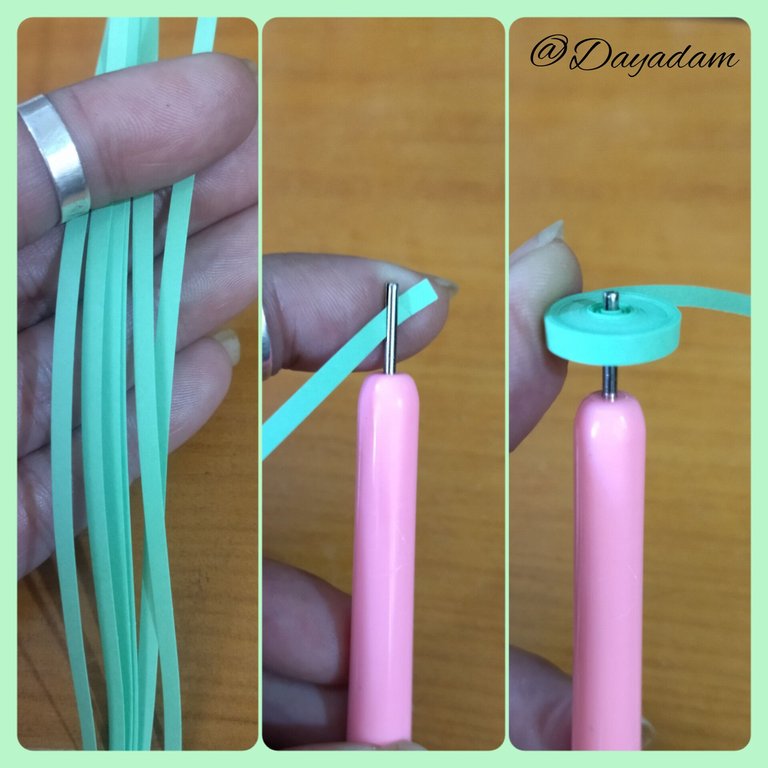
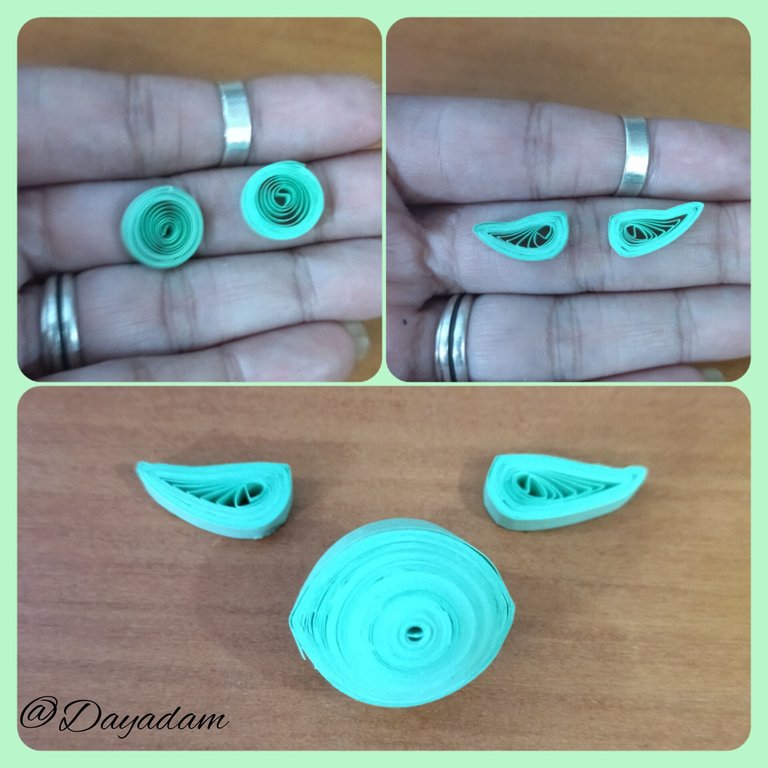
- We start by taking quilling tape of approximately 5mm wide light green color x 150cms long, we roll with the help of the quilling needle until we reach the end of the tape, we remove the needle and seal with extra strong white glue, we will obtain a closed circle, we will need 1 more like it. For each doll we want to make we will repeat the same process.
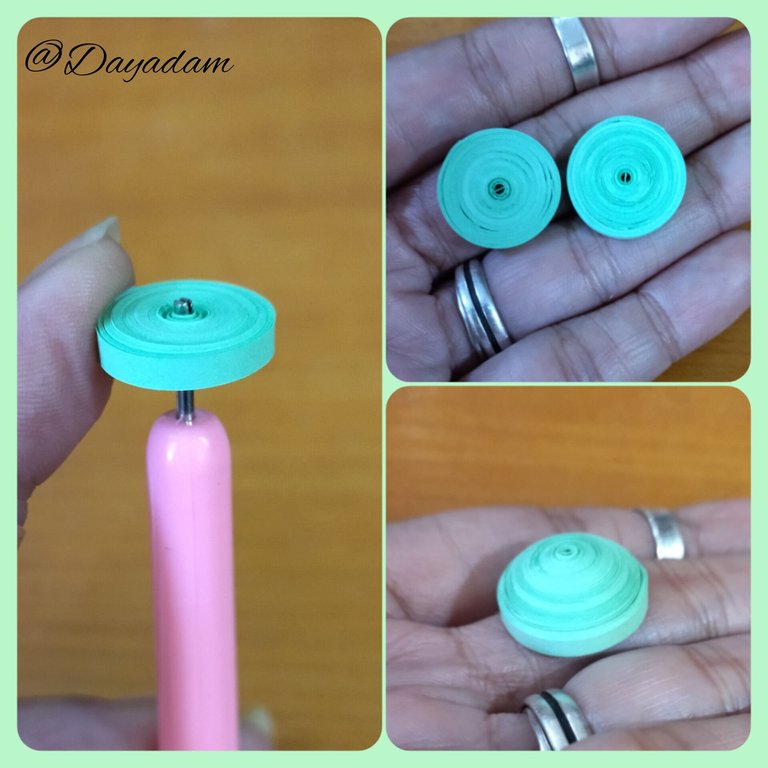
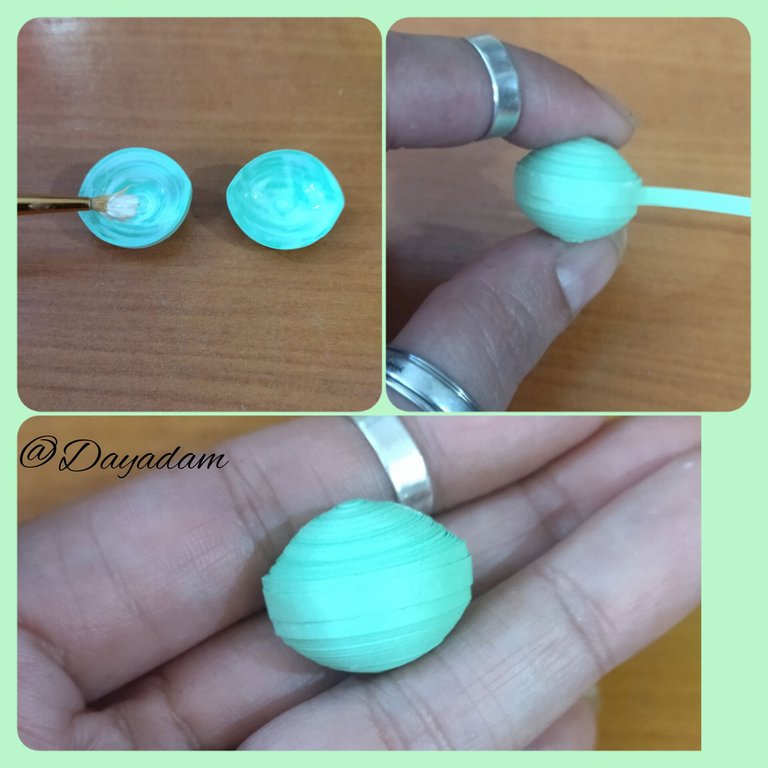
- We will mold the circles, with the help of our fingers we will push outwards and then we will make a kind of oval shape until we get the necessary shape for the baby yoda's head, at the end we will add some glue on the inside and let it dry to prevent the pieces from moving.
- We are going to take a piece of green quilling tape, 3mm wide to join the pieces we made, we couple both passing the tape through the middle with extra strong white glue.

• Comenzamos tomando cinta para quilling de aproximadamente 5mm de ancho color verde claro x 150cms de largo, enrollamos con la ayuda de la aguja para quilling hasta llegar al final de la cinta, sacamos de la aguja y sellamos con pega blanca extra fuerte, obtendremos un círculo cerrado, vamos a necesitar 1 más igual. Por cada muñeco que queramos hacer vamos a repetir el mismo proceso.
• Vamos a moldear los círculos, con la ayuda de los dedos vamos a empujar hacia afuera y luego le haremos una especie de forma ovalada hasta conseguir la forma necesaria para la cabeza del baby yoda, al finalizar en la parte de adentro agregamos un poco de pega y dejamos secar para evitar que se muevan las piezas.
• Vamos a tomar un trozo de cinta de quilling verde, de 3mm de ancho para unir las piezas que elaboramos, acoplamos ambas pasando la cinta por el medio con pega blanca extra fuerte.
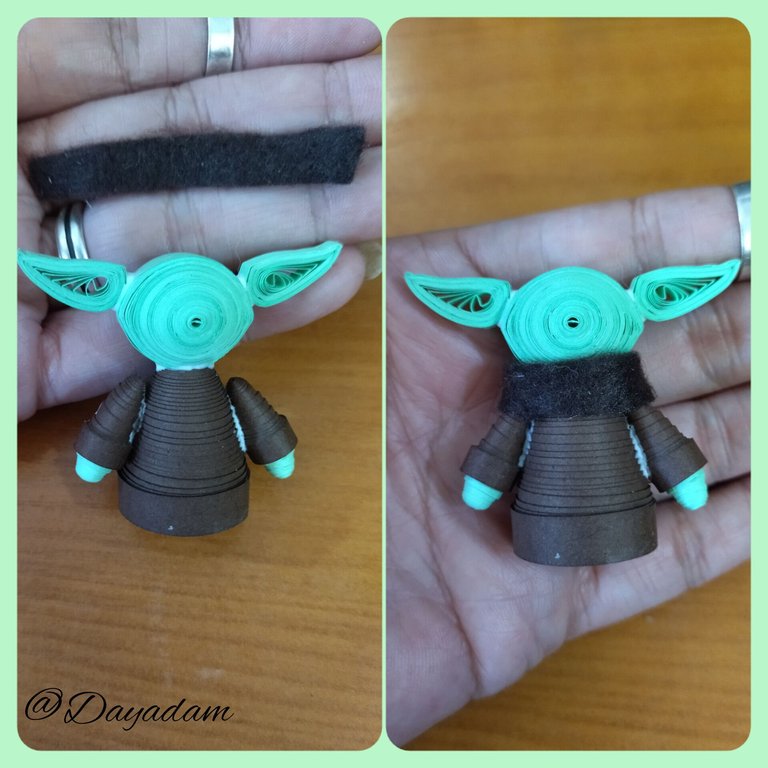
- For the ears we will take green ribbon 3mm wide x 50cms long, we will roll it with the quilling needle until we reach the end, we take it out of the needle and loosen the circle to form an open circle, we seal it with glue, then we will mold it to form the ears as shown in the image. We will need 2 of the same size.
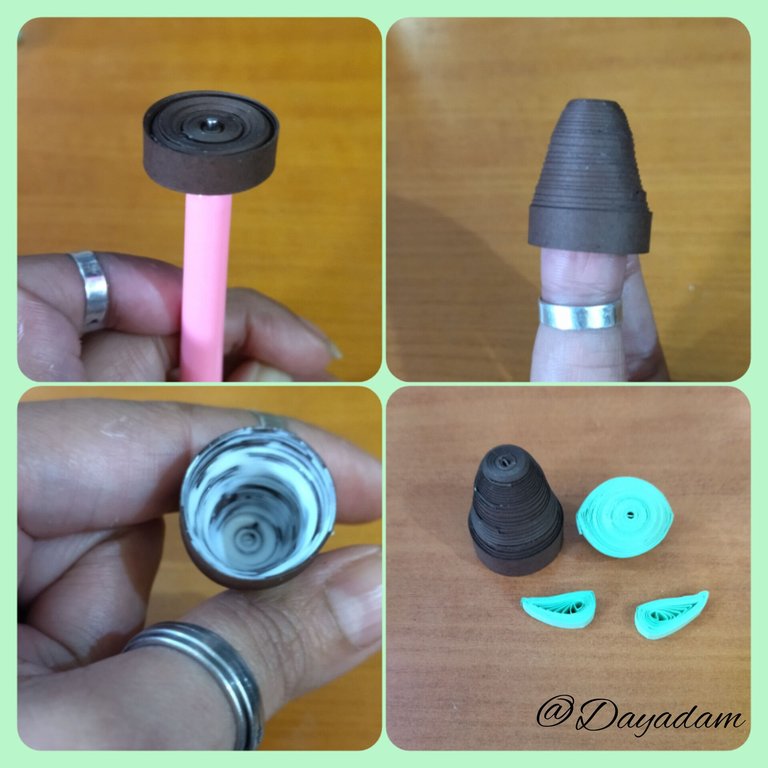
- To make the body we will take a brown ribbon of 5mm wide x 200cms long, we roll it with the quilling needle until we reach the end, we take it out of the needle, seal it with glue and we will mold taking out the circle to form a cone a little flattened at the tip, we put glue on the inside so that it does not deform.
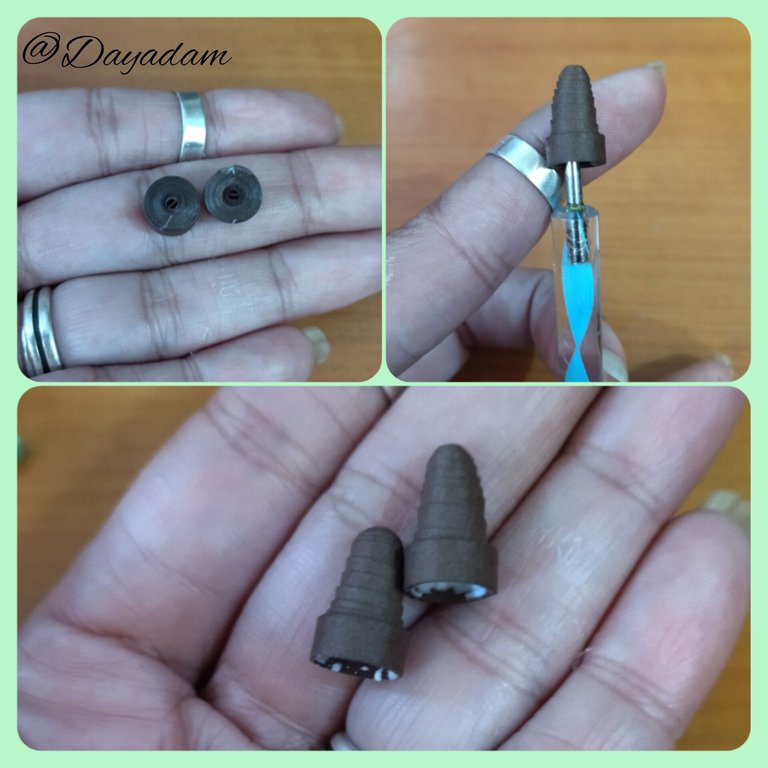
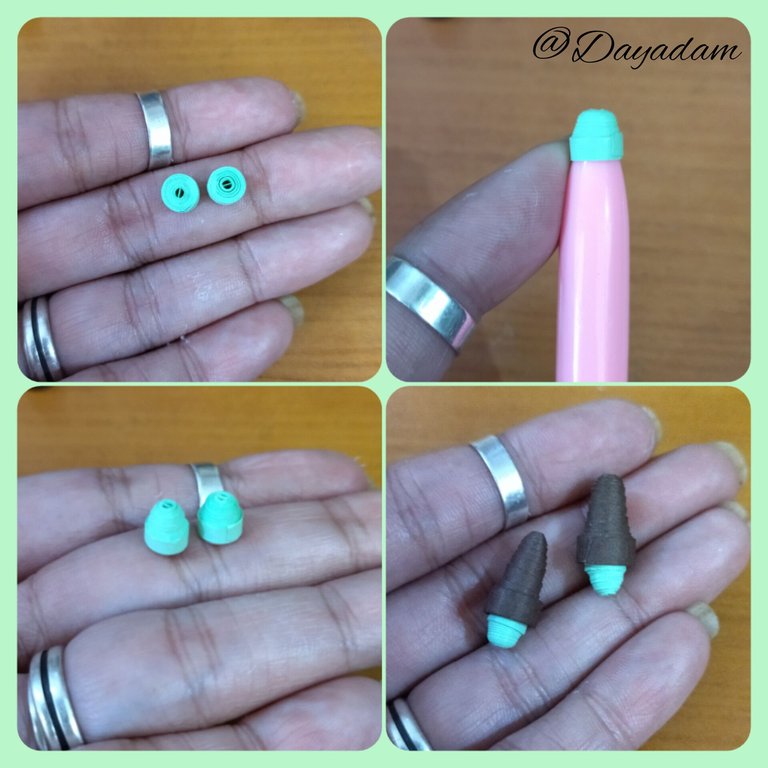
- To make the arms we will take a piece of brown quilling tape 3mm wide x 25cms long, we will roll it with the quilling needle to form a closed circle, we will seal it at the end with glue, we will mold it in the shape of a cone taking it out with a brush or a high stick, we will also put glue on the inside so that the piece does not deform. We will need 2 pieces like this one.
• Para las orejas tomaremos cinta verde de 3mm de ancho x 50cms de largo, enrollaremos con la aguja para quilling hasta llegar al final, sacamos de la aguja y soltamos y poco el circulo para formar un circulo abierto, sellamos con pega, luego moldearemos para formar las orejas tal como muestra la imagen. Necesitaremos 2 iguales.
• Para realizar el cuerpo tomaremos una cinta color marrón de 5mm de ancho x 200cms de largo, enrollamos con la aguja para quilling hasta llegar al final, sacamos de la aguja, sellamos con pega y moldearemos sacando hacia afuera el circulo para formar un cono un poco aplanado en la punta, le colocamos pega por la parte de adentro para que el mismo no se deforme.
• Para realizar los brazos tomaremos un trozo de cinta de quilling marrón de 3mm de ancho x 25cms de largo enrollaremos con la aguja para quilling para formar un círculo cerrado, sellamos al finalizar con pega, moldearemos en forma de cono sacando hacia afuera con un pincel o palito de altura, en la parte de adentro también colocaremos pega para que la pieza no se deforme. Necesitaremos 2 piezas como esta.
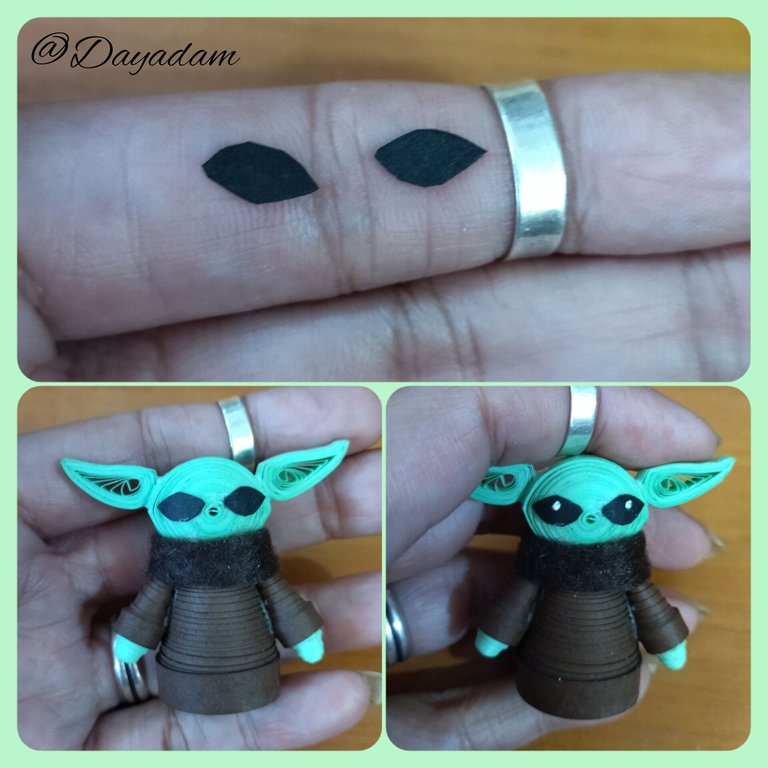
- The hands will be made by rolling a piece of green ribbon 3mm wide x 25cms long, we form a closed circle, we take a little out, apply a little glue on the inside, and glue the arm we made previously, we will need 2 pieces like this.
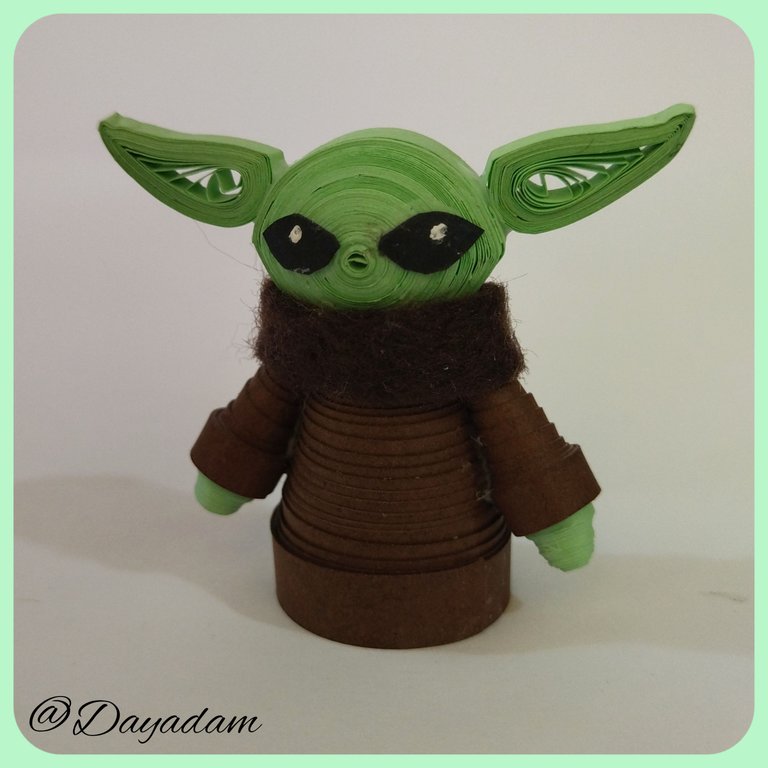
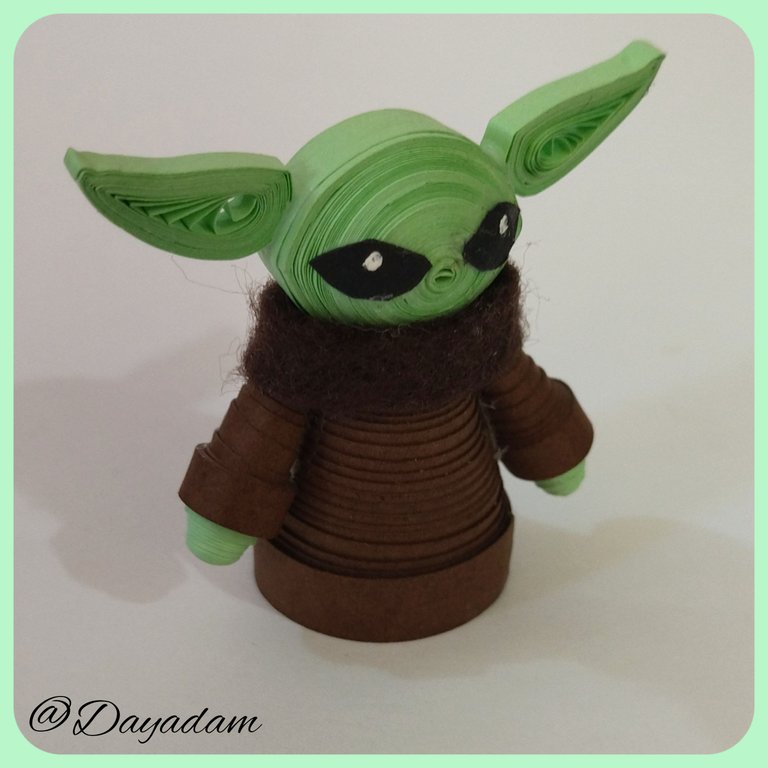
- We are going to assemble our pieces and the last place we will make the eyes. We will join the pieces one by one in a harmonic way as shown in the pictures. Then we will take a piece of beige fabric and place it around the neck to resemble a kind of scarf.
- Finally, cut two small drop-shaped pieces of black cardboard to form the eyes, glue them to the face and add some small white glitters with cold white paint.
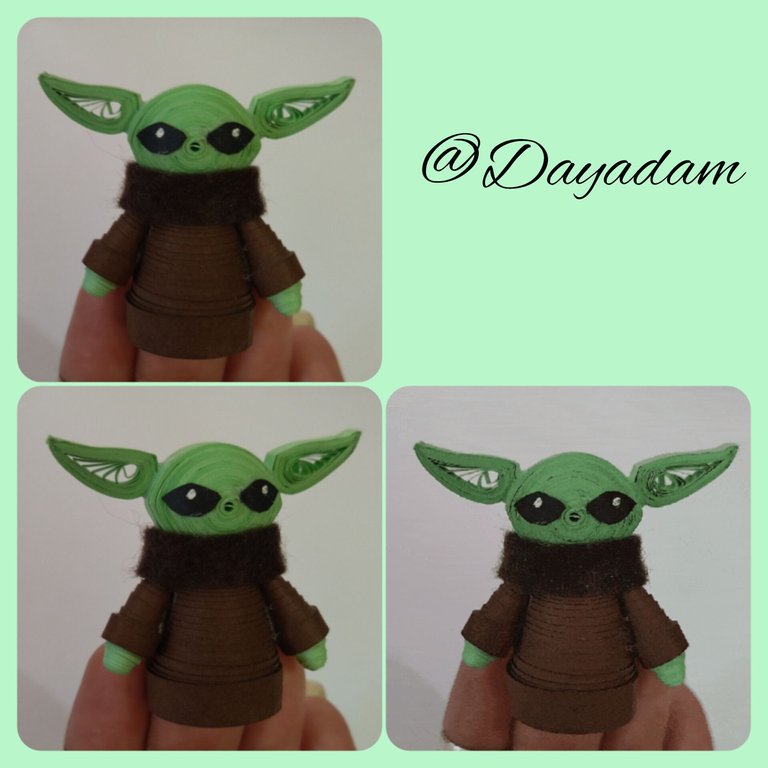
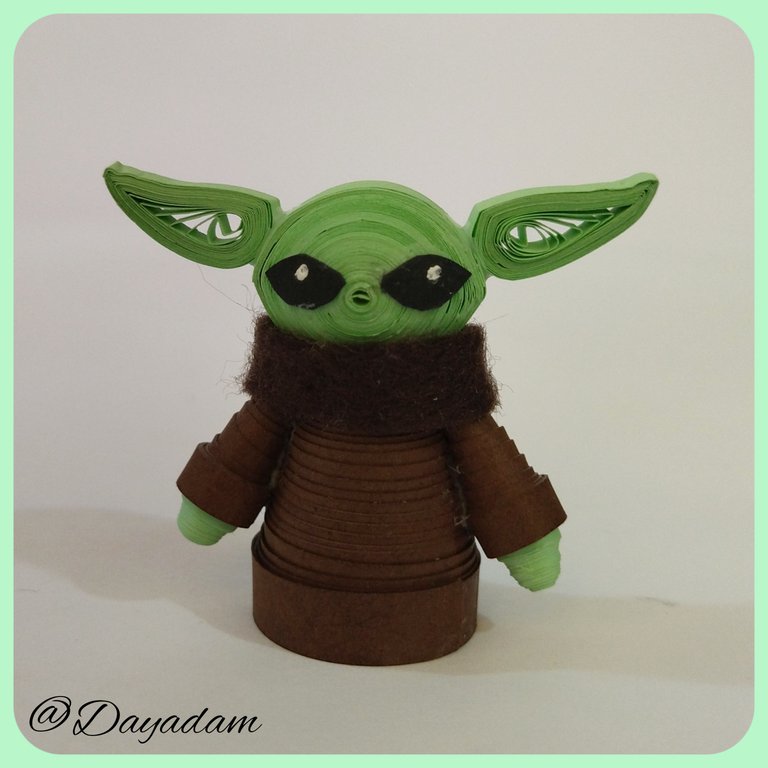
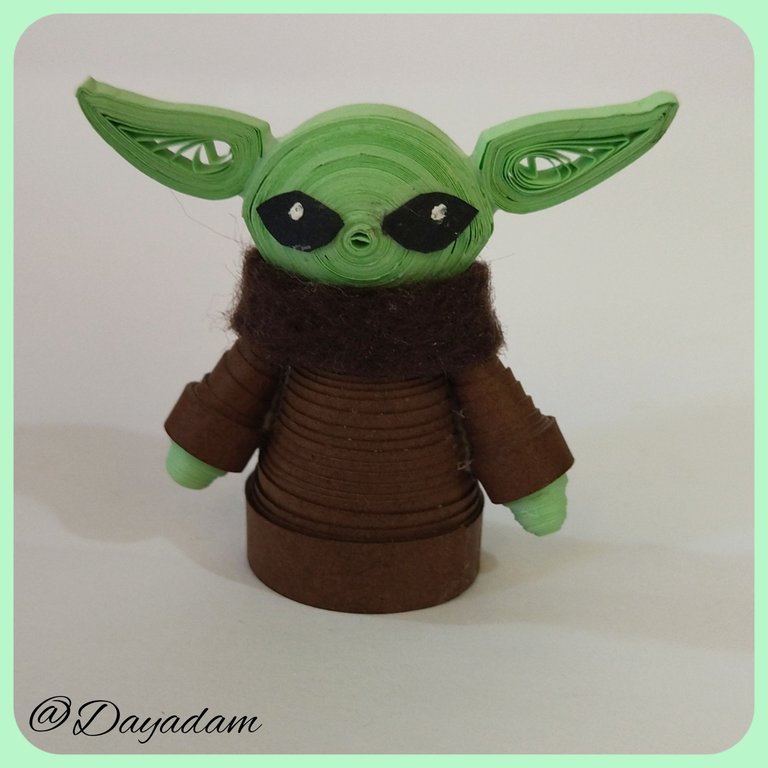
Optionally you can add a layer of white glue to give it shine, but in this case I loved the matte color and I wanted to leave it that way.
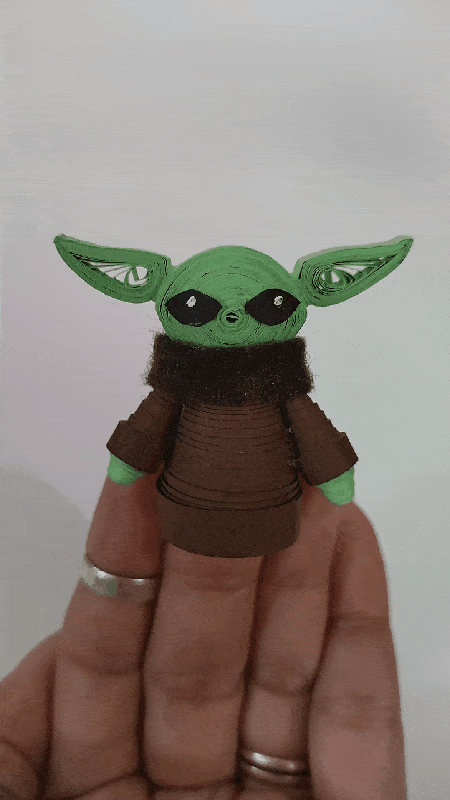
This way we have this decorative Baby Joda ready.
• Las manos las elaboraremos enrollando un trozo de cinta verde de 3mm de ancho x 25cms de largo, formamos un círculo cerrado, sacamos un poco hacia afuera, aplicamos un poco de pega por la parte interna, y pegamos del brazo que ya realizamos previamente, necesitaremos 2 piezas como esta.
• Vamos a armar nuestras piezas y el último lugar hare los ojos. Uniremos las piezas una a una de manera armónica como indican las imágenes. Luego tomaremos un trozo de tela beige y colocaremos alrededor del cuello para asemejar una especie de bufanda.
• Por ultimo pique dos pequeñas piezas en forma de gota de una cartulina negra para formar los ojos, los pegue de la cara y agregue unos pequeños brillitos blancos con pintura blanca al frio.
De manera opcional puedes agregar una capa de pega blanca para darle brillo, pero a mí en este caso me encanto como quedo de color mate y lo quise dejar así.
De esta manera tenemos este Baby Joda decorativo listo.


What did you think, did you like it?
I hope you did, I hope you liked my explanation, procedure and photos, I made them with love for you.
"Let out that muse that inspires you, and let your imagination fly".
Thank you all, see you next time.
¿Que les pareció, les gustó?
Espero que sí, que les haya gustado mi explicación, procedimiento y fotos, los hice con mucho cariño por y para ustedes.
"Deja salir esa musa que te inspira, y deja volar tu imaginación".
Gracias a todos, nos vemos en la próxima.
Todas las fotos usadas en este post son de mi autoría y han sido sacadas en mi celular personal un Redmi 9T y editadas en Canva y en Inshot Banner y separador hecho por mí en Canva Traducido con la ayuda de DeepL

!discovery 40
Gracias bella @mili2801 ✨
A ti por esta obra maestra amiga bella.
!HUG 💕
I sent 1.0 HUG on behalf of @dayadam.
(1/3)
This post was shared and voted inside the discord by the curators team of discovery-it
Join our Community and follow our Curation Trail
Discovery-it is also a Witness, vote for us here
Delegate to us for passive income. Check our 80% fee-back Program
Thanks @mili2801 and @discovery-it ✨
Muero de amor por este maravilloso trabajo, ahora tienes que tomar el reto de hacer a su papá el Mandaloriano 🙏💜
😍 Ainssss tan linda @irenenavarroart. Me alegro que te gustara, esto fue algo flash que vino a mi mente. Tengo otras cositas en cola ya que ando con la onda de las figuritas, unas ya con la idea, otras que tengo que ingeniarme para sacarlas, pero ya esa musa llegara, la que me dices wouuu es otra que tendría que ingeniármela bien para sacarla, pero nada es imposible. Abracitos...
Hermoso trabajo querida amiga #dayadam , te felicito 🌹🌷🌷🌸💮🏵️🌼🌻💐🌺🪷☘️
Gracias mi bella por tus palabras. Un gran abrazo @taniagonzalez ✨
🌹🌷
https://leofinance.io/threads/taniagonzalez/re-taniagonzalez-33nu7nkke
https://leofinance.io/threads/dayadam/re-dayadam-cvp3cscg
The rewards earned on this comment will go directly to the people ( taniagonzalez, dayadam ) sharing the post on LeoThreads,LikeTu,dBuzz.
Thanks @poshthreads ✨
Wooo! @dayadam este trabajo está precioso. Me encantó. Una belleza. Buen trabajo 👍🏼
!VSC
!LUV
@chacald.dcymt has sent VSC to @dayadam
This post was rewarded with 0.1 VSC to support your work.
Join our photography communityVisual Shots
Check here to view or trade VSC Tokens
Be part of our Curation Trail
@chacald.dcymt ha enviado VSC a @dayadam
Éste post fue recompensado con 0.1 VSC para apoyar tu trabajo.
Únete a nuestra comunidad de fotografía Visual Shots
Consulte aquí para ver o intercambiar VSC Tokens
Se parte de nuestro Trail de Curación
Thanks @visualbot ✨
@dayadam, @chacald.dcymt(1/1) sent LUV. | connect | community | HiveWiki | NFT | <>< daily
! help(no space) to get help on Hive. InfoThanks @luvshares 💕
Gracias mi hermosa por tus palabras, por el apoyo y los tokens, me encanta que te haya gustado, sabes el empeño y el esfuerzo que pongo para hacer las cosas. Abrazos, y mil bendiciones para ti @chacald.dcymt ✨
Ver tu hermosa creación me hizo recordar que tengo tiempo sin practicar, talvez haga algo pronto ❤ saludos amiga bella, eres espectacular ✨
Gracias mi linda @sylregne , me alegro que te gustara este pequeño yoda. Espero ver pronto alguno de tus hermosos trabajos. Abrazos cariño... ✨
Como siempre: hermoso tu trabajo mi apreciada @dayadam

Felicitaciones.
Un abrazo
!PIZZA
!PGM
BUY AND STAKE THE PGM TO SEND A LOT OF TOKENS!
The tokens that the command sends are: 0.1 PGM-0.1 LVL-0.1 THGAMING-0.05 DEC-15 SBT-1 STARBITS-[0.00000001 BTC (SWAP.BTC) only if you have 2500 PGM in stake or more ]
5000 PGM IN STAKE = 2x rewards!
Discord
Support the curation account @ pgm-curator with a delegation 10 HP - 50 HP - 100 HP - 500 HP - 1000 HP
Get potential votes from @ pgm-curator by paying in PGM, here is a guide
I'm a bot, if you want a hand ask @ zottone444
Thanks @pgm-curator ✨
Muchísimas gracias mi linda @alicia2022, un placer tenerte por acá y leer tus lindas palabras hacia mi trabajo. Éxitos y un abrazo para ti... ✨
$PIZZA slices delivered:
alicia2022 tipped dayadam
cpol tipped dayadam
@dayadam(2/5) tipped @cpol
@tipu curate 2
Upvoted 👌 (Mana: 32/72) Liquid rewards.
Thanks @tipu ✨
Mil gracias por el apoyo @yonnathang. Bendiciones... ✨
!HUG
I sent 1.0 HUG on behalf of @dayadam.
(3/3)
This is really very creative. Thanks for sharing.
Thanks for watching, honey. I'm glad you liked it @jude9 ✨
That's cute.. I still need to learn this technique..i guess it can be applied to making Christmas decor ☺️
!LADY
View or trade
LOHtokens.@jane1289, you successfully shared 0.1000 LOH with @dayadam and you earned 0.1000 LOH as tips. (3/7 calls)
Use !LADY command to share LOH! More details available in this post.
Thank you, sweetie. I'm glad you liked it. There is always time to learn what you see with your heart. And of course for Christmas decorations you can make beauties, last year I made everything from ornaments for the tree, decorative nativity scenes and earrings, it is a beautiful and versatile technique and you can apply it to make many things. I hope you are encouraged. Here are some links from last year. Hugs dear @jane1289 💕
!LADY
https://peakd.com/hive-189504/@dayadam/lets-make-some-christmas-penguins-dangling-earrings-paper-quilling-technique-engesp
https://peakd.com/hive-130560/@dayadam/lets-make-decorative-snowflakes-paper-quilling-technique-christmas-dreams-engesp
https://peakd.com/hive-130560/@dayadam/lets-make-a-small-decorative-nativity-paper-quilling-technique-engesp
https://peakd.com/hive-189504/@dayadam/lets-make-an-angel-paper-quilling-technique-souls-in-freedom-engesp
https://peakd.com/hive-189504/@dayadam/lets-make-a-little-christmas-gift-lets-give-the-most-beautiful-things-in-our-heart-and-soul-engesp
https://peakd.com/hive-189504/@dayadam/lets-make-christmas-flowers-paper-quilling-technique-engesp
https://peakd.com/hive-189641/@dayadam/lets-make-a-3d-christmas-card-paper-quilling-technique-engesp
View or trade
LOHtokens.@dayadam, you successfully shared 0.1000 LOH with @jane1289 and you earned 0.1000 LOH as tips. (2/2 calls)
Use !LADY command to share LOH! More details available in this post.
Whooo, what a fantastic work! I'd really like to learn this technique and your steps should be helpful in that case. Keep up the great work.
Thank you very much for your words towards my work, to want to learn is to be able to. I hope you do. Grateful for the support @diyhub ✨
Qué belleza amiga, tienes mucha creatividad, me encanto el paso a paso tan bien explicado.
Hermosos muñequito @dayadam
Gracias amiga @soyunasantacruz por tus lindas palabras y por pasar por acá, me alegra que te gustara. Abrazos. Que tengas un lindo dia... 🌈
¡Ja, ja, ja! ¡Te quedó de lo más hermoso el baby Yoda! ¡Me encantó! !PIZZA !PGM !CTP
BUY AND STAKE THE PGM TO SEND A LOT OF TOKENS!
The tokens that the command sends are: 0.1 PGM-0.1 LVL-0.1 THGAMING-0.05 DEC-15 SBT-1 STARBITS-[0.00000001 BTC (SWAP.BTC) only if you have 2500 PGM in stake or more ]
5000 PGM IN STAKE = 2x rewards!
Discord
Support the curation account @ pgm-curator with a delegation 10 HP - 50 HP - 100 HP - 500 HP - 1000 HP
Get potential votes from @ pgm-curator by paying in PGM, here is a guide
I'm a bot, if you want a hand ask @ zottone444
Thanks @pgm-curator ✨
Ainssss gracias amigo @cpol, por pasar y por tus tiernas palabras, me alegro mucho que te gustara, verdaderamente quedo súper cute, hasta a mi me encanto, jajaja. Gracias por el apoyo, y los tokens. Abrazos... ✨
!PIZZA !LUV
@cpol, @dayadam(1/1) sent LUV. | connect | community | HiveWiki | NFT | <>< daily
! help(no space) to get help on Hive. InfoAy, Dios mio! Que quiling más bonito, me encanta su carita! Gran trabajo amiga!
Contáctenos para saber más del proyecto a nuestro servidor de Discord.
Si deseas delegar HP al proyecto: Delegue 5 HP - Delegue 10 HP - Delegue 20 HP - Delegue 30 HP - Delegue 50 HP - Delegue 100 HP.
Muchas gracias por el apoyo @hive-134572 ✨
Congratulations @dayadam! You received a personal badge!
Wait until the end of Power Up Day to find out the size of your Power-Bee.
May the Hive Power be with you!
You can view your badges on your board and compare yourself to others in the Ranking
Check out our last posts:
Hello my dear friend @dayadam it is always a pleasure to see your creations, this art attracts me, every time I see the beautiful works that you do I fall in love with your work, I congratulate you friend, thank you for explaining how to make them.🙂🤗💗
Thank you very much for your words, it's a pleasure that you liked my work. Here to order in what I can humbly help you. Success to you @lauracraft ✨