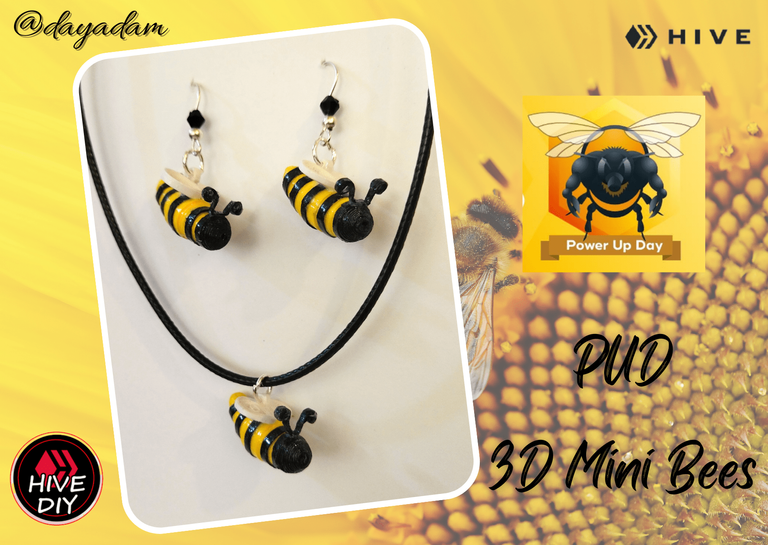
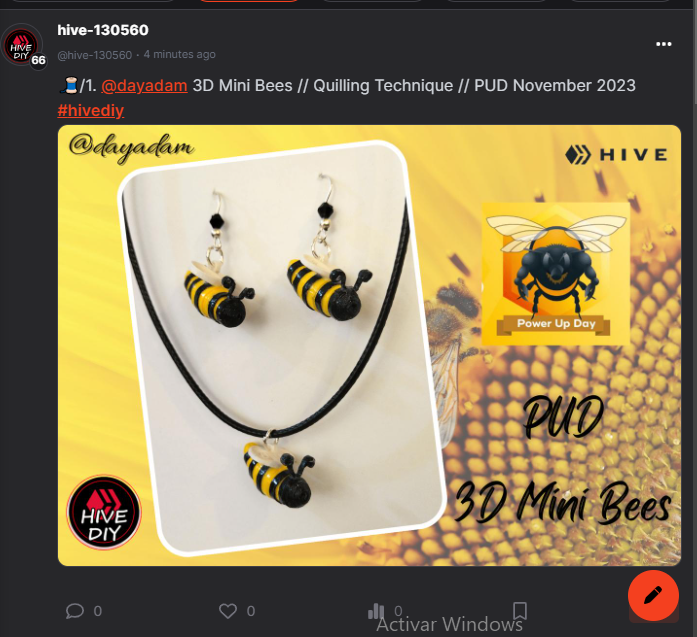
3D Mini Bees // Quilling Technique // PUD November 2023
Hello everyone... ⚡️🐝⚡️💕
Hello to my dear Hivers and the dear community of artists #HiveDIY, as always very pleased and excited to be here again, showing you my work made with love and especially for you.
Another month of this year began, we started November and we are very close to conclude a year full of experiences, and as many of you know in our world of #Hive we celebrate #PowerUpDay (PUD).
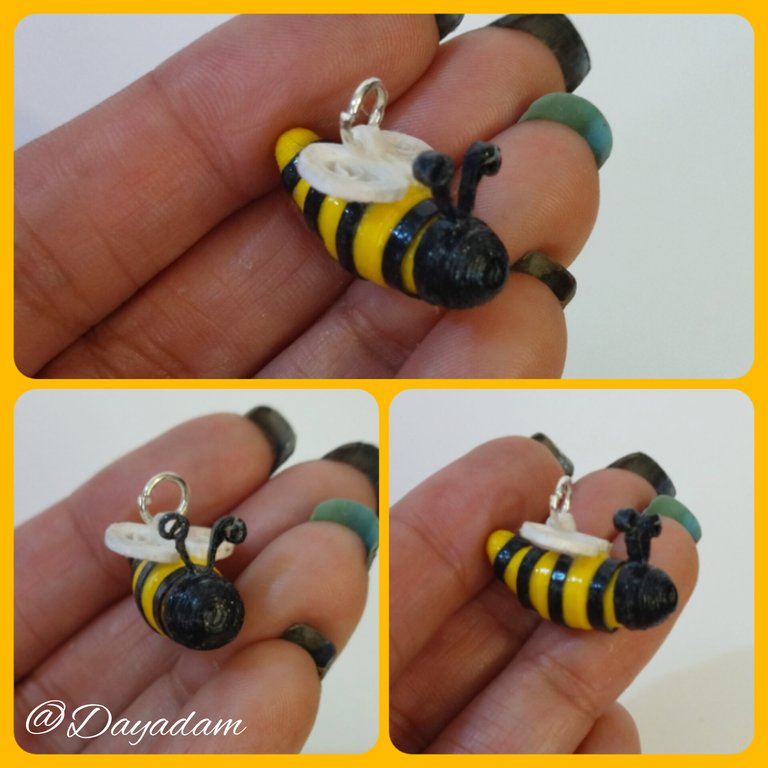
It has become a habit since a few months ago, not only to make my respective PowerUp, but also to make something to commemorate this special day, and today again I bring you a 3D model of a little bee materialized in a quilling bead.
I make you a cordial invitation, to participate in the PUD every time you can and if possible do it month by month, this way you make your HP grow and so you go hand in hand so that our wonderful blockchain becomes stronger every day.
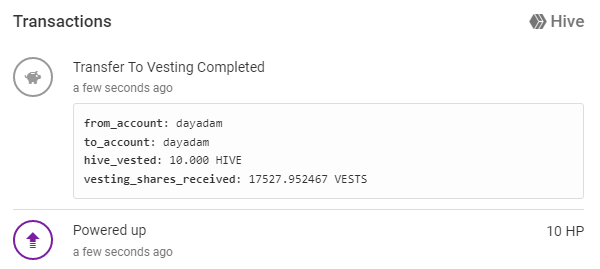
Below is an image of my respective PowerUp with a small contribution of 10 Hive.
Hoping you like it, I leave you my creative process:
Let's start:😃

Hola a Todos... ⚡️🐝⚡️💕
Hola a mis queridos Hivers y a la querida comunidad de artistas #HiveDIY, como siempre muy complacida y emocionada de encontrarme por acá nuevamente, mostrándole mi trabajo hecho con mucho amor y especialmente para ustedes.
Otro mes de este año empezó, iniciamos Noviembre faltando muy poco para concluir un año lleno de experiencias, y pues comenzando el mes como muchos saben en nuestro mundo de #Hive festejamos el #PowerUpDay (PUD).
Ya se me hizo una total costumbre desde hace unos meses, no solo realizar mi respectivo PowerUp, si no también realizar algo para conmemorar este día especial, y pues hoy nuevamente les traigo un modelo de abejita en 3D materializado en dije para collar en la técnica de quilling.
Les hago una cordial invitación, a que participen en el PUD cada vez que puedan y si es posible lo hagan mes a mes, de esta manera haces de que tu HP crezca y así vas de la mano para que nuestra maravillosa blockchain se fortalezca cada día más.
Más abajo les dejo una imagen de mi respectivo PowerUp con un pequeño aporte de 10 Hive.
Esperando que sea de su agrado, les dejo mi proceso creativo:
Comencemos:😃

• Cintas de quilling de amarillo, negro y blanco.
• Aguja para quilling.
• Perlas blanca.
• Bases para zarcillos colgantes (anzuelos).
• Cristal Checo color negro.
• Argolla de bisutería.
• Pega blanca extra fuerte (de carpintería).
• Tijera.
• Pincel.
• Collar de tu preferencia.
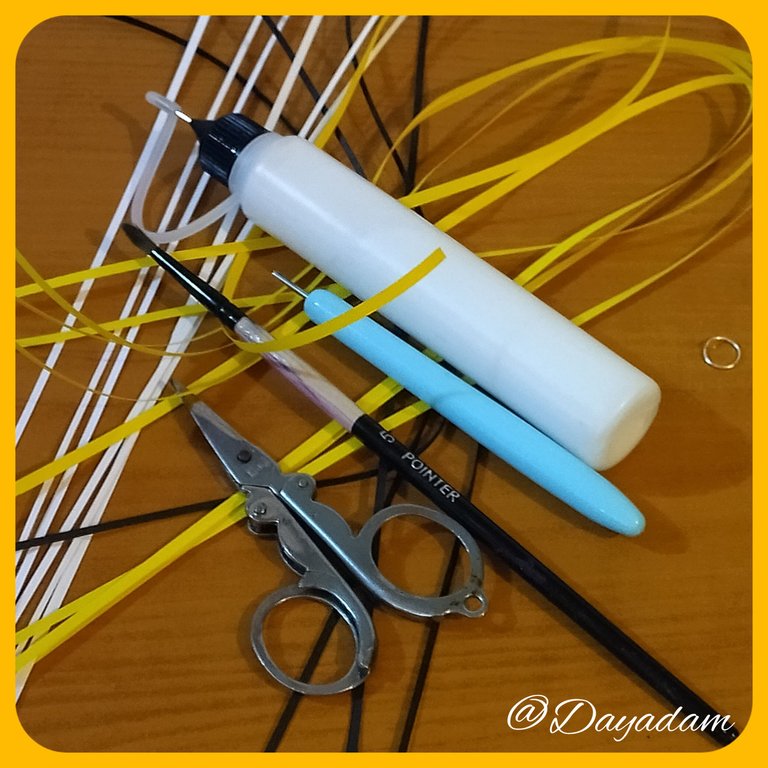
- Yellow, black and white quilling ribbons.
- Quilling needle.
- White beads.
- Bases for hanging tendrils (hooks).
- Black Czech glass.
- Jewelry ring.
- Extra strong white glue (carpentry glue).
- Scissors.
- Paintbrush.
- Necklace of your choice.

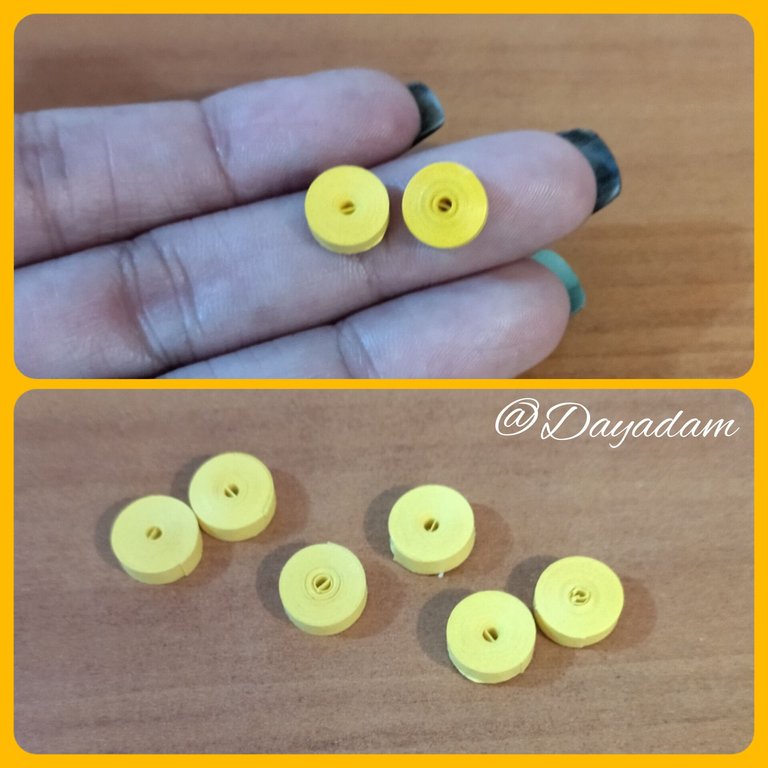
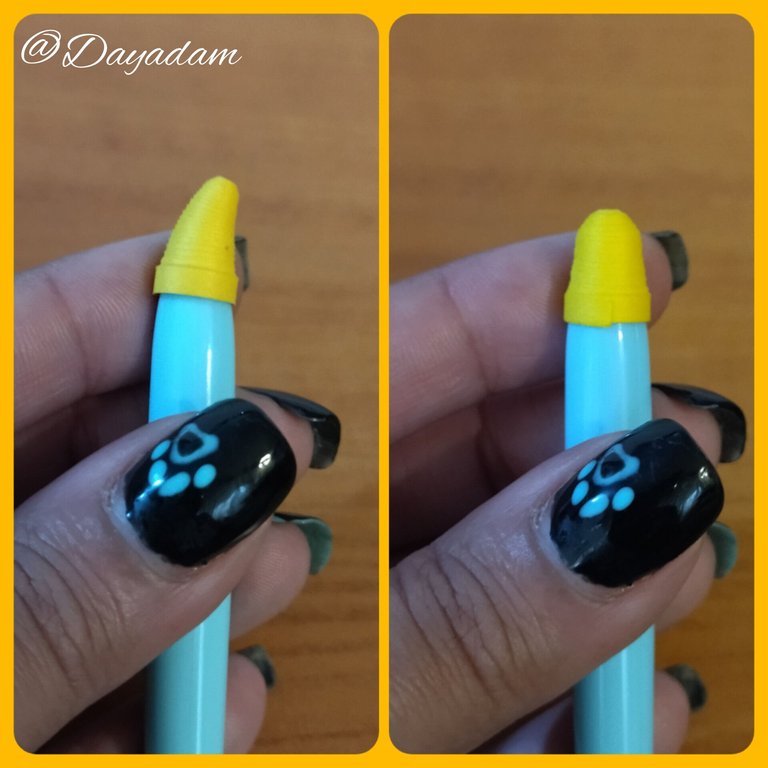
- We start by taking a 3mm wide x 50cms long yellow quilling ribbon, we roll it with the quilling needle until we reach the end of the ribbon, we seal it with extra strong white glue, we take it out of the needle, we will obtain a closed circle, like this one we will need another one like this one. For each charm we want to make we will repeat the same process.
- We are going to mold the circles, with the help of a pointed object we are going to push outwards until we get the necessary shape for the mini bee, on the inside we add a little glue and let it dry to prevent the pieces from moving.

• Comenzamos tomando una cinta de quilling color amarilla de 3mm de ancho x 50cms de largo, enrollamos con la aguja para quilling hasta llegar al final de la cinta, sellamos con pega blanca extra fuerte, sacamos de la aguja, obtendremos un círculo cerrado, como este vamos a necesitar otro igual. Por cada dije que queramos hacer vamos a repetir el mismo proceso.
• Vamos a moldear los círculos, con la ayuda de un objeto puntiagudo vamos a empujar hacia afuera hasta conseguir la forma necesaria para la mini abejita, en la parte de adentro agregamos un poco de pega y dejamos secar para evitar que se muevan las piezas.


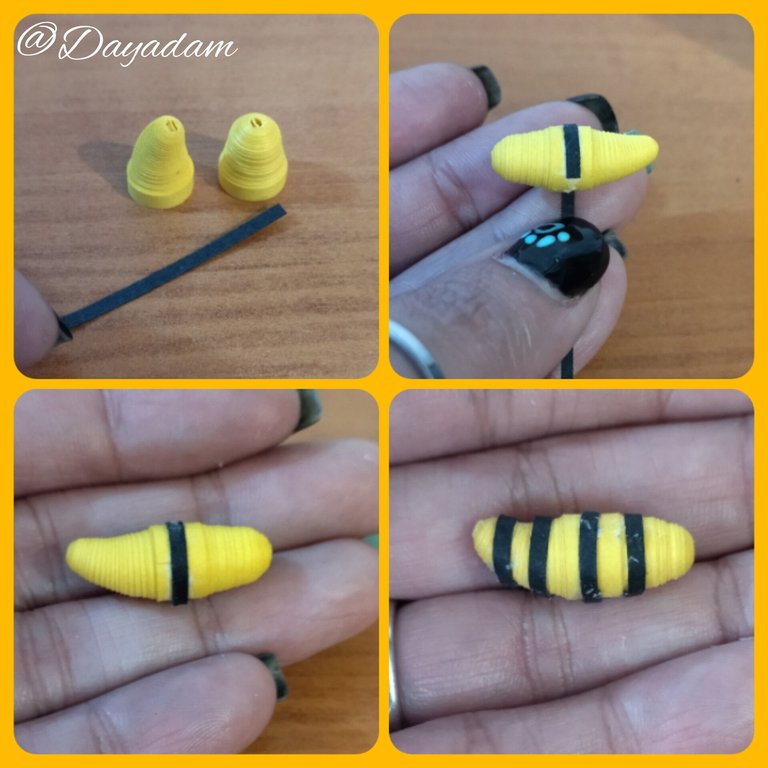
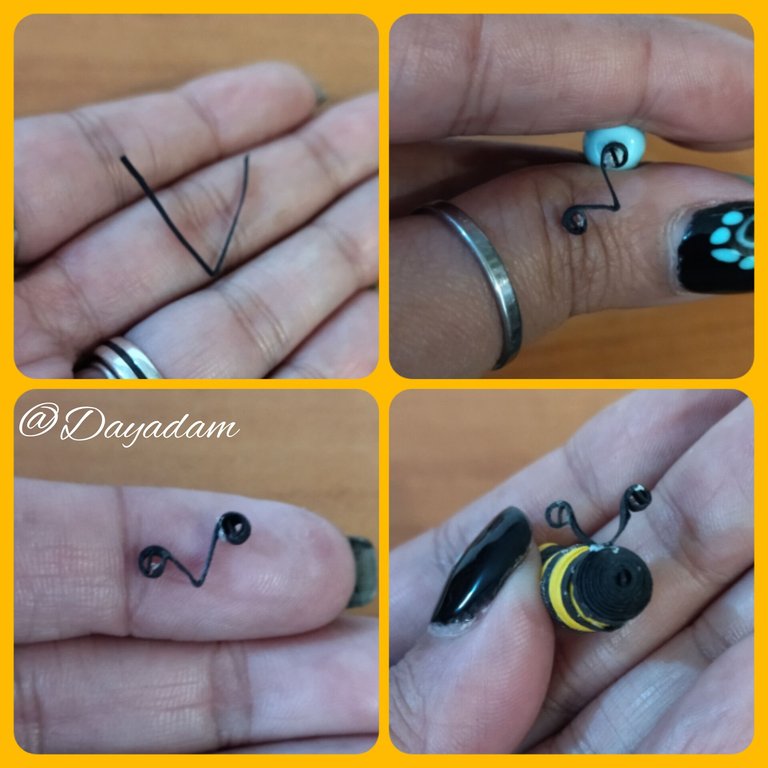
- We are going to take some small pieces of black quilling tape of approximately 1mm wide with this we are going to join the pieces to form the base of the body of the bee, we couple both passing the tape through the middle with extra strong white glue, then we pass 3 more pieces of tape around the body, which will be the stripes of the bee.
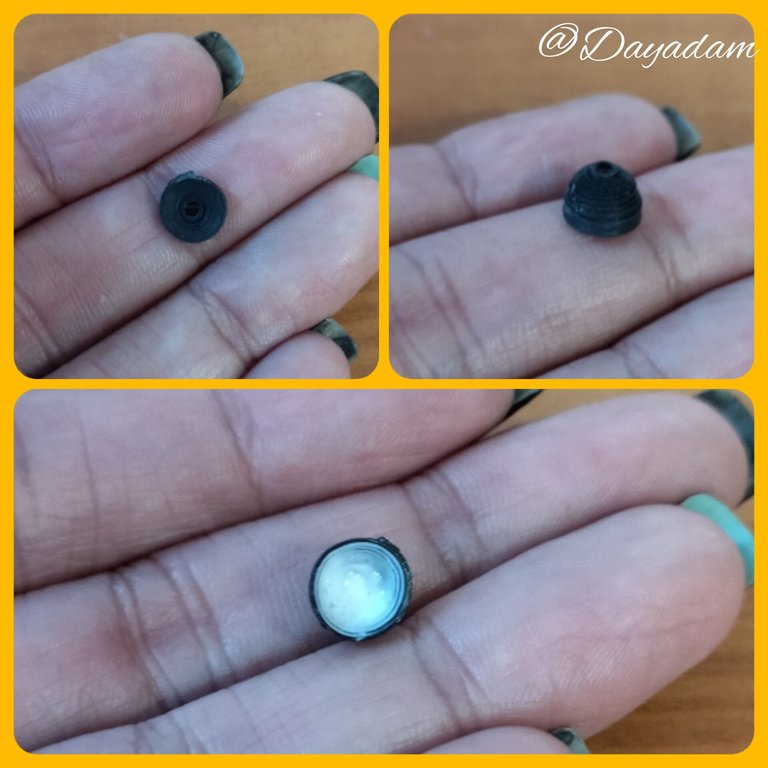
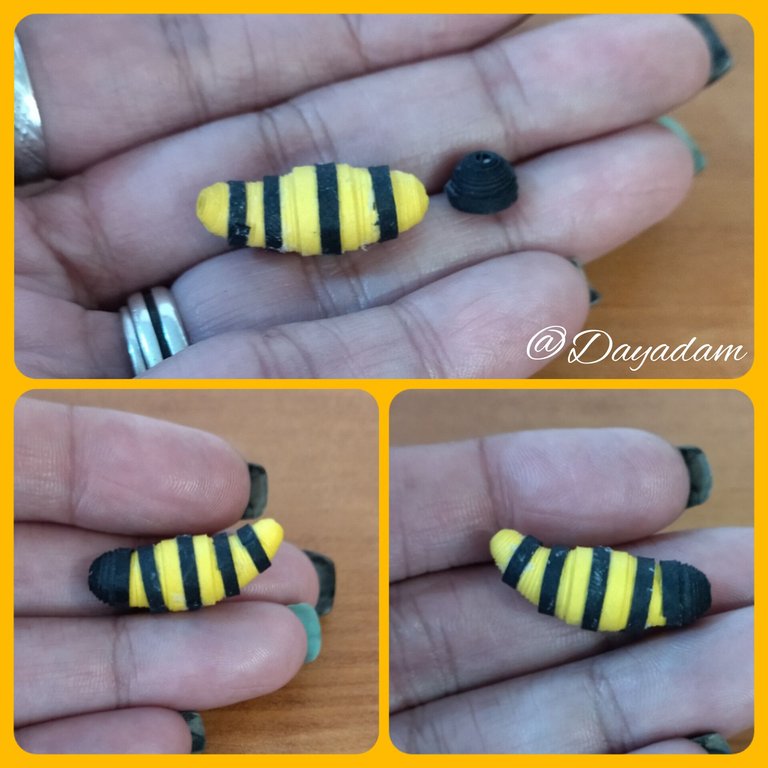
- For the head of the bee we are going to take black tape 1mm wide x 20cms long, we will make a closed circle with the quilling needle, seal with glue and take a little out to give it some depth, in the inner part we will add a little glue and let it dry to prevent the piece from moving or deforming, once dry we will glue on the body of the bee.
• Vamos a tomar unos pequeños trozos de cinta de quilling negro de aproximadamente 1mm de ancho con esta vamos a unir las piezas para formar la base del cuerpo de la abejita, acoplamos ambas pasando la cinta por el medio con pega blanca extra fuerte, luego pasamos 3 trozos más de cinta alrededor del cuerpo, las cuales serán las rayitas de la abeja.
• Para la cabeza de la abeja vamos a tomar cinta negra de 1mm de ancho x 20cms de largo haremos con la aguja para quilling un círculo cerrado, sellamos con pega y sacaremos un poco hacia afuera para darle algo de profundidad, en la parte interna agregaremos un poco de pega y dejamos secar para evitar que se mueva la pieza o se deforme, una vez seca pegaremos en el cuerpo de la abeja.
- To make the antennae we take a piece of black ribbon 1mm wide x 4cms long, roll it on both sides with the quilling needle and seal it with a little glue, we glue it to the head of the bee.
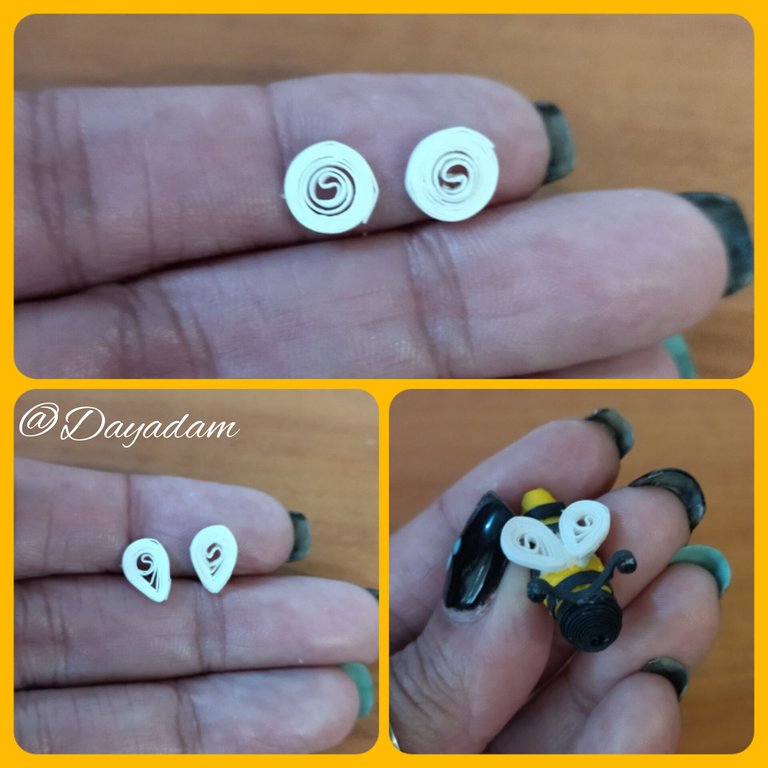
- For the wings we will take a white ribbon of 1mm wide x 10cms long, roll it with the quilling needle, we will mold it in the shape of a drop. We will need two pieces like these, when we finish we will glue them to the body of the bee.
• Para hacer las antenas tomamos un trozo de cinta color negro de 1mm de ancho x 4cms de largo, enrolle por ambos lados con la aguja para quilling y selle con un poco de pega, pegamos a la cabeza de la abeja.
• Para las alas tomaremos una cinta blanca de 1mm de ancho x 10cms de largo, enrollamos con la aguja para quilling, vamos a moldear en forma de gota. Vamos a necesitar dos piezas como estas, al finalizar las pegaremos al cuerpo de la abeja.
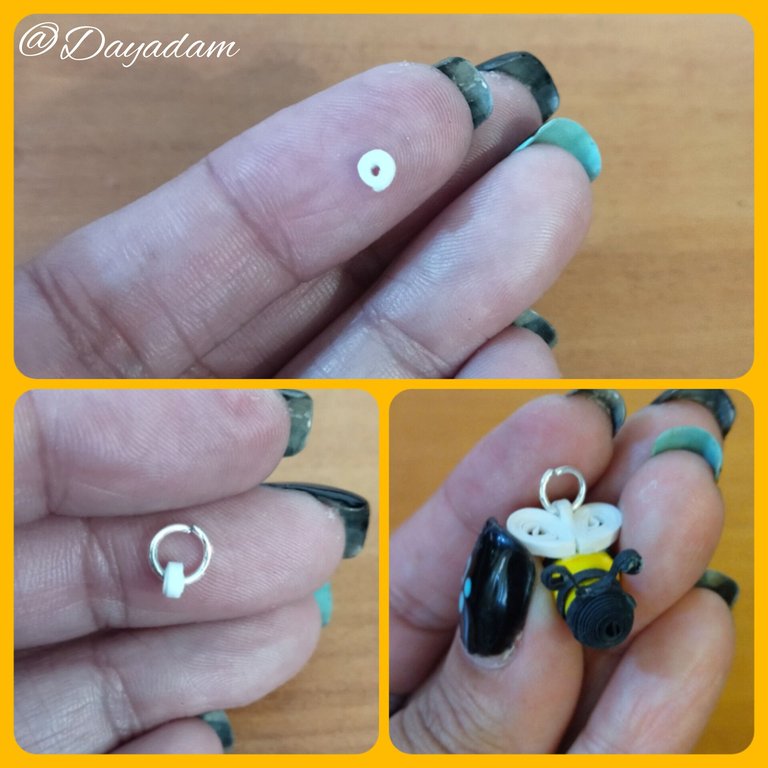
- Finally we are going to make a small closed circle, rolling a piece of white ribbon 1mm wide to which we will incorporate a costume jewelry ring, we will glue it to the wings of the mini bee.
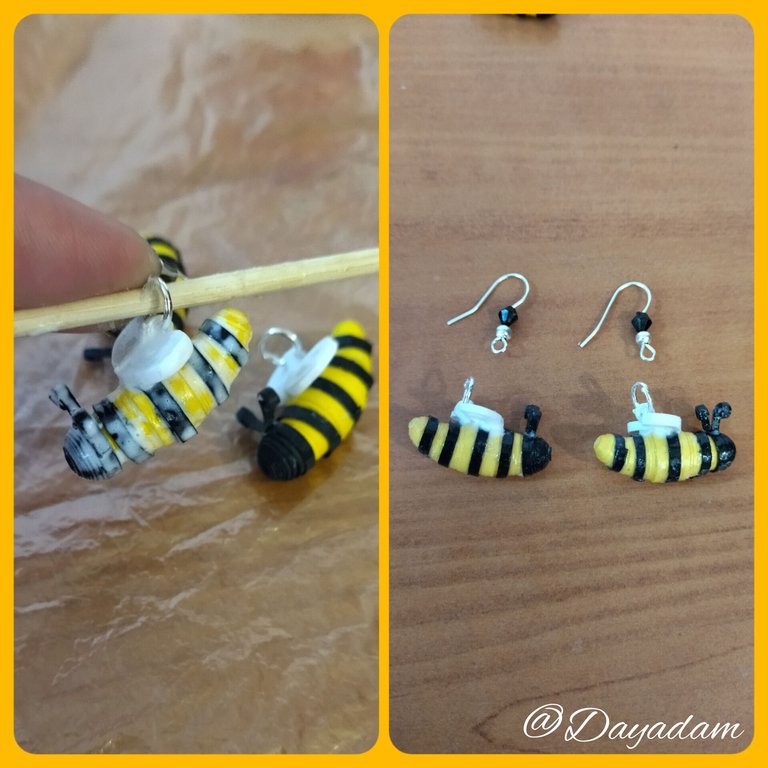
- We are going to place the liquid protection (plasticized), with a brush we apply several layers of extra strong white glue, letting it dry between one layer and another.
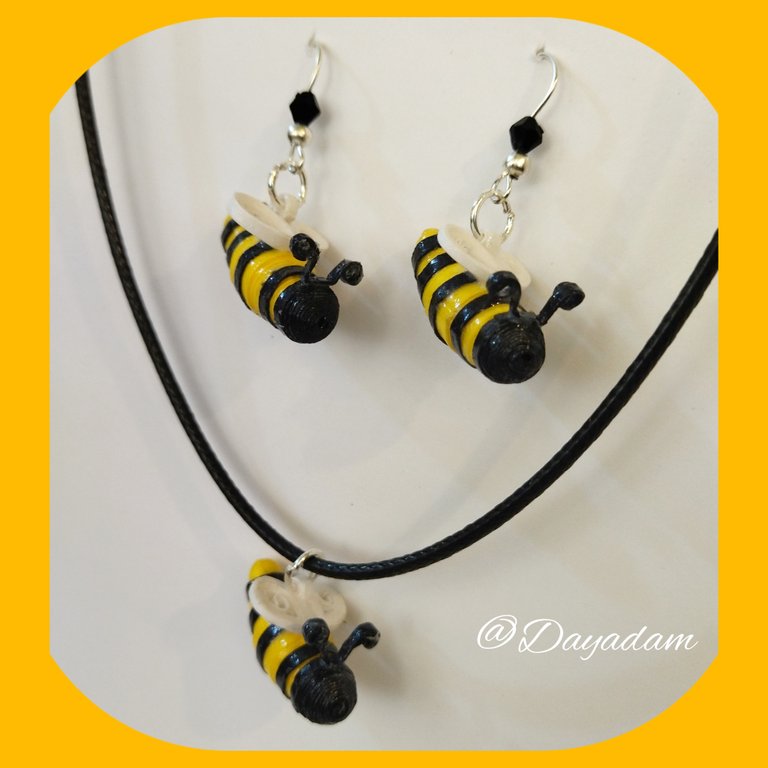
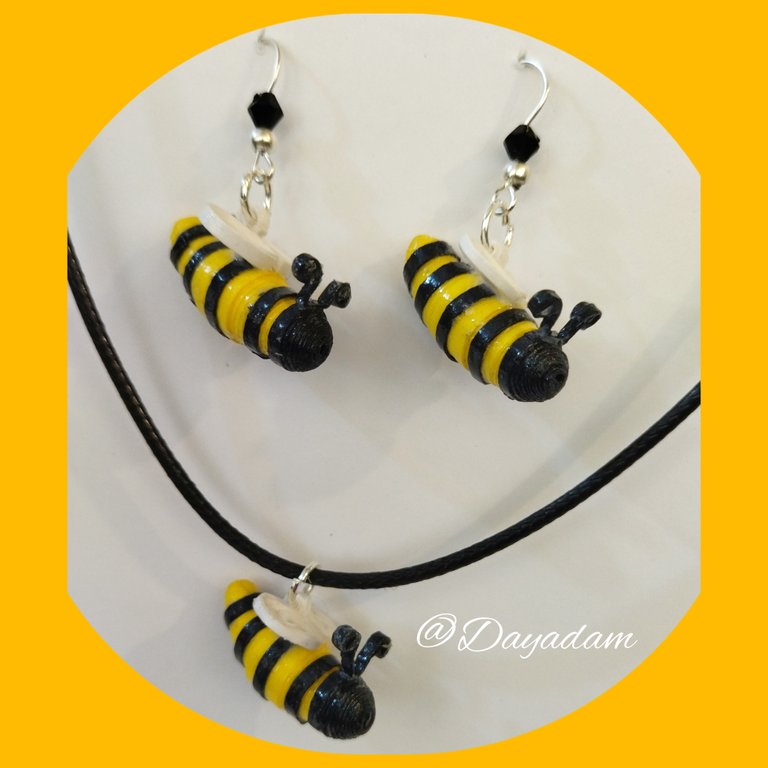
I made 3 mini bees, 2 of them I placed some hanging bases for tendrils (hooks), I left one only with a ring to place it in the necklace of my preference.
This is the end of this new little bee that I made with a lot of love, to commemorate our PUD ⚡️🐝⚡️
• Por ultimo vamos a elaborar un pequeño círculo cerrado, enrollando un trozo de cinta blanca de 1mm de ancho a la cual incorporaremos una argolla de bisutería, pegaremos a las alas de la mini abeja.
• Vamos a colocar la protección liquida (plastificado), con un pincel aplicamos varias capas de pega blanca extra fuerte dejando secar entre una capa y otra.
Realice 3 mini abejas a 2 les coloque unas bases colgantes para zarcillos (anzuelos), deje una solo con una argolla para colocarla en el collar de mi preferencia
De esta manera esta finalizada esta nueva abejita que realice con mucho cariño, para conmemorar nuestro PUD ⚡️🐝⚡️


What did you think, did you like it?
I hope you did, I hope you liked my explanation, procedure and photos, I made them with love for you.
"Let out that muse that inspires you, and let your imagination fly".
Thank you all, see you next time. Happy PowerUpDay ⚡️🐝⚡️
¿Que les pareció, les gustó?
Espero que sí, que les haya gustado mi explicación, procedimiento y fotos, los hice con mucho cariño por y para ustedes.
"Deja salir esa musa que te inspira, y deja volar tu imaginación".
Gracias a todos, nos vemos en la próxima. Feliz PowerUpDay ⚡️🐝⚡️
Todas las fotos usadas en este post son de mi autoría y han sido sacadas en mi celular personal un Redmi 9T, editadas en InShot y Canva Banner y separador hecho por mí en Canva Traducido con la ayuda de DeepL

https://inleo.io/threads/dayadam/re-dayadam-3th7vhzg
The rewards earned on this comment will go directly to the people ( dayadam ) sharing the post on LeoThreads,LikeTu,dBuzz.
Thanks @poshthreads ✨
Wow, qué hermoso y delicado trabajo manual. Estas abejitas te quedaron bellísimas. Han de llevarse su tiempo pero el excelente resultado vale el esfuerzo.
Muchísimas gracias por pasar, me alegra mucho que te hayan gustado. Hay que tener paciencia y dedicación pero con cariño todo se logra, y mas si es para homenajear algo que tenga que ver con nuestra quedada blockchian.
Saludos @rosana6 ✨
Congratulations @dayadam! You received a personal badge!
Participate in the next Power Up Day and try to power-up more HIVE to get a bigger Power-Bee.
May the Hive Power be with you!
You can view your badges on your board and compare yourself to others in the Ranking
Check out our last posts:
Thanks @hivebuzz 🐝⚡️💕
Congrats, @dayadam! The Power Up badge looks bee-autiful on you!
¡Qué hermosas te quedaron las abejitas! ¡Están maravillosas! ¡Saludos! !PIZZA !PGM !CTP !BBH
BUY AND STAKE THE PGM TO SEND A LOT OF TOKENS!
The tokens that the command sends are: 0.1 PGM-0.1 LVL-0.1 THGAMING-0.05 DEC-15 SBT-1 STARBITS-[0.00000001 BTC (SWAP.BTC) only if you have 2500 PGM in stake or more ]
5000 PGM IN STAKE = 2x rewards!
Discord
Support the curation account @ pgm-curator with a delegation 10 HP - 50 HP - 100 HP - 500 HP - 1000 HP
Get potential votes from @ pgm-curator by paying in PGM, here is a guide
I'm a bot, if you want a hand ask @ zottone444
Thanks @pgm-curator ✨
@dayadam! Your Content Is Awesome so I just sent 1 $BBH (Bitcoin Backed Hive) to your account on behalf of @cpol. (3/50)
Thanks @bbhbot ✨
Muchísimas gracias amigo querido @cpol. Me alegra mucho que te gustaran las abejitas, y que estés presente como siempre con palabras tan lindas para valorar mi trabajo.
Abrazos ✨
!HUG
!PIZZA
I sent 1.0 HUG on behalf of @dayadam.
(2/3)
¡Con muchísimo gusto, Dayana! ¡Disculpa que no siempre puedo estar más bien! ¡Te quedaron preciosas! ¡Saludos! !PIZZA !PGM !CTP !BBH
BUY AND STAKE THE PGM TO SEND A LOT OF TOKENS!
The tokens that the command sends are: 0.1 PGM-0.1 LVL-0.1 THGAMING-0.05 DEC-15 SBT-1 STARBITS-[0.00000001 BTC (SWAP.BTC) only if you have 2500 PGM in stake or more ]
5000 PGM IN STAKE = 2x rewards!
Discord
Support the curation account @ pgm-curator with a delegation 10 HP - 50 HP - 100 HP - 500 HP - 1000 HP
Get potential votes from @ pgm-curator by paying in PGM, here is a guide
I'm a bot, if you want a hand ask @ zottone444
@dayadam! Your Content Is Awesome so I just sent 1 $BBH (Bitcoin Backed Hive) to your account on behalf of @cpol. (7/50)
$PIZZA slices delivered:
dayadam tipped cpol
@cpol(7/15) tipped @dayadam (x2)
Thanks @pizzabot 🍕
Wow!, amiga, cuánta belleza y originalidad, de verdad que estas abejas quedaron muy lindas, me gustaron mucho. Felicidades, esa técnica ya está dominada jj, ahora se perfecciona cada día. Un abrazo.
Muchísimos gracias amigo por tu lindo comentario hacia mi trabajo, y tu presencia. Me alegra que te gustaran las abejitas.
Saludos @darknapol ✨
Que adorable pieza mamita! cómo me gustaría coleccionarla <3
Gracias mi hermosa @equipodelta. Sabes que te dije que las piezas que quieras, en lo que tengamos oportunidad seguro te hare llegar algo, especialmente para ti.
Un abrazote mi linda... 💛
Qué belleza de abejitas 😍 Me encantaron! Estarían geniales para acompañar mi primera franela de Hive.. cuando la tenga☺️ Felicidades 🥳 eres una gran artista! Bendiciones 🙏🏻
Gracias mi linda, me alegra mucho que te gustaran las abejitas. Y si, como anillo al dedo para lucir una franela de nuestra querida blockchian, espero tengas la tuya pronto...
Saludos @glorysabel777 💛
Que conjunto tan hermoso. La técnica impecable, como siempre. Gracias por compartir tu arte. Feliz día.
Gracias preciosa @mdrguez. Me alegra mucho que te gustaran. Gracias a ti por pasar...
Que tengas un bello dia ✨
Super adorables! No sabía nada.sobre ésta técnica, hay que tener una paciencia bárbara! Felicidades!
Que lindo que te haya gustado. Con respecto a la técnica vengo haciendo este trabajo para compartir en hive desde hace casi 2 años, si quieres saber mas, puedes visitar mi blog, y ante cualquier duda estoy por acá a la orden.
Saluditos @danigada18 ✨
Hermoso colgante, las abejitas son tan lindas y tiernas, y a la vez tan necesarias para la vida 😍 las adoro y ahora con tu creacion aun mas jeje
Ya me estoy tomando la costumbre tambien de hacer un PowerUp todos los meses, a veces me distraigo y me olvido pero siempre hay un post que me lo hace recordar jaja
Bonita forma de darle tributo a tu PowerUp con esta hermosa creacion, me encanta 😍
Gracias preciosa por siempre esta presente, me alegra que te haya gustado y que también estés haciendo el powerup mientras te sea posible. Es una manera de seguir creciendo hermosa.
Abrazos, y besos a mi emplumado @elbuhito ✨
Esos accesorios van perfectos con tu nuevo badge del Hive PUD. Felicitaciones un muy buen trabajo.
Muchísimas gracias cariño. Me alegra que te gustaran las abejitas. Y si, la verdad muy adecuados para mi preciosa badge.
Mil gracias por tu presencia.
Saludos @edeyglezsosa ✨
@dayadam "Gracias por compartir tu pasión con nosotros. Eres un verdadero artista de Hive DIY."
https://inleo.io/threads/view/hive-130560/re-leothreads-39y6kpawv
https://twitter.com/hivediy47901/status/1720139240682438962
Muchísimas gracias a ustedes por su gran apoyo. y palabras. Que sigan los éxitos. Abrazos a mi equipo hermoso de @hive-130560 ✨
You really are an artist, I wouldn't have imagined some tendrils and said they were made with ribbons., I'm going to try to do it, congratulations for your original work, greetings
Thank you very much for your words. I'm really glad that you like my work and that it inspires you to do it. Welcome to my blog and I'm at your service here. Regards @liyuxiexie ✨🐝
qué cuchitura!
Gracias querido amigo ✨