El “Splinter de Muerte” es una locura | ¿Cómo usarlo para disminuir al máximo la “Ofensiva” del oponente? [EN-ES]
Image created in Canva
A few days ago I published a post about the "Fortress" of the "Death Splinter", in that publication I basically revealed how and when we can use this equipment, which is characterized by decreasing all existing attributes in the game, by this I mean that it can reduce the attack points, speed, life and shield, If we really learn when to use the "Death" equipment, I assure you that you will win many battles regardless of the type of attack you use, which will certify you to have a positive record at the end of battles in your day to day.
That is why, to prove again the effectiveness of the "Splinter of Death" in special conditions where the probability is in our favor thanks to what I call "Fortress", this time I will make a post explaining how to play it in another type of rules totally different from those published in that post a few days ago, in addition, this will complement the content explained in that post, all with the objective of having more complete information about this "Fortress" and when or how it should be used, remember that, at that time I focused on highlighting its "Fort" highlighting the "Structure or Alignment" for a battle with the type of attack "Melee", but, this time I will show you the other 2 types of attack.
So, if you want to know the scope of the "Death Splinter" and how to use it correctly to get the most out of it on the battlefield, you must stay until the end of this post, where I will explain a "Strategy" with a totally different structure using what I call the main "Fortress" of this team. This information will be of high value for you to improve your game, but, if you haven't seen my previous post talking about this team, click Here so you don't miss it. Now, without further ado, let's get started:

Detailed explanation of the correct use of the "Death Splinter".

As I already made a post explaining what was the "Fortress" of the "Splinter of Death", in this section what I will do is to give a summary about that knowledge embodied in my previous post talking about this topic, but, in addition to this, I will be explaining in detail how is the correct use of this equipment so you can get the most out of it in your battles, I will be explaining in detail how is the correct use of this equipment so you can get the most out of it in your battles, so, I will try to be as clear as possible explaining how to use it, what is the reasoning I use to determine if the rule sets I get are favorable or not. I will explain all this here, and then in the last section of the development of this post, I will show you an example with a real battle so that you can observe in a better way everything said theoretically:

What is the "Splinter of Death" Fortress?
What is the "Splinter of Death" Fortress?To give a simple explanation of what their "Strength" is, I must start with the attributes of the different "Splinters" existing in the game, basically each team has its own strength so to speak, we have already seen that the "Fire Splinter" is the best to attack physically even though it also has other types of cards with "Attacks" of range and magic, but, as far as the "Melee" attack is concerned, it is undoubtedly the one that has more possibilities to do more damage thanks to its summoners that increase the attack power, without a doubt it is the one that has more possibilities to do more damage thanks to its summoners that increase the attack power, but, in the case of the "Death Team", it does not focus on increasing any attribute of its team, on the contrary, what it does is to decrease those of the opponent, that is why, the real "Fort" of this splinter is to reduce all the attributes while it carries out its offensive.
So, knowing how it works, what should we take into account to take full advantage of its ability to reduce all attributes in the field?
- Rule Sets:

This for me is the most important thing to take into account when selecting the "Splinter of Death" to play with us, because, if we do not pay attention to this, we will most likely end up losing, because not all the time we can play this way, so, playing in the right rule sets will allow us to reduce the attributes of the opponent and have more effectiveness. For example, if we have the rules (Keep Your Distance and Fog of War) in the same battle, being this precise combination what I will explain later in this same post, logic has to lead us to say that, with the 1st rule we will not be able to play monsters with the "Melee" attack type, which leaves only 2 options, On the other hand, with the 2nd rule it is much more obvious, since it cancels the monsters with the abilities "Sneak, Snipe and Opportunity", and we all know that most of these rules are played with cards of the "Melee" attack type, so, with this we already know the importance of playing with the correct rules.
- Use the correct Monsters and Summoners:


This is another really important aspect to take into account, since, if we do not have the correct summoners and monsters that make a good synergy with the "Rule Sets" analyzed to play, the strategy of decreasing attributes with the "Death Splinter" will be useless, now, what are the correct monsters you may be wondering, well, the cards that should be used must have 3 specific skills, which are; (Demoralize, Headwinds and Silence). As you know, these abilities allow us to reduce the power of the 3 types of attacks existing in the game, so, when we have the correct rules and/or conditions to play, what we must do is to include cards that have these abilities, of course, focusing on the rules, since, if we take as a reference the example I mentioned before, we should only include cards with the abilities (Headwinds and Silence).
Note: Basically this is all we need to know to take advantage of the "Fortress" of the "Splinter of Death" at its maximum capacity, there are no more secrets behind its use, it just boils down to more of the same that I have been explaining for a long time, so, it all comes down to a correct analysis of the rules that do not touch at that time and of course the necessary skills that will allow us to take the advantage on the battlefield. Now, in the next section, I will show a real battle example, where you can see how the "Strategy" of (Attribute Decrease) works.
Battle Royale : Attribute Reduction Strategy
In this battle that I am about to explain, I will start by detailing the rules of the battle, since this is one of the most important points to take into account in order to better exploit the "Fortress" of the "Splinter of Death", then I will proceed to explain the battle and how I thought to form the "Structure" that you will see below. Knowing this, next we will see the "Rule Sets" of this battle:
Born Again:
 This battle rule was casually explained in more detail in my previous post, so, by now we should know its effect on the battlefield, but, what it does is to provide all the monsters on the field with the "Rebirth" ability, which allows the monster that possesses it to revive immediately once it is defeated, of course, this only works once.
Fog of War:
 With this rule present, the battle starts to get interesting, since, from its effect we can determine the types of attacks that will be used in the battle, in that sense, knowing that you can not use the skills (Sneak, Snipe and Opportunity) on the battlefield, it is likely that our opponent will concentrate all his attacks on the "Tank" that I choose, so, the types of attacks we will see more are "Range and Magic".
Keep Your Distance:
 To finish explaining the rules of this battle and determine the "Structure" that I will use, by analyzing this rule I will have everything clearer and as you can observe, having "Keep Your Distance" on the battlefield, all cards with the "Melee" attack type cannot be used on the field, so, the only thing that can be used are the other 2 available attack types which are; "Range and Magic", in such a sense, using the "Death Splinter" to decrease these attack types, is one of the best options available to play and more so when your offense only depends on it.
Battle and Fortress of Death Splinter
Battle and Fortress of Death Splinter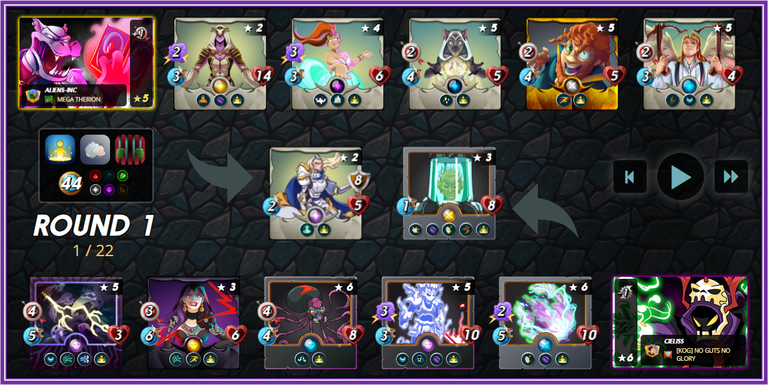
In the previous image you can see the alignment I used to make the most of the "Fortress" of the "Splinter of Death", to start and solve the issue of "Resistance" that must be present in any formation where the "Born Again" rule is present, I started with a strong "Defense" in the first 2 positions, both cards with the possibility of defending very well, especially against magical attacks and a good amount of life points of course, On the other hand, with the rest of the alienation, we must think about placing the other most important aspect that I commented in the previous section, which was to place cards with the abilities "Silence, Headwinds and Demoralize", on this occasion, the first 2 abilities are the necessary ones in this battle, since not being able to play with "Melee" cards, it is not necessary to place cards that decrease the attack.
As the "Fog of War" rule is present, it is not necessary to refrain from placing all the cards that are required, as long as the required abilities are played to take advantage of the "Fortress" of the "Splinter of Death", so, no matter that they have little life and a good amount of attack points, we can place them to have a strong "Offensive", in addition to the abilities to decrease the "Offensive" of the opponent. The rest of the battle I recommend that you watch it every time you can in order to record and practice how to play correctly with this "Splinter".
Conclusion
I hope this publication has served to clarify all your doubts about what is the "Fortress" of the (Splinter of Death) and how to make the most of it, as far as possible I will be bringing you more examples of battles of how to play in the correct "Rules", meanwhile, I think this information is more than enough to practice and win most of the games you play with this "TEAM". If you have any questions, do not hesitate to leave them in the comments.

Hace unos días publique un post acerca de la “Fortaleza” del “Splinter de Muerte”, en esa publicación revelaba básicamente como y cuando podemos usar este equipo, el cual, se caracteriza por disminuir todos los atributos existentes en el juego, con esto me refiero a que puede reducir los puntos de ataque, velocidad, vida y escudo, lo que puede ser realmente bueno si sabemos en qué momento especifico utilizar dicho splinter, si logramos realmente aprender cuando usar el equipo de ”Muerte”, les aseguro que ganarán muchas batallas sin importar el tipo de ataque que utilicen, lo que les certificara tener un récord positivo al término de batallas en su día a día.
Es por eso que, para volver a probarles la efectividad que tiene el “Splinter de Muerte” en condiciones especiales en donde la probabilidad está a nuestro favor gracias a lo que yo llamo “Fortaleza”, en esta oportunidad realizare un post explicando como jugarlo en otro tipo de reglas totalmente distintas a las que publique en ese post de hace unos días, ademas, esto complementara el contenido explicado en ese post, todo con el objetivo de puedan tener información más completa acerca de esta "Fortaleza” y de cuándo o cómo se debe utilizar, recordemos que, en ese momento me enfoque en resaltar su “Fuerte” destacando la “Estructura o Alineación” para una batalla con el tipo de ataque “Cuerpo a Cuerpo”, pero, en esta ocasión les mostrare los otros 2 tipos de ataque.
Así que, si quieres conocer el alcance del “Splinter de Muerte” y como utilizarlo correctamente para sacarle el maximo provecho en el campo de batalla, debes quedarte hasta el final de esta publicación, en donde explicare una “Estrategia” con una estructura totalmente diferente utilizando lo que yo llamo la principal “Fortaleza” de este equipo. Esta información será de alto valor para que puedan mejorar su juego, pero, si aún no has visto mi anterior publicación hablando de este equipo, has click Aquí para que no te lo pierdas. Ahora bien, sin más nada que decir, iniciemos:
Explicación detallada del uso correcto del “Splinter de Muerte”
Como ya realicé un post explicando lo que era la “Fortaleza” del “Splinter de Muerte”, en esta sección lo que hare es dar un resumen acerca de ese conocimiento plasmado en mi anterior publicación hablando de este tema, pero, ademas de esto, estaré explicando en detalle como es el uso correcto de este equipo para que puedan sacarle al mayor provecho posible en sus batallas, por lo que, tratare de ser lo más clara posible explicando cómo usarlo, cual es el razonamiento que yo utilizo para determinar si los conjuntos de reglas que me toquen son favorables o no. Todo esto lo explicare aquí, para luego en la última sección del desarrollo de este post, mostrarles un ejemplo con una batalla real para que puedan observar de una mejor forma todo lo dicho teóricamente:
¿Cuál es la Fortaleza del “Splinter de Muerte?
¿Cuál es la Fortaleza del “Splinter de Muerte?Para dar una explicación sencilla de cual su “Fortaleza”, debo comenzar por los atributos de los distintos “Splinters” existentes en el juego, básicamente cada equipo tiene su propio fuerte por decirlo de alguna manera, ya vimos que el “Splinter de Fuego” es el mejor para atacar de forma física a pesar de que también tiene otros tipo de cartas con “Ataques” de rango y mágicas, pero, en lo que respecta al ataque “Cuerpo a Cuerpo”, sin duda es el que tiene más posibilidades de hacer mayor daño gracias a sus invocadores que aumentan dicho poder de ataque, pero, en el caso del “Equipo de Muerte”, este no se enfoca en aumentar ningun atributo de su equipo, al contrario, lo que hace es disminuir los del oponente, es por eso que, el “Fuerte“ real de este splinter es reducir todos los atributos mientras lleva a cabo su ofensiva.
Entonces, sabiendo cómo funciona ¿Que debemos tomar en cuenta para provechar al maximo su capacidad de reducir todos los atributos en el campo?
- Los Conjuntos de Reglas:
Esto para mi es lo más importante que debemos tomar en cuenta al momento de seleccionar al “Splinter de Muerte” para jugar con nosotros, ya que, si no le prestamos atención a esto, lo más probable es que terminemos perdiendo, ya que no todo el tiempo podemos jugar de esta forma, así que, jugar en los conjuntos de reglas correctos nos permitirá reducir los atributos del oponente y tener más efectividad. Por ejemplo, si tenemos las reglas (Keep Your Distance y Fog of War) en una misma batalla, siendo esta combinación precisa lo que explicare más adelante en este mismo post, la lógica nos tiene que llevar a decir que, con la 1era regla no podremos jugar con los monstruos con el tipo de ataque “Cuerpo a Cuerpo”, lo que deja solo 2 opciones, que son “Rango y Magia”, por otro lado, con la 2da es mucho más obvio, ya que cancela los monstruos con las habilidades “Sneak, Snipe y Opportunity”, y todos sabemos que gran parte de estas reglas se juega es con cartas del tipo de ataque “Cuerpo a Cuerpo”, así que, con esto ya sabemos la importancia de jugar en las reglas correctas.
- Utilizar los Monstruos e Invocadores correctos:
Este es otro aspecto realmente importante a tomar en cuenta, puesto que, si no tenemos los invocadores y monstruos correctos que hagan una buena sinergia con los “Conjuntos de Reglas” analizados para jugar, la estrategia de disminución de atributos con el “Splinter de Muerte” no servirá de nada, ahora bien, cuáles son los monstruos correctos se estarán preguntando, pues, las cartas que se deben utilizar tienen que tener 3 habilidades en específico, las cuales son; (Demoralize, Headwinds y Silence). Como sabrán, estas habilidades permiten reducir el poder de los 3 tipos de ataques existentes en el juego, así que, cuando tengamos las reglas y/o condiciones correctas para jugar, lo que debemos hacer es incluir cartas que posean estas habilidades, por supuesto, enfocándonos en las reglas, ya que, si tomamos como referencia el ejemplo que mencione anteriormente, solo deberíamos incluir cartas con las habilidades (Headwinds y Silence).
Nota: Básicamente esto es todo lo que debemos de saber para lograr aprovechar la “Fortaleza” del “Splinter de Muerte” en su máxima capacidad, no hay más secretos detrás de su uso, solo se reduce a más de lo mismo que llevo tiempo explicándoles, por lo que, todo se reduce a realizar un correcto análisis de las reglas que no toquen en ese momento y por supuesto las habilidades necesarias que nos permitirán tomar la ventaja en el campo de batalla. Ahora bien, en la siguiente sección, mostrare un ejemplo real de batalla, donde podrán observar cómo funciona la “Estrategia” de (Disminución de Atributos).
Batalla Real | Estrategia de Disminución de Atributos
En esta batalla que estoy a punto de explicar, iniciare por detallar las reglas de la misma, ya que este es uno de los puntos más importantes a tomar en cuenta para poder explotar de una mejor forma la “Fortaleza” del “Splinter de Muerte”, posteriormente procederé a explicar la batalla y como pense para formar la “Estructura” que verán más adelante. Sabiendo esto, a continuación veremos los “Conjuntos de Reglas” de esta batalla:
Born Again:
Esta regla de batalla casualmente la explique de forma más detallada en mi post anterior, así que, a estas alturas deberíamos de conocer su efecto en el campo de batalla, pero, lo que hace es brindarles a todos los monstruos en el campo la habilidad de “Rebirth”, la cual, le permite al monstruo que la posee revivir inmediatamente una vez es derrotado, por supuesto, esto solo funciona una sola vez.Fog of War:
Con esta regla presente, la batalla se comienza a poner interesante, ya que, a partir de su efecto podemos ir determinando los tipos de ataques que se utilizaran en la batalla, en tal sentido, sabiendo que no se pueden utilizar las habilidades (Sneak, Snipe y Opportunity) en el campo de batalla, lo más probable es que nuestro oponente concentre todos sus ataques en el “Tanque” que yo elija, así que, los tipos de ataque más veremos son de ”Rango y Magico”.Keep Your Distance:
Para terminar de explicar las reglas de esta batalla y determinar la “Estructura” que utilizare, analizando esta regla lo tendré todo más claro y como pueden observar, teniendo a “Keep Your Distance” en el campo de batalla, todas las cartas con el tipo de ataque “Cuerpo a Cuerpo” no se pueden utilizar en el campo, por lo que, lo unico que se puede utilizar son los otros 2 tipos de ataque disponibles que son; “Rango y Magia”, en tal sentido, usar el “Splinter de Muerte” para disminuir estos tipos de ataques, es una de las mejores opciones disponibles para jugar y más cuando su ofensiva solo depende de ello.
Batalla y Fortaleza del “Splinter de Muerte”
Batalla y Fortaleza del “Splinter de Muerte”
En la imagen anterior pueden observar la alineación que utilice para aprovechar al maximo la “Fortaleza” del “Splinter de Muerte”, para iniciar y solventar el tema de la “Resistencia” que se debe tener en toda formación en donde se hace presente la regla “Born Again”, inicie con una fuerte “Defensa” en las 2 primeras posiciones, ambas cartas con la posibilidad de defenderse muy bien, en especial en contra de los ataques mágicos y una buena cantidad de puntos de vida claro está, por otro lado, con el resto de la alienación, debemos pensar en colocar el otro aspecto más importante que comente en la sección anterior, el cual, era colocar cartas con las habilidades “Silence, Headwinds y Demoralize”, en esta ocasión, las 2 primeras habilidades son las necesarias en esta batalla, ya que al no poder jugar con cartas “Cuerpo a Cuerpo”, no es necesario colocar cartas que disminuyan dicho ataque.
Como la regla “Fog of War” está presente, no es necesario abstenerse en colocar todas las cartas que se requieran, con tal de que se jueguen las habilidades requeridas para aprovechar la “Fortaleza” del “Splinter de Muerte”, por lo que, sin importar que tengan poca cantidad de vida y una buena cantidad de puntos de ataque, podemos colocarlas para poder tener una fuerte “Ofensiva”, ademas de las habilidades para disminuir la “Ofensiva” del oponente. El resto de la batalla recomiendo que la observen cada vez que puedan con el objetivo de que se graben y practiquen la forma de jugar correctamente con este “Splinter”.
Conclusión
Espero que esta publicación les haya servido para aclarar todas sus dudas acerca de lo que es la “Fortaleza” del (Splinter de Muerte) y como aprovecharla al maximo, en la medida de lo posible estaré trayéndoles más ejemplos de batallas de como jugar en las “Reglas” correctas, mientras tanto, creo que con esta información es más que suficiente para poder practicar y ganar la mayoría de las partidas que jueguen con este “EQUIPO”. Cualquier duda, no duden en dejarla en los comentarios.

¡I invite everyone to join Splinterlands, the best game based on chains of blocks, full of adventures, battles, and strategies where you will have fun and get rewards according to your league!
Join the official Spanish community here Discord
!1UP Good work!
!PGM !PIZZA
You have received a 1UP from @underlock!
@monster-curator, @oneup-curator, @ctp-curator, @thg-curator, @neoxag-curator, @fun-curator
And they will bring !PIZZA 🍕.
Learn more about our delegation service to earn daily rewards. Join the Cartel on Discord.
$PIZZA slices delivered:
@curation-cartel(12/20) tipped @cieliss