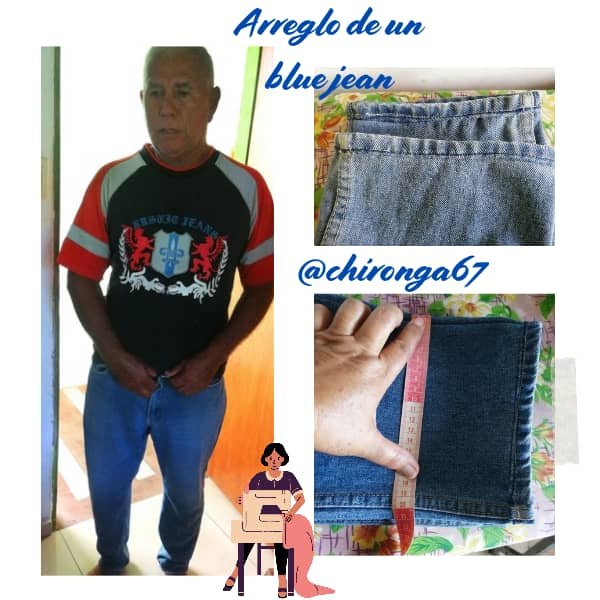
Arreglo de un blue jean🧵🪡[ESP-ENG]

ESPAÑOL🪡🧵ENGLISH
Hola amigos de Hive Diy hace unos días mi esposo me pidio que si por favor le podía poner sus jeans en las piernas un poco más angostos y si le podía dejar el ruedo como viene originalmente pero que le quedara bien sin necesidad de doblarlo, estos días a echo calor así que no me provocaba coser, hoy no fue la excepción pero decidí arreglarle sus pantalones, 4 en total, así que sin más les cuento lo que hice.
Hello friends of Hive Diy a few days ago my husband asked me if I could please make his jeans a little narrower on the legs and if I could leave the hem as it came originally but that it would fit him without the need to fold it, these days it's been hot so I didn't feel like sewing, today was no exception but I decided to fix his pants, 4 in total, so without further ado I'll tell you what I did.
Materiales🪡🧵Materials
🧵Tijeras.
🧵Hilo de coser
🧵Maquina de coser
🧵Pie de maquina
normal
🧵Tiza
🧵Cinta métrica
🧵Regla
🧵Scissors
🧵Sewing thread
🧵Sewing machine
🧵Machine foot
normal
🧵Chalk
🧵Tape measure
🧵Ruler

Paso a paso🪡🧵step by step
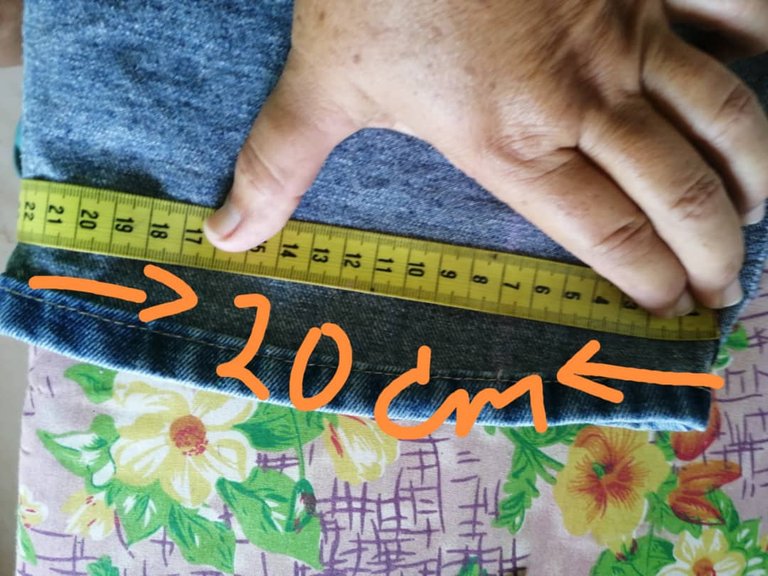
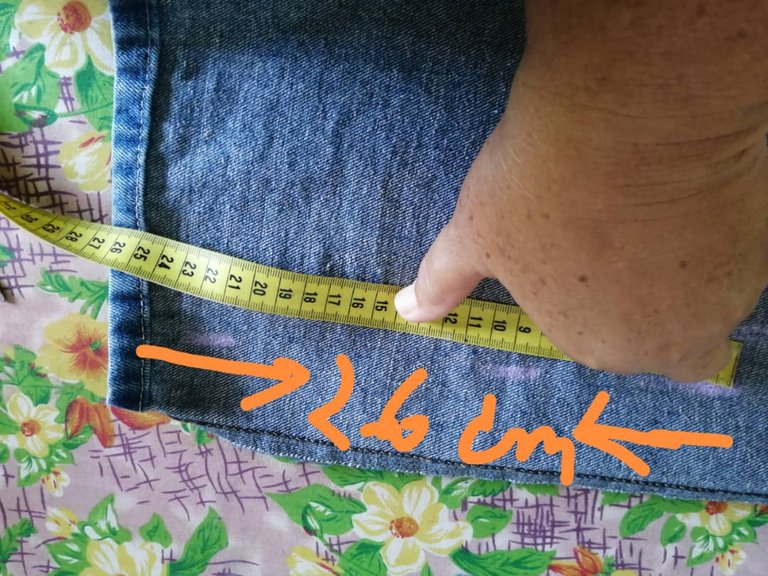
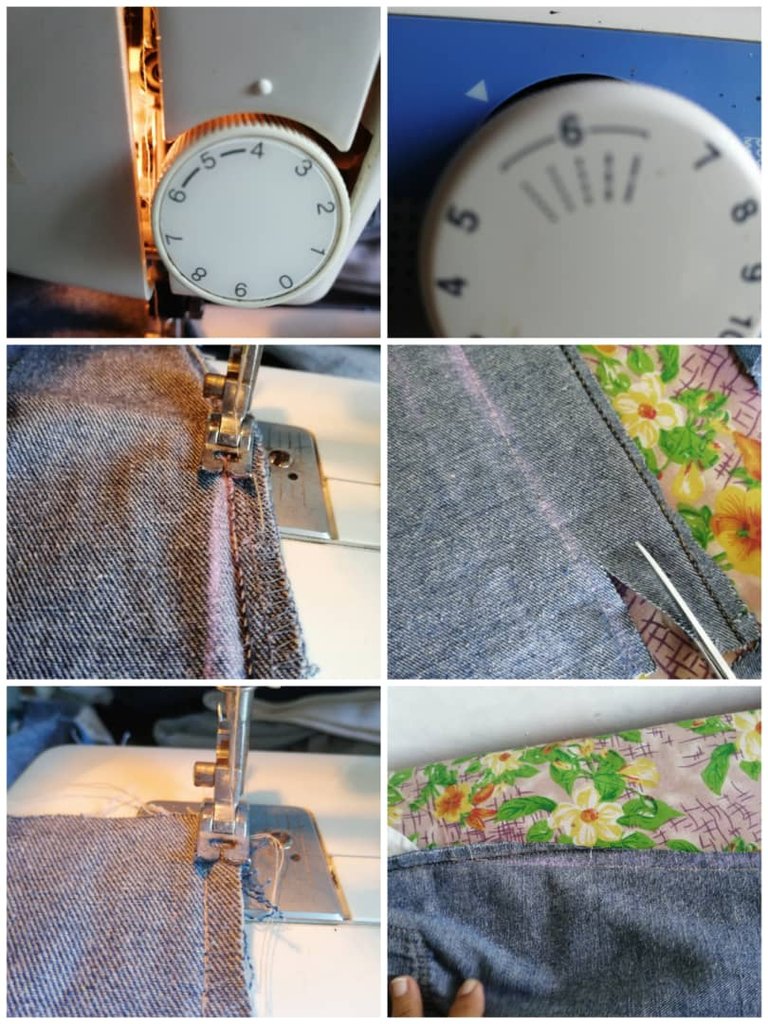
🪡 Comence por poner el blue jean al revés sobre la mesa de planchar y arreglarlo bien para que me quedara bien al marcar y con una cinta métrica medi el ancho de la pierna, la pierna tenía de ancho 24 centímetros y la reduje a 20 centímetros, marque de adentro hacia afuera 20 centímetros y marque con una tiza, marque de abajo hacia arriba 26 cm para guiarme hasta esa medida iba a reducir 4 centimetros del lado afuera del pantalón porque es donde no está la costura doble.
Hecho esto agarre una regla y marque una línea recta hasta los 26 centímetros que marque y desde allí hasta arriba puse la regla en diagonal y marque la línea hasta arriba.
🪡I started by putting the blue jean upside down on the ironing table and fix it well so that it would fit me well when marking and with a tape measure the width of the leg, the leg was 24 centimeters wide and I reduced it to 20 centimeters, I marked from inside to outside 20 centimeters and marked with a chalk, I marked from bottom to top 26 cm to guide me to that measure I was going to reduce 4 centimeters from the outside of the pants because it is where the double seam is not.
Once this was done I took a ruler and marked a straight line up to the 26 centimeters I marked and from there to the top I put the ruler diagonally and marked the line up to the top.

🪡 Luego me fui a la maquina le deje el pie normal, puse una aguja número 14, ajuste la tensión del hilo en 4 y puse la puntada recta hecho esto procedí a coser el pantalon por donde tenía la línea marcada, después que cosí los dos lados recorte el sobrante y remate el borde con zig-zag el que tenga overlock muchísimo mejor.
Then I went to the machine I left the normal foot, I put a needle number 14, set the thread tension at 4 and put the straight stitch and then proceeded to sew the pants where I had the marked line, after I sewed the two sides trim the excess and finish the edge with zig-zag the one who has overlock much better.
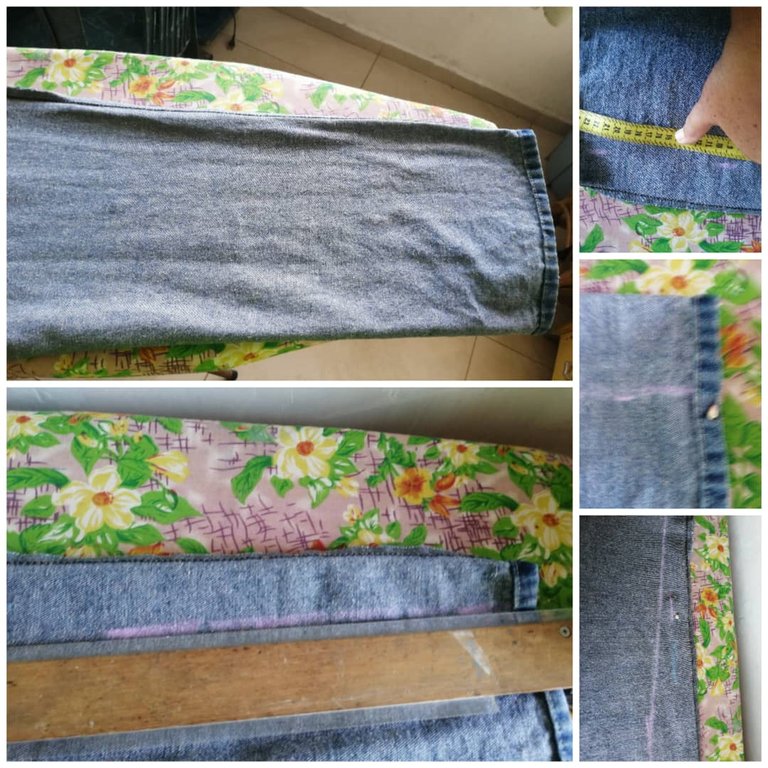
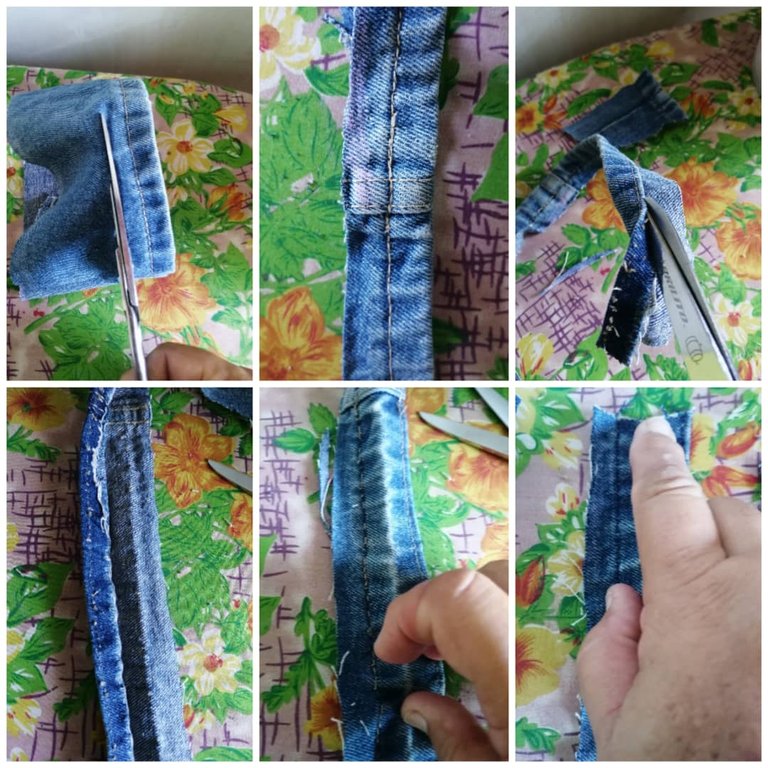
🪡 Ya esta lista la primera parte del pantalón, ahora a recortar el largo y ponerle el mismo ruedo que trae el pantalón, en mi caso no tuve que medir porque ya los de mi esposo estaban marcados de tanto doblarlo, asi que medí hasta donde estaba la marca para que me quedara bien, eran 10 centímetros pase una linea y recorte, pero si no es así hay que tomar la medida para poder cortar al largo deseado.
A lo que recorte le quite el ruedo dejando un centímetro de tela que ya había marcado previamente para unirlo a la pierna del pantalón. Con la ayuda de una tijera o un desbaratador de costura se descose el ruedo y se quitan los hilos sobrantes.
Como yo tuve que reducir la pierna lo descosi de un lado para que me quedara bien al momento de pegarlo a la pierna del pantalón.
🪡 In my case I didn't have to measure because my husband's pants were already marked from so much folding, so I measured up to where the mark was so that it would fit me well, it was 10 centimeters, I drew a line and cut, but if not, you have to take the measurement to be able to cut to the desired length.
I cut out the hem leaving a centimeter of fabric that I had previously marked to join it to the pant leg. With the help of a scissors or a seam ripper, the hem is unpicked and the excess threads are removed.
As I had to reduce the leg, I unpicked it on one side so that it would fit well when I glued it to the pant leg.

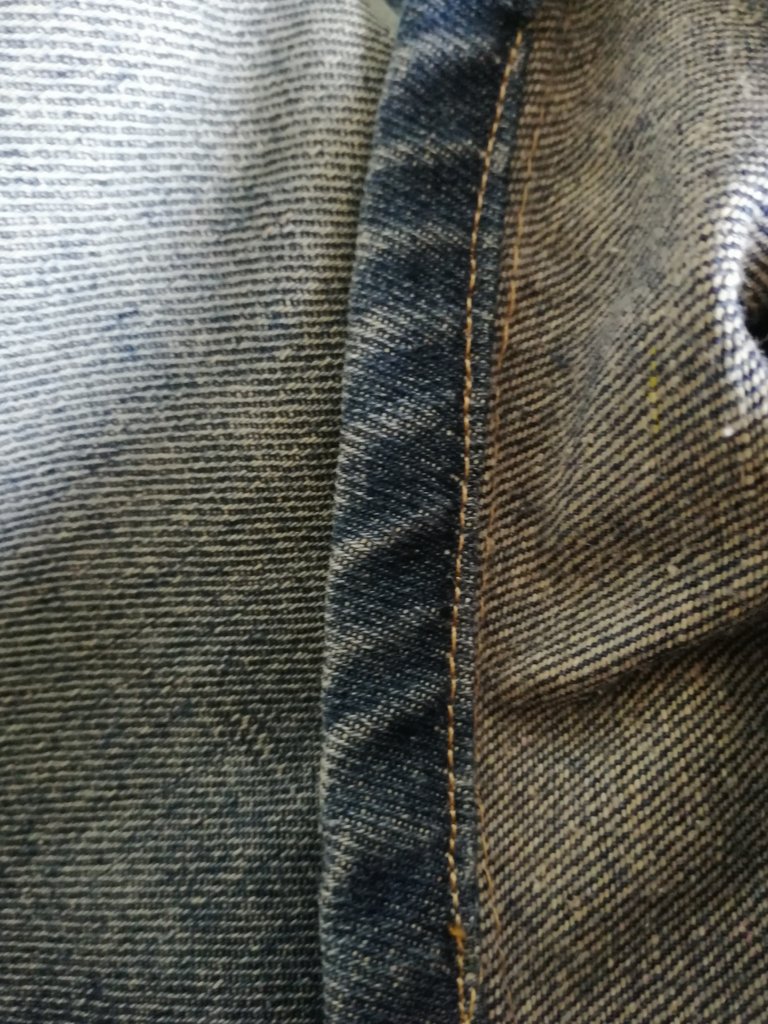
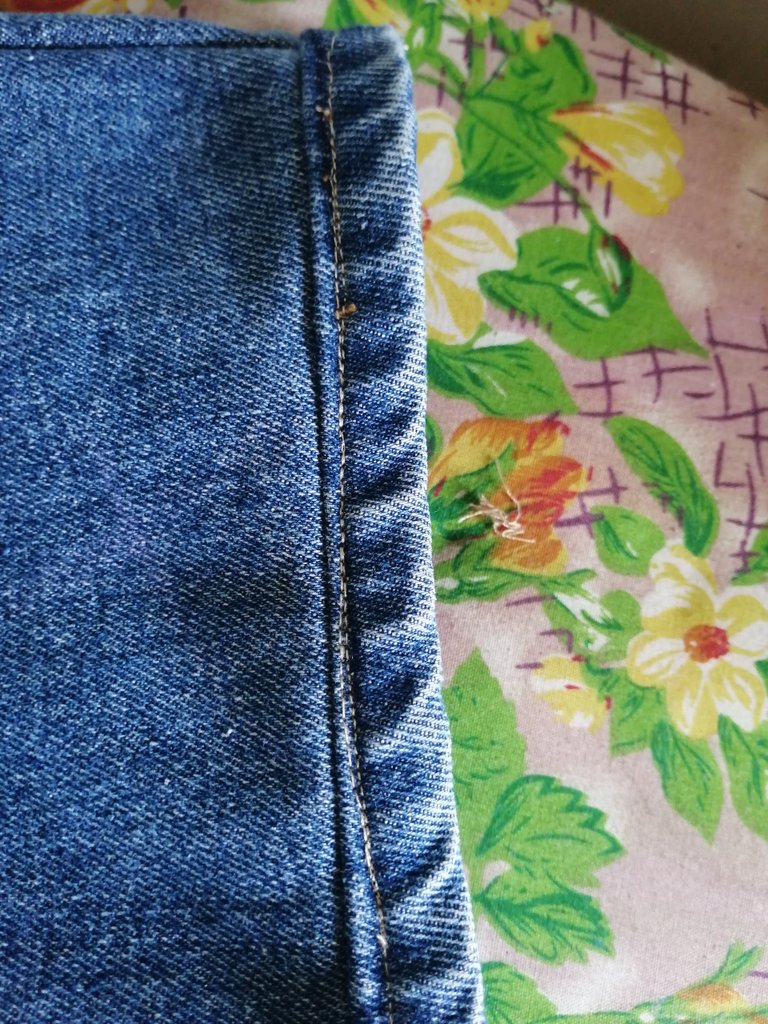
🪡 Hecho todo esto procedí a pegar el ruedo a la pierna, lo primero que hay que hacer es ver que coincidan las costuras de ambos lados por que si no se vera feo, puede primero asegurar una con la maquina ver que quedo bien y luego asegurar la otra y ver que quedo bien o coincidir ambas costuras y asegurar con alfiler y verificar que este bien y empezar a coser, yo probe de las 2 formas y me gusto más la primera, cosí alrededor para unir el ruedo a la pierna del pantalón, luego con cuidado fui doblando el ruedo y metiendo la costura de la unión para que no se viera, cuidando donde quedaba muy grueso darle con un martillo para que no quedara muy grueso y poder coser sin partir la aguja o quitarle un poquito del sobrante con la tijera pero igual lo golpeamos con un martillo o con lo que tengan a mano para que no quede tan abultado, igual ayudamos a la maquina poniendo atrás en el pie algo que lo mantenga levantado en esa parte y cosemos con cuidado, quitamos y seguimos cosiendo normal cuidando guardar el empate para, que todo se vea bien, por dentro y por fuera, planchamos y listo.
🪡Con paciencia y amor todo es posible🪡
🪡Once all this was done I proceeded to attach the hem to the leg, the first thing to do is to make sure that the seams on both sides match, otherwise it will look ugly, you can first secure one with the machine and then secure the other one and check that it is ok or match both seams and secure with a pin and check that it is ok and start sewing, I tried both ways and I liked the first one better, I sewed around to join the hem to the leg of the pants, then I carefully folded the hem and tucked the seam of the union so that it was not visible, taking care where it was too thick to hit it with a hammer so it would not be too thick and be able to sew without breaking the needle or remove a little bit of the excess with the scissors but we still hit it with a hammer or with what you have at hand so it is not so bulky, we also help the machine by putting something back on the foot to keep it up in that part and sew carefully, we remove and continue sewing normal taking care to keep the tie so that everything looks good, inside and out, iron and ready.
🪡With patience and love everything is possible🪡.

Hasta aquí mi post de hoy espero les guste y se animen a arreglar algún pantalón que tengan por ahí con ganas de arreglar hace tiempo.
Las fotos aquí utilizadas fueron tomadas por mi con mi celular huawei mate lite20 use Deelp traductor imagen editada en canva, use cool text.
This is my post today I hope you like it and I encourage you to fix some pants that you have out there wanting to fix a long time ago.
The photos used here were taken by me with my cell phone huawei mate lite20 use Deelp translator image edited in canva, use cool text.
🪡🧵🪡🧵🪡🧵🪡🧵🪡🧵🪡🧵🪡🧵
Esa máquina Singer sí que cose bien y se ve bien cuidada… Espero se encuentren bien. Bendiciones.
!gifs FRIENDS!
Via Tenor
Gracias, no es singer es brother y la trajo hace años mi mamá de atlanta y varios años después me la regalo , algún día quizás tenga una singer
Gracias @edwing357 por el apoyo
🤗🤗😊
¡¡¡Buen trabajo!!! Gracias por publicar tu excelente contenido en Hive Diy, fantástico arreglo, suele pasar que con el paso del tiempo este tipo de telas comienzan a encogerse mucho
Tu comunidad artesana ahora es testigo

Gracias a ustedes por su apoyo y comentario ☺️🤗
https://twitter.com/hivediy47901/status/1783746463857590628
Gracias @yennysferm71 🤗